本文中使用一个基于lstm的RNN来预测电影评论的情感方向是“正面”还是“负面”,具体代码可参考代码
整体过程:
由于词汇量较大,使用one-hot编码的话效率太低,因此这儿先使用词嵌入实现输入数据的降维。词嵌入可以用word2vec来实现,但在此只创建一个词嵌入层,并让网络自己学习词嵌入表(embedding table)。
从嵌入层中获取训练数据中每一个词的低维表示,并将其传入LSTM元胞。这将为网络添加循环连接,因此在该网络中可以包含数据的序列信息。 然后,将LSTM的输出结果输入到sigmoid层。 使用sigmoid的原因是我们要试图预测这个文本是“正面”还是“负面”。
结构图如下:
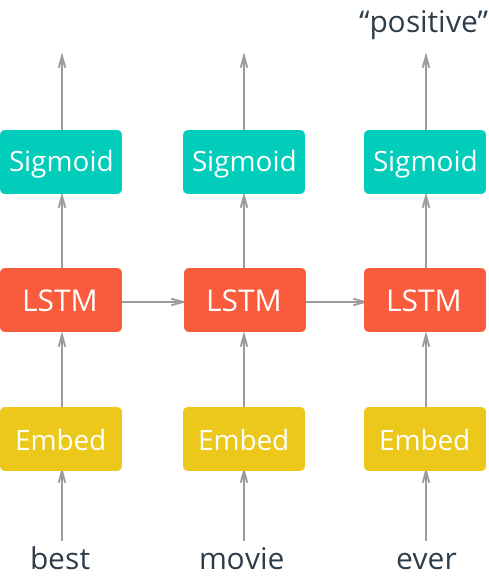
因为每一个评论所对应的label是"positive” 或者 “negative”,所以我们只需要关注sigmoid层的最后一个输出,忽略前面的其他输出, 我们将从最后一步的输出和训练label来计算cost。
下面我们来看代码
导入库文件
import numpy as np
import tensorflow as tf
读取数据
with open('./data/reviews.txt', 'r') as f:
    reviews = f.read()
with open('./data/labels.txt', 'r') as f:
    labels = f.read()
数据预处理
from string import punctuation
all_text = ''.join([c for c in reviews if c not in punctuation]) #去掉标点符号
reviews = all_text.split('
')

all_text = ' '.join(reviews)
words = all_text.split()
编码review和label
# 创建词到数字转换的词典
from collections import Counter

counter = Counter(words)
vocab_sorted = sorted(counter,key=counter.get,reverse=True)
vocab_to_int = {word: num for num,word in enumerate(vocab_sorted, 1)}

# 将评论转化为数字
reviews_ints = []
for review in reviews:
    reviews_ints.append([vocab_to_int[word] for word in review.split()])

# 将'positive' 和'negative'的label分别转换为1和0
labels = labels.split('
')
labels = np.array([1 if each == 'positive' else 0 for each in labels])

# 删除长度为0的review和对应的label
non_zero_index = [ii for ii, review in enumerate(reviews_ints) if len(review) != 0]
reviews_ints = [reviews_ints[ii] for ii in non_zero_index]
labels = np.array([labels[ii] for ii in non_zero_index])
至此,我们已将reviews和labels全部转换为更容易处理的整数。
现在,我们要创建一个传递给网络的features数组,为方便处理可以将特征向量的长度定义为200。 对于短于200个字的评论,左边补全为0。 也就是说,如果review是['best','movie','ever'](对应整数位[117,18,128]),相对应的行将是[0,0,0,...,0,117 ,18,128]; 对于超过200次的评论,使用前200个单词作为特征向量。
seq_len = 200
features = np.array([review[:seq_len] if len(review) > seq_len else [0] * (seq_len - len(review)) + review for review in reviews_ints])
创建training validation test数据集
split_frac = 0.8

split_idx = int(len(features)*split_frac)
train_x, val_x = features[:split_idx], features[split_idx:]
train_y, val_y = labels[:split_idx], labels[split_idx:]

val_idx = int(len(val_x)*0.5)
val_x, test_x = val_x[:val_idx], val_x[val_idx:]
val_y, test_y = val_y[:val_idx], val_y[val_idx:]
创建graph
首先,定义超参数
lstm_size = 256
lstm_layers = 1
batch_size = 1000
learning_rate = 0.01
其中:
- lstm_size:LSTM元胞中隐藏层的单元数量,LSTM元胞中实际有四种不同的网络层,这是每一层中的单元数
- lstm_layers:LSTM层的数量
- batch_size: 单次训练中传入网络的review数量
- learning_rate:学习率
定义变量及嵌入层
n_words = len(vocab_to_int)

graph = tf.Graph()
with graph.as_default():
    inputs_ = tf.placeholder(tf.int32,(batch_size, seq_len),name='inputs')
    labels_ = tf.placeholder(tf.int32,(batch_size,1),name='labels')
    keep_prob = tf.placeholder(tf.float32,name='keep_prob')

embed_size = 300

with graph.as_default():
    embedding = tf.Variable(tf.random_uniform((n_words,embed_size),-1,1))
    embed = tf.nn.embedding_lookup(embedding,inputs_)
LSTM层
在TensorFlow中,使用tf.contrib.rnn.BasicLSTMCell可以很方便的创建LSTM元胞,基本用法可以参考官方文档https://www.tensorflow.org/api_docs/python/tf/contrib/rnn/BasicLSTMCell
使用tf.contrib.rnn.BasicLSTMCell(num_units)就可以创建一个隐藏层单元数量为num_units的元胞
接下来,可以使用tf.contrib.rnn.DropoutWrapper来给lstm元胞添加dropout
例如 :drop = tf.contrib.rnn.DropoutWrapper(cell, output_keep_prob=keep_prob) 即给元胞cell添加了dropout
通常,多个LSTM层可以是我们的模型获得更好的表现,如果我们想使用多个LSTM层的话,该怎么做呢?TensorFlow也能很方便的实现这个
例如:cell = tf.contrib.rnn.MultiRNNCell([drop] * lstm_layers)就创建了lstm_layers个lstm层,每层的结构和drop类似(drop是一个添加了dropout的基本的lstm层)。
with graph.as_default():
    lstm = tf.contrib.rnn.BasicLSTMCell(lstm_size)
    drop = tf.contrib.rnn.DropoutWrapper(lstm, output_keep_prob=keep_prob)
    cell = tf.contrib.rnn.MultiRNNCell([drop] * lstm_layers)
    initial_state = cell.zero_state(batch_size, tf.float32)
前向传播
在数据的前向传播中,我们需要使用tf.nn.dynamic_rnn来运行LSTM层的代码。
基本使用方法:outputs, final_state = tf.nn.dynamic_rnn(cell, inputs, initial_state=initial_state),其中cell是上面定义的lstm层。
with graph.as_default():
    outputs, final_state = tf.nn.dynamic_rnn(cell, embed, initial_state=initial_state)
输出
由于我们只关心最终的输出,所以我们需要使用outputs[:,-1]来获取最终输出,并由此计算cost。
with graph.as_default():
    predictions = tf.contrib.layers.fully_connected(outputs[:, -1], 1, activation_fn=tf.sigmoid)
    cost = tf.losses.mean_squared_error(labels_, predictions)

    optimizer = tf.train.AdamOptimizer(learning_rate, beta1=0.9, beta2=0.999).minimize(cost)
获取精度
从validation中获取精度
with graph.as_default():
    correct_pred = tf.equal(tf.cast(tf.round(predictions), tf.int32), labels_)
    accuracy = tf.reduce_mean(tf.cast(correct_pred, tf.float32))
获取训练batch
这里使用生成器generator来获取训练用的batch
def get_batches(x, y, batch_size=100):

    n_batches = len(x)//batch_size
    x, y = x[:n_batches*batch_size], y[:n_batches*batch_size]
    for ii in range(0, len(x), batch_size):
        yield x[ii:ii+batch_size], y[ii:ii+batch_size]
训练 Trainging
epochs = 3

with graph.as_default():
    saver = tf.train.Saver()

with tf.Session(graph=graph) as sess:
    sess.run(tf.global_variables_initializer())
    iteration = 1
    for e in range(epochs):
        state = sess.run(initial_state)

        for ii, (x, y) in enumerate(get_batches(train_x, train_y, batch_size), 1):
            feed = {inputs_: x,
                    labels_: y[:, None],
                    keep_prob: 0.5,
                    initial_state: state}
            loss, state, _ = sess.run([cost, final_state, optimizer], feed_dict=feed)

            if iteration%5==0:
                print("Epoch: {}/{}".format(e, epochs),
                      "Iteration: {}".format(iteration),
                      "Train loss: {:.3f}".format(loss))

            if iteration%25==0:
                val_acc = []
                val_state = sess.run(cell.zero_state(batch_size, tf.float32))
                for x, y in get_batches(val_x, val_y, batch_size):
                    feed = {inputs_: x,
                            labels_: y[:, None],
                            keep_prob: 1,
                            initial_state: val_state}
                    batch_acc, val_state = sess.run([accuracy, final_state], feed_dict=feed)
                    val_acc.append(batch_acc)
                print("Val acc: {:.3f}".format(np.mean(val_acc)))
            iteration +=1
    saver.save(sess, "checkpoints/sentiment.ckpt")
结果:
Epoch: 0/3 Iteration: 5 Train loss: 0.352
Epoch: 0/3 Iteration: 10 Train loss: 0.252
Epoch: 0/3 Iteration: 15 Train loss: 0.235
Epoch: 0/3 Iteration: 20 Train loss: 0.197
Epoch: 0/3 Iteration: 25 Train loss: 0.186
Val acc: 0.720
Epoch: 0/3 Iteration: 30 Train loss: 0.228
Epoch: 0/3 Iteration: 35 Train loss: 0.204
Epoch: 0/3 Iteration: 40 Train loss: 0.199
Epoch: 1/3 Iteration: 45 Train loss: 0.179
Epoch: 1/3 Iteration: 50 Train loss: 0.105
Val acc: 0.846
Epoch: 1/3 Iteration: 55 Train loss: 0.078
Epoch: 1/3 Iteration: 60 Train loss: 0.028
Epoch: 1/3 Iteration: 65 Train loss: 0.015
Epoch: 1/3 Iteration: 70 Train loss: 0.010
Epoch: 1/3 Iteration: 75 Train loss: 0.008
Val acc: 0.506
Epoch: 1/3 Iteration: 80 Train loss: 0.008
Epoch: 2/3 Iteration: 85 Train loss: 0.429
Epoch: 2/3 Iteration: 90 Train loss: 0.223
Epoch: 2/3 Iteration: 95 Train loss: 0.156
Epoch: 2/3 Iteration: 100 Train loss: 0.138
Val acc: 0.534
Epoch: 2/3 Iteration: 105 Train loss: 0.114
Epoch: 2/3 Iteration: 110 Train loss: 0.097
Epoch: 2/3 Iteration: 115 Train loss: 0.035
Epoch: 2/3 Iteration: 120 Train loss: 0.032
运行测试集
test_acc = []
with tf.Session(graph=graph) as sess:
    saver.restore(sess, tf.train.latest_checkpoint('checkpoints'))
    test_state = sess.run(cell.zero_state(batch_size, tf.float32))
    for ii, (x, y) in enumerate(get_batches(test_x, test_y, batch_size), 1):
        feed = {inputs_: x,
                labels_: y[:, None],
                keep_prob: 1,
                initial_state: test_state}
        batch_acc, test_state = sess.run([accuracy, final_state], feed_dict=feed)
        test_acc.append(batch_acc)
    print("Test accuracy: {:.3f}".format(np.mean(test_acc)))
结果: