一、准备工作
1.1 Download the Git binary from git-scm.com
1.2 Tell Git who you are
$ git config --global user.name "Matthew Huang"
$ git config --global user.email matthew_hs@outlook.com
查看用户名和邮箱
$ git config user.name
$ git config user.email
1.3 Ask for colors while we're at it
$ git config --global color.ui true
二、基本操作
文件在 git 中的生命周期有 untracked、unstaged、staged 三种状态,不能被 git 识别的 untracked 状态通过初始化 git 仓库变成 unmodified 状态,文件一旦修改变成 modified 状态,add 之后变成 staged 状态,再 commit 变成 unmodified 状态。如果 staged 状态下的文件使用 reset 则变回 modified 状态。

2.1 Start tracking files
初始化 git 仓库,会在当前文件夹下创建一个隐藏的 .git 文件,不要随意修改。
$ git init
创建一个文件,使用 touch 命令。
$ touch 文件名.后缀
如果有 Github 上的项目,可以用 clone 命令来复制到本地。如果需要 clone 类似于 Maven 的项目代码,可以打开 Intellji Idea,选择check out from Version Control,再选择 Git,输入 url 进行克隆。
$ git clone Github-Site
2.2 Check whenever a file has changed
$ git status
$ git status -s
-s 表示以缩写的形式查看。
2.3 Save the changes into the history timeline

2.3.1 Add
将文件添加到 git 仓库的暂存区,变为 staged 状态。如果有不想要添加到缓存区的文件,可以添加 .gitignore 文件,来配置忽略管理文件目录。
$ git add 文件名.后缀   #将某个文件提交到暂存区
$ git add .           #将所有文件提交到暂存区
$ git add *.后缀       #将以该后缀结尾的文件提交到暂存区
$ git add subfolder/  #将全部子文件夹提交到暂存区
将已经提交到暂存区的某个文件取消提交操作。
$ git reset 文件名
2.3.2 Commit
将添加到暂存区的文件提交到本地 git 仓库中,此时会生成唯一的一个版本号。
$ git commit -m "描述提交信息"   #将暂存区的文件提交到本地 git 仓库
$ git commit -am "描述提交信息"  #不用先 add,直接提交到本地 git 仓库,注意文件需要已经被加入到 git 管理中
如果忘记添加某些内容,不想创建一个新的 commit,则可以使用 amend 命令。
$ git commit --amend -m "描述修改后的提交信息"
三、进阶操作
3.1 Deletions
git 默认不执行删除操作,如果 rm 某个文件夹后(进入 deleted 状态),需要使用 -u 来进行提交。若只提交删除某一个文件的操作,可以使用 reset 将其他文件拉回 unstaged 状态。
$ git rm 文件名.后缀
$ git add -u .
$ git commit -m 'delete file:***'
3.2 Compare the current state with the previously committed state
diff 命令可以查看文件修改情况,其中 ‘-’ 表示删除内容,‘+’ 表示增加内容。
$ git diff           #查看 unstaged 状态和之前提交的状态有什么不同
$ git diff --cached  #查看 staged 状态和之前提交的状态有什么不同
$ git diff HEAD      #查看 staged 和 unstaged 状态与之前提交的状态有什么不同
3.3 See commit log
$ git log
$ git log --oneline             #以一行简洁信息的形式查看 git 提交日志
$ git log --author=name         #以作者名为条件,进行筛选查看提交日志
$ git log --since="1 week ago"  #以日期为条件,进行筛选查看提交日志
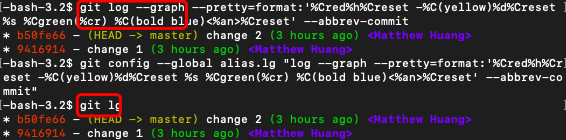
一种清晰的查看日志方式,也可以用 git.lg 为日志添加一个alias。
$ git log --graph --pretty=format:'%Cred%h%Creset -%C(yellow)%d%Creset %s %Cgreen(%cr) %C(bold blue)<%an>%Creset' --abbrev-commit
or
$ git config --global alias.lg "log --graph --pretty=format:'%Cred%h%Creset -%C(yellow)%d%Creset %s %Cgreen(%cr) %C(bold blue)<%an>%Creset' --abbrev-commit"
$ git lg
四、关注 HEAD,回到从前
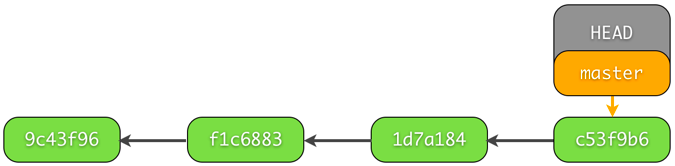
整个提交的历史记录相当于一个 timeline,这样的一个 timeline 成为一个 branch,默认的一个 branch 是 master。HEAD 是一个指向当前版本位置的指针,我们可以通过 checkout 命令来移动 HEAD 指针。
$ git checkout 版本号
$ git checkout master  #返回最后一次提交(移动前)的位置
reset 不仅可以对某个文件操作,也可以对 revision 进行操作。
$ git reset filename  #Unstage one files
$ git reset HEAD      #Unstage all files
unstage 文件的变化可以被丢弃,即可返回上一个版本。其中 checkout 用于单个文件或分支,而 reset 用于 commit 之间。
$ git checkout 版本号 -- filename  #Unstage one file, and only it go back to the revision.(可以不需要版本号)
$ git reset HEAD --hard           #Unstage all + discard all changes, cannot be undone!!!
$ git reset --hard HEAD^^         #Back to last two submission
$ git stash                       #Unstage all + stash all changes, Can be undone as the state is saved in a stash.
注意:建议慎重 reset --hard 操作,删除操作不可逆,如果不幸删除可以参考 git fsck --lost-found 操作来尝试找回。
五、分支
5.1 New a branch
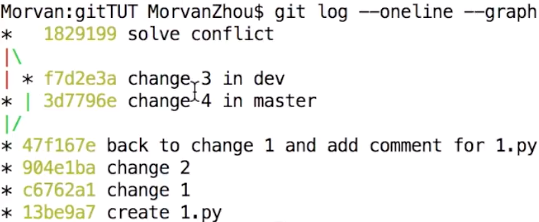
有分支存在时,查看日志的时候推荐使用 --graph,会以图形的形式展示各个分支的历史提交记录。
$ git log --oneline --graph
对分支的操作如下:
$ git branch dev       #新建一个 dev 分支
$ git branch           #查看所有分支
$ git checkout dev     #切换到 dev 分支
$ git checkout -b dev  #直接新建一个 dev 分支,并将 HEAD 移动到 dev 分支上
$ git branch -d dev    #删除 dev 分支,注意当前分支不能在 dev 上
$ git branch -D dev    #删除没有完全 merge 的分支 dev
5.2 Merge and Solve conflict
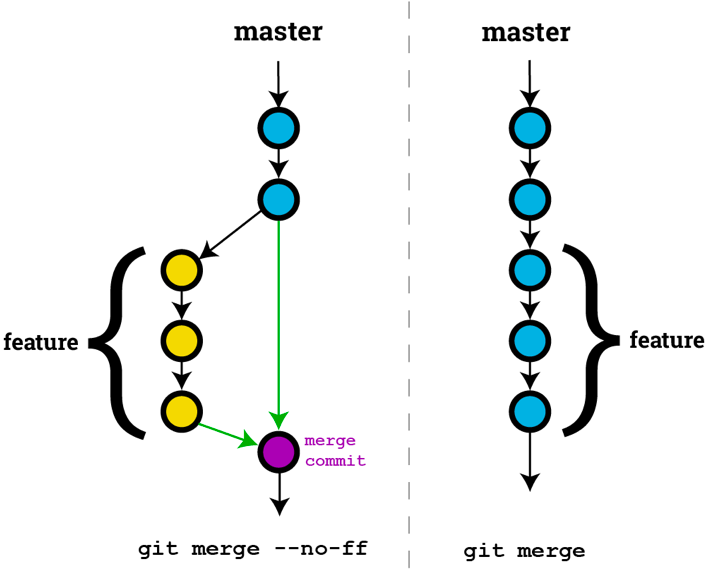
如果需要将 dev 分支的代码发布到 master 分支中,可以使用 merge 命令。
$ git merge --no-f -m "描述信息" dev #需要确保当前分支在 master 上
这里的 --no-ff 指的是合并时不使用默认的 fast-forward 方式(要将两个版本的内容进行合并,只有在没有需要合并内容的时候,会有这个fast-forward 方式的提交),使用较为简单的默认方式,实际上只是将 master 指针指向了 dev,没有创建一个新的 commit。更具体的原理解释可以参考:
https://git-scm.com/book/en/v2/Git-Branching-Basic-Branching-and-Merging
如果 merge 发生冲突,命令行会报出 conflict 提示,需要我们在原文件(原文件中已经添加了冲突提示信息,《《《与===之间是我们修改的部分,===与》》》之间是别人修改的部分)中进行修改,再将 modified 状态的文件进行提交。
5.3 Another dangerous merge opration
还有一种危险的 merge 操作是 rebase 命令,建议在操作前观看一下教程视频:https://www.bilibili.com/video/av16377923/?p=9。
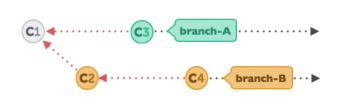
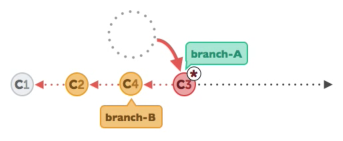
应用场景:如果你在 branch-A 进行开发,别人发现并修改了上线分支 branch-B 中的 bug,你需要重新基于 branch-B 的修改 bug 版本进行开发。
六、一个很常见的场景——临时修改代码
场景: 当你正在自己的分支上愉快的写代码,项目经理需要你去修改开发环境的一个 bug,而你并不想让这个临时任务与你的主线任务相混淆。这时,你就需要 stash 命令了。
解决方案:先用 stash 命令将自己的任务存至缓存区,这时当你查看 status 时,没有这一 modified 状态的任务。然后你可以创建一了 temp 分支,修改完 bug 之后提交并合并到 dev 分支上,解决冲突之后就可以删除 temp 分支,并利用 stash 切回到自己的主线任务中去了。
$ git stash save "描述信息"                     #将自己的主线任务存至暂存区,并添加描述信息
$ git checkout -b temp                         #创建一个临时修改代码的分支 temp
...                                            #修改 bug
$ git commit -am "job form manager"            #提交代码
$ git checkout dev                             #切换到开发分支 dev
$ git merge --no-ff -m "merge form temp" temp  #将 temp 分支的内容合并到 dev 分支上
...                                            #解决冲突
$ git commit -am "solve conflict"              #提交解决冲突后的代码
$ git checkout mybranch                        #切换回自己的开发分支
$ git branch -D temp                           #删除临时分支 temp
$ git stash pop                                #从暂存区取回自己的主线任务
...                                            #继续自己的工作
注意:在编写项目过程中,我曾经遇到过在没有 stash 现有工作的情况下 checkout 到其他分支中,发现会提示分支切换并带着更改内容一起切换到了这个分支,从而无法查看到原本分支中的代码。这里可以使用上述的 stash 操作,先将修改的部分缓存起来,或者 commit 一下。基于 stash 可以有:stash clear/drop shash@{index} (清除全部/某一个),stash list(查看所有 stash)。
七、提交到远程仓库

7.1 Simple submission
在你新建了一个远程 GitHub 仓库后,页面会提示一个最简单的提交代码方式。
$ git remote add origin Github网址                #根据你的 GitHub 网址定义一个远程仓库 origin
$ git push -u origin master                      #将 master 分支上的内容推到远程 GitHub 仓库中
$ git branch --set-upstream-to=origin/dev dev    #将远程分支dev和本地分支dev关联
7.2 Use your remote repository
注意,在向远程仓库 push 之前一定要先 pull,因为别人可能对代码做出了更改。在修改完冲突之后再 add & commit,便可以 merge 了,输入 push 命令并在 GitHub 上发起 PR,等待 merge 成功提示。
$ git clone url              #从 GitHub 的 url 中拷贝项目
$ git push origin master
$ git pull origin master:dev
$ git remote show            #显示所有的 remote 仓库
$ git remote show origin     #查看某一个 remote 仓库信息
如果要将两个不同的项目合并,可以使用 --allow-unrelated-histories 来解决无法 pull 的问题。
$ git pull origin master --allow-unrelated-histories
八、删除历史 commit 记录
$ git log --oneline                #查看commit日志内容,主要找到相对应的日志地址
$ git rebase -i commit_id          #在相对应的日志地址建立一个rebase
                                   #将文件中的pick修改为drop
$ git checkout branch_name         #确保回到master分支,查看log已经删除
$ git push origin branch_name -f   #提交到远程仓库,覆盖记录
推荐图形化 Git 管理工具Sourcetree:https://www.sourcetreeapp.com/
参考链接:http://bramus.github.io/ws2-sws-course-materials/xx.git.html#/