一、MyBatis快速入门
(一)开发步骤介绍
1、创建MyBatis_db数据库和person表
2、创建java项目,引入MyBatis坐标
3、创建User实体类
4、编写映射文件PersonMapper.xml
5、编写配置文件SqlMapConfig.xml
6、编写测试类
(二) 代码实现
1、创建对应的数据库的表 person
create table person(
id int primary key auto_increment,
name varchar(32),
bir date ,
address varcahr(32)
);
2、导入MyBatis框架依赖
<dependencies>
<dependency>
<groupId>junit</groupId>
<artifactId>junit</artifactId>
<version>4.12</version>
</dependency>
<dependency>
<groupId>org.mybatis</groupId>
<artifactId>mybatis</artifactId>
<version>3.4.2</version>
</dependency>
<dependency>
<groupId>mysql</groupId>
<artifactId>mysql-connector-java</artifactId>
<version>5.1.32</version>
</dependency>
</dependencies>
<build>
<!--规定 java包下的配置文件 编译之后照样生效-->
<resources>
<resource>
<directory>src/main/java</directory>
<includes>
<include>**/*.properties</include>
<include>**/*.xml</include>
</includes>
<filtering>false</filtering>
</resource>
</resources>
</build>
3、创建数据模型
public class Person implements Serializable {
private int id;
private String name;
private Date bir;
private String address;
//提供set和get方法部分省略
}
4、创建接口对应映射文件PersonMapper.xml
<?xml version="1.0" encoding="UTF-8" ?>
<!DOCTYPE mapper
PUBLIC "-//MyBatis.org//DTD Mapper 3.0//EN"
"http://MyBatis.org/dtd/MyBatis-3-mapper.dtd">
<mapper namespace="PersonMapper">
<select id="findAll" resultType="com.offcn.bean.Person">
select * from person
</select>
</mapper>
5、在src下创建MyBatis的核心配置文件 SqlMapConfig.xml
<?xml version="1.0" encoding="UTF-8" ?>
<!DOCTYPE configuration PUBLIC "-//MyBatis.org//DTD
Config 3.0//EN" "http://MyBatis.org/dtd/MyBatis-3-config.dtd">
<configuration>
<!--环境配置-->
<environments default="MySQL">
<!--使用MySQL环境-->
<environment id="MySQL">
<!--使用JDBC类型事务管理器-->
<transactionManager type="JDBC"></transactionManager>
<!--使用连接池-->
<dataSource type="POOLED">
<property name="driver" value="com.MySQL.jdbc.Driver"></property>
<property name="url" value="jdbc:MySQL://localhost:3306/0423dbs"/>
<property name="username" value="root"></property>
<property name="password" value="root"></property>
</dataSource>
</environment>
</environments>
<!--加载映射配置-->
<mappers>
<mapper resource="com/offcn/mapper/PersonMapper.xml"></mapper>
</mappers>
</configuration>
6、编码测试
@Test
public void testFindAll() throws Exception {
// 加载核心配置文件
InputStream is = Resources.getResourceAsStream("SqlMapConfig.xml");
// 获取SqlSessionFactory工厂对象
SqlSessionFactory sqlSessionFactory = new SqlSessionFactoryBuilder().build(is);
// 获取SqlSession会话对象
SqlSession sqlSession = sqlSessionFactory.openSession();
// 执行sql
List<User> list = sqlSession.selectList("PersonMapper.findAll");
for (Person person: list) {
System.out.println(person);
}
// 释放资源
sqlSession.close();
}
(三) 配置文件概述
1、SqlMapConfig.xml配置文件
这个配置文件是整个Mybatis的核心配置文件,在这个配置文件中我们主要进行了整个数据库交互的整体配置,例如数据库的连接,事务的管理,映射文件的加载,这个配置文件我们只需要操作一次即可,不需要频繁改动。
2、PersonMapper.xml配置文件
<mapper namespace="PersonMapper">
<select id="findAll" resultType="com.offcn.bean.Person">
select * from person
</select>
</mapper>
namespace属性:属性的值我们可以任意定义的一个字符串(做到见名知意),用来作为映射sql的一个部分,
id:我们sql语句的唯一标记
resultType:我们查询数据的结果类型。
二、MyBatis增删改查
(一) 使用MyBatis完成增删改操作
1、新增操作
编写映射文件PersonMapper.xml
<mapper namespace="PersonMapper">
<!--新增-->
<insert id="insert" parameterType="com.offcn.bean.Person">
insert into user(name,bir,address) values(#{name},#{bir},#{address})
</insert>
</mapper>
编写测试类
@Test
public void save() throws Exception {
// 加载核心配置文件
InputStream is = Resources.getResourceAsStream("SqlMapConfig.xml");
// 获取SqlSessionFactory工厂对象
SqlSessionFactory sqlSessionFactory = new SqlSessionFactoryBuilder().build(is);
// 获取SqlSession会话对象
SqlSession sqlSession = sqlSessionFactory.();
Person person = new Person();
person.setName(“张三”);
person.setBir(new java.util.Date());
person.setAddress(“上海”);
// 执行sql
sqlSession.insert("PersonMapper.insert", person);
//提交事务
sqlSession.commit();
// 释放资源
sqlSession.close();
}
2、更新操作
<mapper namespace="PersonMapper">
<!--修改-->
<update id="update" parameterType="com.offcn.bean.Person">
update person set name= #{name},bir= #{bir},address = #{address} where id = #{id}
</update>
</mapper>
编写测试类
@Test
public void updateInfo() throws Exception {
// 加载核心配置文件
InputStream is = Resources.getResourceAsStream("SqlMapConfig.xml");
// 获取SqlSessionFactory工厂对象
SqlSessionFactory sqlSessionFactory = new SqlSessionFactoryBuilder().build(is);
// 获取SqlSession会话对象
SqlSession sqlSession = sqlSessionFactory.();
Person person = new Person();
person.setName(“李四”);
person.setBir(new java.util.Date());
person.setAddress(“北京”);
// 执行sql
sqlSession.update("PersonMapper.update", person);
//提交事务
sqlSession.commit();
// 释放资源
sqlSession.close();
}
3、删除操作
<mapper namespace="PersonMapper">
<!--删除--> <delete id="delete" parameterType="java.lang.Integer">
delete from person where id = #{id}
</delete>
</mapper>
编写测试类
@Test
public void updateInfo() throws Exception {
// 加载核心配置文件
InputStream is = Resources.getResourceAsStream("SqlMapConfig.xml");
// 获取SqlSessionFactory工厂对象
SqlSessionFactory sqlSessionFactory = new SqlSessionFactoryBuilder().build(is);
// 获取SqlSession会话对象
SqlSession sqlSession = sqlSessionFactory.();
// 执行sql
sqlSession.delete("PersonMapper.delete", 50);
//提交事务
sqlSession.commit();
// 释放资源
sqlSession.close();
}
(二)使用抽取的工具类完成操作
1、制作统一的工具类
public class MyBatisUtils {
private static SqlSessionFactory sqlSessionFactory = null;
static {
try {
// 加载核心配置文件
InputStream is = Resources.getResourceAsStream("SqlMapConfig.xml");
// 获取SqlSessionFactory工厂对象
sqlSessionFactory = new SqlSessionFactoryBuilder().build(is);
} catch (IOException e) {
throw new RuntimeException("加载Mybatis配置文件失败");
}
}
// 获取SqlSession会话对象
public static SqlSession openSession() {
return sqlSessionFactory.openSession();
}
}
2、抽取测试类代码基类
public class TestBaseMapper {
protected SqlSession sqlSession = null;
@Before
public void before() {
sqlSession = MyBatisUtils.openSession();
}
@After
public void after() {
sqlSession.commit();
sqlSession.close();
}
}
3、使用工具类完成操作
public class UserTest extends TestBaseMapper {
@Test public void testFindAll() throws Exception {
// 执行
sql List<User> list = sqlSession.selectList("PersonMapper.findAll");
for (User user : list) {
System.out.println(user);
}
}
}
(三) MyBatis核心配置文件详解
1、MyBatis核心配置文件层级关系
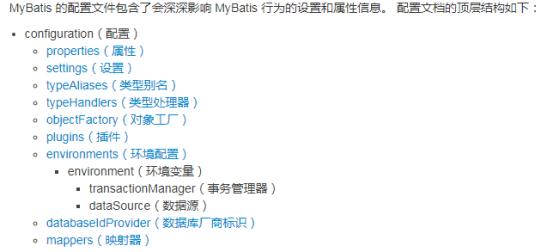
2、environments标签
数据库环境的配置,支持多环境配置
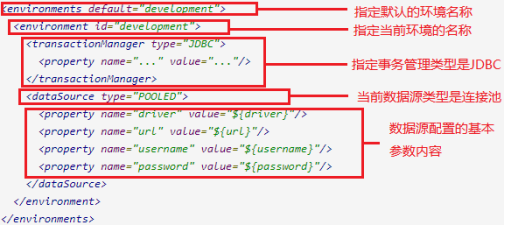
(1) 其中,事务管理器(transactionManager)类型有两种:
* JDBC: 这个配置就是直接使用了JDBC 的提交和回滚设置,它依赖于从数据源得到的连接来管理事务作用域。
* MANAGED:这个配置几乎没做什么。它从来不提交或回滚一个连接,而是让容器来管理事务的整个生命周期。 例如:mybatis与Spring整合后,事务交给Spring容器管理。
(2) 其中,数据源(dataSource)类型有三种:
* UNPOOLED: 这个数据源的实现只是每次被请求时打开和关闭连接。
* POOLED:这种数据源的实现利用“池”的概念将 JDBC 连接对象组织起来。
* JNDI: 这个数据源的实现是为了能在如 EJB 或应用服务器这类容器中使用,容器可以集中或在外部配置数据 源,然后 放置一个 JNDI 上下文的引用
3、mappers标签
该标签的作用是加载映射的,加载方式有如下几种:
(1) 使用相对于类路径的资源引用,
例如: <mapper resource="org/mybatis/builder/AuthorMapper.xml"/>
(2) 使用完全限定资源定位符(URL),
例如: <mapper url="file:///var/mappers/AuthorMapper.xml"/>
(3) 使用映射器接口实现类的完全限定类名,
例如: <mapper class="org.mybatis.builder.AuthorMapper"/>
(4) 将包内的映射器接口实现全部注册为映射器,例如:
<package name="org.mybatis.builder"/>
4、properties标签
实际开发中,习惯将数据源的配置信息单独抽取成一个properties文件,该标签可以加载额外配置的properties:
<properties resource="org/mybatis/example/jdbc.properties">
5、typeAliases标签
类型别名是为 Java 类型设置一个短的名字。
为了简化映射文件 Java 类型设置,mybatis框架为我们设置好的一些常用的类型的别名:

原来的类型名称配置如下:

配置typeAliases,为com.offcn.bean.Person定义别名为person,在 SqlMapConfig.xml配置别名:
<typeAliases>
<typeAlias alias="person" type="com.offcn.bean.Person"/>
</typeAliases>
在PersonMapper.xml中使用别名:
<select id="findAll" resultType="person">
select * from person
</select>
(四) MyBatis核心API概述
1、Resources
加载mybatis的配置文件。
// 加载核心配置文件
InputStream inputStream = Resources.getResourceAsStream("SqlMapConfig.xml");
2、SqlSessionFactoryBuilder
利用Resources指定的资源,将配置信息加载到内存中,还会加载mybatis配置文件中指定的所有映射配置信息,并
用特定的对象实例进行保存,从而创建SqlSessionFactory对象。
// 构建SqlSessionFactory对象
SqlSessionFactoryBuilder builder = new SqlSessionFactoryBuilder(); SqlSessionFactory factory = builder.build(inputStream);
3、SqlSessionFactory
这是一个工厂对象,对于这种创建和销毁都非常耗费资源的重量级对象,一个项目中只需要存在一个即可。 也就是说,它的生命周期跟项目的生命周期是一致的(项目不亡,我不销毁)
它的任务是创建SqlSession。
// 默认开启一个事务,但事务不会自动提交,需要手动提交事务,DML语句才会持久化到数据库中
SqlSession openSession();
// 参数为是否开启自动提交,如果设置为true,那么不需要手动提交事务
SqlSession openSession(boolean autoCommit);
4、 SqlSession
这是Mybatis的一个核心对象。我们基于这个对象可以实现对数据的CRUD操作。
对于这个对象应做到每个线程独有,每次用时打开,用完关闭。
执行语句的方法主要有:
<T> T selectOne(String statement, Object parameter);
<E> List<E> selectList(String statement, Object parameter);
int insert(String statement, Object parameter);
int update(String statement, Object parameter);
int delete(String statement, Object parameter);
(五) MyBatis的执行原理
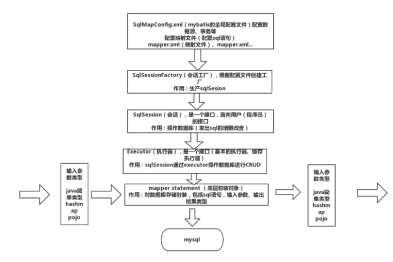
详细流程如下:
1、加载mybatis全局配置文件(数据源、mapper映射文件等),解析配置文件,MyBatis基于XML配置文件生成Configuration,和一个个MappedStatement(包括了参数映射配置、动态SQL语句、结果映射配置),其对应着<select | update | delete | insert>标签项。
2、SqlSessionFactoryBuilder通过Configuration对象生成SqlSessionFactory,用来开启SqlSession。
3、SqlSession对象完成和数据库的交互:
(1)用户程序调用mybatis接口层api(即Mapper接口中的方法)
(2)SqlSession通过调用api的Statement ID找到对应的MappedStatement对象
(3)通过Executor(负责动态SQL的生成和查询缓存的维护)将MappedStatement对象进行解析,sql参数转化、动态sql拼接,生成jdbc Statement对象
(4)JDBC执行sql。
(5)借助MappedStatement中的结果映射关系,将返回结果转化成HashMap、JavaBean等存储结构并返回。
三、MyBatis基于接口代理方式实现Dao层开发
(一)基于接口代理方式实现Dao的开发
1、介绍
采用 Mybatis 的基于接口代理方式实现 持久层 的开发,这种方式是我们后面进入企业的主流。
基于接口代理方式的开发只需要程序员编写 Mapper 接口,Mybatis 框架会为我们动态生成实现类的对象。
这种开发方式要求我们遵循一定的规范:
Mapper.xml映射文件中的namespace与mapper接口的全限定名相同
Mapper接口方法名和Mapper.xml映射文件中定义的每个statement的id相同
Mapper接口方法的输入参数类型和mapper.xml映射文件中定义的每个sql的parameterType的类型相同
Mapper接口方法的输出参数类型和mapper.xml映射文件中定义的每个sql的resultType的类型相同
2、实现步骤
(1) 编写接口 PersonMapper
public interface UserMapper {
public List<User> findAll() throws Exception;
}
(2) 编写PersonMapper.xml文件
<?xml version="1.0" encoding="UTF-8" ?>
<!DOCTYPE mapper PUBLIC "-//mybatis.org//DTD
Mapper 3.0//EN" "http://mybatis.org/dtd/mybatis-3-mapper.dtd">
<mapper namespace="com.offcn.mapper.PersonMapper">
<!--查询所有-->
<select id="findAll" resultType="person">
select * from person
</select>
</mapper>
(3)测试
@Test
public void testFindAll() throws Exception {
// 加载核心配置文件
InputStream is = Resources.getResourceAsStream("SqlMapConfig.xml");
// 获得SqlSessionFactory工厂对象
SqlSessionFactory sqlSessionFactory = new SqlSessionFactoryBuilder().build(is);
// 获得SqlSession会话对象
SqlSession sqlSession = sqlSessionFactory.openSession();
// 获得Mapper代理对象
UserMapper userMapper = sqlSession.getMapper(UserMapper.class);
// 执行查询
List<User> list = userMapper.findAll(); for (User user : list) {
System.out.println(user);
}
// 释放资源
sqlSession.close();
}
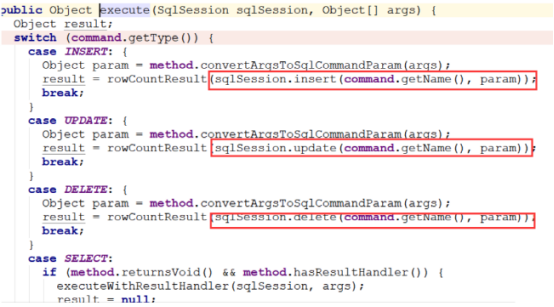
3、基于代理实现的内部执行原理
我们的持久层现在只有一个接口,而接口是不实际干活的,那么是谁在做findAll的实际工作呢?
下面通过追踪源码看一下:
(1)通过追踪源码我们会发现,我们使用的mapper实际上是一个代理对象,是由MapperProxy代理产生的。

(2)追踪MapperProxy的invoke方法会发现,其最终调用了mapperMethod.execute(sqlSession, args)

(3)进入execute方法会发现,最终工作的还是sqlSession
(二) MyBatis高级查询
1、ResultMap标签
如果数据库结果集中的列名和要封装的javaBean的属性名有不一致的情况下,我们查询的结果中不一致的属性值会为null,这个时候我们可以使用 resultMap 标签手动的建立映射关系,很好的解决数据不对应的问题。
(1) 编写接口PersonMapper
public interface PersonMapper {
public List<User> findAllResultMap();
}
(2) 编写PersonMapper.xml
<mapper namespace="com.offcn.mapper.PersonMapper">
<!--手动映射对象-->
<resultMap id="personResultMap" type="person">
<id column="id" property="id"></id>
<result column="name" property="name"></result>
<result column="bir" property="bir"></result>
<result column="address" property="address"></result>
</resultMap>
<!--查询所有 resultMap-->
<select id="findAllResultMap" resultMap="personResultMap">
select id as id, name, bir, address from person
</select>
</mapper>
(3) 测试
@Test
public void testFindAllResultMap() throws Exception {
PersonMapper personMapper = sqlSession.getMapper(PersonMapper .class);
List<Person> list = personMapper .findAllResultMap();
for (Person person : list) {
System.out.println(person);
}
}
(三) MyBatis多参数处理
MyBatis中方法中出现了多个参数的处理方式:
1、第一种使用方法索引
使用java方法的默认规范,参数是有索引,我们需要在sql中指定参数的的索引位置
<select>
select * from person where id=#{参数索引} and name=#{参数索引}
</select>
2、第二种map的key
使用map集合的方式传入多个参数值,在sql中我们使用map中的key来映射值
<select>
select * from person where id=#{map的key} and name=#{map的key}
</select>
3、第三种使用注解
使用MyBatis的注解 @Param("定义参数在sql中的应用名称"),在定义方法的时候声明sql中使用参数的名字
<select>
select * from person where id=#{ddi} and name=#{nnmae}
</select>
3、 第四种 使用自身封装的对象
<select>
select * from person where id=#{id} and name=#{name}
</select>
(四) 模糊查询
1、占位符方式
(1)构建PersonMapper接口
public interface PersonMapper {
public List<Person> findByName(String name);
}
(2)构建PersonMapper.xml
<mapper namespace="com.offcn.mapper.PersonMapper">
<select id="findByName" parameterType="string" resultType="person">
select * from person where name like #{name}
</select>
</mapper>
(3)测试
@Test
public void testFindByUsername() throws Exception {
PersonMapper personMapper= sqlSession.getMapper(PersonMapper.class);
List<Person> list = personMapper.findByName("%王%");
for (Person person: list) {
System.out.println(person);
}
}
2、字符串拼接方式
(1)构建PersonMapper接口
public interface PersonMapper{
public List<Person> findByName(String name);
}
(2)构建PersonMapper.xml
<mapper namespace="com.offcn.mapper.PersonMapper">
<!-- 不推荐使用,因为Oracle数据库 除了设置别名其余位置不能使用 双引号 -->
<select id="findByName" parameterType="string" resultType="person">
select * from person where name like "%"#{name}"%"
</select>
</mapper>
(3)测试
@Test
public void testFindByUsername() throws Exception {
PersonMapper personMapper= sqlSession.getMapper(PersonMapper.class);
List<Person> list = personMapper.findByName("王");
for (Person person: list) {
System.out.println(person);
}
}
3、$的拼接方式
(3)构建PersonMapper 接口
public interface PersonMapper {
public List<Person> findByName(String name);
}
构建PersonMapper.xml
<mapper namespace="com.offcn.mapper.PersonMapper ">
<!--不推荐使用,因为会出现sql注入问题-->
<select id="findByName" parameterType="string" resultType="person">
select * from person where name like '%${value}%'
</select>
</mapper>
测试
@Test
public void testFindByName() throws Exception {
PersonMapper personMapper= sqlSession.getMapper(PersonMapper.class);
List<Person> list = personMapper.findByName("王");
for (Person person: list) {
System.out.println(person);
}
}
4、使用函数拼接数据
(1)构建PersonMapper 接口
public interface PersonMapper {
public List<Person> findByName(String name);
}
(2)构建PersonMapper.xml
<mapper namespace="com.offcn.mapper.PersonMapper">
<!-- 推荐使用,concat() 字符串拼接函数 注意:在Oracle中,concat() 函数只能传递二次参数,我们解决方案是嵌套拼接 -->
<select id="findByName" parameterType="string" resultType="person">
select * from person where name like concat(concat('%',#{name}),'%');
</select>
</mapper>
(3)测试
@Test
public void testFindByName() throws Exception {
PersonMapper personMapper= sqlSession.getMapper(PersonMapper.class);
List<Person> list = personMapper.findByName("王");
for (Person person: list) {
System.out.println(person);
}
}
总结:${} 与 #{} 区别
#{} :表示一个占位符号
通过 #{} 可以实现preparedStatement向占位符中设置值,自动进行java类型和jdbc类型转换,#{}可以有效防止sql注入。#{} 可以接收简单类型值或pojo属性值。
如果parameterType传输单个简单类型值, #{} 括号中可以是value或其它名称。
${} :表示拼接sql串
通过 ${} 可以将parameterType 传入的内容拼接在sql中且不进行jdbc类型转换,会出现sql注入问题。
${} 可以接收简单类型值或pojo属性值。如果parameterType传输单个简单类型值, ${} 括号中可以使任意名称。