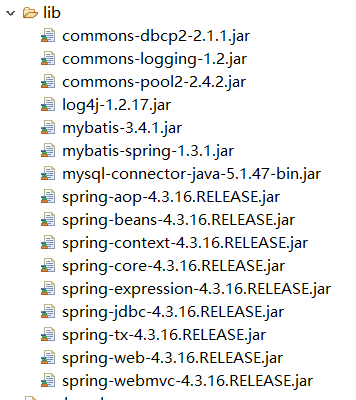
1、导入包
2、创建一个请求文件发送请求
 1 <%@ page language="java" contentType="text/html; charset=UTF-8"
 2     pageEncoding="UTF-8"%>
 3 <!DOCTYPE html PUBLIC "-//W3C//DTD HTML 4.01 Transitional//EN" "http://www.w3.org/TR/html4/loose.dtd">
 4 <html>
 5 <head>
 6 <meta http-equiv="Content-Type" content="text/html; charset=UTF-8">
 7 <title>Insert title here</title>
 8 </head>
 9 <body>
10     <form action="${pageContext.request.contextPath }/student/login.html" method="post">
11         用户名:<input type="text" name="studentName" /> <br />
12         密码:<input type="text" name="studentPwd" /> <br />
13         <input type="submit" value="登录">
14     </form>
15 </body>
16 </html>
3、① 创建 web.xml 文件(核心控制器,拦截所有的请求)
 1 <?xml version="1.0" encoding="UTF-8"?>
 2 <web-app xmlns:xsi="http://www.w3.org/2001/XMLSchema-instance" xmlns="http://xmlns.jcp.org/xml/ns/javaee" xsi:schemaLocation="http://xmlns.jcp.org/xml/ns/javaee http://xmlns.jcp.org/xml/ns/javaee/web-app_3_1.xsd" id="WebApp_ID" version="3.1">
 3   <display-name>springmvc-mybatis-001</display-name>
 4   <!-- 配置过滤器 -->
 5   <filter>
 6       <filter-name>characterEncodingFilter</filter-name>
 7       <filter-class>org.springframework.web.filter.CharacterEncodingFilter</filter-class>
 8       <init-param>
 9           <param-name>encoding</param-name>
10           <param-value>UTF-8</param-value>
11       </init-param>
12   </filter>
13   <filter-mapping>
14       <filter-name>characterEncodingFilter</filter-name>
15       <url-pattern>/*</url-pattern>
16   </filter-mapping>
17   <!-- 配置核心控制器 -->
18   <servlet>
19       <servlet-name>dispatcherServlet</servlet-name>
20       <servlet-class>org.springframework.web.servlet.DispatcherServlet</servlet-class>
21       <!-- 加载spring配置文件 -->
22       <init-param>
23           <param-name>contextConfigLocation</param-name>
24           <param-value>classpath:spring-*.xml</param-value>
25       </init-param>
26   </servlet>
27   <servlet-mapping>
28       <servlet-name>dispatcherServlet</servlet-name>
29       <url-pattern>*.html</url-pattern>
30   </servlet-mapping>
31   <welcome-file-list>
32     <welcome-file>index.jsp</welcome-file>
33   </welcome-file-list>
34 </web-app>
② 创建扫描组件的文件
 1 <?xml version="1.0" encoding="UTF-8"?>
 2 <beans xmlns="http://www.springframework.org/schema/beans"
 3     xmlns:xsi="http://www.w3.org/2001/XMLSchema-instance"
 4     xmlns:context="http://www.springframework.org/schema/context"
 5     xsi:schemaLocation="http://www.springframework.org/schema/beans http://www.springframework.org/schema/beans/spring-beans.xsd
 6         http://www.springframework.org/schema/context http://www.springframework.org/schema/context/spring-context-4.3.xsd">
 7
 8     <context:component-scan base-package="cn.mgy" />
 9
10 </beans>
4、创建业务层处理请求
① 创建一个StudentController
 1 package cn.mgy.controller;
 2
 3 import javax.servlet.http.HttpServletRequest;
 4
 5 import org.springframework.context.support.ClassPathXmlApplicationContext;
 6 import org.springframework.stereotype.Controller;
 7 import org.springframework.web.bind.annotation.RequestMapping;
 8
 9 import cn.mgy.mapper.StudentMapper;
10 import cn.mgy.pojo.Student;
11
12 @Controller
13 @RequestMapping("/student")
14 public class StudentController {
15
16     @RequestMapping("/login")
17     public String login(Student student,HttpServletRequest req) {
18         ClassPathXmlApplicationContext context = new ClassPathXmlApplicationContext("classpath:spring-*.xml");
19         StudentMapper studentMapper = context.getBean(StudentMapper.class);
20         Student student2 = studentMapper.findByStudent(student.getStudentName(), student.getStudentPwd());
21         req.setAttribute("student", student2);
22         context.close();
23         return "/view/login.jsp";
24     }
25 }
② 创建一个Student实体类
 1 package cn.mgy.pojo;
 2
 3 import java.io.Serializable;
 4 import java.util.Date;
 5
 6 public class Student implements Serializable {
 7
 8     private static final long serialVersionUID = 7276888295138830869L;
 9     private Long studentId;
10     private String studentName;
11     private String studentPwd;
12     private Integer studentStatus;
13     private Date createDate;
14     private String studentAccount;
15     public Long getStudentId() {
16         return studentId;
17     }
18     public void setStudentId(Long studentId) {
19         this.studentId = studentId;
20     }
21     public String getStudentName() {
22         return studentName;
23     }
24     public void setStudentName(String studentName) {
25         this.studentName = studentName;
26     }
27     public String getStudentPwd() {
28         return studentPwd;
29     }
30     public void setStudentPwd(String studentPwd) {
31         this.studentPwd = studentPwd;
32     }
33     public Integer getStudentStatus() {
34         return studentStatus;
35     }
36     public void setStudentStatus(Integer studentStatus) {
37         this.studentStatus = studentStatus;
38     }
39     public Date getCreateDate() {
40         return createDate;
41     }
42     public void setCreateDate(Date createDate) {
43         this.createDate = createDate;
44     }
45     public String getStudentAccount() {
46         return studentAccount;
47     }
48     public void setStudentAccount(String studentAccount) {
49         this.studentAccount = studentAccount;
50     }
51 }
5、配置数据源(整合Mybatis配置)
分三步:① 创建会话工厂;② 创建一个扫描器,将操作接口的操作对象扫描到Spring容器;③ 配置事务代理
 1 <?xml version="1.0" encoding="UTF-8"?>
 2 <beans xmlns="http://www.springframework.org/schema/beans"
 3     xmlns:xsi="http://www.w3.org/2001/XMLSchema-instance"
 4     xmlns:tx="http://www.springframework.org/schema/tx"
 5     xsi:schemaLocation="http://www.springframework.org/schema/beans http://www.springframework.org/schema/beans/spring-beans.xsd
 6         http://www.springframework.org/schema/tx http://www.springframework.org/schema/tx/spring-tx-4.3.xsd">
 7
 8     <!-- 配置连接池 -->
 9     <bean name="dataSource" class="org.apache.commons.dbcp2.BasicDataSource">
10         <!-- 四要素:-->
11         <!-- 驱动 -->
12         <property name="driverClassName" value="org.gjt.mm.mysql.Driver"/>
13         <!-- 连接字符串 -->
14         <property name="url" value="jdbc:mysql://localhost:3306/sms?useSSL=true"/>
15         <!-- 用户名 -->
16         <property name="username" value="root"/>
17         <!-- 密码 -->
18         <property name="password" value="root"/>
19     </bean>
20
21     <!--
22         如何让 Mybatis 使用 Spring 的连接池?
23         Mybatis 整合包的实现方式,是让 Spring 代理 Mybatis 创建会话工厂,然后实现一个扫描器,
24         将 Mybatis 的操作接口加到 Spring 容器里面
25      -->
26      <!-- 1. 创建 Spring 代理的会话工厂 -->
27      <bean name="sqlSessionFactoryBean" class="org.mybatis.spring.SqlSessionFactoryBean">
28          <!-- 会话工厂引用连接池 -->
29          <property name="dataSource" ref="dataSource"></property>
30          <!-- 指定别名 -->
31          <property name="typeAliasesPackage" value="cn.mgy.pojo"></property>
32          <!-- 配置映射文件,Spring 支持通配符*,表示加载 -mapper.xml 结尾映射文件 -->
33          <property name="mapperLocations" value="classpath:cn/mgy/mapper/xml/*-mapper.xml"></property>
34          <property name="configuration">
35              <!-- 对应 mybatis-config.xml 中的 settings 标签 -->
36               <bean class="org.apache.ibatis.session.Configuration">
37                 <!-- 支持驼峰命名法 -->
38                 <property name="mapUnderscoreToCamelCase" value="true"></property>
39               </bean>
40          </property>
41      </bean>
42      <!-- 2. 使用扫描器将操作的接口扫描到 Spring 容器 -->
43      <bean class="org.mybatis.spring.mapper.MapperScannerConfigurer">
44          <!-- 使用会话工厂 -->
45          <property name="sqlSessionFactoryBeanName" value="sqlSessionFactoryBean"></property>
46          <!-- 扫描的接口所在的包 -->
47          <property name="basePackage" value="cn.mgy.mapper"></property>
48      </bean>
49     <!-- 3. Spring 支持 Mybatis 的事务代理,代理 Mybatis 的事务 -->
50     <bean name="transactionManager" class="org.springframework.jdbc.datasource.DataSourceTransactionManager">
51         <!-- 对那个数据源使用事务代理 -->
52         <property name="dataSource" ref="dataSource"></property>
53     </bean>
54     <!-- 编程式事务代理,事务注解支持事务 -->
55     <tx:annotation-driven transaction-manager="transactionManager"/>
56 </beans>
6、创建映射接口
 1 package cn.mgy.mapper;
 2
 3 import org.apache.ibatis.annotations.Param;
 4
 5 import cn.mgy.pojo.Student;
 6
 7 public interface StudentMapper {
 8     /**
 9      * 查询学生
10      * @param student
11      * @return
12      */
13     Student findByStudent(@Param("studentName")Object studentName,@Param("studentPwd")Object studentPwd);
14 }
7、创建映射文件
1 <?xml version="1.0" encoding="UTF-8"?>
2 <!DOCTYPE mapper PUBLIC "-//mybatis.org//DTD Mapper 3.0//EN" "mybatis-3-mapper.dtd" >
3 <mapper namespace="cn.mgy.mapper.StudentMapper">
4   <select id="findByStudent" resultType="Student">
5       SELECT * FROM tb_student WHERE STUDENT_NAME=#{studentName} AND STUDENT_PWD=#{studentPwd}
6   </select>
7 </mapper>
附:数据库
