中间凸起的圆形TabBar曾经比较流行,类似于闲鱼之类的APP就使用了中间凸起TabBar,这两天自己动手实现了一个,效果图如下: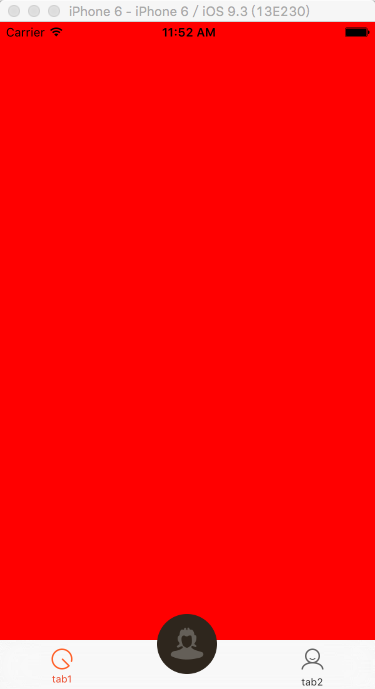
大致原理:重写UITabBar和UITabBarController,在UITabBar中枚举所有的UITabBarButton类型子控件,重新设置子控件的位置,为中间的圆形按钮预留位置,在layoutsubviews中添加圆形按钮并且重写hitTest方法,判断触摸是否位于圆形按钮区域,如果是,则通过圆形按钮响应点击事件。在UITabBarController我们需要用我们自己创建的UITabBar去替换系统原来的UITabBar,在创建UITabBarController的时候也需要用我们自己创建的UITabBarController。
代码如下:
MyUITabBar.m
#import "MyUITabBar.h"
#import "RoundButtonViewController.h"
#import "MyUITabBarController.h"

@interface MyUITabBarController ()

@end

@implementation MyUITabBarController

- (void)viewDidLoad {
    [super viewDidLoad];
    MyUITabBar *tabbar = [[MyUITabBar alloc] initWithFrame:CGRectMake(0, 0, 0, 0)];
    tabbar.myDelegate = self;
    //修改系统的Tabbar,使用我们自定义的Tabbar
    [self setValue:tabbar forKeyPath:@"tabBar"];
    // Do any additional setup after loading the view.
}

- (void)didReceiveMemoryWarning {
    [super didReceiveMemoryWarning];
    // Dispose of any resources that can be recreated.
}

- (void)RoundButtonClicked
{
    RoundButtonViewController *roundButtonViewController = [[RoundButtonViewController alloc] init];
    roundButtonViewController.view.backgroundColor = [UIColor blueColor];
    UINavigationController *navVc = [[UINavigationController alloc] initWithRootViewController:roundButtonViewController];
    [self presentViewController:navVc animated:YES completion:nil];
}
/*
#pragma mark - Navigation

// In a storyboard-based application, you will often want to do a little preparation before navigation
- (void)prepareForSegue:(UIStoryboardSegue *)segue sender:(id)sender {
    // Get the new view controller using [segue destinationViewController].
    // Pass the selected object to the new view controller.
}
*/

@end
MyUITabBar.h
#import <UIKit/UIKit.h>

@protocol RoundButtonDelegate <NSObject>

- (void)RoundButtonClicked;

@end

@interface MyUITabBar : UITabBar<RoundButtonDelegate>

@property (nonatomic, weak) id <RoundButtonDelegate>myDelegate;

@property (nonatomic, strong)UIButton *roundButton;

@end
MyUITabBar.m
#import "MyUITabBar.h"

@implementation MyUITabBar

/*
// Only override drawRect: if you perform custom drawing.
// An empty implementation adversely affects performance during animation.
- (void)drawRect:(CGRect)rect {
    // Drawing code
}
*/

- (instancetype) initWithFrame:(CGRect)frame{
    if (self = [super initWithFrame:frame]) {
        self.roundButton.frame = frame;
        self.backgroundColor = [UIColor whiteColor];
        [self.roundButton setBackgroundImage:[UIImage imageNamed:@"roundbutton" ] forState:UIControlStateNormal];
        [self.roundButton addTarget:self action:@selector(roundBtnClicked) forControlEvents:UIControlEventTouchUpInside];
        [self addSubview:self.roundButton];
    }
    return self;
}

//懒加载
- (UIButton *)roundButton
{
    if (!_roundButton) {
        _roundButton = [[UIButton alloc] init];
    }
    return _roundButton;
}

- (void)roundBtnClicked{
    if ([self.myDelegate respondsToSelector:@selector(RoundButtonClicked)]) {
        [self.myDelegate RoundButtonClicked];
    }
}

- (void)layoutSubviews{
    int centerx = self.bounds.size.width * 0.5;
    int centery = self.bounds.size.height * 0.5;
    self.roundButton.frame = CGRectMake(centerx - 30, centery - 50, 60, 60);

    Class class = NSClassFromString(@"UITabBarButton");
    int index = 0;
    int tabWidth = self.bounds.size.width / 3.0;

    for (UIView *view in self.subviews) {
        //找到UITabBarButton类型子控件
        if ([view isKindOfClass:class]) {
            CGRect rect = view.frame;
            rect.origin.x = index * tabWidth;
            rect.size.width = tabWidth;
            view.frame = rect;
            index++;
            //留出位置放置中间凸出按钮
            if (index == 1) {
                index++;
            }

        }
    }
}

//响应触摸事件,如果触摸位置位于圆形按钮控件上,则由圆形按钮处理触摸消息
- (UIView *)hitTest:(CGPoint)point withEvent:(UIEvent *)event{
    //判断tabbar是否隐藏
    if (self.hidden == NO) {
        if ([self touchPointInsideCircle:self.roundButton.center radius:30 targetPoint:point]) {
            //如果位于圆形按钮上,则由圆形按钮处理触摸消息
            return self.roundButton;
        }
        else{
            //否则系统默认处理
            return [super hitTest:point withEvent:event];
        }
    }
    return [super hitTest:point withEvent:event];
}

- (BOOL)touchPointInsideCircle:(CGPoint)center radius:(CGFloat)radius targetPoint:(CGPoint)point
{
    CGFloat dist = sqrtf((point.x - center.x) * (point.x - center.x) +
                         (point.y - center.y) * (point.y - center.y));
    return (dist <= radius);
}

@end
RoundButtonViewController.m
#import "RoundButtonViewController.h"

@interface RoundButtonViewController ()

@end

@implementation RoundButtonViewController

- (void)viewDidLoad {
    [super viewDidLoad];
    [self.view setBackgroundColor:[UIColor blueColor]];

    [self setUpNav];
    // Do any additional setup after loading the view.
}

- (void)didReceiveMemoryWarning {
    [super didReceiveMemoryWarning];
    // Dispose of any resources that can be recreated.
}

- (void)setUpNav
{
    UIBarButtonItem *backItem = [[UIBarButtonItem alloc] initWithImage:[UIImage imageNamed:@"back"] style:UIBarButtonItemStyleDone target:self action:@selector(pop)];

    [backItem setBackgroundImage:[UIImage imageNamed:@"back_clicked"] forState:UIControlStateSelected barMetrics:UIBarMetricsDefault];

    self.navigationItem.leftBarButtonItem = backItem;
    self.navigationItem.title = @"12345";

}

- (void)pop
{
    [self dismissViewControllerAnimated:YES completion:nil];
}

/*
#pragma mark - Navigation

// In a storyboard-based application, you will often want to do a little preparation before navigation
- (void)prepareForSegue:(UIStoryboardSegue *)segue sender:(id)sender {
    // Get the new view controller using [segue destinationViewController].
    // Pass the selected object to the new view controller.
}
*/

@end
AppDelegate.m
#import "AppDelegate.h"
#import "TabViewController1.h"
#import "TabViewController2.h"
#import "MyUITabBarController.h"
@interface AppDelegate ()

@end

@implementation AppDelegate


- (BOOL)application:(UIApplication *)application didFinishLaunchingWithOptions:(NSDictionary *)launchOptions {
    // Override point for customization after application launch.
    MyUITabBarController *myUITabBarController=[[MyUITabBarController alloc]init];
    self.window.rootViewController=myUITabBarController;

    NSDictionary *attributes = @{ NSForegroundColorAttributeName : [UIColor colorWithRed:0x33 / 255.0 green:0x33 / 255.0 blue:0x33 / 255.0 alpha:1],NSFontAttributeName : [UIFont systemFontOfSize:10]};
    [[UITabBarItem appearance] setTitleTextAttributes:attributes forState:UIControlStateNormal];

    NSDictionary *attributesSelected = @{ NSForegroundColorAttributeName : [UIColor colorWithRed:0xec / 255.0 green:0x48 / 255.0 blue:0x28 / 255.0 alpha:1],NSFontAttributeName : [UIFont systemFontOfSize:10]};
    [[UITabBarItem appearance] setTitleTextAttributes:attributesSelected forState:UIControlStateSelected];

    UIImage *normalImage = [[UIImage imageNamed:@"tab1"] imageWithRenderingMode:UIImageRenderingModeAlwaysOriginal];
    UIImage *selectImage = [[UIImage imageNamed:@"tab1_selected"] imageWithRenderingMode:UIImageRenderingModeAlwaysOriginal];
    UITabBarItem *tabBarItem = [[UITabBarItem alloc]initWithTitle:@"tab1" image:normalImage selectedImage:selectImage];
    tabBarItem.titlePositionAdjustment = UIOffsetMake(0.f, -3.f);
    TabViewController1 *tabViewController1 = [[TabViewController1 alloc] init];
    tabViewController1.tabBarItem = tabBarItem;

    normalImage = [[UIImage imageNamed:@"tab2"] imageWithRenderingMode:UIImageRenderingModeAlwaysOriginal];
    selectImage = [[UIImage imageNamed:@"tab2_selected"] imageWithRenderingMode:UIImageRenderingModeAlwaysOriginal];
    tabBarItem = [[UITabBarItem alloc] initWithTitle:@"tab2" image:normalImage selectedImage:selectImage];
    TabViewController2 *tabViewController2 = [[TabViewController2 alloc] init];
    tabViewController2.tabBarItem = tabBarItem;

    myUITabBarController.viewControllers=@[tabViewController1,tabViewController2];
    [self.window makeKeyAndVisible];

    return YES;
}

- (void)applicationWillResignActive:(UIApplication *)application {
    // Sent when the application is about to move from active to inactive state. This can occur for certain types of temporary interruptions (such as an incoming phone call or SMS message) or when the user quits the application and it begins the transition to the background state.
    // Use this method to pause ongoing tasks, disable timers, and throttle down OpenGL ES frame rates. Games should use this method to pause the game.
}

- (void)applicationDidEnterBackground:(UIApplication *)application {
    // Use this method to release shared resources, save user data, invalidate timers, and store enough application state information to restore your application to its current state in case it is terminated later.
    // If your application supports background execution, this method is called instead of applicationWillTerminate: when the user quits.
}

- (void)applicationWillEnterForeground:(UIApplication *)application {
    // Called as part of the transition from the background to the inactive state; here you can undo many of the changes made on entering the background.
}

- (void)applicationDidBecomeActive:(UIApplication *)application {
    // Restart any tasks that were paused (or not yet started) while the application was inactive. If the application was previously in the background, optionally refresh the user interface.
}

- (void)applicationWillTerminate:(UIApplication *)application {
    // Called when the application is about to terminate. Save data if appropriate. See also applicationDidEnterBackground:.
}

@end
部分头文件和TabViewController1、TabViewController2的文件没有放上来,因为这里面没有添加任何自己的代码。源码下载链接:http://download.csdn.net/detail/lzm2625347497/9571511