Docker:
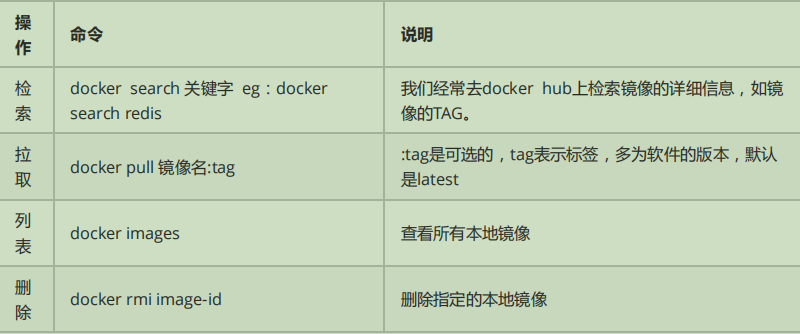
3、容器操作:
根据镜像启动容器:docker run ‐‐name mytomcat ‐d tomcat:latest
如果需要映射端口,则使用-p参数:docker run ‐d ‐p 8888:8080 tomcat
查看运行中的容器:docker ps
查看系统上所有的容器:docker ps ‐a
org.apache.tomcat.jdbc.pool.DataSource、HikariDataSource、BasicDataSource、
@ConditionalOnMissingBean(DataSource.class)
@ConditionalOnProperty(name = "spring.datasource.type")
static class Generic {
 @Bean
   public DataSource dataSource(DataSourceProperties properties) {
       //使用DataSourceBuilder创建数据源,利用反射创建响应type的数据源,并且绑定相关属性
      return properties.initializeDataSourceBuilder().build();
   }
}
然后在配置文件配置spring.datasource.type属性即可;
4、DataSourceInitializer:ApplicationListener;
作用:
1)、runSchemaScripts();运行建表语句;
2)、runDataScripts();运行插入数据的sql语句;
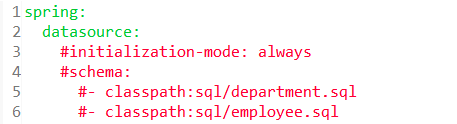
可将sql文件放入项目中,然后通过配置文件指定就可在运行项目时自动建表;如:
导入druid类型的数据源:
编写配置类:
package com.example.demo.config;

import javax.sql.DataSource;

import org.springframework.boot.autoconfigure.condition.ConditionalOnClass;
import org.springframework.boot.autoconfigure.condition.ConditionalOnProperty;
import org.springframework.boot.web.servlet.FilterRegistrationBean;
import org.springframework.boot.web.servlet.ServletRegistrationBean;
import org.springframework.context.annotation.Bean;
import org.springframework.context.annotation.Configuration;

import com.alibaba.druid.spring.boot.autoconfigure.DruidDataSourceBuilder;
import com.alibaba.druid.support.http.StatViewServlet;
import com.alibaba.druid.support.http.WebStatFilter;

@Configuration
@ConditionalOnClass(com.alibaba.druid.pool.DruidDataSource.class)
@ConditionalOnProperty(name = "spring.datasource.type", havingValue = "com.alibaba.druid.pool.DruidDataSource", matchIfMissing = true)
public class DruidDataSource {
    public DataSource dataSourceOne() {
        return DruidDataSourceBuilder.create().build();

    }

    @Bean
    public ServletRegistrationBean druidStatViewServlet(){
        //org.springframework.boot.context.embedded.ServletRegistrationBean提供类的进行注册.
        ServletRegistrationBean servletRegistrationBean = new ServletRegistrationBean(new StatViewServlet(),"/druid/*");
        //添加初始化参数:initParams
        //IP黑名单 (存在共同时,deny优先于allow) : 如果满足deny的话提示:Sorry, you are not permitted to view this page.
        servletRegistrationBean.addInitParameter("deny","192.168.1.73");
        //登录查看信息的账号密码.
        servletRegistrationBean.addInitParameter("loginUsername","admin");
        servletRegistrationBean.addInitParameter("loginPassword","123456");
        //是否能够重置数据.
        servletRegistrationBean.addInitParameter("resetEnable","false");
        return servletRegistrationBean;
    }
    @Bean
    public FilterRegistrationBean druidStatFilter(){
        FilterRegistrationBean filterRegistrationBean = new FilterRegistrationBean(new WebStatFilter());
        //添加过滤规则.
        filterRegistrationBean.addUrlPatterns("/*");
        //添加不需要忽略的格式信息.
        filterRegistrationBean.addInitParameter("exclusions","*.js,*.gif,*.jpg,*.png,*.css,*.ico,/druid/*");
        return filterRegistrationBean;
    }
}
这里注入的ServletRegistrationBean、和FilterRegistrationBean都是druid特有的功能,可以实时监控数据库以及web的访问情况;需要注意的是得在配置中配好数据池的类型;
整合Mybatis:
注解版:
先在主进口类那里加上@MapperScan()注解,告诉容器应该扫描哪些mapper文件:

然后编写mapper类:
package com.example.demo.Mapper;

import org.apache.ibatis.annotations.Delete;
import org.apache.ibatis.annotations.Insert;
import org.apache.ibatis.annotations.Mapper;
import org.apache.ibatis.annotations.Select;
import org.apache.ibatis.annotations.Update;

import com.example.demo.bean.Department;

@Mapper
public interface DepartmentMapper {
    @Select("select * from department where id = #{id}")
    public Department getDeptById(Integer id);
    @Delete("delete from department where id = #(id)")
    public int deleteDeptById(Integer id);
    @Insert("insert into department(departmentName) values(#{departmentName})")
    public int insertDept(Department department);
    @Update("update department set departmentName = #{departmentName} where id = #{id}")
    public int updateDept(Department department);
}
@Mapper指定这个操作数据库的mapper
通过controller调用mapper:
package com.example.demo.contoller;

import org.apache.ibatis.annotations.Param;
import org.springframework.beans.factory.annotation.Autowired;
import org.springframework.web.bind.annotation.GetMapping;
import org.springframework.web.bind.annotation.PathVariable;
import org.springframework.web.bind.annotation.RestController;

import com.example.demo.Mapper.DepartmentMapper;
import com.example.demo.Mapper.EmployeeMapper;
import com.example.demo.bean.Department;
import com.example.demo.bean.Employee;

@RestController
public class DeptController {
    @Autowired
    DepartmentMapper departmentMapper;
    @Autowired
    EmployeeMapper employeeMapper;
    @GetMapping("/dept/{id}")
    public Department getDepartment(@PathVariable("id") Integer id) {
        return departmentMapper.getDeptById(id);
    }
    @GetMapping("/dept")
    public Department insertDept(Department department) {
        departmentMapper.insertDept(department);
        return department;
    }
    @GetMapping("/emp/{id}")
    public Employee getEmp(@PathVariable("id") Integer id) {
        return employeeMapper.getEmpById(id);
    }


}
修改mabatis的配置规则,可以给容器添加一个ConfigurationCustomizer;比如,让实体类的dId能匹配上数据库的d_id,即开启自动驼峰转换功能:
package com.example.demo.config;

import org.apache.ibatis.session.Configuration;
import org.mybatis.spring.boot.autoconfigure.ConfigurationCustomizer;
import org.springframework.context.annotation.Bean;
@org.springframework.context.annotation.Configuration
public class MybatisConfig {
    @Bean
    public ConfigurationCustomizer configurationCustomzer() {
        return new ConfigurationCustomizer() {

            @Override
            public void customize(Configuration configuration) {
                // TODO Auto-generated method stub
                configuration.setMapUnderscoreToCamelCase(true);
            }
        };
    }
}
配置文件版:在配置文件加上配置:
mybatis:
  config-location: classpath:mybatis/mybatis-config.xml
  mapper-locations: classpath:mybatis/mapper/*.xml
mybatis-config.xml:
<?xml version="1.0" encoding="UTF-8" ?>
<!DOCTYPE configuration
  PUBLIC "-//mybatis.org//DTD Config 3.0//EN"
  "http://mybatis.org/dtd/mybatis-3-config.dtd">
<configuration>
     <settings>
         <setting name="mapUnderscoreToCamelCase" value = "true"/>
     </settings>
</configuration>
mapper类:
package com.example.demo.Mapper;

import com.example.demo.bean.Employee;

public interface EmployeeMapper {
    public Employee getEmpById(Integer id);
    public void insertEmp(Employee employee);
}
controller类:
@Autowired
    EmployeeMapper employeeMapper;
@GetMapping("/emp/{id}")
    public Employee getEmp(@PathVariable("id") Integer id) {
        return employeeMapper.getEmpById(id);
    }
整合SpringData JPA
1)、编写一个实体类(bean)和数据表进行映射,并且配置好映射关系:
//使用JPA注解配置映射关系
@Entity //告诉JPA这是一个实体类(和数据表映射的类)
@Table(name = "tbl_user") //@Table来指定和哪个数据表对应;如果省略默认表名就是user;
public class User {
    @Id //这是一个主键
    @GeneratedValue(strategy = GenerationType.IDENTITY)//自增主键
    private Integer id;
    @Column(name = "last_name",length = 50) //这是和数据表对应的一个列
    private String lastName;
    @Column //省略默认列名就是属性名
    private String email;
}
2)、编写一个Dao接口来操作实体类对应的数据表(Repository):
package com.example.demo.Dao;

import org.springframework.data.jpa.repository.JpaRepository;

import com.example.demo.entity.User;

public interface UserRepository extends JpaRepository<User, Integer> {


}
3、配置好配置文件:
spring:
  datasource:
    username: root
    password: 123456
    url: jdbc:mysql://192.168.112.51:3306/jpa
    driver-class-name: com.mysql.jdbc.Driver
  jpa:
    hibernate:
      ddl-auto: update#更新或者创建数据表结构
    show-sql: true#显示台输出sql语句
最后再通过控制器controller来调用:
package com.example.demo.controller;

import org.springframework.beans.factory.annotation.Autowired;
import org.springframework.web.bind.annotation.GetMapping;
import org.springframework.web.bind.annotation.PathVariable;
import org.springframework.web.bind.annotation.RestController;

import com.example.demo.Dao.UserRepository;
import com.example.demo.entity.User;

@RestController
public class UserController {
    @Autowired
    UserRepository userRepository;
    @GetMapping("/user/{id}")
    public User getUser(@PathVariable("id") Integer id) {
        User user = userRepository.findById(id).orElse(null);
        return user;
    }
    @GetMapping("/user")
    public User insertUser(User user) {
        User save = userRepository.save(user);
        return save;
    }
}