https://blog.csdn.net/qq_39240270/article/details/94202815
https://segmentfault.com/a/1190000022984410
https://copyfuture.com/blogs-details/20201126094324349srtxd7wd6yntbs8
直连交换机
是根据消息携带的路由键(routing key) 将消息投递到对应的队列,步骤如下:
- 将一个队列绑定到某个交换机上,同时赋予绑定一个路由键(routing key);
- 当一个携带着路由键值为R的消息被发送给直连交换机时,交换机会把它路由给绑定值同样为R的队列

config如下:
@Configuration
public class MQConfig {

    public static final String QUEUE = "queue";
    public static final String TOPIC_QUEUE1 = "topic.queue1";
    public static final String TOPIC_QUEUE2 = "topic.queue2";
    public static final String TOPIC_EXCHANGE = "topicExchage";

    /**
     * Direct模式,交换机Exchange,创建消息队列。指定队列名,往里面塞数据取数据。
     * 消息发到交换机exchange,再到队列
     */
    @Bean
    public Queue queue() {
        // Queue的第一个参数为队列名称,第二个参数为是否持久存在
        return new Queue(QUEUE, true);
    }


}
sender如下:
public void send(Object message) {
        String msg = RedisService.beanToString(message);
        log.info("send message" + msg);
        // 第一个参数是发送到的队列名称,第二个参数是发送的数据
        amqpTemplate.convertAndSend(MQConfig.QUEUE, msg);
    }
扇形交换机
将消息路由给绑定到它身上的所有队列,不同于直连交换机,路由键在此类型上不启任务作用
如果N个队列绑定到某个扇形交换机上,当有消息发送给此扇形交换机时,交换机会将此消息发送给这所有的N个队列

队列还是1,2.只不过少了路由键
config
/*
    * 广播模式,fanout
    * */
    @Bean // 交换机
    public FanoutExchange fanoutExchage(){
        return new FanoutExchange(FANOUT_EXCHANGE);
    }
    // 队列1,2绑定到同一个交换机
    @Bean
    public Binding FanoutBinding1() {
        return BindingBuilder.bind(topicQueue1()).to(fanoutExchage());
    }
    @Bean
    public Binding FanoutBinding2() {
        return BindingBuilder.bind(topicQueue2()).to(fanoutExchage());
    }
sender如下所示
// 因为是广播模式,队列1,队列2都能收到消息
    public void sendFanout(Object message) {
        String msg = RedisService.beanToString(message);
        log.info("send fanout message:"+msg);
        amqpTemplate.convertAndSend(MQConfig.FANOUT_EXCHANGE, "", msg);
    }
receiver:和topic那个共用了receiver,因为监听的队列一样
结果:

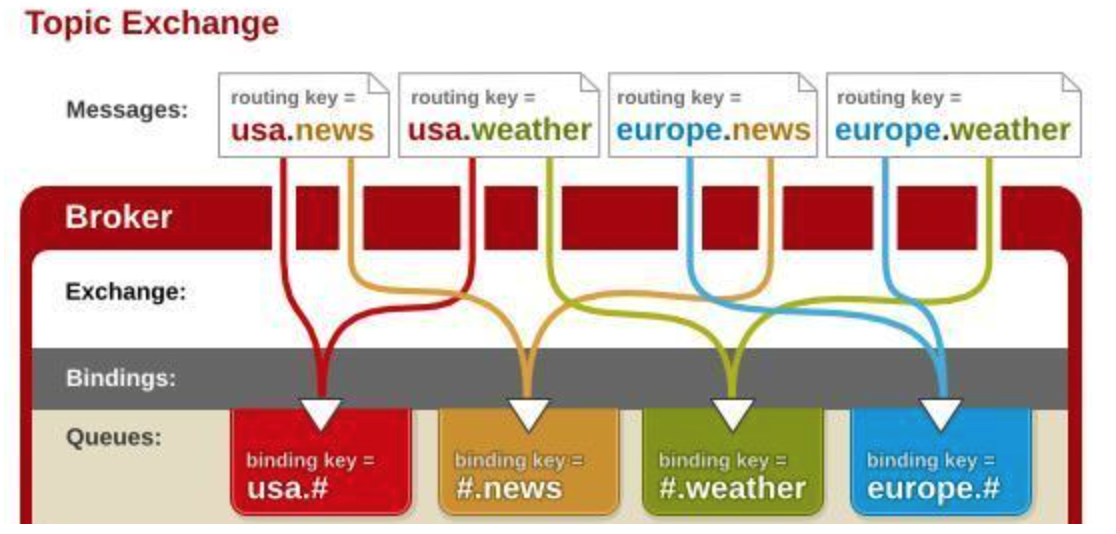
主题交换机
将路由键和某模式进行匹配。此时队列需要绑定要一个模式上。符号“#”匹配一个或多个词,符号“”匹配不多不少一个词。因此“abc.#”能够匹配到“abc.def.ghi”,但是“abc.” 只会匹配到“abc.def”。
绑定键有两种特殊类型:
- *符号用来代替任意单词
- #符号可以代替0个或多个单词
备注:
Topic型交换器比较强大跟其它交换器很相似。
当一个队列以”#”作为绑定键时,它将接收所有消息,而不管路由键如何,类似于fanout型交换器。
当特殊字符”*”、”#”没有用到绑定时,topic型交换器就好比direct型交换器了。
例子:
首先config如下
可以看出,topicQueue1与topicQueue2这俩队列都绑定上了一个交换机
而路由键topic.key1与队列1绑定,路由键topic.#与队列2绑定
@Configuration
public class MQConfig {

    public static final String QUEUE = "queue";
    public static final String TOPIC_QUEUE1 = "topic.queue1";
    public static final String TOPIC_QUEUE2 = "topic.queue2";
    public static final String TOPIC_EXCHANGE = "topicExchage";


    /**
     * Topic模式,交换机exchange
     * 将路由键和某模式进行匹配。此时队列需要绑定要一个模式上。符号“#”匹配一个或多个词,
     * 符号“.”匹配不多不少一个词。因此“abc.#”能够匹配到“abc.def.ghi”,但是“abc.” 只会匹配到“abc.def”。
     */
    @Bean
    public Queue topicQueue1() {
        return new Queue(TOPIC_QUEUE1, true);
    }

    @Bean
    public Queue topicQueue2() {
        return new Queue(TOPIC_QUEUE2, true);
    }

    @Bean // 交换机
    public TopicExchange topicExchage() {
        return new TopicExchange(TOPIC_EXCHANGE);
    }
    // 路由键的作用:匹配队列的
    @Bean // 将topicQueue1与topicExchange交换机绑定
    public Binding topicBinding1() { // 如果路由键为topic.key1,会被发送到TOPIC_QUEUE1队列
        return BindingBuilder.bind(topicQueue1()).to(topicExchage()).with("topic.key1");
    }

    @Bean // 将topicQueue2与topicExchange交换机绑定
    public Binding topicBinding2() { // 如果路由键为topic.#,会被发送到TOPIC_QUEUE2队列
        return BindingBuilder.bind(topicQueue2()).to(topicExchage()).with("topic.#");
    }
}
receiver:
@RabbitListener(queues=MQConfig.TOPIC_QUEUE1)
    public void receiveTopic1(String message) {
        log.info("topic  queue1 message:" + message);
    }

    @RabbitListener(queues=MQConfig.TOPIC_QUEUE2)
    public void receiveTopic2(String message) {
        log.info("topic  queue2 message:" + message);
    }
sender如下所示:
public void sendTopic(Object message) {
        String msg = RedisService.beanToString(message);
        log.info("send topic message:"+msg);
        // 第一个参数指将消息发送到该名称的交换机,第二个参数为对应的routing_key,第三个参数为发送的具体消息
        amqpTemplate.convertAndSend(MQConfig.TOPIC_EXCHANGE, "topic.key1", msg+"1");
        amqpTemplate.convertAndSend(MQConfig.TOPIC_EXCHANGE, "topic.key2", msg+"2");
    }
首先,路由键的作用是与队列进行匹配。例如sender中的这俩个语句:
amqpTemplate.convertAndSend(MQConfig.TOPIC_EXCHANGE, "topic.key1", msg+"1");
amqpTemplate.convertAndSend(MQConfig.TOPIC_EXCHANGE, "topic.key2", msg+"2");
这俩语句发送到的交换机都一致, topic.key1这个路由键,可以匹配到topicQueue1,也可以匹配到topicQueue2
topic.key2不能匹配到topicQueue1(topic.key1),只能匹配到topicQueue2(topic.#)。总之,msg+1可以发送到两个队列。msg+2只能被发送到第二个队列.

测试的结果是:队列1,2都收到了消息1。消息2只被队列2收到了,与预计的一致。
4: Headers Exchanges
不处理路由键。而是根据发送的消息内容中的headers属性进行匹配。在绑定Queue与Exchange时指定一组键值对;当消息发送到RabbitMQ时会取到该消息的headers与Exchange绑定时指定的键值对进行匹配;如果完全匹配则消息会路由到该队列,否则不会路由到该队列。headers属性是一个键值对,可以是Hashtable,键值对的值可以是任何类型。而fanout,direct,topic 的路由键都需要要字符串形式的。
匹配规则x-match有下列两种类型:
x-match = all :表示所有的键值对都匹配才能接受到消息
x-match = any :表示只要有键值对匹配就能接受到消息
config:
@Bean
    public Binding headerBinding() {
        Map<String, Object> map = new HashMap<String, Object>();
        map.put("header1", "value1");
        map.put("header2", "value2");
        // headers必须完全满足上面那俩key和value,才能送到队列里面去
        return BindingBuilder.bind(headerQueue1()).to(headersExchage()).whereAll(map).match();
    }
sender
public void sendHeader(Object message) {
        String msg = RedisService.beanToString(message);
        log.info("send fanout message:"+msg);
        // header
        MessageProperties properties = new MessageProperties();
        properties.setHeader("header1", "value1");
        properties.setHeader("header2", "value2");
        // message,需要用字节方式传输
        Message obj = new Message(msg.getBytes(), properties);
        amqpTemplate.convertAndSend(MQConfig.HEADERS_EXCHANGE, "", obj);
    }
receiver
@RabbitListener(queues=MQConfig.HEADER_QUEUE)
    public void receiveHeaderQueue(byte[] message) {
        log.info(" header  queue message:"+new String(message));
    }
