Spring(官网:https://spring.io/)
- 简介
- 优点
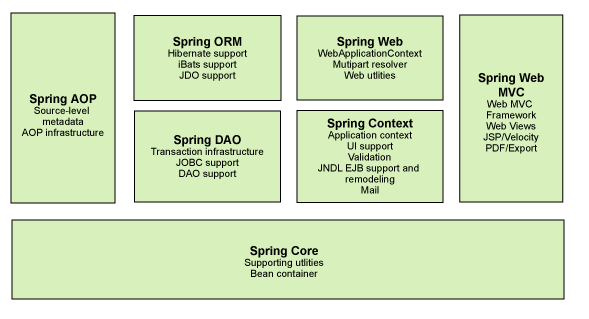
- 组成
- IOC:spring ioc指的是控制反转,IOC容器负责实例化、定位、配置应用程序中的对象及建立这些对象间的依赖。交由Spring容器统一进行管理,从而实现松耦合
IOC是Inversion of Control的缩写,多数书籍翻译成“控制反转”,还有些书籍翻译成为“控制反向”或者“控制倒置”。简单来说就是把复杂系统分解成相互合作的对象,这些对象类通过封装以后,内部实现对外部是透明的,从而降低了解决问题的复杂度,而且可以灵活地被重用和扩展。IOC理论提出的观点大体是这样的:借助于“第三方”实现具有依赖关系的对象之间的解耦,如图
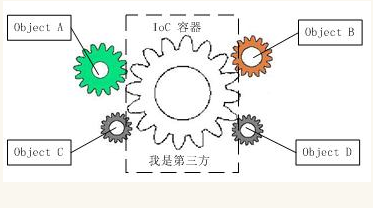
由上图,由于引进了中间位置的“第三方”,也就是IOC容器,使得A、B、C、D这4个对象没有了耦合关系,齿轮之间的传动全部依靠“第三方”了,全部对象的控制权全部上缴给“第三方”IOC容器,所以,IOC容器成了整个系统的关键核心,它起到了一种类似“粘合剂”的作用,把系统中的所有对象粘合在一起发挥作用,如果没有这个“粘合剂”,对象与对象之间会彼此失去联系,这就是有人把IOC容器比喻成“粘合剂”的由来。
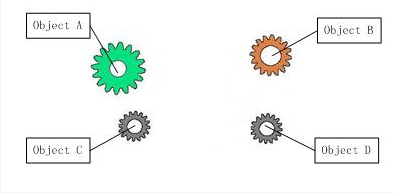
我们再来做个试验:把上图中间的IOC容器拿掉,然后再来看看这套系统:
- spring的配置
<?xml version="1.0" encoding="UTF-8"?>
<beans xmlns="http://www.springframework.org/schema/beans"
xmlns:xsi="http://www.w3.org/2001/XMLSchema-instance" xmlns:context="http://www.springframework.org/schema/context"
xmlns:aop="http://www.springframework.org/schema/aop"
xsi:schemaLocation="
http://www.springframework.org/schema/aop http://www.springframework.org/schema/aop/spring-aop-4.0.xsd
http://www.springframework.org/schema/beans http://www.springframework.org/schema/beans/spring-beans.xsd
http://www.springframework.org/schema/context http://www.springframework.org/schema/context/spring-context-4.0.xsd">
<bean id="moocAppctx" class="imooc_spring.test.aware.MoocApplicationContext"
init-method="hhhh">
</bean>
<!-- 引入db.properties -->
<context:property-placeholder location="classpath:db.properties" />
<!-- 配置C3P0数据源 -->
<bean id="dataSource" class="com.mchange.v2.c3p0.ComboPooledDataSource">
<property name="jdbcUrl" value="${jdbc.url}"></property>
<property name="driverClass" value="${jdbc.driverName}"></property>
<property name="user" value="${jdbc.username}"></property>
<property name="password" value="${jdbc.pwd}"></property>
</bean>
<!-- 配置 Spring 的 org.springframework.jdbc.core.JdbcTemplate -->
<bean id="jdbcTemplate" class="org.springframework.jdbc.core.JdbcTemplate">
<property name="dataSource" ref="dataSource"></property>
</bean>
<bean id="moocBeanNameAware" class="imooc_spring.test.aware.MoocBeanNameAware"></bean>
<!-- 测试 SpEL: 可以为属性进行动态的赋值(了解) -->
<bean id="girl" class="com.helloworld.User">
<property name="userName" value=""></property>
</bean>
<!-- <bean id="boy" class="com.helloworld.User" init-method="init" destroy-method="destroy">
<property name="userName" value=""></property> <property name="wifeName"
value="#{girl.userName}"></property> </bean> -->
<bean id="girl2" class="com.helloworld.User2">
<property name="userName" value="Talor Swift"></property>
</bean>
<!-- autowired测试,自动装配测试 -->
<bean id="people" class="test.spring.autowired.Person" scope="prototype"
autowire="byName">
<property name="name" value=""></property>
<!-- <property name="cat" ref="cat222"></property> -->
<!-- <property name="cat" ref="cat1"></property> -->
</bean>
<bean id="cat" class="test.spring.autowired.Cat" scope="prototype">
<property name="name" value=""></property>
</bean>
<!-- <bean id="cat222" class="test.spring.autowired.Cat"> <property name="name"
value=""></property> </bean> -->
<bean id="people2" class="test.spring.autowired.Person" scope="prototype"
autowire="byName">
<property name="name" value="小明"></property>
<property name="cat" ref="cat222"></property>
</bean>
<bean id="cat222" class="test.spring.autowired.Cat" scope="prototype">
<property name="name" value=""></property>
</bean>
<!--context:component-scan 指定 扫描的包 -->
<!--可以通过 resource-pattern 指定扫描的资源, resource-pattern="myrepository/*.class"
的含义: 只扫描 base-package 对应包下的 目录为 myrepository 的所有java Bean -->
<!-- <context:component-scan base-package="imooc_spring.test.anotation"
resource-pattern="myrepository/*.class"></context:component-scan> -->
<!-- context:exclude-filter type="annotation" expression="org.springframework.stereotype.Repository"
子节点指定排除哪些注解 context:include-filter type="annotation" 需要结合context:component-scan
标签的 use-default-filters="false"来使用 context:exclude-filter type="assignable"
这个expression指的是自己写的类,意思排除哪些类 expression="imooc_spring.test.anotation.TestObj" -->
<context:component-scan base-package="imooc_spring.test.anotation">
<!-- <context:exclude-filter type="annotation" expression="org.springframework.stereotype.Repository"
/> -->
<!-- <context:exclude-filter type="assignable" expression="imooc_spring.test.anotation.TestObj"
/> -->
</context:component-scan>
<context:component-scan base-package="com.aop"></context:component-scan>
<!-- aop测试,需要引入aop命名空间 -->
<aop:aspectj-autoproxy></aop:aspectj-autoproxy>
<!-- aop annotationType, -->
<!-- 切点的bean -->
<bean class="com.aop.xmltype.CalculatorImplxml" id="calImplxml"></bean>
<!-- 切面的bean -->
<bean class="com.aop.xmltype.MyAspectxml" id="myaspxml"></bean>
<bean class="com.aop.xmltype.Diary" id="myDiary"></bean>
<!-- aop xmlType,用xml的形式配置AOP前置通知 -->
<aop:config>
<!--aop:pointcut 其实放在这儿也可以 -->
<!-- <aop:pointcut expression="execution (* com.aop.xmltype.CalculatorImplxml.*(..))"
id="pointcut1" /> -->
<!-- 配置切面和通知 ,aop:aspect标签需要通过ref指定配置好的bean,id随便配置或者不配置,id的值可以随意起 -->
<aop:aspect id="myaspxml" ref="myaspxml" order="2">
<!-- 配置切点,即 要被记日记的对象, aop:pointcut 放在这儿也可以 ,切点不需要根对应的bean相关联,
只要expression指定的方法所在的类被Spring扫描得到就行,即只要所在的类配置了bean就可以 -->
<aop:pointcut expression="execution (* com.aop.xmltype.CalculatorImplxml.*(..))"
id="pointcut1" />
<!-- 切面里的具体的用于记录的方法就是一个通知,需要用通过pointcut-ref来指定具体的切点, -->
<aop:before method="logBefore" pointcut-ref="pointcut1" />
<aop:after method="logAfter" pointcut-ref="pointcut1" />
</aop:aspect>
<aop:aspect ref="myDiary" order="3">
<!-- execution (* com.aop.*.*.*(..)) 包含了 com.aop.xmltype.CalculatorImplxml.*(..)) 的这种情况 -->
<!-- <aop:pointcut expression="execution (* com.aop.*.*.*(..))" id="allPointcut"/> -->
<aop:pointcut expression="execution (* com.aop.xmltype.CalculatorImplxml.*(..))" id="allPointcut"/>
<aop:before method="myEnd" pointcut-ref="allPointcut"/>
</aop:aspect>
</aop:config>
</beans>
- DI依赖注入(三种方式注入)
构造器注入
<bean id="student" class="com.Student">
    <!-- 根据参数的个数 会去调用相应的构造器   也可以通过索引指定 index 从0开始 也可以通过name指定参数名  或者指定参数的类型type -->
    <constructor-arg value=""></constructor-arg>
    <constructor-arg value=""></constructor-arg>
    <constructor-arg ref="teacher"></constructor-arg>
</bean>
set注入(重点)
<bean id="student" class="com.Student">   //调用类的无参构造器
    <property name="name" value=""></property>  // 调用对应属性的set方法
    <property name="age" value=""></property>
    <property name="info" ref="info"></property>//info类型
</bean>
p/c命名空间注入
先引用命名空间
xmlns:p="http://www.springframework.org/schema/p"
或
xmlns:c="http://www.springframework.org/schema/c"
注入值
<bean id="student" class="com.Student" p:name="" p:age="" p:info-ref="info"></bean>
或
<bean id="student" class="com.Student" c:name="" c:age="22" c:info-ref="info"></bean>
- Bean的作用域
① singleton(默认)
使用该属性定义Bean时,IOC容器仅创建一个Bean实例,IOC容器每次返回的是同一个Bean实例。
② prototype
使用该属性定义Bean时,IOC容器可以创建多个Bean实例,每次返回的都是一个新的实例。
③ request
该属性仅对HTTP请求产生作用,使用该属性定义Bean时,每次HTTP请求都会创建一个新的Bean,适用于WebApplicationContext环境。
④ session
该属性仅用于HTTP Session,同一个Session共享一个Bean实例。不同Session使用不同的实例。
⑤ global-session
该属性仅用于HTTP Session,同session作用域不同的是,所有的Session共享一个Bean实例。
- Bean的自动装配
Spring IOC容器可以自动装配Bean,只需要在<bean> 的autowire属性中指定装配的模式。
缺点:
在Bean配置文件中涉及autowire属性进行自动装配将会配置Bean的所有属性,然而,若只希望装配个别属性时,autowire就不够灵活了。
autowire要么根据类型自动装配要么根据名字自动装配,不能两者兼顾。
弊大于利,不建议使用
- 注解开发
常用的注解
| @Controller | 组合注解(组合了@Component注解),应用在MVC层(控制层),DispatcherServlet会自动扫描注解了此注解的类,然后将web请求映射到注解了@RequestMapping的方法上。 |
| @Service | 组合注解(组合了@Component注解),应用在service层(业务逻辑层) |
| @Reponsitory | 组合注解(组合了@Component注解),应用在dao层(数据访问层) |
| @Component | 表示一个带注释的类是一个“组件”,成为Spring管理的Bean。当使用基于注解的配置和类路径扫描时,这些类被视为自动检测的候选对象。同时@Component还是一个元注解。 |
| @Autowired | Spring提供的工具(由Spring的依赖注入工具(BeanPostProcessor、BeanFactoryPostProcessor)自动注入。) |
| @Resource | JSR-250提供的注解 |
@Autowired和@Resource的区别
@Resource(java)注解的name属性解析为bean的名字,而type属性则解析为bean的类型。所以如果使用name属性,则使用byName的自动注入策略,而使用type属性时则使用byType自动注入策略。如果既不指定name也不指定type属性,这时将通过反射机制使用byName自动注入策略。
Autowired(Spring)先根据type进行注入,后去匹配name。如果涉及到type无法辨别注入对象时,那需要依赖@Qualifier或@Primary注解一起来修饰。
- 代理模式
静态代理:
动态代理:利用反射机制实现(Proxy、invocationHandler)
实现invocationHandler接口,重写Invoker()方法。
动态代理的两大类:基于接口、基于类的动态代理
基于接口:jdk动态代理
基于类:cglib
字节码的实现:javasist
- AOP
概念:面向切面编程,通过预编译方式和运行期动态代理实现程序功能的统一维护的一种技术。AOP是OOP的延续,是软件开发中的一个热点,也是Spring框架中的一个重要内容,是函数式编程的一种衍生范型。利用AOP可以对业务逻辑的各个部分进行隔离,从而使得业务逻辑各部分之间的耦合度降低,提高程序的可重用性,同时提高了开发的效率。AOP的工作重心在于如何将增强应用于目标对象的连接点上,这包括第一,如何通过切点和增强定位到连接点,第二,如何在增强中编写切面代码。
作用:日志记录、性能统计、安全控制、事务处理、异常处理等等
关键词:
Aspect(切面): 通常是一个类,里面可以定义切入点和通知
JointPoint(连接点): 程序执行过程中明确的点,一般是方法的调用
Advice(通知): AOP在特定的切入点上执行的增强处理,有before,after,afterReturning,afterThrowing,around
Pointcut(切入点): 就是带有通知的连接点,在程序中主要体现为书写切入点表达式
目标对象(Target): 增强逻辑的织入目标类
引介(Introduction): 引介是特殊的增强,他为类添加一些属性和方法。
织入(Weaving): 将增强添加到目标类的具体链接点的过程。
AOP代理:AOP框架创建的对象,代理就是目标对象的加强。Spring中的AOP代理可以使JDK动态代理,也可以是CGLIB代理,前者基于接口,后者基于子类
通知类型:
前置通知(@Before):调用目标组件前,调用方面组件(before)
后置通知(@AfterReturning):调用目标组件后,调用方面组件(after-returning)
最终通知(@After):调用目标组件后,在finally里调用方面组件(after)
异常通知(@AfterThrowing):目标组件发生异常时,调用方面组件。(after-throwing)
环绕通知(@Around):调用目标组件前、后,分别调用一次方面组件。(around)
- 声明式事务
它是建立在AOP之上的。其本质是对方法前后进行拦截,然后在目标方法开始之前创建或者加入一个事务,在执行完目标方法之后根据执行情况提交或者回滚事务。声明式事务最大的优点就是不需要通过编程的方式管理事务,这样就不需要在业务逻辑代码中掺杂事务管理的代码,只需在配置文件中做相关的事务规则声明(或通过基于@Transactional注解的方式),便可以将事务规则应用到业务逻辑中。
- 编程式事务使用TransactionTemplate或者直接使用底层的PlatformTransactionManager。对于编程式事务管理,spring推荐使用TransactionTemplate。简单来说就是在代码里面加入事务代码
Spring的bean生命周期推荐文章:https://blog.csdn.net/w_linux/article/details/80086950