1.读取所有的xml配置文件(注意,和MyBatis有关的所有配置文件)
1.1主要流程:
去取xml配置文件(包括了mybatis-config.xml和mapper.xml)和注解中的配置信息,创建配置对象(Configuration ,单利的,应用级别的对象),并完成各个模块的初始化工作,(在创建该对象的过程中,使用了建造者模式,关于建造者模式的话,需要在设计模式的工程中详细介绍);
首先我们看看,在创建 SqlSessionFactory 的时候,创建了创建配置对象(Configuration ),我们看下面的代码:
 String path = "mybatis-config.xml";
 InputStream stream = Resources.getResourceAsStream(path);
 // 1.读取mybatis配置文件创SqlSessionFactory
 sqlSessionFactory = new SqlSessionFactoryBuilder().build(stream);
new SqlSessionFactoryBuilder()根据名字我们可以看出来,已经在使用建造者模式了,这不是我们关注的重点,下面我们键入到sqlSessionFactory 的build(stream)方法;
public SqlSessionFactory build(InputStream inputStream) {
    return build(inputStream, null, null);
}

我们只看主流程,没用的就先删掉了
public SqlSessionFactory build(InputStream inputStream, String environment, Properties properties) {
  try {
XMLConfigBuilder parser = new XMLConfigBuilder(inputStream, environment, properties);//读取配置文件
return build(parser.parse());//解析配置文件得到configuration对象,并返回SqlSessionFactory
  } catch (Exception e) {
  } finally {
    ErrorContext.instance().reset();
    try {inputStream.close();} catch (IOException e) {}
  }
}
1.2 下面我们进入XMLConfigBuilder解析流程:
下面我们开始看 build()方法 中的 parser.parse()
public class XMLConfigBuilder extends BaseBuilder {

  public Configuration parse() {
    if (parsed) {
      throw new BuilderException("Each XMLConfigBuilder can only be used once.");
    }
    parsed = true;
    parseConfiguration(parser.evalNode("/configuration"));
    return configuration;
  }

private void parseConfiguration(XNode root) {
  try {
    //issue #117 read properties first
   //解析<properties>节点
    propertiesElement(root.evalNode("properties"));
    //解析<settings>节点
    Properties settings = settingsAsProperties(root.evalNode("settings"));
    loadCustomVfs(settings);
    //解析<typeAliases>节点
    typeAliasesElement(root.evalNode("typeAliases"));
    //解析<plugins>节点
    pluginElement(root.evalNode("plugins"));
    //解析<objectFactory>节点
    objectFactoryElement(root.evalNode("objectFactory"));
    //解析<objectWrapperFactory>节点
    objectWrapperFactoryElement(root.evalNode("objectWrapperFactory"));
    //解析<reflectorFactory>节点
    reflectorFactoryElement(root.evalNode("reflectorFactory"));
    settingsElement(settings);//将settings填充到configuration
    // read it after objectFactory and objectWrapperFactory issue #631
    //解析<environments>节点
    environmentsElement(root.evalNode("environments"));
    //解析<databaseIdProvider>节点
    databaseIdProviderElement(root.evalNode("databaseIdProvider"));
    //解析<typeHandlers>节点
    typeHandlerElement(root.evalNode("typeHandlers"));
    //解析<mappers>节点
    mapperElement(root.evalNode("mappers"));
  } catch (Exception e) {
    throw new BuilderException("Error parsing SQL Mapper Configuration. Cause: " + e, e);
  }
}
}
为了快速了解,我们先看关键部分的解析,
1.2.1.我们先看一下settings的解析:
1.1 我们先看一下Properties settings = settingsAsProperties(root.evalNode("settings"));
这里只是得到了解析,但是真正做解析的是下面的方法:
settingsElement(settings);//将settings填充到configuration
private Properties settingsAsProperties(XNode context) {
    if (context == null) {
      return new Properties();
    }
   //解析配置文件中settings节点中信息到props中
    Properties props = context.getChildrenAsProperties();
    // Check that all settings are known to the configuration class(意思是为了校验settings中的配置,是不是在Configuartion中定义的)
    MetaClass metaConfig = MetaClass.forClass(Configuration.class, localReflectorFactory);
    for (Object key : props.keySet()) {
      if (!metaConfig.hasSetter(String.valueOf(key))) {
        throw new BuilderException("The setting " + key + " is not known.  Make sure you spelled it correctly (case sensitive).");
      }
    }
    return props;
  }
1.2 loadCustomVfs(settings);该方法是为了校验


private void loadCustomVfs(Properties props) throws ClassNotFoundException {
    String value = props.getProperty("vfsImpl");
    if (value != null) {
      String[] clazzes = value.split(",");
      for (String clazz : clazzes) {
        if (!clazz.isEmpty()) {
          @SuppressWarnings("unchecked")
          Class<? extends VFS> vfsImpl = (Class<? extends VFS>)Resources.classForName(clazz);
          configuration.setVfsImpl(vfsImpl);
        }
      }
    }
  }
1.3 loadCustomLogImpl(settings);;该方法和上面的一样,也是为了加载扩展信息
private void loadCustomLogImpl(Properties props) {
    Class<? extends Log> logImpl = resolveClass(props.getProperty("logImpl"));
    configuration.setLogImpl(logImpl);
  }
2.下面我们看看解析typeAliases(别名定义)节点
  private void typeAliasesElement(XNode parent) {
    if (parent != null) {
      for (XNode child : parent.getChildren()) {//根据这里的循环,我们可以看出来,package是可以配置多个的
        if ("package".equals(child.getName())) {
          String typeAliasPackage = child.getStringAttribute("name");
          configuration.getTypeAliasRegistry().registerAliases(typeAliasPackage);
        } else {
          String alias = child.getStringAttribute("alias");
          String type = child.getStringAttribute("type");
          try {
            Class<?> clazz = Resources.classForName(type);
            if (alias == null) {
              typeAliasRegistry.registerAlias(clazz);
            } else {
              typeAliasRegistry.registerAlias(alias, clazz);
            }
          } catch (ClassNotFoundException e) {
            throw new BuilderException("Error registering typeAlias for '" + alias + "'. Cause: " + e, e);
          }
        }
      }
    }
  }

几点下来我们看看嫩红的方法是怎么做的:TypeAliasRegistry.registerAliases(java.lang.String)
public void registerAliases(String packageName){
  registerAliases(packageName, Object.class);
}
我们在看registerAliases方法的具体解释
public void registerAliases(String packageName, Class<?> superType){
  ResolverUtil<Class<?>> resolverUtil = new ResolverUtil<>();
  //找到packageName下面的所有类,返回
  resolverUtil.find(new ResolverUtil.IsA(superType), packageName);
  Set<Class<? extends Class<?>>> typeSet = resolverUtil.getClasses();
  for(Class<?> type : typeSet){
    // Ignore inner classes and interfaces (including package-info.java)
    // Skip also inner classes. See issue #6
    if (!type.isAnonymousClass() && !type.isInterface() && !type.isMemberClass()) {
      //关键的还是这个方法,这个方法的作用就是将上面的到的类信息对应到别名
      //最终存储的是在Map里面,key:类名 , value: bean对象的全路径名称
      registerAlias(type);
    }
  }
}
经过看代码,我们可以看到,这里的配置还可以有两种的配置情况使用,下面我们看代码
第一种情况:
<typeAliases>
     <!-- type指的是javabean的完全限定名   alias就是指代别名-->
     <typeAlias alias="student" type="cn.entity.Student" />
</typeAliases>
第二种情况:
<!-- 别名定义 -->
<typeAliases>
    <typeAlias  type="com.lgm.mybatis.model.PageAccessURL" />
</typeAliases>
3.我们在看一下这个信息environmentsElement(root.evalNode("environments")); 数据源信息加载
<!--配置environment环境 -->
    <environments default="development">
        <!-- 环境配置1,每个SqlSessionFactory对应一个环境 -->
        <environment id="development">
            <transactionManager type="JDBC" />
            <dataSource type="UNPOOLED">
                <property name="driver" value="${jdbc_driver}" />
                <property name="url" value="${jdbc_url}" />
                <property name="username" value="${jdbc_username}" />
                <property name="password" value="${jdbc_password}" />
            </dataSource>
        </environment>

    </environments>
  private void environmentsElement(XNode context) throws Exception {
    if (context != null) {
      if (environment == null) {
        environment = context.getStringAttribute("default");
      }
      //通过这里我们可看到,数据源信息也是可以多个的,但是每个名字(id)必粗要是不一样的
      for (XNode child : context.getChildren()) {
        String id = child.getStringAttribute("id");
        if (isSpecifiedEnvironment(id)) {
          TransactionFactory txFactory = transactionManagerElement(child.evalNode("transactionManager"));
          DataSourceFactory dsFactory = dataSourceElement(child.evalNode("dataSource"));
          DataSource dataSource = dsFactory.getDataSource();
          Environment.Builder environmentBuilder = new Environment.Builder(id)
              .transactionFactory(txFactory)
              .dataSource(dataSource);
          configuration.setEnvironment(environmentBuilder.build());
        }
      }
    }
  }
我们需要注意的是,在配置事物的时候 transactionManager 参数,有两种情况:在Mybatis里面支持两种配置:JDBC和MANAGED。
这两种事务管理器的区别:
JDBC:这个配置就是直接使用了 JDBC 的提交和回滚设置,它依赖于从数据源得到的连接来管理事务作用域。
MANAGED:这个配置几乎没做什么。它从来不提交或回滚一个连接,而是让容器来管理事务的整个生命周期(比如 JEE 应用服务器的上下文)。 默认情况下它会关闭连接,然而一些容器并不希望这样,因此需要将 closeConnection 属性设置为 false 来阻止它默认的关闭行为
我们在看 dataSource 参数也是有多种配置的:
(1)UNPOOLED
这个数据源的实现只是每次被请求时打开和关闭连接。虽然一点慢,它对在及时可用连接方面没有性能要求的简单应用程序是一个很好的选择。 不同的数据库在这方面表现也是不一样的,所以对某些数据库来说使用连接池并不重要,这个配置也是理想的。
UNPOOLED 类型的数据源仅仅需要配置以下 5 种属性:
driver : 这是 JDBC 驱动的 Java 类的完全限定名(并不是JDBC驱动中可能包含的数据源类)。
url :这是数据库的 JDBC URL 地址。
username : 登录数据库的用户名。
password :登录数据库的密码。
defaultTransactionIsolationLevel : 默认的连接事务隔离级别。
作为可选项,你也可以传递属性给数据库驱动。要这样做,属性的前缀为“driver.”,例如:
driver.encoding=UTF8
这将通过DriverManager.getConnection(url,driverProperties)方法传递值为 UTF8 的 encoding 属性给数据库驱动。
(2)POOLED
这种数据源的实现利用“池”的概念将 JDBC 连接对象组织起来,避免了创建新的连接实例时所必需的初始化和认证时间。 这是一种使得并发 Web 应用快速响应请求的流行处理方式。
除了上述提到 UNPOOLED 下的属性外,会有更多属性用来配置 POOLED 的数据源:
poolMaximumActiveConnections : 在任意时间可以存在的活动(也就是正在使用)连接数量,默认值:10
poolMaximumIdleConnections :任意时间可能存在的空闲连接数。
poolMaximumCheckoutTime :在被强制返回之前,池中连接被检出(checked out)时间,默认值:20000 毫秒(即 20 秒)
poolTimeToWait :这是一个底层设置,如果获取连接花费的相当长的时间,它会给连接池打印状态日志并重新尝试获取一个连接(避免在误配置的情况下一直安静的失败),默认值:20000 毫秒(即 20 秒)。
poolPingQuery : 发送到数据库的侦测查询,用来检验连接是否处在正常工作秩序中并准备接受请求。默认是“NO PING QUERY SET”,这会导致多数数据库驱动失败时带有一个恰当的错误消息。
poolPingEnabled : 是否启用侦测查询。若开启,也必须使用一个可执行的 SQL 语句设置 poolPingQuery 属性(最好是一个非常快的 SQL),默认值:false。poolPingConnectionsNotUsedFor : 配置 poolPingQuery 的使用频度。这可以被设置成匹配具体的数据库连接超时时间,来避免不必要的侦测,默认值:0(即所有连接每一时刻都被侦测 — 当然仅当 poolPingEnabled 为 true 时适用)。
(3)JNDI
这个数据源的实现是为了能在如 EJB 或应用服务器这类容器中使用,容器可以集中或在外部配置数据源,然后放置一个 JNDI 上下文的引用。这种数据源配置只需要两个属性:
initial_context : 这个属性用来在 InitialContext 中寻找上下文(即,initialContext.lookup(initial_context))。这是个可选属性,如果忽略,那么 data_source 属性将会直接从 InitialContext 中寻找。
data_source : 这是引用数据源实例位置的上下文的路径。提供了 initial_context 配置时会在其返回的上下文中进行查找,没有提供时则直接在 InitialContext 中查找。
和其他数据源配置类似,可以通过添加前缀“env.”直接把属性传递给初始上下文。比如:
env.encoding=UTF8
这就会在初始上下文(InitialContext)实例化时往它的构造方法传递值为 UTF8 的 encoding 属性。
4.配置文件中还有一个配置是:typeHandlers :TypeHandler,类型转换器,在mybatis中用于实现java类型和JDBC类型的相互转换,相当于 TypeHandlerRegister类;
5.下面我们再看看 mappers(映射文件,mapper的配置文件) 节点下面的信息解析:
第一种:可以是xml文件的详细具体路径
<!-- 映射文件,mapper的配置文件 -->
<mappers>
    <!--直接映射到相应的mapper文件 -->
    <mapper resource="sqlmapper/TuserMapper.xml" />
    <mapper resource="sqlmapper/TPositionMapper.xml" />
</mappers>

第二种:这种引入方式相当于批量引入一个包下的所有映射器
<mappers>
        <package name="com.daily.mapper"/>
</mappers>

第三种:用类注册引入(这样还真用的少)
<mappers>
        <mapper class="com.daily.mapper.UserMapper" />
        <mapper class="com.daily.mapper.ProductMapper" />
        <mapper class="com.daily.mapper.BlogMapper" />
</mappers>
第四种:使用URL方式引入
<mappers>
        <mapper url="xml文件访问URL" />
</mappers>
下面我们看具体源码解析:
类:XMLConfigBuilder
方法:mapperElement(root.evalNode("mappers"));
方法的具体情况:
  private void mapperElement(XNode parent) throws Exception {
    if (parent != null) {
      for (XNode child : parent.getChildren()) {
        if ("package".equals(child.getName())) {
          String mapperPackage = child.getStringAttribute("name");
          configuration.addMappers(mapperPackage);
        } else {
          //如果不是package的情况下,resources,url,class 是只允许有一种配置信息存在
          String resource = child.getStringAttribute("resource");
          String url = child.getStringAttribute("url");
          String mapperClass = child.getStringAttribute("class");
          if (resource != null && url == null && mapperClass == null) {
            ErrorContext.instance().resource(resource);
            InputStream inputStream = Resources.getResourceAsStream(resource);
            XMLMapperBuilder mapperParser = new XMLMapperBuilder(inputStream, configuration, resource, configuration.getSqlFragments());
        //在解析mapper信息的时候,我们看见,就需要到 XMLMapperBuilder 类里面解析了;
            mapperParser.parse();
          } else if (resource == null && url != null && mapperClass == null) {
            ErrorContext.instance().resource(url);
            InputStream inputStream = Resources.getUrlAsStream(url);
            XMLMapperBuilder mapperParser = new XMLMapperBuilder(inputStream, configuration, url, configuration.getSqlFragments());
            mapperParser.parse();
          } else if (resource == null && url == null && mapperClass != null) {
            Class<?> mapperInterface = Resources.classForName(mapperClass);
            configuration.addMapper(mapperInterface);
          } else {
            throw new BuilderException("A mapper element may only specify a url, resource or class, but not more than one.");
          }
        }
      }
    }
  }
下面进入到 类 XMLMapperBuilder 进行分析
public void parse() {
     //注意传递过来的是resurce对象,是具体的mapper.xml文件
    if (!configuration.isResourceLoaded(resource)) {
      configurationElement(parser.evalNode("/mapper"));
      configuration.addLoadedResource(resource);
      bindMapperForNamespace();
    }
//这里开始的就是解析mapper.xml 配置文件信息了
private void configurationElement(XNode context) {
    try {
        //获取mapper节点的namespace属性
      String namespace = context.getStringAttribute("namespace");
      if (namespace == null || namespace.equals("")) {
        throw new BuilderException("Mapper's namespace cannot be empty");
      }
      //设置builderAssistant的namespace属性
      builderAssistant.setCurrentNamespace(namespace);
      //解析cache-ref节点
      cacheRefElement(context.evalNode("cache-ref"));
      //重点分析 :解析cache节点----------------1-------------------
      cacheElement(context.evalNode("cache"));
      //解析parameterMap节点(已废弃)
      parameterMapElement(context.evalNodes("/mapper/parameterMap"));
      //重点分析 :解析resultMap节点(基于数据结果去理解)----------------2-------------------
      resultMapElements(context.evalNodes("/mapper/resultMap"));
      //解析sql节点
      sqlElement(context.evalNodes("/mapper/sql"));
      //重点分析 :解析select、insert、update、delete节点 ----------------3-------------------
      buildStatementFromContext(context.evalNodes("select|insert|update|delete"));
    } catch (Exception e) {
      throw new BuilderException("Error parsing Mapper XML. The XML location is '" + resource + "'. Cause: " + e, e);
    }
  }
看到上面的加粗的那个代码,是将 namespace 放到了 builderAssistant 里面,这个对象针对这个 XMLMapperBuilder 对象,还是很重要的,我们看一下这个类是做了什么吧
public class MapperBuilderAssistant extends BaseBuilder {
  private String currentNamespace;
  private final String resource;
  private Cache currentCache;
  private boolean unresolvedCacheRef; // issue #676
}
下面我们先看看的是(我们会看到缓存的加载完美的解释了建造者模式和装饰着模式的情况)
//重点分析 :解析cache节点
cacheElement(context.evalNode("cache"));
  private void cacheElement(XNode context) throws Exception {
    if (context != null) {
      //获取cache节点的type属性,默认为PERPETUAL(也就是缓存的默认使用类PerpetualCache.java)
      String type = context.getStringAttribute("type", "PERPETUAL");
      //找到type对应的cache接口的实现
      Class<? extends Cache> typeClass = typeAliasRegistry.resolveAlias(type);
      //读取eviction属性,既缓存的淘汰策略,默认LRU
      String eviction = context.getStringAttribute("eviction", "LRU");
      //根据eviction属性,找到装饰器
      Class<? extends Cache> evictionClass = typeAliasRegistry.resolveAlias(eviction);
      //读取flushInterval属性,既缓存的刷新周期
      Long flushInterval = context.getLongAttribute("flushInterval");
      //读取size属性,既缓存的容量大小
      Integer size = context.getIntAttribute("size");
     //读取readOnly属性,既缓存的是否只读
      boolean readWrite = !context.getBooleanAttribute("readOnly", false);
      //读取blocking属性,既缓存的是否阻塞
      boolean blocking = context.getBooleanAttribute("blocking", false);
      Properties props = context.getChildrenAsProperties();
      //通过builderAssistant创建缓存对象,并添加至configuration
      builderAssistant.useNewCache(typeClass, evictionClass, flushInterval, size, readWrite, blocking, props);
    }
  }
我们关于以下黑色的字体的信息:
 //通过 builderAssistant 创建缓存对象,并添加至configuration
  public Cache useNewCache(Class<? extends Cache> typeClass,
      Class<? extends Cache> evictionClass,
      Long flushInterval,
      Integer size,
      boolean readWrite,
      boolean blocking,
      Properties props) {
    //经典的建造起模式,创建一个cache对象
    Cache cache = new CacheBuilder(currentNamespace)
        .implementation(valueOrDefault(typeClass, PerpetualCache.class))
        .addDecorator(valueOrDefault(evictionClass, LruCache.class))
        .clearInterval(flushInterval)
        .size(size)
        .readWrite(readWrite)
        .blocking(blocking)
        .properties(props)
        .build();
    //将缓存添加至configuration,注意二级缓存以命名空间为单位进行划分
    configuration.addCache(cache);
    currentCache = cache;
    return cache;
  }
看一下buile() 方法的创建情况,这才是装饰器的关键体现
  public Cache build() {
      //设置缓存的主实现类为PerpetualCache
    setDefaultImplementations();
    //通过反射实例化PerpetualCache对象
    Cache cache = newBaseCacheInstance(implementation, id);
    setCacheProperties(cache);//根据cache节点下的<property>信息,初始化cache
    // issue #352, do not apply decorators to custom caches

    if (PerpetualCache.class.equals(cache.getClass())) {//如果cache是PerpetualCache的实现,则为其添加标准的装饰器
      for (Class<? extends Cache> decorator : decorators) {//为cache对象添加装饰器,这里主要处理缓存清空策略的装饰器
        cache = newCacheDecoratorInstance(decorator, cache);
        setCacheProperties(cache);
      }
      //通过一些属性为cache对象添加装饰器
      cache = setStandardDecorators(cache);
    } else if (!LoggingCache.class.isAssignableFrom(cache.getClass())) {
      //如果cache不是PerpetualCache的实现,则为其添加日志的能力
      cache = new LoggingCache(cache);
    }
    return cache;
  }
下面我们退回去,看解析ResultMap节点的过程
resultMapElements(context.evalNodes("/mapper/resultMap"));
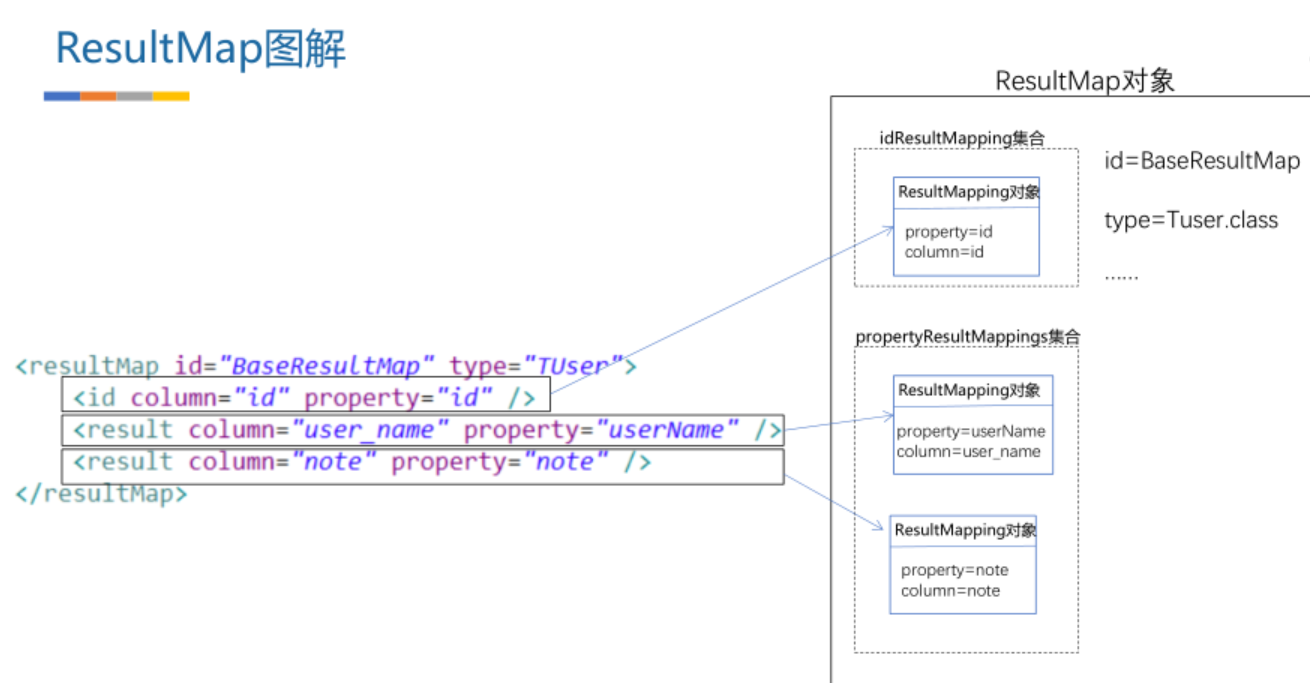
//解析resultMap节点,实际就是解析sql查询的字段与pojo属性之间的转化规则
  private void resultMapElements(List<XNode> list) throws Exception {
    //遍历所有的resultmap节点
    for (XNode resultMapNode : list) {
      try {
         //解析具体某一个resultMap节点
        resultMapElement(resultMapNode);
      } catch (IncompleteElementException e) {
        // ignore, it will be retried
      }
    }
  }

private ResultMap resultMapElement(XNode resultMapNode) throws Exception {
    return resultMapElement(resultMapNode, Collections.<ResultMapping> emptyList());
  }

 private ResultMap resultMapElement(XNode resultMapNode, List<ResultMapping> additionalResultMappings) throws Exception {
    ErrorContext.instance().activity("processing " + resultMapNode.getValueBasedIdentifier());
    //获取resultmap节点的id属性
    String id = resultMapNode.getStringAttribute("id",
        resultMapNode.getValueBasedIdentifier());
    //获取resultmap节点的type属性
    String type = resultMapNode.getStringAttribute("type",
        resultMapNode.getStringAttribute("ofType",
            resultMapNode.getStringAttribute("resultType",
                resultMapNode.getStringAttribute("javaType"))));
    //获取resultmap节点的extends属性,描述继承关系
    String extend = resultMapNode.getStringAttribute("extends");
    //获取resultmap节点的autoMapping属性,是否开启自动映射
    Boolean autoMapping = resultMapNode.getBooleanAttribute("autoMapping");
    //从别名注册中心获取entity的class对象
    Class<?> typeClass = resolveClass(type);
    Discriminator discriminator = null;
    //记录子节点中的映射结果集合
    List<ResultMapping> resultMappings = new ArrayList<>();
    resultMappings.addAll(additionalResultMappings);
    //从xml文件中获取当前resultmap中的所有子节点,并开始遍历
    List<XNode> resultChildren = resultMapNode.getChildren();
    for (XNode resultChild : resultChildren) {
      if ("constructor".equals(resultChild.getName())) {//处理<constructor>节点
        processConstructorElement(resultChild, typeClass, resultMappings);
      } else if ("discriminator".equals(resultChild.getName())) {//处理<discriminator>节点
        discriminator = processDiscriminatorElement(resultChild, typeClass, resultMappings);
      } else {//处理<id> <result> <association> <collection>节点
        List<ResultFlag> flags = new ArrayList<>();
        if ("id".equals(resultChild.getName())) {
          flags.add(ResultFlag.ID);//如果是id节点,向flags中添加元素
        }
        //创建ResultMapping对象并加入resultMappings集合中
        resultMappings.add(buildResultMappingFromContext(resultChild, typeClass, flags));
      }
    }
    //实例化resultMap解析器
    ResultMapResolver resultMapResolver = new ResultMapResolver(builderAssistant, id, typeClass, extend, discriminator, resultMappings, autoMapping);
    try {
      //通过resultMap解析器实例化resultMap并将其注册到configuration对象
      return resultMapResolver.resolve();
    } catch (IncompleteElementException  e) {
      configuration.addIncompleteResultMap(resultMapResolver);
      throw e;
    }
  }
下面我们老看一下,Configuration 里面包含了ResultMap对象,ResultMap又有两个List对象,包含的都是ResultMaping对象,我们可以看看
public class ResultMap {
  private Configuration configuration;//configuration对象

  private String id;//resultMap的id属性
  private Class<?> type;//resultMap的type属性
  private List<ResultMapping> resultMappings;//除discriminator节点之外的映射关系
  private List<ResultMapping> idResultMappings;//记录ID或者<constructor>中idArg的映射关系
  private List<ResultMapping> constructorResultMappings;////记录<constructor>标志的映射关系
  private List<ResultMapping> propertyResultMappings;//记录非<constructor>标志的映射关系
  private Set<String> mappedColumns;//记录所有有映射关系的columns字段
  private Set<String> mappedProperties;//记录所有有映射关系的property字段
  private Discriminator discriminator;//鉴别器,对应discriminator节点
  private boolean hasNestedResultMaps;//是否有嵌套结果映射
  private boolean hasNestedQueries;////是否有嵌套查询
  private Boolean autoMapping;//是否开启了自动映射
}

public class ResultMapping {

  private Configuration configuration;//引用的configuration对象
  private String property;//对应节点的property属性
  private String column;//对应节点的column属性
  private Class<?> javaType;//对应节点的javaType属性
  private JdbcType jdbcType;//对应节点的jdbcType属性
  private TypeHandler<?> typeHandler;//对应节点的typeHandler属性
  private String nestedResultMapId;////对应节点的resultMap属性,嵌套结果时使用
  private String nestedQueryId;////对应节点的select属性,嵌套查询时使用
  private Set<String> notNullColumns;//对应节点的notNullColumn属性
  private String columnPrefix;//对应节点的columnPrefix属性
  private List<ResultFlag> flags;//标志,id 或者 constructor
  private List<ResultMapping> composites;
  private String resultSet;//对应节点的resultSet属性
  private String foreignColumn;//对应节点的foreignColumn属性
  private boolean lazy;//对应节点的fetchType属性,是否延迟加载
}
从结构上我们可以看出的是,ResultMapping,其实就是resultMap里面的每一行属性,包括了id节点和 result节点
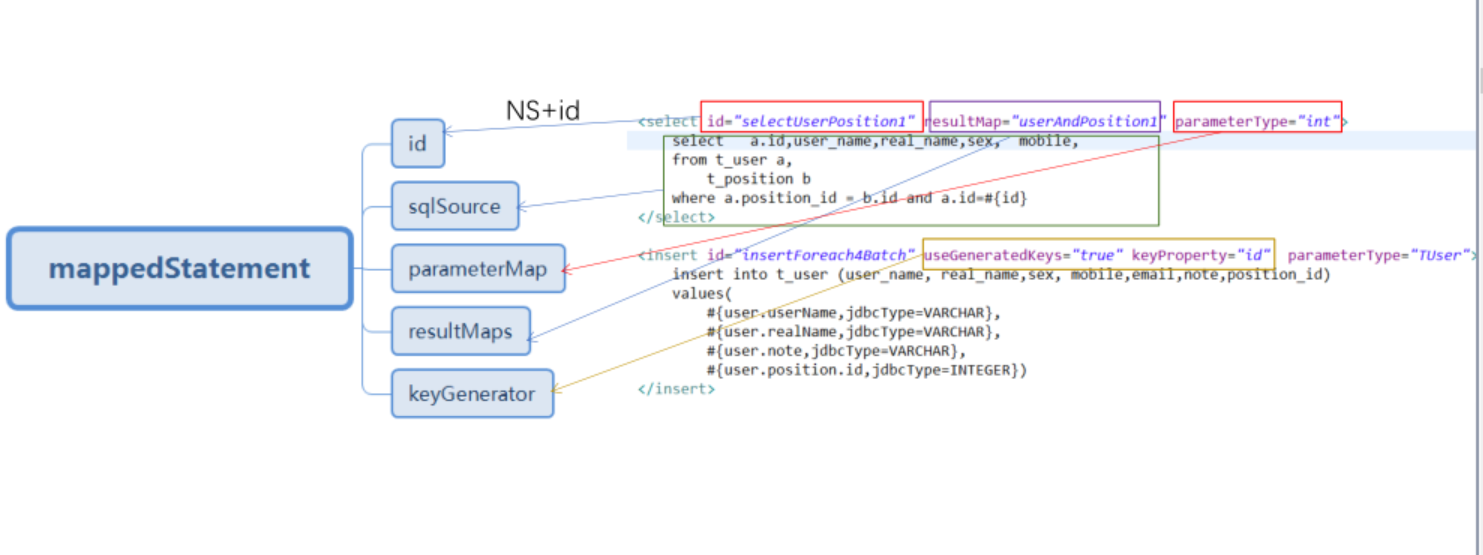
最后我们看一看解析sql语句的过程(这里会创建了对象MappedStatement,这个对象里面创建的包含了重要的对象是sqlSources,保存的是sql语句的信息):
buildStatementFromContext(context.evalNodes("select|insert|update|delete"));

//解析select、insert、update、delete节点
  private void buildStatementFromContext(List<XNode> list) {
    if (configuration.getDatabaseId() != null) {
      buildStatementFromContext(list, configuration.getDatabaseId());
    }
    buildStatementFromContext(list, null);
  }

private void buildStatementFromContext(List<XNode> list, String requiredDatabaseId) {
    for (XNode context : list) {
      //创建XMLStatementBuilder 专门用于解析sql语句节点
      final XMLStatementBuilder statementParser = new XMLStatementBuilder(configuration, builderAssistant, context, requiredDatabaseId);
      try {
        //解析sql语句节点
        statementParser.parseStatementNode();//这里面会创建
      } catch (IncompleteElementException e) {
        configuration.addIncompleteStatement(statementParser);
      }
    }
  }
映射器的关键类
Configuration : Mybatis启动初始化的核心就是将所有xml配置文件信息加载到Configuration对象
中, Configuration是单例的,生命周期是应用级的;
MapperRegistry:mapper接口动态代理工厂类的注册中心。在MyBatis中,通过mapperProxy实现
InvocationHandler接口,MapperProxyFactory用于生成动态代理的实例对象;
ResultMap:用于解析mapper.xml文件中的resultMap节点,使用ResultMapping来封装id,result等
子元素;
MappedStatement:用于存储mapper.xml文件中的select、insert、update和delete节点,同时还包
含了这些节点的很多重要属性;
SqlSource:mapper.xml文件中的sql语句会被解析成SqlSource对象,经过解析SqlSource包含的语
句最终仅仅包含?占位符,可以直接提交给数据库执行;
疑问点:mybatis是怎么保证缓存贯穿的?
myabtis中MetaClass的具体作用