网络爬虫概述
网络爬虫的分类
网络爬虫大致可以分为通用网络爬虫、聚焦网络爬虫、增量式网络爬虫、深层网络爬虫等。
- 通用网络爬虫
比如搜索引擎 - 聚焦爬虫
是一个自动下载网页的程序,他根据既定的抓取目标,有选择的访问万维网上的网页和相关的链接,获取所需要的信息。 - 增量式爬虫
是指对已经下载网页采取增量式更新和只爬取新产生的或者已经发生变化网页的爬虫,它能保证在一定程度上爬取的网页尽可能新。 - 深层网络爬虫
是爬取那些大部分内容不能通过静态链接获取的、隐藏在搜索表单后的,只有用户提交一些关键词才能获得Web网页。
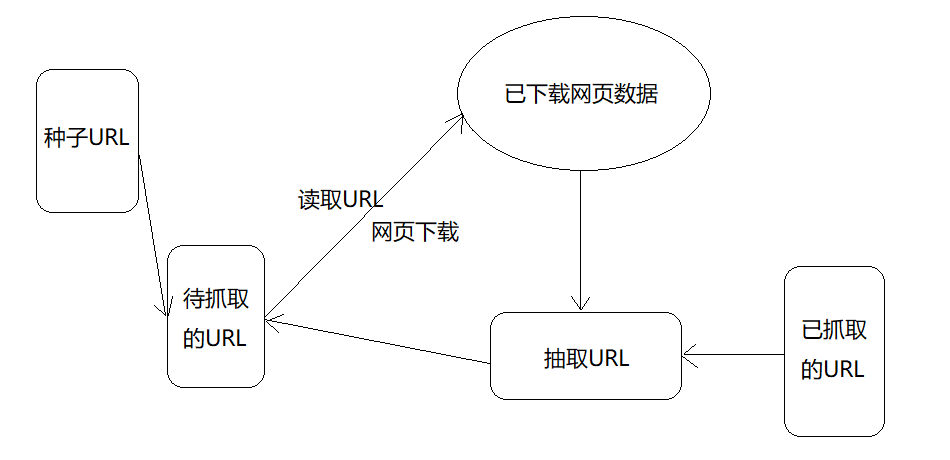
网络爬虫的结构
HTTP请求的Python实现
Requests实现
Requests库是第三方模块,需要额外进行安装。有两种安装方式:
- 使用pip安装:pip install requests
- 直接到githu下载源代码:http://github.com/kennethreitz/requests/releases 解压后运行setup.py文件即可。
一、实现一个完整的请求和响应模型
Get请求:
import requests
r = requests.get('http://www.baidu.com')
print r.content
Post请求:
import requests
postdata = {'key':'value'}
r = requests.post('http://www.xxxxxxxx.com/login',data=postdata)
print r.content
带参的Get请求
import requests
# 方式一:
r = requests.get('http://zzk.cnblogs.com/s/blogpost?Keywords=python&pageindex=1')
# 方式二:
payload = {'Keywords':'python','pageindex':1}
r = requests.get('http://zzk.cnblogs.com/s/blogpost',params=payload)
print r.url
print r.content
二、响应和编码
import requests
r = requests.get('http://www.baidu.com')
print 'content-->' + r.content
print 'text-->' + r.text
print 'encoding-->' + r.encoding
r.content返回的是字节形式
r.text返回的是文本形式
r.encoding返回的是根据HTTP头猜测的网页编码格式
可以看到r.encoding返回的是ISO-8859-1,而实际编码是UTF-8,导致r.text返回的内容存在乱码,
这里可以手动设置r.encoding='utf-8'来解决,也可以使用chardet这个字符串/文件编码检测模块来解决。
chardet.detect()返回字典,其中confidence是检测精确度,encoding是编码形式。
# coding=utf8
import requests
import chardet
r = requests.get('http://www.baidu.com')
r.encoding = chardet.detect(r.content)['encoding']
print r.text
除了上面直接获取全部响应的方式,还有一种流模式:
import requests
r = requests.get('http://www.baidu.com',stream=True)
print r.raw.read(100) # read函数指定读取的字节数
三、请求头headers处理
在Requests的get函数中添加headers参数即可。
# encoding:utf-8
import requests
user_agent = 'Mozilla/5.0 (Windows NT 10.0; Win64; x64)'
headers={'User-Agent':user_agent}
r = requests.get('https://www.cnblogs.com/',headers=headers)
print r.content
四、响应码code和响应头headers处理
使用status_code字段获取响应码
使用headers字段获取响应头
# encoding:utf-8
import requests
r = requests.get('https://www.baidu.com/')
if r.status_code==requests.codes.ok:
    print r.status_code #响应码
    print r.headers #响应头
    print r.headers.get('Content-Type') #推荐方式,获取其中某个字段,若字段不存在则返回None
#     print r.headers['context-type'] #不推荐,若字段不存在则抛异常
else:
    r.raise_for_status() #当响应码为4xx或5xx时,抛异常,为200时,返回None
五、Cookie处理
如果响应中包含Cookie的值,可以如下方式获取Cookie字段的值:
# encoding:utf-8
import requests
user_agent = 'Mozilla/4.0(compatible; MSIE 5.5; Windows NT)'
headers={'User-Agent':user_agent}
r = requests.get('https://www.cnblogs.com/',headers=headers)
# 遍历出所有Cookie字段的值
for cookie in r.cookie.keys():
    print cookie+':'+r.cookies.get(cookie)
如果想自定义Cookie值发送出去,可以使用如下方式:
# encoding:utf-8
import requests
user_agent = 'Mozilla/4.0(compatible; MSIE 5.5; Windows NT)'
headers={'User-Agent':user_agent}
r = requests.get('https://www.cnblogs.com/',headers=headers)
cookies = dict(name='qiye',age='10')
r = requests.get('http://www.baidu.com',headers=headers,cookies=cookies)
print r.text
自动处理Cookie的方式:使用Requests的session:
import requests
loginUrl = 'http://www.xxxxxx.com/login'
s = requests.Session()
# 首先访问登录界面,作为游客,服务器会先分配一个cookie
r = s.get(loginUrl,allow_redirects=True)
datas = {'name':'qiye','password':'qiye'}
# 向登录连接发送post请求,验证成功后游客权限转为会员权限
r = s.post(loginUrl, datas, allow_redirects=True)
print r.text
六、重定向和历史信息
处理重定向只需设置一下allow_redirects字段,设为True则允许重定向,否则不允许。
通过history字段查看历史信息,即访问成功之前的所有请求跳转信息。
七、超时设置
通过timeout字段设置,例如requests.get('http://www.github.com',timeout=2)
八、代理设置
import requests
proxies={
    "http":"http://0.10.1.10:3128",
    "https":"http://10.10.1.10.1080"
    }
requests.get('http://example.org',proxies=proxies)