public class MainActivity extends ActionBarActivity {

	private EditText et_path;
	private TextView tv_result;

	@Override
	protected void onCreate(Bundle savedInstanceState) {
		super.onCreate(savedInstanceState);
		setContentView(R.layout.activity_main);
		//1、获取我们关心的组件
		et_path = findViewById(R.id.et_path);
		tv_result = findViewById(R.id.tv_result);
	}
	public void click(View v) {
		//2.1、获取源代码路径
		String path = et_path.getText().toString().trim();

		try {
			//2.2、创建URL 对象 指定我们要访问的网址
			URL url = new URL(path);

			//2.3、拿HttpUrlConnection对象
			HttpURLConnection connection = (HttpURLConnection) url.openConnection();

			//2.4、设置发送get请求
			connection.setRequestMethod("GET");//get要求大写,默认是get请求你
			//2.5、设置请求的超时时间
			connection.setConnectTimeout(5000);

			//2.6、获取服务器返回的状态码
			int responseCode = connection.getResponseCode();
			//2.7、如果responseCode==200 ,请求成功
			if(responseCode == 200) {
				//2.8、获取服务器返回的数据 是以流的形式返回的,由于流装换为字符串是一个非常常见的操作 索引抽出一个工具类Utils
				InputStream in = connection.getInputStream();

				//2.9、使用定义的工具类来把in转为String
				String text = StringTool.readStram(in);
				//2.9、把流的数据展示到textview上
				tv_result.setText(text);

			}

		} catch (MalformedURLException e) {
			// TODO Auto-generated catch block
			e.printStackTrace();
		} catch (IOException e) {
			// TODO Auto-generated catch block
			e.printStackTrace();
		}
	}

}
     private Handler handler = new Handler() {
		public void handleMessage(android.os.Message msg) {
			tv_result.setText((String)msg.obj);
		};
	};
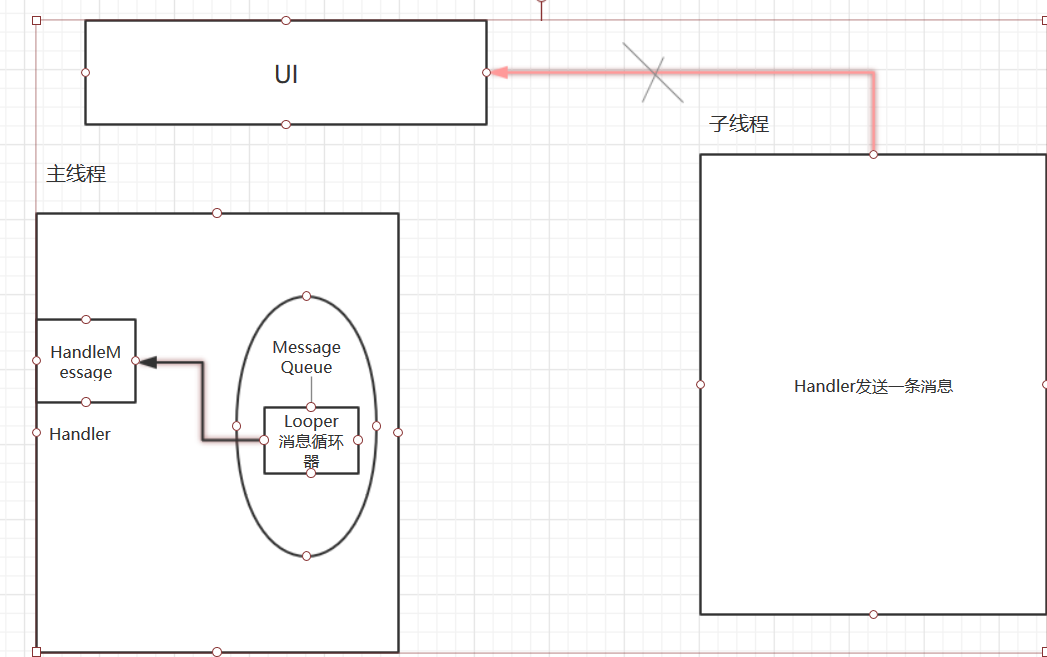
【2】使用Handler 会重写Handler里面的handleMessage 方法(如上述代码)
【3】拿着我在主线程创建的Handler去子线程发消息
handler.sendMessage(msg);
【4】一发消息handleMessage方法就会执行
Handler的作用:是用于发消息和处理消息的
Looper是去消息队列中取消息,取完消息交给Handler,
Looper是在主线程一创建 Looper就有了

4、使用Handler和子线程优化后的联网小应用
public class MainActivity extends ActionBarActivity {

	protected static final int REQUESTSUCCESS = 0;
	protected static final int REQUSETFAILURE = 1;
	protected static final int REQUESTEXCEPTION = 2;
	private EditText et_path;
	private TextView tv_result;

	private Handler handler = new Handler() {
		public void handleMessage(android.os.Message msg) {
			if(msg.what == REQUESTSUCCESS) {
				tv_result.setText((String)msg.obj);
			}else if(msg.what == REQUSETFAILURE){
				Toast.makeText(getApplicationContext(), "请求资源不存在", 1).show();
			}else if(msg.what == REQUESTEXCEPTION){
				Toast.makeText(getApplicationContext(), "服务器忙,请稍后尝试.........", 1).show();
			}
		};
	};


	@Override
	protected void onCreate(Bundle savedInstanceState) {
		super.onCreate(savedInstanceState);
		setContentView(R.layout.activity_main);
		//1、获取我们关心的组件
		et_path = findViewById(R.id.et_path);
		tv_result = findViewById(R.id.tv_result);
	}
	public void click(View v) {
		//2.0、创建一个子线程
		new Thread() {
			public void run() {

				//2.1、获取源代码路径
				String path = et_path.getText().toString().trim();

				try {
					//2.2、创建URL 对象 指定我们要访问的网址
					URL url = new URL(path);

					//2.3、拿HttpUrlConnection对象
					HttpURLConnection connection = (HttpURLConnection) url.openConnection();

					//2.4、设置发送get请求
					connection.setRequestMethod("GET");//get要求大写,默认是get请求你
					//2.5、设置请求的超时时间
					connection.setConnectTimeout(5000);

					//2.6、获取服务器返回的状态码
					int responseCode = connection.getResponseCode();
					//2.7、如果responseCode==200 ,请求成功
					if(responseCode == 200) {
						//2.8、获取服务器返回的数据 是以流的形式返回的,由于流装换为字符串是一个非常常见的操作 索引抽出一个工具类Utils
						InputStream in = connection.getInputStream();

						//2.9、使用定义的工具类来把in转为String
						String text = StringTool.readStram(in);

						//2.9.0、创建Message对象
						Message msg = new Message();
						msg.obj = text;
						msg.what = REQUESTSUCCESS;
						//2.9.1、使用handler
						//发一条消息,消息中有数据,有数据在msg中,handleMessage方法会执行,这个方法在主线程
						handler.sendMessage(msg);
						//2.9、把流的数据展示到textview上,更新UI逻辑
						//tv_result.setText(text);

					}else {
						//请求资源不存在
						//Toast是一view ,不能再子线程展示
						Message msg = new Message();
						msg.what = REQUSETFAILURE;//代表哪条消息
						handler.sendMessage(msg);

					}

				}  catch (Exception e) {

					e.printStackTrace();
					//异常时发送消息
					Message msg = new Message();
					msg.what = REQUESTEXCEPTION;
					handler.sendMessage(msg);
				}
			};


		}.start();;

	}

}
规则:只要是耗时的操作,就开一个子线程,获取数据后想要更新UI 就使用Handler
5、图片查看器
BitFactory类(Creates Bitmap objects from various sources, including files, streams, and byte-arrays.)
static Bitmap |
decodeStream(InputStream is)
Decode an input stream into a bitmap. |
【1】把流信息转换成BitMap对象
【2】BitFactory.decodeStream(inputStream)
【3】记得加上网络访问权限
6、使用cache优化后的代码
public class MainActivity extends ActionBarActivity {

	protected static final int REQUESTSUCCESS = 0;
	protected static final int REQUSETFAILURE = 1;
	protected static final int REQUESTEXCEPTION = 2;
	private EditText et_path;
	private ImageView iv_result;

	private Handler handler = new Handler() {
		public void handleMessage(android.os.Message msg) {
			Bitmap bitmap = (Bitmap) msg.obj;
			iv_result.setImageBitmap(bitmap);
		};
	};


	@Override
	protected void onCreate(Bundle savedInstanceState) {
		super.onCreate(savedInstanceState);
		setContentView(R.layout.activity_main);
		//1、获取我们关心的组件
		et_path = findViewById(R.id.et_path);
		iv_result = findViewById(R.id.iv_result);
	}
	public void click(View v) {


		//创建子线程
		new Thread() {

			@Override
			public void run() {
				//2.1获取访问图片路径
				String path = et_path.getText().toString().trim();


				try {

					File file = new File(getCacheDir(),"test.jpg");
					if(file.exists()&&file.length()>0) {
						//
						System.out.println("使用缓存图片");
						Bitmap bitmap = BitmapFactory.decodeFile(file.getAbsolutePath());
						Message obtain = Message.obtain();
						obtain.obj =  bitmap;
						handler.sendMessage(obtain);

					}else {
						System.out.println("第一次访问");
						//2.2、创建URL对象
						URL url = new URL(path);

						//2.3、获取httpurlconnection

						HttpURLConnection connection = (HttpURLConnection) url.openConnection();

						//2.4、设置请求方式
						connection.setRequestMethod("GET");
						//2.5、设置超时时间
						connection.setConnectTimeout(5000);
						//2.6、获取返回状态码
						int code = connection.getResponseCode();
						if(code == 200) {
							//2.7、获取图片的数据,不管什么数据,都是以流的形式返回
							InputStream in = connection.getInputStream();

							//2.7.1、缓存图片,谷歌提供缓存目录

							FileOutputStream fos = new FileOutputStream(file);
							int len =-1;
							byte[] bytes = new byte[1024];
							while((len = in.read(bytes))!=-1) {
								fos.write(bytes);
							}
							fos.close();
							in.close();

							//2.8、通过位图工厂获取bitmap
							Bitmap bitmap = BitmapFactory.decodeFile(file.getAbsolutePath());
							//Bitmap bitmap = BitmapFactory.decodeStream(in);
							//位图,bitMap
							//更新UI逻辑,找Handler
							Message msg = Message.obtain();//使用Message的静态方法可以减少对象的创建
							msg.obj = bitmap;
							msg.what = REQUESTSUCCESS;
							handler.sendMessage(msg);

						}
					}

				} catch (Exception e) {
					// TODO Auto-generated catch block
					e.printStackTrace();
				}

			}
		}.start();
	}

}
7、cache目录和FileDir区别
重要数据不放在cache中
8、runOnUIThread api介绍
【1】如果仅仅是更新UI 那么就使用runOnUIThread
【2】有时可以根据Handler 携带数据
9、常见消息 API
【1】定时执行某个语句
		new Handler().postDelayed(new Runnable() {

			@Override
			public void run() {
				System.out.println("哈哈哈哈哈哈哈........");

			}
		}, 5000);
	}
Timer也可以实现
void |
schedule(TimerTask task, long delay)
Schedules the specified task for execution after the specified delay. |
【2】3秒后,每隔一秒执行一次,可调用cancel方法取消
		Timer timer = new Timer();
		timer.schedule(new TimerTask() {

			@Override
			public void run() {
				System.out.println("哈哈哈哈哈哈哈哈哈....");
			}
		}, 3000,1000);
【3】Handler和Timer的区别
Handler里面run方法可以更新UI
Timer里面的run方法不能更新UI
10、新闻客户端
【1】UI效果美工制作
【2】应用的传输数据 定义接口
【3】关于xml数据,是服务器开发人员通过一定的技术手段返回 Android开发人员只需解析
11、开源项目smartimageview介绍
【1】把com包拷贝到当前工程
【2】在使用smartimageview时 在布局里面定义 一定包含整个包名+类名
【3】开源项目smartImageView下载网址,https://github.com/Robin-Yang/SmartImageView.git