s1、Android系统的介绍
[1]Linux
[2]函数库层 由C或者C++编写的
[3]Application framework 应用框架层
[4]最上层 应用层
2、jvm与dvm的区别
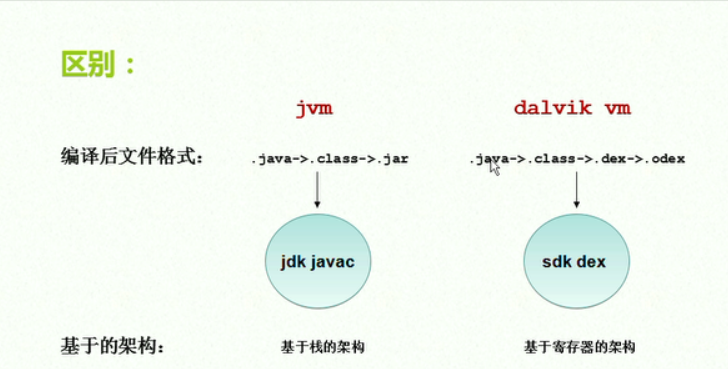
[1]dvm把所有的.class编程了一个dex文件
[2]基于的架构不同
3、art模式
提高手机的运行的效率,存储内存使用大
4、SDKManager介绍
dx.bat 把所有.class文件变成一个.dex
aapt 安卓应用打包工具
adb 安卓调试桥
Intel 生产CPU,主要针对PC机或笔记本
arm 生产标准
mips
5、helloworld介绍
src: 源文件
gen: R文件,通过R文件可以访问一些内容
bin: apk文件
assets: 资产目录
libs: 额外的jar
drawable 存的是Android图片资源
layout 存的是Android布局
values 字符串
Android文件清单: Android中四大组件(Activity broadCastReceiver service ContentProvider) 都需要在清单文件里面配置
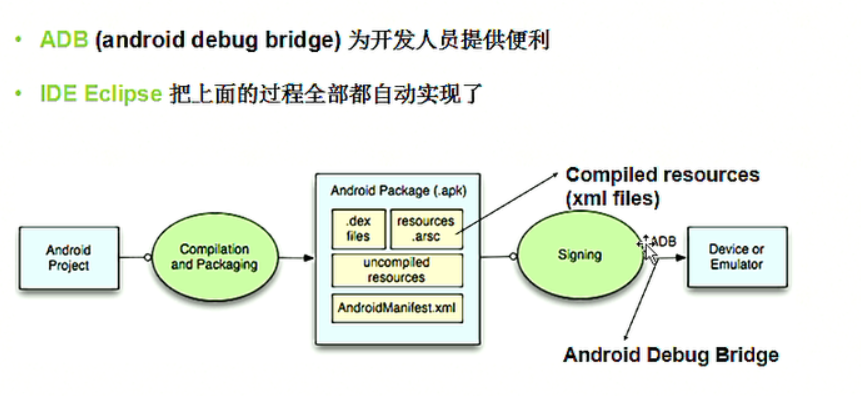
6、Android的打包过程
7、adb常用的指令
adb kill-server 杀死adb服务
adb start-server 启动adb服务
adb install ad.apk 安装ad.apk应用
adb uninstall com.example.helloworld 卸载应用ad,com.example.helloworld为该应用对应的包名
adb shell 进入手机终端
adb push test.txt /mnt/sdcard 把文件test.txt推入虚拟设备
adb pull /mnt/sdcard test.txt 把文件拉到文件拖出电脑
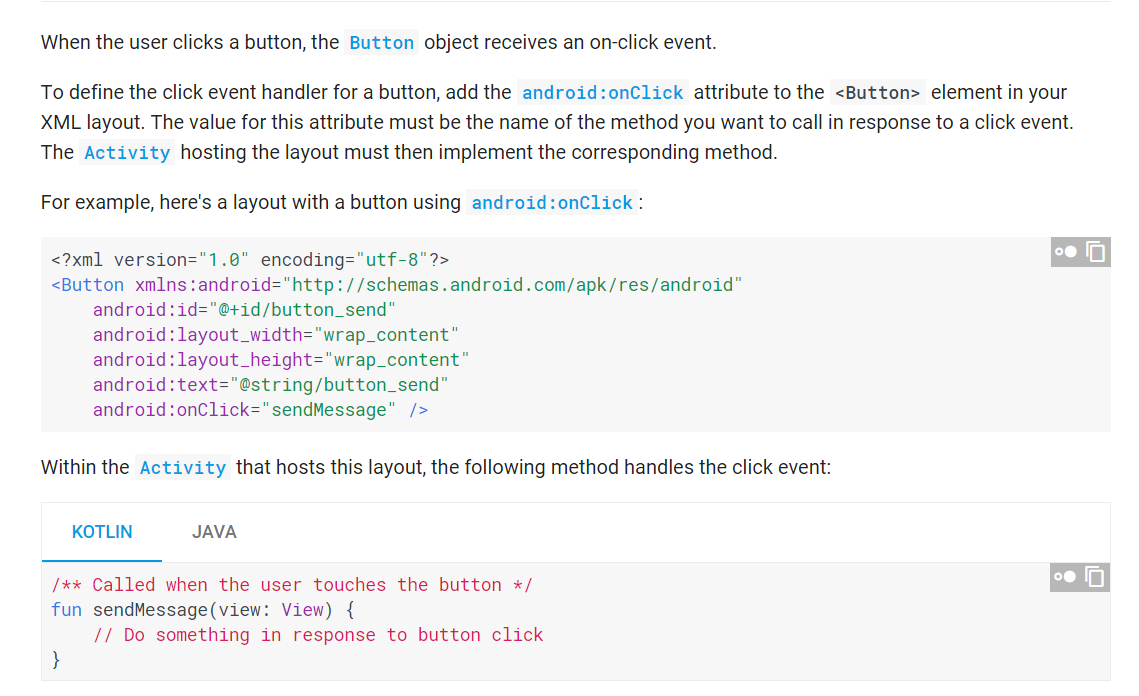
8、按钮的四种点击事件
【1】定义了一个内部类
【2】通过匿名内部类
【3】让当前类实现OnclickListener接口(多个按钮需要被点击的时候)
【4】声明一个方法,方法名与你要点击的这个按钮在布局中声明的Onclick属性一样(适合做一些Demo)
9、Android的五大布局
【1】线性布局
【2】相对布局
【3】帧布局
【4】表格布局
一个tabrow 就代表一行
里面有几个控件就代表有几列
【5】绝对布局
android 的所有控件的首字母都大写
10、Android中的单位
sp : 给textview设置文字大小时
dp : 屏幕适配(即其他)
11、测试的相关概念
【1】好的软件不是开发出来的,是不断测试出来的
【2】
【1】根据是否知道源代码
黑盒:功能测试
白盒:知道源代码,需要写测试代码进行测试
【2】根据测试的粒度
方法测试
单元测试
继承测试
系统测试
【3】根据暴力程度测试
压力 12306
冒烟
谷歌工程师给我们提供了一个monkey + 1000 指令可以进行压力测试
12、单元测试(遇到问题)
13、使用上下文进行获取常见目录(Context类)
getResourse 获取资源目录
getFileDir()
startActivity(Intent intent) 启动意图
| abstractFileInputStream | openFileInput(String name)
Open a private file associated with this Context's application package for reading. |
abstractFileOutputStream |
openFileOutput(String name, int mode)
Open a private file associated with this Context's application package for writing. |
【1】String path = context.getFilesDir().getPath();
【2】使用上下文快速获取文件输入输出流
    fos  = context.openFileOutput("infoo.txt", 0);
    FileInputStream fin = context.openFileInput("infoo.txt");
14、把数据写到sdcard(Environment类)
向sdcard写东西需要Write_External_stortage权限(User Permission)
【1】如何获取SD卡的目录
String path = Environment.getExternalStorageDirectory().getPath();
【2】如何判断SD卡的状态是否可用
if(Environment.MEDIA_MOUNTED.equals(Environment.getExternalStorageState()))
String |
MEDIA_MOUNTED
Storage state if the media is present and mounted at its mount point with read/write access. |
static String |
getExternalStorageState()
Returns the current state of the primary shared/external storage media. |
static String |
getExternalStorageState(File path)
Returns the current state of the shared/external storage media at the given path. |
15、获取SD卡可用空间和总空间大小
		//获取相关组件
		TextView tv_total_size = findViewById(R.id.tv_total);
		TextView tv_Avaliable_size = findViewById(R.id.tv_avaliable);

		//获取sd卡总大小和可用空间
		File file = Environment.getExternalStorageDirectory();
		long totalSpace = file.getTotalSpace();
		long usableSpace = file.getUsableSpace();

		//转换数据格式
		String formatFileSize = Formatter.formatFileSize(this, totalSpace);  //  总
		String formatFileSize2 = Formatter.formatFileSize(this, usableSpace); //  可用

		//展示
		tv_total_size.setText("总大小:  "+formatFileSize);
		tv_Avaliable_size.setText("可用大小:  "+formatFileSize2);
16、文件权限介绍
Linux下的文件权限10位
|
表示文件类型 (-表示文件,d表示文件夹) |
1 | 1 | 1(这三位表示当前用户) | 2 | 2 | 2(当前用户所在的组) | 3 | 3 | 3(其他用户) |
每三位一个表示
r可读(1),w可写(1),x可执行(1),-没有权限(0)
Linux下文件权限修改命令(chmod)
chmod (各个权限的访问权限十进制) 文件名 如:chmod 777 1.txt (修改1.txt的文件权限为-rwxtwxrwx)
17、SharedPreferences 介绍
使用步骤
获取应用的 SharedPreferences 对象
要获取应用的 SharedPreferences 对象,请使用以下两个方法之一:
-
-
getSharedPreferences()- 如果您需要多个按名称(使用第一个参数指定)识别的首选项文件,请使用此方法。getPreferences()- 如果您只需要一个用于 Activity 的首选项文件,请使用此方法。 由于这将是用于 Activity 的唯一首选项文件,因此无需提供名称。
-
要写入值:
- 调用
edit()以获取SharedPreferences.Editor。 - 使用
putBoolean()和putString()等方法添加值。 - 使用
commit()提交新值
- 调用
要读取值,请使用 getBoolean() 和 getString() 等 SharedPreferences 方法。
代码说明
public class Calc extends Activity {
    public static final String PREFS_NAME = "MyPrefsFile";

    @Override
    protected void onCreate(Bundle state){
       super.onCreate(state);
       . . .

       // Restore preferences
       SharedPreferences settings = getSharedPreferences(PREFS_NAME, 0);
       boolean silent = settings.getBoolean("silentMode", false);
       setSilent(silent);
    }

    @Override
    protected void onStop(){
       super.onStop();

      // We need an Editor object to make preference changes.
      // All objects are from android.context.Context
      SharedPreferences settings = getSharedPreferences(PREFS_NAME, 0);
      SharedPreferences.Editor editor = settings.edit();
      editor.putBoolean("silentMode", mSilentMode);

      // Commit the edits!
      editor.commit();
    }
}
18、生成xml的第一种方式
使用xml存储信息,xml结构
<?xml version="1.0" encoding="utf-8"?>
<smss>
    <sms>
        <address>120</address>
        <body>vdedwjgcj</body>
        <date>2019</date>
    </sms>
    <sms>
        <address>130</address>
        <body>vdedwjgcj</body>
        <date>2019</date>
    </sms>
</smss>
	StringBuffer sb = new StringBuffer();
		//开始组拼xml文件头
		sb.append("<?xml version="1.0" encoding="utf-8"?>");
		//开始组拼xml根节点
		sb.append("<smss>");
		//开始组拼sms节点
		for(Sms sms :smsList) {
			sb.append("<sms>");

			//组拼address
			sb.append("<address>");
			sb.append(sms.getAddress());
			sb.append("</address>");

			//组拼body
			sb.append("<body>");
			sb.append(sms.getBody());
			sb.append("</body>");

			//组拼date
			sb.append("<date>");
			sb.append(sms.getDate());
			sb.append("</date>");

			sb.append("</sms>");
		}

		sb.append("</smss>");

		//把数据保存到sd卡中
		File file =new File(Environment.getExternalStorageDirectory().getPath(),"sms.xml");

		try {
			fos = new FileOutputStream(file);
			fos.write(sb.toString().getBytes());

		} catch (IOException e) {
			e.printStackTrace();
		}finally {
			if(fos!=null) {
				try {
					fos.close();
				} catch (IOException e) {
					e.printStackTrace();
				}
			}
		}
19、生成xml的第二种方式(XmlSerializer接口)
描述
Define an interface to serialization of XML Infoset. This interface abstracts away if serialized XML is XML 1.0 compatible text or other formats of XML 1.0 serializations (such as binary XML for example with WBXML).
通过Xml获取XmlSerializer实例
static XmlSerializer |
newSerializer()
Creates a new xml serializer. |
XmlSerializer中常用方法
abstract void |
startDocument(String encoding, Boolean standalone)
Write <?xml declaration with encoding (if encoding not null) and standalone flag (if standalone not null) This method can only be called just after setOutput. |
abstract XmlSerializer |
startTag(String namespace, String name)
Writes a start tag with the given namespace and name. |
abstract void |
endDocument()
Finish writing. |
abstract XmlSerializer |
endTag(String namespace, String name)
Write end tag. |
abstract XmlSerializer |
text(char[] buf, int start, int len)
Writes text, where special XML chars are escaped automatically |
abstract XmlSerializer |
text(String text)
Writes text, where special XML chars are escaped automatically |
abstract void |
setOutput(OutputStream os, String encoding)
Set to use binary output stream with given encoding. |
abstract void |
setOutput(Writer writer)
Set the output to the given writer. |
使用步骤
【1】获取XmlSerializer实例
【2】设置序列化参数
【3】开始写xml头
【4】写xml根节点
【5】循环其他节点
详细使用代码详细使用代码
//获取XmlSerializer,通过Xml工具类
		XmlSerializer xs = Xml.newSerializer();//【1】
		//设置序列化参数
		File file = new File(Environment.getExternalStorageDirectory().getPath(),"sms2.xml");
		FileOutputStream fos;
		try {

			fos = new FileOutputStream(file);
               //【2】
			xs.setOutput(fos, "UTF-8");
			//开始写xml头【3】
			xs.startDocument("utf-8", true);
			//标签address【4】
			xs.startTag(null, "smss");

			//循环写sms Tag
			for(Sms sms:smsList) {
				xs.startTag(null, "sms");

				xs.startTag(null, "address");
				xs.text(sms.getAddress());
				xs.endTag(null, "address");

				xs.startTag(null, "body");
				xs.text(sms.getBody());
				xs.endTag(null, "body");

				xs.startTag(null, "date");
				xs.text(sms.getDate());
				xs.endTag(null, "date");

				xs.endTag(null, "sms");
			}

			xs.endTag(null, "smss");

			//尾
			xs.endDocument();
		} catch (IllegalArgumentException e) {
			// TODO Auto-generated catch block
			e.printStackTrace();
		} catch (IllegalStateException e) {
			// TODO Auto-generated catch block
			e.printStackTrace();
		} catch (IOException e) {
			// TODO Auto-generated catch block
			e.printStackTrace();
		}
20、xml解析之简介
测试文件,命名weather.xml
<?xml version="1.0" encoding="utf-8"?>
<weather>
	<channel id="1">
		<city>北京</city>
		<temp>25°</temp>
		<wind>3</wind>
		<pm250>300</pm250>
	</channel>
	<channel id="2">
		<city>郑州</city>
		<temp>20°</temp>
		<wind>4</wind>
		<pm250>300</pm250>
	</channel>
	<channel id="3">
		<city>长春</city>
		<temp>10°</temp>
		<wind>4</wind>
		<pm250>100</pm250>
	</channel>
	<channel id="4">
		<city>沈阳</city>
		<temp>20°</temp>
		<wind>1</wind>
		<pm250>50</pm250>
	</channel>
</weather>
【1】 xml数据来源 来源于服务器 服务器的技术把数据准备一个xml返回给客户端
【2】Android工程师只需,解析其中内容
【3】服务器以流形式把数据返回
有关方法的介绍
static XmlPullParser |
newPullParser()
Returns a new pull parser with namespace support. |
abstract void |
setInput(Reader in)
Set the input source for parser to the given reader and resets the parser. |
abstract void |
setInput(InputStream inputStream, String inputEncoding)
Sets the input stream the parser is going to process. |
bstract int |
getEventType()
Returns the type of the current event (START_TAG, END_TAG, TEXT, etc.) |
int |
END_DOCUMENT
Logical end of the xml document. |
int |
START_DOCUMENT
Signalize that parser is at the very beginning of the document and nothing was read yet. |
int |
START_TAG
Returned from getEventType(), next(), nextToken() when a start tag was read. |
int |
END_TAG
Returned from getEventType(), next(), or nextToken() when an end tag was read. |
abstract String |
getAttributeValue(String namespace, String name)
Returns the attributes value identified by namespace URI and namespace localName. |
abstract String |
getAttributeValue(int index)
Returns the given attributes value. |
abstract int |
next()
Get next parsing event - element content will be coalesced and only one TEXT event must be returned for whole element content (comments and processing instructions will be ignored and entity references must be expanded or exception must be thrown if entity reference can not be expanded). |
解析步骤
【1】获取XmlPullParser
XmlPullParser parser = Xml.newPullParser();
【2】设置XmlPullParser参数
parser.setInput(in,"utf-8");
【3】获取解析文档的事件类型
int type = parser.getEventType();
【4】具体判断是哪一个标签
          //1、声明集合对象
		List<Channel> weatherList = null;

		//2、获取XmlPullParser的参数
		XmlPullParser parser = Xml.newPullParser();

		//3、设置XmlPullParser参数
		parser.setInput(in,"utf-8");

		//4、获取事件类型
		int type = parser.getEventType();

		while(type!=XmlPullParser.END_DOCUMENT) {
			switch (type) {
			//5、具体判断解析到哪一个开始标签
			case XmlPullParser.START_TAG:
				if("weather".equals(parser.getName())) {
					//6、创建集合对象
					weatherList = new ArrayList<Channel>();

				}else if("channel".equals(parser.getName())) {
					channel = new Channel();
					//获取id值
					String id = parser.getAttributeValue(0);
					channel.setId(id);
				}else if ("city".equals(parser.getName())) {
					//获取city属性
					String city = parser.nextText();
					channel.setCity(city);
				}else if ("temp".equals(parser.getName())) {
					//获取temp属性
					String temp = parser.nextText();
					channel.setTemp(temp);
				}else if ("pm250".equals(parser.getName())) {
					String pm250 = parser.nextText();
					channel.setPm250(pm250);
				}else if ("wind".equals(parser.getName())) {
					String wind = parser.nextText();
					channel.setWind(wind);

				}
				break;

			case XmlPullParser.END_TAG:
				if("channel".equals(parser.getName())) {
					weatherList.add(channel);
				}
			}
			type = parser.next();
		}
21、数据库的使用
1)使用的数据库是SQLite
2)数据库的创建(在Oncreate方法创建
)
【1】创建一个MyOpenHelper类继承抽象类SQLiteOpenHepler
import android.content.Context;
import android.database.sqlite.SQLiteDatabase;
import android.database.sqlite.SQLiteOpenHelper;

public class MyOpenHelper extends SQLiteOpenHelper{


	public MyOpenHelper(Context context) {
          //SQLiteOpenHelper 的构造函数的参数的解释
          //context上下文,name 数据库的名字,factory 游标(默认在属性行),version 数据库的版本
		super(context, "lyhcc.db", null, 1);
	}

	/**
	 * Called when the database is created for the first time
	 * 适合做表的初始化
	 */
	@Override
	public void onCreate(SQLiteDatabase db) {
		//id一般以下划线开头
		db.execSQL("create table info(_id integer primary key autoincrement,name varchar(20))");
	}

	@Override
	public void onUpgrade(SQLiteDatabase db, int oldVersion, int newVersion) {

	}

}
【2】使用实现类创建数据库
                MyOpenHelper myOpenHelper = new MyOpenHelper(getApplicationContext());
		//打开或创建数据库 如果是第一次就是创建
		SQLiteDatabase sqLiteDatabase = myOpenHelper.getWritableDatabase();

		//打开或创建数据库 如果是第一次就创建   如果磁盘满了就返回只读的
		//SQLiteDatabase readableDatabase = myOpenHelper.getReadableDatabase();
3)OnUpagrade方法介绍(Called when the database needs to be upgraded.)
这个方法适合做 更新表的结构
    public MyOpenHelper(Context context) {
		super(context, "lyhcc.db", null, 4);
	}
4)Android中使用sqlite3进行命令行操作数据库
【1】adb shell
【2】进入*.db所在文件夹
【3】sqlite3 *.db 打开数据库
【4】进行SQL语句操作
更换编码方式:chcp 936(为GBK) chcp 65001(为UTF-8)
5)使用谷歌封装好的API进行增删改查
优点:写法简单(不需要写复杂的SQL语句),有返回值(方便开发者进行开发)
缺点:不容易对多张表进行查询
int |
delete(String table, String whereClause, String[] whereArgs)
Convenience method for deleting rows in the database. |
static boolean |
deleteDatabase(File file)
Deletes a database including its journal file and other auxiliary files that may have been created by the database engine. |
long |
insert(String table, String nullColumnHack, ContentValues values)
Convenience method for inserting a row into the database. |
long |
insertOrThrow(String table, String nullColumnHack, ContentValues values)
Convenience method for inserting a row into the database. |
long |
insertWithOnConflict(String table, String nullColumnHack, ContentValuesinitialValues, int conflictAlgorithm)
General method for inserting a row into the database. |
Cursor |
query(boolean distinct, String table, String[] columns, Stringselection, String[] selectionArgs, String groupBy, String having, StringorderBy, String limit)
Query the given URL, returning a |
Cursor |
query(String table, String[] columns, String selection, String[]selectionArgs, String groupBy, String having, String orderBy, Stringlimit)
Query the given table, returning a |
Cursor |
query(boolean distinct, String table, String[] columns, Stringselection, String[] selectionArgs, String groupBy, String having, StringorderBy, String limit, CancellationSignal cancellationSignal)
Query the given URL, returning a |
Cursor |
query(String table, String[] columns, String selection, String[]selectionArgs, String groupBy, String having, String orderBy)
Query the given table, returning a |
int |
update(String table, ContentValues values, String whereClause, String[]whereArgs)
Convenience method for updating rows in the database. |
22、Android中数据库中的事务介绍
事务:一段逻辑,要么全部执行,要么都不执行
SQLiteDataBase中用来处理事务的方法
void |
beginTransaction()
Begins a transaction in EXCLUSIVE mode. |
void |
endTransaction()
End a transaction. |
void |
setTransactionSuccessful()
Marks the current transaction as successful. |
          SQLiteDatabase db = myOpenHelper.getReadableDatabase();
		//使用事务进行转账
		db.beginTransaction();//开启事务
		try {

			//实现转账逻辑 实际上就是写sql语句
			db.execSQL("update info set money = money - 100 where name=?",new Object[] {"张三"});

			int i = 10/0;//

			db.execSQL("update info set money = money + 100 where name=?",new Object[] {"李四"});


			//给当时事务设置一个成功的标记
			db.setTransactionSuccessful();
		}catch (Exception e) {
			Toast.makeText(getApplicationContext(), "服务器忙", 1).show();
                         //不成功自动回滚
		} finally {
			db.endTransaction();
		}
23、ListView入门
(template自定义快速提示)
public class MainActivity extends ActionBarActivity {

	@Override
	protected void onCreate(Bundle savedInstanceState) {
		super.onCreate(savedInstanceState);
		setContentView(R.layout.activity_main);
		//找到相关控件
		ListView lv = findViewById(R.id.lv);

		lv.setAdapter(new MyListAdapter());
		//显示数据 和其他普通控件不一样 来源于ListAdapter
	}

	//定义ListView适配器
	private class MyListAdapter extends BaseAdapter{

		//一共有多少条数据需要展示出来
		@Override
		public int getCount() {

			return 6;
		}

		//返回指定position位置对应的对象
		@Override
		public Object getItem(int position) {
			// TODO Auto-generated method stub
			return null;
		}
		//返回position位置对于达到id

		@Override
		public long getItemId(int position) {
			// TODO Auto-generated method stub
			return 0;
		}

		//获取一个View 用来显示ListView 的数据 会作为ListView的一个条目出现
		@Override
		public View getView(int position, View convertView, ViewGroup parent) {
			TextView tv = new TextView(MainActivity.this);
			tv.setText("哈哈"+position);
			return tv;
		}

	}
}//ctrl+shift+o快速导包
24、ListView的优化
Out of memory on a 108-byte allocation
下面代码可以解决该错误
public class MainActivity extends ActionBarActivity {

	@Override
	protected void onCreate(Bundle savedInstanceState) {
		super.onCreate(savedInstanceState);
		setContentView(R.layout.activity_main);
		//找到相关控件
		ListView lv = findViewById(R.id.lv);

		lv.setAdapter(new MyListAdapter());
		//显示数据 和其他普通控件不一样 来源于ListAdapter
	}

	//定义ListView适配器
	private class MyListAdapter extends BaseAdapter{


		//一共有多少条数据需要展示出来
		@Override
		public int getCount() {

			return 1000000000;
		}

		//返回指定position位置对应的对象
		@Override
		public Object getItem(int position) {
			// TODO Auto-generated method stub
			return null;
		}
		//返回position位置对于达到id

		@Override
		public long getItemId(int position) {
			// TODO Auto-generated method stub
			return 0;
		}

		//获取一个View 用来显示ListView 的数据 会作为ListView的一个条目出现
		//看不见作为ContentView 保存起来
		@Override
		public View getView(int position, View convertView, ViewGroup parent) {
			//显示多少条条目,就运行多少次
			TextView tv;
              //如果不进行这个If判断,有可能出现Out of memory 108-byte allocation
			if(convertView == null) {
				tv = new TextView(MainActivity.this);
				//
				System.out.println("创建新TV--"+position);
			}else {
				System.out.println("复用TV--"+position);
				tv=(TextView)convertView;
			}


			tv.setText("哈哈"+position);
			return tv;
		}

	}
}
25、ListView 显示数据原理图
mvc模式
javaweb:
m:mode数据
v: view 视图 jsp
c: controller servlet
Android:
m : mode 展示的数据(javabean)
v : ListView
c : adapter
把adapter数据展示到Listview上
26、ListView的奇怪现象
layout_height为wrap_parent时需要进行多次校验,而match_parent不需要,所以运行时只需运行getView 中Count次,match_parent效率高
以后再使用ListView 高的时候 使用填充父窗体
Adapter作用就是把数据显示在ListView
27、打气筒的介绍
线性布局、相对布局都继承自ViewGroup 可以有自己的孩子
通过打气筒 inflate可以将一个布局装换为一个View对象
public class MainActivity extends ActionBarActivity {

	@Override
	protected void onCreate(Bundle savedInstanceState) {
		super.onCreate(savedInstanceState);
		setContentView(R.layout.activity_main);
		ListView lv = findViewById(R.id.lv);
		lv.setAdapter(new BaseAdapter() {

			@Override
			public View getView(int position, View convertView, ViewGroup parent) {
				View view;
				if(convertView == null) {
					//inflate 打气筒把一个布局资源转换为一个View对象
					view = View.inflate(getApplicationContext(), R.layout.item, null);
				}else {
					view = convertView;
				}

				return view;
			}

			@Override
			public long getItemId(int position) {
				// TODO Auto-generated method stub
				return 0;
			}

			@Override
			public Object getItem(int position) {
				// TODO Auto-generated method stub
				return null;
			}

			@Override
			public int getCount() {
				// TODO Auto-generated method stub
				return 7;
			}
		});
	}
}
28、打气筒常用API
【1】View.inflate()
【2】view = LayoutInflater.from(getApplicationContext()).inflate(R.layout.item, null);
【3】LayoutInflater service = (LayoutInflater) getSystemService(LAYOUT_INFLATER_SERVICE);
view = service.inflate(R.layout.item, null);
29、数组适配器介绍(ArrayAdapter)
ListView lv =findViewById(R.id.lv);
lv.setAdapter(new ArrayAdapter<Object>(getApplicationContext(), R.layout.item, objects));
30、权重的介绍
通常在线性布局中使用weight
31、SimpleAdapter适配器
//from是map集合的键,to为各个列显示的位置
/*
*SimpleAdapter(Context context, List<? extends Map<String, ?>> data, int resource, String[] from, int[] to)
* Parameters:
* 	context 	The context where the View associated with this SimpleAdapter is running
* 	data 		A List of Maps. Each entry in the List corresponds to one row in the list.
* 			 	TheMaps contain the data for each row, and should include all the entries specified in"from"
* resource 	Resource identifier of a view layout that defines the views for this listitem.
* 				The layout file should include at least those named views defined in "to"
* from 		A list of column names that will be added to the Map associated with eachitem.
* to 			The views that should display column in the "from" parameter. These should all beTextViews.
* 				The first N views in this list are given the values of the first N columnsin the from parameter.
*/
lv.setAdapter(new SimpleAdapter(getApplicationContext(), data, R.layout.item, new String[] {"name","phone"},
                    new int[] {R.id.tv_1,R.id.tv_2}));
补充:Intent的使用
        //进行拨打电话,意图Intent
	    Intent intent = new Intent();
	   //1、设置动作
	    intent.setAction(Intent.ACTION_CALL);
	   //2、设置要拨打的数据
	    intent.setData(Uri.parse("tel:"+phoneNum));
	   //开启意图
	    startActivity(intent);