主要内容
-
多版本支持
-
主机绑定
-
集群容错
-
服务降级
-
配置优先级别
-
什么是SPI
-
源码阅读之Dubbo中的SPI机制分析
-
源码阅读之Dubbo服务发布过程分析
dubbo的服务端 dubbo-server.xml 配置文件如下
<?xml version="1.0" encoding="UTF-8"?>
<beans xmlns="http://www.springframework.org/schema/beans" xmlns:xsi="http://www.w3.org/2001/XMLSchema-instance"
       xmlns:dubbo="http://code.alibabatech.com/schema/dubbo"
       xsi:schemaLocation="http://www.springframework.org/schema/beans http://www.springframework.org/schema/beans/spring-beans.xsd http://code.alibabatech.com/schema/dubbo http://code.alibabatech.com/schema/dubbo/dubbo.xsd">
    <!--提供方信息,用于计算依赖关系-->
    <dubbo:application name="dubbo-server" owner="mic"/>

    <!--注册中心 暴露服务地址-->
    <dubbo:registry id="zk1"  address="zookeeper://192.168.1.101:2181"/>


    <dubbo:registry id="zk2"  address="zookeeper://192.168.1.101:2181"/>

    <!--用dubbo协议在20880 端口暴露服务-->
    <dubbo:protocol port="20880" name="dubbo"/>
    <!--用hessian协议在 8080 端口暴露服务-->
    <dubbo:protocol port="8080" name="hessian"/>

    <!--声明需要暴露的服务接口,Dubbo支持同一个服务多种协议,指定协议为dubbo,hessian -->
    <dubbo:service interface="com.learn.dubbo.HelloService" ref="helloService" registry="zk1" protocol="dubbo,hessian" version="1.0.1"/>

    <!--声明需要暴露的服务接口,指定协议为dubbo,设置版本号1.1.2-->
    <dubbo:service interface="com.learn.dubbo.HelloService" ref="helloService2" registry="zk2" protocol="dubbo" version="1.1.2"/>


    <!--对应的服务实现服务-->
    <bean id="helloService" class="com.learn.dubbo.HelloServiceImpl"/>

    <bean id="helloService2" class="com.learn.dubbo.HelloServiceImpl2"/>


</beans>
dubbo的客户端 dubbo-client.xml 配置文件如下
<?xml version="1.0" encoding="UTF-8"?>
<beans xmlns="http://www.springframework.org/schema/beans" xmlns:xsi="http://www.w3.org/2001/XMLSchema-instance"
       xmlns:dubbo="http://code.alibabatech.com/schema/dubbo"
       xsi:schemaLocation="http://www.springframework.org/schema/beans http://www.springframework.org/schema/beans/spring-beans.xsd http://code.alibabatech.com/schema/dubbo http://code.alibabatech.com/schema/dubbo/dubbo.xsd">

    <!--提供方信息-->
    <dubbo:application name="dubbo-client" owner="mic"/>

    <!--zookeeper 注册中心 暴露服务地址-->
    <dubbo:registry  address="zookeeper://192.168.1.101:2181" file="D:/dubbo-server"/>

    <!--<dubbo:protocol port="20880" name="dubbo"/>
    <dubbo:protocol port="8080" name="hessian"/>-->

    <!--调用dubbo远端服务,需要指定url地址就能发起远端调用, 可以通过check="false"关闭检查,比如,测试时,有些服务不关心,或者出现了循环依赖,必须有一方先启动。
    关闭某个服务的启动时检查:(没有提供者时报错)-->
    <dubbo:reference id="helloService" interface="com.learn.dubbo.HelloService" check="false" protocol="dubbo" version="1.1.2"/>

</beans>
主机绑定
发布一个Dubbo服务的时候,会生成一个dubbo://ip:port的协议地址,那么这个IP是根据什么生成的呢?可以在ServiceConfig.java代码中 doExportUrlsFor1Protocol 方法找到如下代码;可以发现,在生成绑定的主机的时候,会通过一层一层的判断,直到获取到合法的ip地址。以下源码就是绑定 host 的判断逻辑过程,对于不同协议绑定不同的端口。
 1 1.NetUtils.isInvalidLocalHost(host), //从配置文件中获取host
 2 2.host = InetAddress.getLocalHost().getHostAddress();
 3 3.Socket socket = ``new` `Socket();
 4     try{
 5         SocketAddress addr = new InetSocketAddress(registryURL.getHost(), registryURL.getPort());
 6         socket.connect(addr, 1000);
 7         host = socket.getLocalAddress().getHostAddress();
 8         break;
 9     } finally{
10         try{
11             socket.close();
12         }catch(Throwable e) {}
13     }
1 public static String getLocalHost(){
2     InetAddress address = getLocalAddress();
3     return address == null ? LOCALHOST : address.getLocalHostAddress();
4 }
相关协议默认端口
dubbo:20880
rmi:1099
http:80
webservice:80
集群容错
什么是容错机制? 容错机制指的是某种系统控制在一定范围内的一种允许或包容犯错情况的发生,举个简单例子,我们在电脑上运行一个程序,有时候会出现无响应的情况,然后系统会弹出一个提示框让我们选择,是立即结束还是继续等待,然后根据我们的选择执行对应的操作,这就是“容错”。
在分布式架构下,网络、硬件、应用都可能发生故障,由于各个服务之间可能存在依赖关系,如果一条链路中的其中一个节点出现故障,将会导致雪崩效应。为了减少某一个节点故障的影响范围,所以我们才需要去构建容错服务,来优雅的处理这种中断的响应结果。
Dubbo提供了 6种容错机制,分别如下:
-
failsafe 失败 安全,可以认为是把错误吞掉(记录日志)
-
failover (默认) 重试其他服务器; retries (2) 表示重试次数,缺省的重试次数默认是2,不包含第一次,加上第一次共3次
-
failfast 快速失败,失败以后立马报错
-
failback 失败后自动恢复
-
forking forks,设置并行最大数
-
broadcast 广播,任意一台报错,则执行的方法报错
<!--失败安全,可以认为是把错误吞掉(记录日志)-->
<dubbo:reference id="helloService" interface="com.learn.dubbo.HelloService" check="false" protocol="dubbo" cluster="failsafe" version="1.1.2"/>
配置优先级别
客户端的配置优先于服务端
-
方法级别优先、然后是接口、最后是全局配置
-
如果级别是一样的,客户端优先
retires、LoadBalance、cluster(客户端)、timeout(服务端)
服务降级
降级的目的是为了保证核心服务可用。
降级可以有几个层面的分类: 自动降级和人工降级; 按照功能可以分为:读服务降级和写服务降级;
-
对一些非核心服务进行人工降级,在大促之前通过降级开关关闭哪些推荐内容、评价等对主流程没有影响的功能
-
故障降级,比如调用的远程服务挂了,网络故障、或者RPC服务返回异常。 那么可以直接降级,降级的方案比如设置默认值、采用兜底数据(系统推荐的行为广告挂了,可以提前准备静态页面做返回)等等
-
限流降级,在秒杀这种流量比较集中并且流量特别大的情况下,因为突发访问量特别大可能会导致系统支撑不了。这个时候可以采用限流来限制访问量。当达到阀值时,后续的请求被降级,比如进入排队页面,比如跳转到错误页(活动太火爆,稍后重试等)
dubbo的降级方式: Mock
实现步骤:
1、在client端创建一个TestMock类,实现对应 HelloService 的接口(需要对哪个接口进行mock,就实现哪个),名称必须以Mock结尾
 1 package com.learn.dubbo;
 2
 3 /**
 4  * dubbo的降级方式: Mock
 5  *
 6  * @Author: cong zhi
 7  * @CreateDate: 2021/2/13 12:53
 8  * @UpdateUser: cong zhi
 9  * @UpdateDate: 2021/2/13 12:53
10  * @UpdateRemark: 修改内容
11  * @Version: 1.0
12  */
13 public class TestMock implements HelloService {
14     @Override
15     public String sayHello(String s) {
16         return "系统繁忙!:" + s;
17     }
18 }
2、在dubbo-client.xml 客户端xml配置文件中,添加如下配置,增加一个mock属性指向创建的 TestMock
<?xml version="1.0" encoding="UTF-8"?>
<beans xmlns="http://www.springframework.org/schema/beans" xmlns:xsi="http://www.w3.org/2001/XMLSchema-instance"
       xmlns:dubbo="http://code.alibabatech.com/schema/dubbo"
       xsi:schemaLocation="http://www.springframework.org/schema/beans http://www.springframework.org/schema/beans/spring-beans.xsd http://code.alibabatech.com/schema/dubbo http://code.alibabatech.com/schema/dubbo/dubbo.xsd">

    <!--提供方信息-->
    <dubbo:application name="dubbo-client" owner="mic"/>

    <!--zookeeper 注册中心 暴露服务地址-->
    <dubbo:registry  address="zookeeper://192.168.1.101:2181" file="D:/dubbo-server"/>

    <!--<dubbo:protocol port="20880" name="dubbo"/>
    <dubbo:protocol port="8080" name="hessian"/>-->

    <!--调用dubbo远端服务,需要指定url地址就能发起远端调用, 可以通过check="false"关闭检查,比如,测试时,有些服务不关心,或者出现了循环依赖,必须有一方先启动。
    关闭某个服务的启动时检查:(没有提供者时报错)-->
    <dubbo:reference id="helloService" interface="com.learn.dubbo.HelloService" check="false" protocol="dubbo"  mock="com.learn.dubbo.TestMock" timeout="1">
        <!--<dubbo:method name=""-->
    </dubbo:reference>

</beans>
运行结果输出:
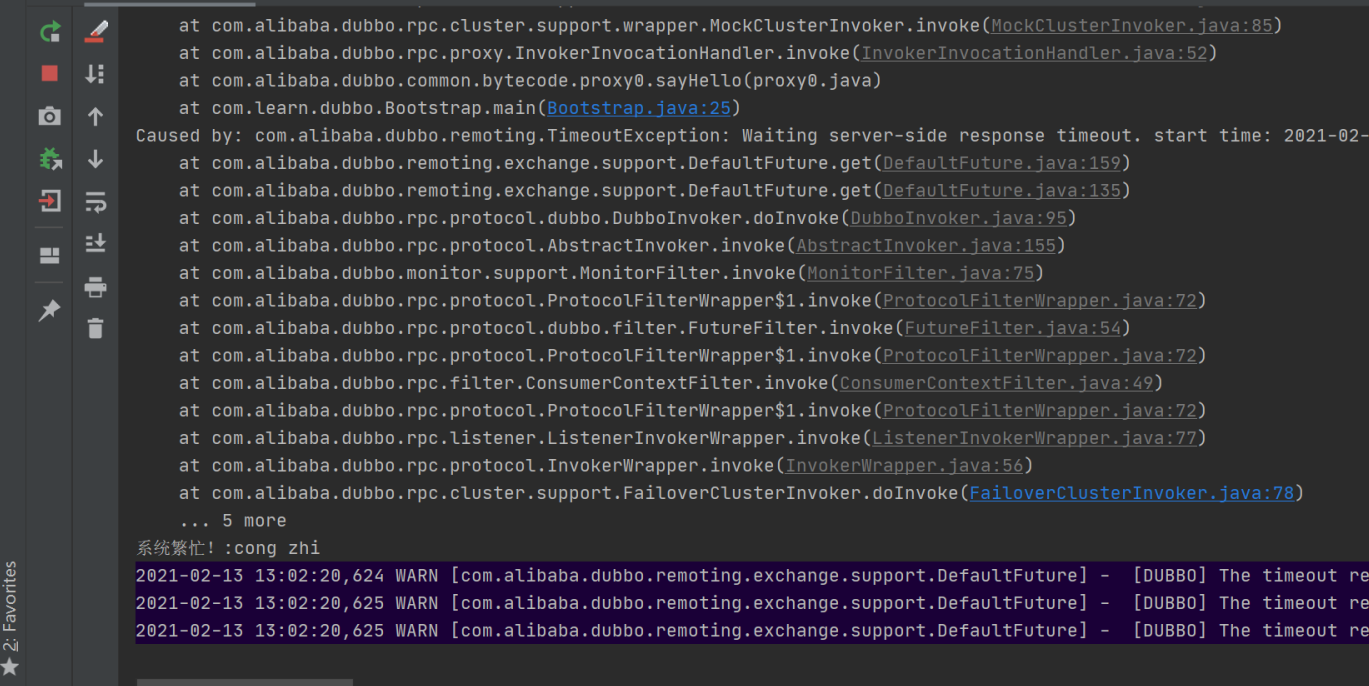
运行结果:输出:null (因cluster="failsafe" 采用了服务降级策略,吞掉这个错误,不会报错)
什么是SPI
在Dubbo中,SPI是一个非常核心的机制,贯穿在几乎所有的流程中。Dubbo是基于Java原生SPI机制思想的一个改进,所以,先从JAVA SPI机制开始了解什么是SPI以后再去学习Dubbo的SPI,就比较容易了
关于JAVA 的SPI机制:
SPI全称(service provider interface),是JDK内置的一种服务提供发现机制,目前市面上有很多框架都是用它来做服务的扩展发现,大家耳熟能详的如JDBC、日志框架都有用到;简单来说,它是一种动态替换发现的机制。举个简单的例子,如果我们定义了一个规范,需要第三方厂商去实现,那么对于我们应用方来说,只需要集成对应厂商的插件,既可以完成对应规范的实现机制。 形成一种插拔式的扩展手段。
SPI机制:提供了一个类去读取指定目录下 的文件,读取文件的内容通过反射创建对象

SPI的实际应用
SPI在很多地方有应用,大家可以看看最常用的java.sql.Driver驱动。JDK官方提供了java.sql.Driver这个驱动扩展点,但是你们并没有看到JDK中有对应的Driver实现。 那在哪里实现呢?以连接Mysql为例,我们需要添加mysql-connector-java依赖。然后,你们可以在这个jar包中找到SPI的配置信息。如下图,所以java.sql.Driver由各个数据库厂商自行实现。这就是SPI的实际应用。当然除了这个意外,大家在spring的包中也可以看到相应的痕迹

SPI机制规范
1、META-INF/services/接口全路径文件,文件中填写对应的实现类

2、文件名称和接口名称保持一致,文件内容和SPI有差异,内容是KEY对应Value
Dubbo 的SPI规范
-
/META-INF/dubbo; 或者 /META-INF/internal; ?META-INF/services
-
文件名(全路径);内容 key =value
1、创建规范接口工程并打成jar 包:
 1 package com.learn.dubbo.spi;
 2
 3 /**
 4  * Dubbo SPI机制
 5  * @Author:         cong zhi
 6  * @CreateDate:     2021/2/13 17:48
 7  * @UpdateUser:     cong zhi
 8  * @UpdateDate:     2021/2/13 17:48
 9  * @UpdateRemark:   修改内容
10  * @Version:        1.0
11  */
12 public interface DataBaseDriver {
13
14     String connect(String host);
15 }
2、创建mysql连接工程(引入接口 jar包):
<dependency>
    <groupId>com.learn.dubbo.spi</groupId>
    <artifactId>DataBaseDriver</artifactId>
    <version>1.0.1-SNAPSHOT</version>
</dependency>
 1 package com.learn.dubbo.spi;
 2
 3 /**
 4  * 创建 mysql连接工程(引入接口jar):
 5  * @Author:         cong zhi
 6  * @CreateDate:     2021/2/13 17:56
 7  * @UpdateUser:     cong zhi
 8  * @UpdateDate:     2021/2/13 17:56
 9  * @UpdateRemark:   修改内容
10  * @Version:        1.0
11  */
12 public class MysqlDriver implements DataBaseDriver {
13     @Override
14     public String connect(String s) {
15         return "begin build Mysql Driver connection";
16     }
17 }
3、创建service文件:
在resources/META-INF/services创建文件并命名 com.learn.dubbo.spi.DateBaseDriver,内容为实现类的全路径:com.learn.dubbo.spi.MysqlDriver
<dependency>
    <groupId>com.learn.dubbo.spi</groupId>
    <artifactId>MysqlDriver</artifactId>
    <version>1.0.1-SNAPSHOT</version>
</dependency>
<dependency>
    <groupId>com.learn.dubbo.spi</groupId>
    <artifactId>DataBaseDriver</artifactId>
    <version>1.0.1-SNAPSHOT</version>
</dependency>
<dependency>
    <groupId>com.learn.dubbo.spi</groupId>
    <artifactId>OracleDriver</artifactId>
    <version>1.0.1-SNAPSHOT</version>
</dependency>
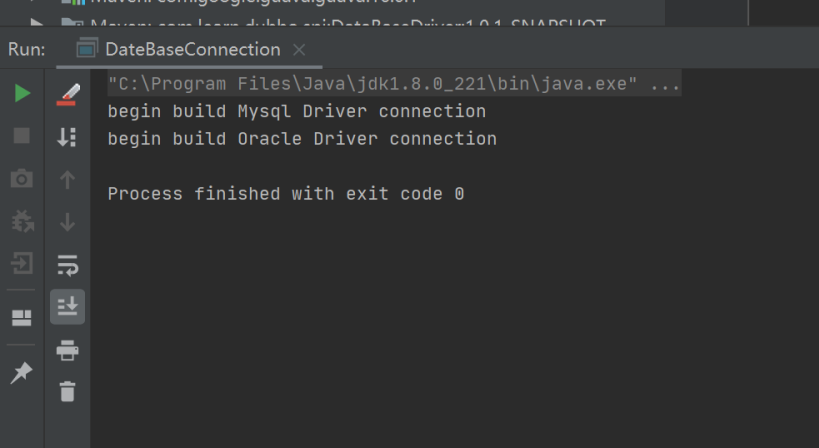
4、创建连接类:
 1 package com.learn.dubbo.spi;
 2
 3 import java.util.ServiceLoader;
 4 /**
 5  * SPI动态加载对应的驱动
 6  * @Author:         cong zhi
 7  * @CreateDate:     2021/2/13 19:04
 8  * @UpdateUser:     cong zhi
 9  * @UpdateDate:     2021/2/13 19:04
10  * @UpdateRemark:   修改内容
11  * @Version:        1.0
12  */
13 public class DateBaseConnection {
14
15     public static void main(String[] args) {
16         ServiceLoader<DataBaseDriver> serviceLoader = ServiceLoader.load(DataBaseDriver.class);
17         for (DataBaseDriver dateBaseDriver : serviceLoader) {
18             System.out.println(dateBaseDriver.connect("localhost"));
19         }
20     }
21
22 }
运行输出结果如下:
GitHub 地址:https://github.com/lwx57280/Dubbo-learning
Protocol protocol = ExtensionLoader.getExtensionLoader(Protocol.class).getExtension("MyProtocol");
System.out.println(protocol.getDefaultPort());
Adaptive
-
如果是配置在类级别上,表示自定义适配器
-
如果是配置在方法级别上,表示需要动态生成适配器
getExtensionLoader 根据一个类型《Class》得到一个ExtensionLoader 初始化 ExtensionLoader
源码入口
1 // 此处得到一个动态适配器对象 Protocol$Adaptive
2 Protocol protocol = ExtensionLoader.getExtensionLoader(Protocol.class). getAdaptiveExtension();
第一段是通过一个Class参数去获得一个ExtensionLoader对象,有点类似一个工厂模式。把上面这段代码分成两段,一段是getExtensionLoader、 另一段是getAdaptiveExtension。 初步猜想一下;
第二段getAdaptiveExtension,去获得一个自适应的扩展点
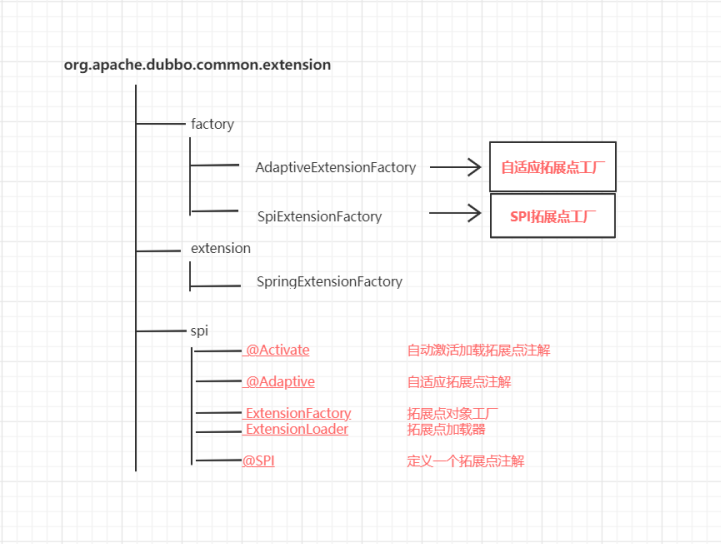
Extension源码的结构
Protocol 源码
Protocol的源码,在这个源码中可以看到有两个注解,一个是在类级别上的@SPI(“dubbo”). 另一个是@Adaptive
@SPI 表示当前这个接口是一个扩展点,可以实现自己的扩展实现,默认的扩展点是DubboProtocol。
@Adaptive 表示一个自适应扩展点,在方法级别上,会动态生成一个适配器类
 1 @SPI("dubbo")
 2 public interface Protocol {
 3
 4     /**
 5      * 获取缺省端口,当用户没有配置端口时使用。
 6      *
 7      * @return 缺省端口
 8      */
 9     int getDefaultPort();
10
11     /**
12      * 暴露远程服务:<br>
13      * 1. 协议在接收请求时,应记录请求来源方地址信息:RpcContext.getContext().setRemoteAddress();<br>
14      * 2. export()必须是幂等的,也就是暴露同一个URL的Invoker两次,和暴露一次没有区别。<br>
15      * 3. export()传入的Invoker由框架实现并传入,协议不需要关心。<br>
16      *
17      * @param <T> 服务的类型
18      * @param invoker 服务的执行体
19      * @return exporter 暴露服务的引用,用于取消暴露
20      * @throws RpcException 当暴露服务出错时抛出,比如端口已占用
21      */
22     @Adaptive
23     <T> Exporter<T> export(Invoker<T> invoker) throws RpcException;
24
25      /**
26      * 引用远程服务:<br>
27      * 1. 当用户调用refer()所返回的Invoker对象的invoke()方法时,协议需相应执行同URL远端export()传入的Invoker对象的invoke()方法。<br>
28      * 2. refer()返回的Invoker由协议实现,协议通常需要在此Invoker中发送远程请求。<br>
29      * 3. 当url中有设置check=false时,连接失败不能抛出异常,并内部自动恢复。<br>
30      *
31      * @param <T> 服务的类型
32      * @param type 服务的类型
33      * @param url 远程服务的URL地址
34      * @return invoker 服务的本地代理
35      * @throws RpcException 当连接服务提供方失败时抛出
36      */
37     @Adaptive
38     <T> Invoker<T> refer(Class<T> type, URL url) throws RpcException;
39
40      /**
41      * 释放协议:<br>
42      * 1. 取消该协议所有已经暴露和引用的服务。<br>
43      * 2. 释放协议所占用的所有资源,比如连接和端口。<br>
44      * 3. 协议在释放后,依然能暴露和引用新的服务。<br>
45      */
46     void destroy();
47
48     /**
49      * Get all servers serving this protocol
50      *
51      * @return
52      */
53     default List<ProtocolServer> getServers() {
54         return Collections.emptyList();
55     }
56
57 }
该方法需要一个Class类型的参数,该参数表示希望加载的扩展点类型,该参数必须是接口,且该接口必须被@SPI注解注释,否则拒绝处理。检查通过之后首先会检查ExtensionLoader缓存中是否已经存在该扩展对应的ExtensionLoader,如果有则直接返回,否则创建一个新的ExtensionLoader负责加载该扩展实现,同时将其缓存起来。可以看到对于每一个扩展,dubbo中只会有一个对应的ExtensionLoader实例
 1 public static <T> ExtensionLoader<T> getExtensionLoader(Class<T> type) {
 2     if (type == null) {
 3         throw new IllegalArgumentException("Extension type == null");
 4     }
 5     if (!type.isInterface()) {
 6         throw new IllegalArgumentException("Extension type (" + type + ") is not an interface!");
 7     }
 8     if (!withExtensionAnnotation(type)) {
 9         throw new IllegalArgumentException("Extension type (" + type +
10                 ") is not an extension, because it is NOT annotated with @" + SPI.class.getSimpleName() + "!");
11     }
12
13     ExtensionLoader<T> loader = (ExtensionLoader<T>) EXTENSION_LOADERS.get(type);
14     if (loader == null) {
15         EXTENSION_LOADERS.putIfAbsent(type, new ExtensionLoader<T>(type));
16         loader = (ExtensionLoader<T>) EXTENSION_LOADERS.get(type);
17     }
18     return loader;
19 }
ExtensionLoader提供了一个私有的构造函数,并且在这里面对两个成员变量type/objectFactory进行赋值。而objectFactory赋值的意义是什么呢?先留个悬念
getAdaptiveExtension
简单对自适应扩展点做一个解释,大家一定了解过适配器设计模式,而这个自适应扩展点实际上就是一个适配器。
这个方法里面主要做几个事情:
-
从cacheAdaptiveInstance 这个内存缓存中获得一个对象实例
-
 1 public T getAdaptiveExtension() {
 2     Object instance = cachedAdaptiveInstance.get();
 3     // 双重检查锁
 4     if (instance == null) {
 5         if (createAdaptiveInstanceError != null) {
 6             throw new IllegalStateException("Failed to create adaptive instance: " +
 7                     createAdaptiveInstanceError.toString(),
 8                     createAdaptiveInstanceError);
 9         }
10
11         synchronized (cachedAdaptiveInstance) {
12             instance = cachedAdaptiveInstance.get();
13             if (instance == null) {
14                 try {
15                     instance = createAdaptiveExtension();
16                     cachedAdaptiveInstance.set(instance);
17                 } catch (Throwable t) {
18                     createAdaptiveInstanceError = t;
19                     throw new IllegalStateException("Failed to create adaptive instance: " + t.toString(), t);
20                 }
21             }
22         }
23     }
24
25     return (T) instance;
26 }
createAdaptiveExtension
这段代码里面有两个结构,一个是injectExtension. 另一个是getAdaptiveExtensionClass()
我们需要先去了解getAdaptiveExtensionClass这个方法做了什么?很显然,从后面的.newInstance来看,应该是获得一个类并且进行实例)
1 private T createAdaptiveExtension() {
2     try {
3         return injectExtension((T) getAdaptiveExtensionClass().newInstance());
4     } catch (Exception e) {
5         throw new IllegalStateException("Can't create adaptive extension " + type + ", cause: " + e.getMessage(), e);
6     }
7 }
getAdaptiveExtensionClass
从类名来看,是获得一个适配器扩展点的类。
在这段代码中,做了两个事情
-
getExtensionClasses() 加载所有路径下的扩展点
-
createAdaptiveExtensionClass() 动态创建一个扩展点
1 private Class<?> getAdaptiveExtensionClass() {
2     getExtensionClasses();
3     if (cachedAdaptiveClass != null) {
4         return cachedAdaptiveClass;
5     }
6     return cachedAdaptiveClass = createAdaptiveExtensionClass();
7 }
createAdaptiveExtensionClass
动态生成适配器代码,以及动态编译
-
createAdaptiveExtensionClassCode, 动态创建一个字节码文件。返回code这个字符串
-
通过compiler.compile进行编译(默认情况下使用的是javassist)
-
 1 // 创建一个适配器拓展点。(创建一个动态的字节码文件)
 2 private Class<?> createAdaptiveExtensionClass() {
 3     // 生成字节码代码
 4     String code = new AdaptiveClassCodeGenerator(type, cachedDefaultName).generate();
 5     // 获得类加载器
 6     ClassLoader classLoader = findClassLoader();
 7     org.apache.dubbo.common.compiler.Compiler compiler = ExtensionLoader.getExtensionLoader(org.apache.dubbo.common.compiler.Compiler.class).getAdaptiveExtension();
 8     // 动态编译字节码
 9     return compiler.compile(code, classLoader);
10 }
 1 public class Protocol$Adaptive implements com.alibaba.dubbo.rpc.Protocol {
 2     public void destroy() {
 3         throw new UnsupportedOperationException("method public abstract void com.alibaba.dubbo.rpc.Protocol.destroy() of interface com.alibaba.dubbo.rpc.Protocol is not adaptive method!");
 4     }
 5
 6     public int getDefaultPort() {
 7         throw new UnsupportedOperationException("method public abstract int com.alibaba.dubbo.rpc.Protocol.getDefaultPort() of interface com.alibaba.dubbo.rpc.Protocol is not adaptive method!");
 8     }
 9
10     public com.alibaba.dubbo.rpc.Invoker refer(java.lang.Class arg0, com.alibaba.dubbo.common.URL arg1) throws com.alibaba.dubbo.rpc.RpcException {
11         if (arg1 == null) throw new IllegalArgumentException("url == null");
12         com.alibaba.dubbo.common.URL url = arg1;
13         String extName = (url.getProtocol() == null ? "dubbo" : url.getProtocol());
14         if (extName == null)
15             throw new IllegalStateException("Fail to get extension(com.alibaba.dubbo.rpc.Protocol) name from url(" + url.toString() + ") use keys([protocol])");
16         com.alibaba.dubbo.rpc.Protocol extension = (com.alibaba.dubbo.rpc.Protocol) ExtensionLoader.getExtensionLoader(com.alibaba.dubbo.rpc.Protocol.class).getExtension(extName);
17         return extension.refer(arg0, arg1);
18     }
19
20     public com.alibaba.dubbo.rpc.Exporter export(com.alibaba.dubbo.rpc.Invoker arg0) throws com.alibaba.dubbo.rpc.RpcException {
21         if (arg0 == null) throw new IllegalArgumentException("com.alibaba.dubbo.rpc.Invoker argument == null");
22         if (arg0.getUrl() == null)
23             throw new IllegalArgumentException("com.alibaba.dubbo.rpc.Invoker argument getUrl() == null");
24         com.alibaba.dubbo.common.URL url = arg0.getUrl();
25         String extName = (url.getProtocol() == null ? "dubbo" : url.getProtocol());
26         if (extName == null)
27             throw new IllegalStateException("Fail to get extension(com.alibaba.dubbo.rpc.Protocol) name from url(" + url.toString() + ") use keys([protocol])");
28         com.alibaba.dubbo.rpc.Protocol extension = (com.alibaba.dubbo.rpc.Protocol) ExtensionLoader.getExtensionLoader(com.alibaba.dubbo.rpc.Protocol.class).getExtension(extName);
29         return extension.export(arg0);
30     }
31 }
Protocol$Adaptive的主要功能
1、从url或扩展接口获取扩展接口实现类的名称;
2、根据名称,获取实现类ExtensionLoader.getExtensionLoader(扩展接口类).getExtension(扩展接口实现类名称),然后调用实现类的方法。
需要明白一点dubbo的内部传参基本上都是基于Url来实现的,也就是说Dubbo是基于URL驱动的技术
所以,适配器类的目的是在运行期获取扩展的真正实现来调用,解耦接口和实现,这样的话要不我们自己实现适配器类,要不dubbo帮我们生成,而这些都是 通过Adpative来实现。
到目前为止,我们的AdaptiveExtension的主线走完了,可以简单整理一下他们的调用关系如下
调用链

getExtensionClasses
这段代码主要做如下几个事情
-
从cachedClasses中获得一个结果,这个结果实际上就是所有的扩展点类,key对应name,value对应class
-
通过双重检查锁进行判断
调用loadExtensionClasses,去加载左右扩展点的实现
 1 private Map<String, Class<?>> getExtensionClasses() {
 2     Map<String, Class<?>> classes = cachedClasses.get();
 3     if (classes == null) {
 4         synchronized (cachedClasses) {
 5             classes = cachedClasses.get();
 6             if (classes == null) {
 7                 classes = loadExtensionClasses();
 8                 cachedClasses.set(classes);
 9             }
10         }
11     }
12     return classes;
13 }
loadExtensionClasses
从不同目录去加载扩展点的实现,在最开始的时候讲到过的。META-INF/dubbo ;META-INF/internal ; META-INF/services
主要逻辑
-
获得当前扩展点的注解,也就是Protocol.class这个类的注解,@SPI
-
判断这个注解不为空,则再次获得@SPI中的value值
-
如果value有值,也就是@SPI(“dubbo”),则讲这个dubbo的值赋给cachedDefaultName。这就是为什么我们能够通过ExtensionLoader.getExtensionLoader(Protocol.class).getDefaultExtension() ,能够获得DubboProtocol这个扩展点的原因
-
 1 /**
 2  * synchronized in getExtensionClasses
 3  * 此方法已经getExtensionClasses方法同步过
 4  */
 5 private Map<String, Class<?>> loadExtensionClasses() {
 6     //得到SPI的注解
 7     final SPI defaultAnnotation = type.getAnnotation(SPI.class);
 8     if (defaultAnnotation != null) {
 9         String value = defaultAnnotation.value();
10         if ((value = value.trim()).length() > 0) {
11             String[] names = NAME_SEPARATOR.split(value);
12             if (names.length > 1) {
13                 throw new IllegalStateException("more than 1 default extension name on extension " + type.getName()
14                                                 + ": " + Arrays.toString(names));
15             }
16             if (names.length == 1) cachedDefaultName = names[0];
17         }
18     }
19
20     Map<String, Class<?>> extensionClasses = new HashMap<String, Class<?>>();
21     loadDirectory(extensionClasses, DUBBO_INTERNAL_DIRECTORY);
22     loadDirectory(extensionClasses, DUBBO_DIRECTORY);
23     loadDirectory(extensionClasses, SERVICES_DIRECTORY);
24     return extensionClasses;
25 }
loadDirectory
解析指定路径下的文件,获取对应的扩展点,通过反射的方式进行实例化以后,put到extensionClasses这个Map集合中
 1 private void loadDirectory(Map<String, Class<?>> extensionClasses, String dir) {
 2     String fileName = dir + type.getName();
 3     try {
 4         Enumeration<java.net.URL> urls;
 5         ClassLoader classLoader = findClassLoader();
 6         if (classLoader != null) {
 7             urls = classLoader.getResources(fileName);
 8         } else {
 9             urls = ClassLoader.getSystemResources(fileName);
10         }
11         if (urls != null) {
12             while (urls.hasMoreElements()) {
13                 java.net.URL resourceURL = urls.nextElement();
14                 loadResource(extensionClasses, classLoader, resourceURL);
15             }
16         }
17     } catch (Throwable t) {
18         logger.error("Exception when load extension class(interface: " +
19                 type + ", description file: " + fileName + ").", t);
20     }
21 }
 1 private void loadResource(Map<String, Class<?>> extensionClasses, ClassLoader classLoader, java.net.URL resourceURL) {
 2     try {
 3         BufferedReader reader = new BufferedReader(new InputStreamReader(resourceURL.openStream(), "utf-8"));
 4         try {
 5             String line;
 6             while ((line = reader.readLine()) != null) {
 7                 final int ci = line.indexOf('#');
 8                 if (ci >= 0) line = line.substring(0, ci);
 9                 line = line.trim();
10                 if (line.length() > 0) {
11                     try {
12                         String name = null;
13                         int i = line.indexOf('=');
14                         if (i > 0) { // 文件采用name =value方式,通过i进行分割
15                             name = line.substring(0, i).trim();
16                             line = line.substring(i + 1).trim();
17                         }
18                         if (line.length() > 0) {
19                             // 加载对应的实现类,并且判断实现类必须是当前的加载拓展点的实现
20                             loadClass(extensionClasses, resourceURL, Class.forName(line, true, classLoader), name);
21                         }
22                     } catch (Throwable t) {
23                         IllegalStateException e = new IllegalStateException("Failed to load extension class(interface: " + type + ", class line: " + line + ") in " + resourceURL + ", cause: " + t.getMessage(), t);
24                         exceptions.put(line, e);
25                     }
26                 }
27             }
28         } finally {
29             reader.close();
30         }
31     } catch (Throwable t) {
32         logger.error("Exception when load extension class(interface: " +
33                 type + ", class file: " + resourceURL + ") in " + resourceURL, t);
34     }
35 }
 1 private void loadClass(Map<String, Class<?>> extensionClasses, java.net.URL resourceURL, Class<?> clazz, String name) throws NoSuchMethodException {
 2     if (!type.isAssignableFrom(clazz)) {
 3         throw new IllegalStateException("Error when load extension class(interface: " +
 4                 type + ", class line: " + clazz.getName() + "), class "
 5                 + clazz.getName() + "is not subtype of interface.");
 6     }
 7     // 判断是否有自定义适配类,如果有,则在前面讲过的获取适配类的时候,直接返回当前的自定义适配类,不需要动态创建
 8     // @Adaptive如果是加在类上, 表示当前类是一个自定义的自适应扩展点
 9     //如果是加在方法级别上,表示需要动态创建一个自适应扩展点,也就是Protocol$Adaptive
10     if (clazz.isAnnotationPresent(Adaptive.class)) {
11         if (cachedAdaptiveClass == null) {
12             cachedAdaptiveClass = clazz;
13         } else if (!cachedAdaptiveClass.equals(clazz)) {
14             throw new IllegalStateException("More than 1 adaptive class found: "
15                     + cachedAdaptiveClass.getClass().getName()
16                     + ", " + clazz.getClass().getName());
17         }
18         //如果没有Adaptive注解,则判断当前类是否带有参数是type类型的构造函数,如果有,则认为是
19         //wrapper类。这个wrapper实际上就是对扩展类进行装饰.
20         //可以在dubbo-rpc-api/internal下找到Protocol文件,发现Protocol配置了3个装饰
21         //分别是,filter/listener/mock. 所以Protocol这个实例来说,会增加对应的装饰器
22         //得到带有public DubboProtocol(Protocol protocol)的扩展点。进行包装
23     } else if (isWrapperClass(clazz)) {
24         Set<Class<?>> wrappers = cachedWrapperClasses;
25         if (wrappers == null) {
26             cachedWrapperClasses = new ConcurrentHashSet<Class<?>>();
27             wrappers = cachedWrapperClasses;
28         }
29         wrappers.add(clazz);
30     } else {
31         clazz.getConstructor();
32         if (name == null || name.length() == 0) {
33             name = findAnnotationName(clazz);
34             if (name.length() == 0) {
35                 throw new IllegalStateException("No such extension name for the class " + clazz.getName() + " in the config " + resourceURL);
36             }
37         }
38         String[] names = NAME_SEPARATOR.split(name);
39         if (names != null && names.length > 0) {
40             Activate activate = clazz.getAnnotation(Activate.class);
41             if (activate != null) {
42                 cachedActivates.put(names[0], activate);
43             }
44             for (String n : names) {
45                 if (!cachedNames.containsKey(clazz)) {
46                     cachedNames.put(clazz, n);
47                 }
48                 Class<?> c = extensionClasses.get(n);
49                 if (c == null) {
50                     extensionClasses.put(n, clazz);
51                 } else if (c != clazz) {
52                     throw new IllegalStateException("Duplicate extension " + type.getName() + " name " + n + " on " + c.getName() + " and " + clazz.getName());
53                 }
54             }
55         }
56     }
57 }