Spring,Spring,Spring,天天用,但是对她太过缺乏“深入”的了解,今天思虑良久,下定决心,我要好好“深入的”了解一下她。
Spring是一个架构性的框架:也就是改变代码结构的框架;
1.学习环境的准备
大部分教学视频是使用老掉牙Ecliplse教学Spring的,但是我TM是真的不想用Ecliplse,虽然我电脑上有Ecliplse...如果你要选择Ecliplse那么你可以跟着视频老老实实创建java项目--->导入jar包--->创建XML配置文件,完成spring学习环境的搭建;但是下面我要说的是我是如何使用IDEA开始Spring的学习的:


创建完maven项目之后,在pom.xml文件里面添加如下依赖:
<!--  spring-context:导入spring核心jar包  -->
    <dependency>
      <groupId>org.springframework</groupId>
      <artifactId>spring-context</artifactId>
      <version>5.0.7.RELEASE</version>
<!--      <scope>test</scope>-->
    </dependency>
<!--    导入日志jar包-->
    <dependency>
      <groupId>commons-logging</groupId>
      <artifactId>commons-logging</artifactId>
      <version>1.2</version>
    </dependency>
  </dependencies>
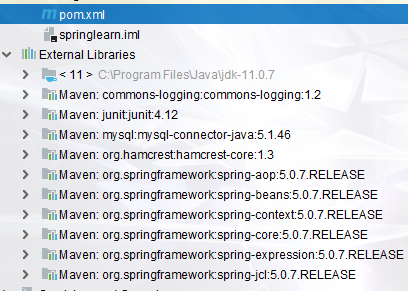
然后,你会发现项目依赖库下面增加了许多spring相关jar:
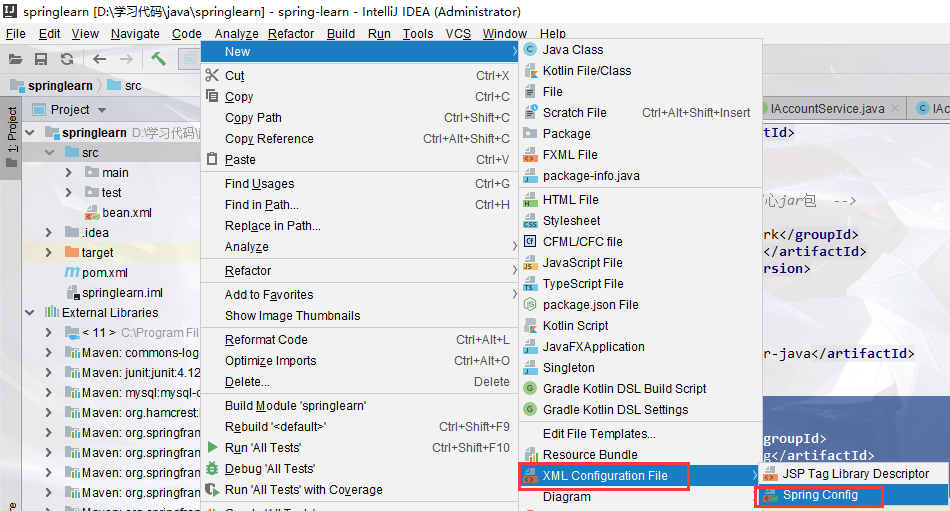
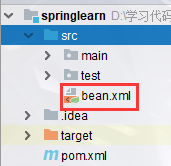
然后我们在项目资源文件夹src下面创建spring的配置文件:
这样你就可以愉快的开始spring学习之旅了....简单吧
2.IOC入门案例
2.1在bean.xml里面添加如下配置:
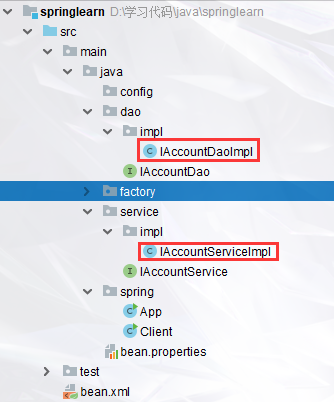
前提是下面的类已经在对应的路径下创建了:
<!--
bean:来映射一个类
id:是bean的唯一标识,如果没有指定则默认将会以类名作为标识
class:映射类的全路径
IOC容器管理默认是单例
-->
<bean id="accountService" class="main.java.service.impl.IAccountServiceImpl"></bean>
<bean id="accountDao" class="main.java.dao.impl.IAccountDaoImpl"></bean>
2.2获取Spring的核心容器,并且根据bean的id获取对象
创建一个类,书写如下代码:
public class Client {
    public static void main(String[] args) {
        /**
         * 获取Spring的核心容器,并且根据bean的id获取对象
         *
         * ApplicationContext:是BeanFactory的孙子接口,创建对象的时候采取的是立即加载的策略.(读取完XML配置文件之后,xml里面所有的bean对象就已经全部创建完成了)
         */
//        1.获取容器
        ApplicationContext context = new ClassPathXmlApplicationContext("bean.xml");
//        2.根据bean的id获取对象
        IAccountService iAccountService=(IAccountService)context.getBean("accountService");
        IAccountDao accountDao = context.getBean("accountDao", IAccountDao.class);
        System.out.println(iAccountService);
        System.out.println(accountDao);
    }
}
补充:ApplicationContext子类:
       /* * ApplicationContext子类:
         * -----ClassPathXmlApplicationContext:
         *      她是通过读取类路径下的配置文件创建spring容器;要求配置文件在类路径下
         * -----FileSystemXmlApplicationContext
         *      她是通过读取文件系统中的配置文件创建spring容器;要求配置文件在文件系统中即可
         */
2.3懒加载
如果我ლ❥们xml文件里面bean非常多,在创建容器的时候我们瞬间初始化那么多bean可能会导致卡顿,这个时候我们可以在xml文件里面按照下图:就能实现在调用getBean时才初始化:

2.4懒加载容器
如果我们不想通过上面的配置实现懒加载,下面的代码也可以实现在getBean时才创建对象:
public class Client {
    public static void main(String[] args) {
        /**
         * 获取Spring的核心容器,并且根据bean的id获取对象
         *
         * ApplicationContext:是BeanFactory的孙子接口,创建对象的时候采取的是理解加载的策略.(读取完XML配置文件之后,xml里面所有的bean对象就已经全部创建完成了)
         * BeanFactory:是springIoc的顶层接口,创建bean对象时,采用延迟加载的策略(当真正要从容器中获取对象时,才会创建,读完配置文件并不创建)
         */
//        1.获取容器
        ApplicationContext context = new ClassPathXmlApplicationContext("bean.xml");
//        2.获取对象
        IAccountService iAccountService = (IAccountService) context.getBean("accountService");
        IAccountDao accountDao = context.getBean("accountDao", IAccountDao.class);
        System.out.println(iAccountService);
        System.out.println(accountDao);

//        1.加载配置文件
        Resource resource = new ClassPathResource("bean.xml");
//        2.获取容器
        BeanFactory beanFactory = new XmlBeanFactory(resource);
//        3.获取对象
        IAccountService accountService = beanFactory.getBean("accountService", IAccountService.class);
    }
}
2.5bean对象的三种创建方式
<?xml version="1.0" encoding="UTF-8"?>
<beans xmlns="http://www.springframework.org/schema/beans"
       xmlns:xsi="http://www.w3.org/2001/XMLSchema-instance"
       xsi:schemaLocation="http://www.springframework.org/schema/beans http://www.springframework.org/schema/beans/spring-beans.xsd"
><!--default-lazy-init="true" :设置所有的bean为懒加载 -->

<!--spring管理bean对象细节:
bean标签:来映射一个类
    作用:让spring帮我们读取配置之后创建对象
    属性:
        id:是bean的唯一标识,如果没有指定则默认将会以类名作为标识
        class:映射类的全路径
        factory-method:指定创建bean对象的方法;
        factory-bean:指定创建bean对象的工厂bean的id

bean对象的三种创建方式:
                    1.通过调用默认构造函数创建bean对象   (常用)
                    在默认情况下我们在spring配置文件中写了一个bean标签,并提供了class属性,spring就会调用默认构造方法创建对象
                    2.通过静态工厂创建bean对象
                        工厂类中提供一个静态方法,可以返回一个我们要获取的类的对象
                        public class BeanFactory {
                                public static IAccountService getBean1() {
                                    return new IAccountServiceImpl();
                                 }
                                                  }
                    3.通过实例工厂创建bean对象
                         工厂类中提供一个非静态方法,可以返回一个我们要获取的类的对象
                         public class BeanFactory {
                                 public IAccountService getBean2() {
                                         return new IAccountServiceImpl();
                                 }
                                                   }
-->
<!--    1.默认方式创建对象:-->
<bean id="accountService" class="main.java.service.impl.IAccountServiceImpl"></bean>
<!--    2.静态工厂创建对象
                        id:bean的id
                        class:工厂类
                        factory-method:工厂类里面生成bean对象的方法(静态方法)
-->
    <bean id="staticFactory" class="main.java.factory.BeanFactory" factory-method="getBean1"></bean>

<!--    3.实例工厂创建对象
                        factory-bean:指定工厂bean的id
                        factory-method:指定工厂类里面生产bean对象的方法(非静态方法)
-->
    <bean id="instanceFactory" class="main.java.factory.BeanFactory"></bean>
    <bean id="instanceFactoryBean" factory-bean="instanceFactory" factory-method="getBean2"></bean>
</beans>
public class CreatBeanTest {
    public static void main(String[] args) {
        ApplicationContext context = new ClassPathXmlApplicationContext("bean.xml");
//        1.默认构造函数创建对象,获取方法
        IAccountService accountService = context.getBean("accountService", IAccountService.class);
        System.out.println(accountService);//main.java.service.impl.IAccountServiceImpl@17f7cd29
//        2.静态工厂创建对象,获取方法
        IAccountService accountService1 = context.getBean("staticFactory", IAccountService.class);
        System.out.println(accountService1);//main.java.service.impl.IAccountServiceImpl@7d8704ef
//        3.实例工厂创建对象,获取方法
        IAccountService accountService2 = context.getBean("instanceFactoryBean", IAccountService.class);
        System.out.println(accountService2);//main.java.service.impl.IAccountServiceImpl@17f7cd29
    }
}
2.6bean对象的作用范围:
<!--
bean对象的作用范围:
    它是可以通过配置的方式来指定的。
    配置的属性:bean标签的scope属性
    属性的取值:
        singleton:单例的。默认值
        prototype:多例的.
        request:WEB项目中,Spring创建一个Bean的对象,将对象存入到 request域中。
        session:WEB项目中,Spring创建一个Bean的对象,将对象存入到 session域中。
        global-session:WEB项目中,应用在 Portlet环境,如果没有Portlet环境那么 global-session相当于session

-->
<bean id="accountService" class="main.java.service.impl.IAccountServiceImpl" scope="prototype"></bean>
2.7bean对象的生命周期:
<!--
bean对象的生命周期:
    单例对象
        出生:容器创建对象出生
        活着:只要容器存在,对象就一直可用。
        死亡:容器销毁,对象消亡。
    多例对象
        出生:每次使用时,容器会为我们创建对象。
        活着:只要对象在使用过程中,就一直活着。
        死亡:当对象长时间不用,并且也没有其他对象引用时,由java的垃圾回收器回收.
-->
<bean id="singleton_accountService" class="main.java.service.impl.IAccountServiceImpl" scope="singleton" init-method="init" destroy-method="destory"></bean>
<bean id="prototype_accountService" class="main.java.service.impl.IAccountServiceImpl" scope="prototype" init-method="init" destroy-method="destory"></bean>
public class IAccountServiceImpl  implements IAccountService {
    IAccountDao iAccountDao=new IAccountDaoImpl();
    public IAccountServiceImpl(){
        System.out.println("对象创建了!!!");
    }
    public void init(){
        System.out.println("对象初始化了");
    }
    public void destory(){
        System.out.println("对象销毁了了");
    }
    @Override
    public void saveAccount() {
        iAccountDao.save();
    }
}
public class _05LifecycleTest {
    public static void main(String[] args) {
//        1.获取容器
        ClassPathXmlApplicationContext context = new ClassPathXmlApplicationContext("bean_lifecycle.xml");
//        2.获取对象
        IAccountService accountService1 = context.getBean("singleton_accountService", IAccountService.class);
        System.out.println(accountService1);
        IAccountService accountService2 = context.getBean("prototype_accountService", IAccountService.class);
        System.out.println(accountService2);
//        3.销毁容器
        context.close();
    }
}
3.DI依赖注入
3.1介绍两种注入类型
<?xml version="1.0" encoding="UTF-8"?>
<beans xmlns="http://www.springframework.org/schema/beans"
       xmlns:xsi="http://www.w3.org/2001/XMLSchema-instance"
       xsi:schemaLocation="http://www.springframework.org/schema/beans http://www.springframework.org/schema/beans/spring-beans.xsd">

<!--
Spring的依赖注入
    注入的方式:只有3中(今天只涉及两种)
                第一种方式:通过构造函数注入
                第二种方式:通过set方法注入
    注入的内容:
                第一类:基本类型和String类型
                第二类:其他的bean类型
                第三类:复杂类型(集合类型)
-->
<!--
第一种:使用构造函数注入:
            该方式要求对应的类必须有对应的带参构造方法
            涉及的标签:
            constructor-arg
            该标签是写在bean标签内部的子标签
            标签的属性:
                type:指定要注入的参数在构造函数中的类型
                index:指定要注入的参数在构造函数的索引位置
                name:指定参数在构造函数的中的名称
                value:指定注入的数据内容,他只能指定基本类型数据和String类型数据
                ref:指定其他bean类型数据。写的是其他bean的id。其他bean指的是存在于spring容器中的bean。
-->
<!--    1.构造方法注入-->
<bean id="accountService" class="main.java.service.impl.IAccountServiceImpl" >
    <constructor-arg name="name" value="李沁"></constructor-arg>
    <constructor-arg name="age" value="18"></constructor-arg>
    <constructor-arg name="birthday" ref="birthday"></constructor-arg>
</bean>
<bean id="birthday" class="java.util.Date"></bean>
<!--
第二种:使用set方法注入常用
            涉及的标签:
            property
            该标签也是要写在bean标签内部的子标签
            标签的属性:
                name:指定的是set方法的名称。匹配的是类中set后面的部分的全小写。
                value:指定注入的数据内容,他只能指定基本类型数据和String类型数据
                ref:指定其他bean类型数据。写的是其他bean的id。其他bean指的是存在于spring容器中的bean。
-->
<!--    2.set方法注入-->
    <bean id="accountService2" class="main.java.service.impl.IAccountServiceImpl" >
        <property name="name" value="李沁2"></property>
        <property name="age" value="17"></property>
        <property name="birthday" ref="birthday"></property>
    </bean>
</beans>
public class IAccountServiceImpl  implements IAccountService {
    private String name;
    private int age;
    private Date birthday;

    public IAccountServiceImpl(String name, int age, Date birthday) {
        this.name = name;
        this.age = age;
        this.birthday = birthday;
    }

    public void setName(String name) {
        this.name = name;
    }

    public void setAge(int age) {
        this.age = age;
    }

    public void setBirthday(Date birthday) {
        this.birthday = birthday;
    }

    public IAccountServiceImpl(){
        System.out.println("对象创建了!!!");
    }
    @Override
    public void saveAccount() {
        System.out.println(name+age+birthday);
    }
}
public class _06DI {
    public static void main(String[] args) {
//        1.获取容器
        ClassPathXmlApplicationContext context = new ClassPathXmlApplicationContext("bean_DI.xml");
//        2.获取对象
        IAccountService accountService1 = context.getBean("accountService", IAccountService.class);
        accountService1.saveAccount();
        IAccountService accountService2 = context.getBean("accountService2", IAccountService.class);
        accountService2.saveAccount();
//        3.销毁容器
        context.close();
    }
}
3.2 P名称空间注入:
<!--
使用p名称空间注入
    它的本质仍然是需要类中提供set方法,同时在配置文件中要导入p名称空间
-->
    <bean id="accountService3" class="main.java.service.impl.IAccountServiceImpl" p:name="李沁3">
    </bean>

3.3特殊类型属性注入
public class CollectionsDI {
    private String [] strings;
    private List<String>myList;
    private Set<String> mySet;
    private Map<String,String>myMap;
    private Properties myProps;

    public void setStrings(String[] strings) {
        this.strings = strings;
    }

    public void setMyList(List<String> myList) {
        this.myList = myList;
    }

    public void setMySet(Set<String> mySet) {
        this.mySet = mySet;
    }

    public void setMyMap(Map<String, String> myMap) {
        this.myMap = myMap;
    }

    public void setMyProps(Properties myProps) {
        this.myProps = myProps;
    }
    public void print(){
        System.out.println(Arrays.toString(strings));
        System.out.println(myList);
        System.out.println(myMap);
        System.out.println(mySet);
        System.out.println(myProps);
    }
}
<bean id="CollectionsDI" class="main.java.service.CollectionsDI" >
        <!-- 1.给数组注入数据-->
        <property name="strings">
            <array>
                <value>args</value>
                <value>args</value>
                <value>args</value>
            </array>
        </property>
        <!-- 2.给List注入数据-->
        <property name="myList">
            <list>
                <value>LIST</value>
                <value>LIST</value>
                <value>LIST</value>
            </list>
        </property>
        <!-- 3.给Set注入数据-->
        <property name="mySet">
            <set>
                <value>SET</value>
                <value>SET</value>
                <value>SET</value>
            </set>
        </property>
        <!-- 4.给Map注入数据-->
        <property name="myMap">
            <map>
                <entry key="001" value="map"></entry>
                <entry key="002">
                    <value>map注入方式2</value>
                </entry>
            </map>
        </property>
        <!-- 5.给Properties注入数据-->
        <property name="myProps">
            <props>
                <prop key="url">http:www.baidu.com</prop>
            </props>
        </property>
    </bean>
public class _06DI {
    public static void main(String[] args) {
//        1.获取容器
        ClassPathXmlApplicationContext context = new ClassPathXmlApplicationContext("bean_DI.xml");
//        2.获取对象
        CollectionsDI collectionsdi = context.getBean("CollectionsDI", CollectionsDI.class);
        collectionsdi.print();
        /**
         [args, args, args]
         [LIST, LIST, LIST]
         {001=map, 002=map注入方式2}
         [SET1, SET2, SET3]
         {url=http:www.baidu.com}
         */
//        3.销毁容器
        context.close();
    }
}
注意:上面xml文件里面bean标签内部结构相同的标签可以互换使用:
 <!-- 1.给数组注入数据-->
        <property name="strings">
            <list>
                <value>LIST</value>
                <value>LIST</value>
                <value>LIST</value>
            </list>
        </property>
        <!-- 2.给List注入数据-->
        <property name="myList">
            <array>
                <value>args</value>
                <value>args</value>
                <value>args</value>
            </array>
        </property>
3.4注入时特殊符号处理

3.5注解注入
一,用于创建对象的注解:
/***
 * 账号业务层实现类
 * 原来在XML的配置
 * <bean id="IAccountService_annotation" class="main.java.service.impl.IAccountService_annotationImpl" >
 *     <property name="iAccountDao_annotation" ref="dao"></property>
 * </bean>
 * 上面原来在XML里面的配置现在可以使用下面的注解搞定:
 *  注解的分类
 *     一,用于创建对象的:
 *          @Component:
 *          作用:就相当于在spring的xml配置文件中写了一个bean标签。
 *          属性:
 *              value:用于指定bean的id。当不写时,默认值是当前类名,首字母改小写。例如:accountServiceImpl
 *      由此注解衍生的三个注解:
 *                @Controller:一般用于表现层
 *                @Service:一般用于业务层
 *                @Repository:一般用于持久层
 *                他们的作用以及属性和@Component的作用是一模一样的。他们的出现是spring框架为我们提供更明确的语义化来指定不同层的bean对象。
*/
//@Component(value = "IAccountService_annotation")
//@Service(value = "IAccountService_annotation")
@Repository(value = "IAccountService_annotation")
public class IAccountService_annotationImpl implements IAccountService_annotation {
...
}
上面的代码就实现了将类IAccountService_annotationImpl 交给Spring容器作为组件管理,当然,前提是上面这个类要在Spring启动的时候被Spring扫描到,配置Spring的扫描路径是在spring的xml配置文件里添加如下代码:
<!--告知Spring创建容器时要扫描的包:这些包下面所有带有Spring注解的内容都会被加载到Spring容器里面-->
    <context:component-scan base-package="main.java.service"></context:component-scan>
    <context:component-scan base-package="main.java.dao"></context:component-scan>
二,用于注入数据的:
/**
 *     二,用于注入数据的:
 *           @Autowired
 *           作用:自动按照类型注入。只要容器中有唯一的类型匹配,则可以直接注入成功。如果没有匹配的类型就报错。
 *                如果有多个类型匹配时,会先按照类型找到符合条件的对象,然后再用变量名称作为bean的id,从里面继续查找,如果找到仍然可以注入成功,如果没有匹配的id,就报错
 *           细节:当使用此注解注入时,set方法就可以省略了。
 *           属性:
 *               required:是否必须注入成功。取值是true(默认值)/false。当取值是true时,没有匹配的对象就报错。
 *           @Qualifier作用:在自动按照类型(@Autowired)注入的基础之上,再按照bean的id注入。在给类成员注入时,它不能够浊立使用。
 *           属性:
 *              value:用于指定bean的id。
 *           @Resource作用:直接按照bean的id注入。
 *           属性:
 *              name:用于指定bean的id。
 *          以上3个注解,都只能用于注入其他bean类型,而不能注入基本类型和String。
 *          用于注入基本类型和String类型的注解
*/
//@Component(value = "IAccountService_annotation")
//@Service(value = "IAccountService_annotation")
@Repository(value = "IAccountService_annotation")
public class IAccountService_annotationImpl implements IAccountService_annotation {
  //@Autowired
  //@Qualifier(value = "dao")
    @Resource(name = "dao")
    private IAccountDao_annotation iAccountDao_annotation;

 /*   public void setiAccountDao_annotation(IAccountDao_annotation iAccountDao_annotation) {
        this.iAccountDao_annotation = iAccountDao_annotation;
    }*/

    @Override
    public void saveAccount() {
        iAccountDao_annotation.save();
    }
}
@Value:
/**
           @Value作用:用于注入基本类型和String类型的数据。
           属性:
                value:用于指定要注入的数据。它支持使用spring的el表达式。
                spring的el表达式写法:
                                    ${表达式}
**/

@Repository(value = "IAccountService_annotation")
public class IAccountService_annotationImpl implements IAccountService_annotation {
    @Value("https://www.hao123.com/")
    public String url;
    @Value("${jdbc.driver}")
    private String driver;
 @Override
    public void saveAccount() {
        System.out.println(url);//https://www.hao123.com/
        System.out.println(driver);//com.mysql.jdbc.Driver;
        iAccountDao_annotation.save();
    }
}
spring的el表达式的使用前提是:
1.我们要提前创建了相应的配置文件:

2.我们在spring的xml配置文件里面添加如下注解:
<!--    告知Spring,properties配置文件的位置-->
    <context:property-placeholder location="dataBaseConfig.properties"></context:property-placeholder>
三,用于改变作用范围:
/**
       三,用于改变作用范围:
 *      @Scope
 *          作用:用于改变bean的作用范围。范围的取值和xml中的配置是一样的(单例:singleton;多例:prototype)
 *          属性:
 *              value:用于指定范围。
**/
@Component(value = "IAccountService_annotation")
@Scope("prototype")//多例(默认情况是单例)
public class IAccountService_annotationImpl implements IAccountService_annotation {
...
}
测试代码:
    public static void main(String[] args) {
        ClassPathXmlApplicationContext context = new ClassPathXmlApplicationContext("bean_annotation.xml");
        IAccountService_annotation annotation = context.getBean("IAccountService_annotation", IAccountService_annotation.class);
        IAccountService_annotation annotation2 = context.getBean("IAccountService_annotation", IAccountService_annotation.class);
        System.out.println(annotation==annotation2);//false
}
四,和生命周期相关的:
/**
 *      四,和生命周期相关的:
 *          @PostContruct
 *              作用:用于指定初始化方法。和配置文件中init-method属性是一样的
 *          @PreDestroy
 *              作用:用于指定销毁方法。和配置文件中destroy-method属性是一样的
 */
@Component(value = "IAccountService_annotation")
@Scope("singleton")
public class IAccountService_annotationImpl implements IAccountService_annotation {
    @PostConstruct
    public void init(){
        System.out.println("对象初始化了");
    }
    @PreDestroy
    public void destory(){
        System.out.println("对象销毁了");
    }
}
补充内容:
@Autowired图解

@Resource爆红?

Alt+Enter


最后项目pom.xml会添加上如下内容,并在对应jar下载完毕之后,就可以使用@Resource了:
    <dependency>
      <groupId>jakarta.annotation</groupId>
      <artifactId>jakarta.annotation-api</artifactId>
      <version>1.3.4</version>
    </dependency>

注意属性如果只有一个value要赋值,那么value可以省略@Component(value = "IAccountService")可以写作@Component("IAccountService")