
 <%@ Page Language="C#" AutoEventWireup="true" CodeFile="Default.aspx.cs" Inherits="_Default" %>

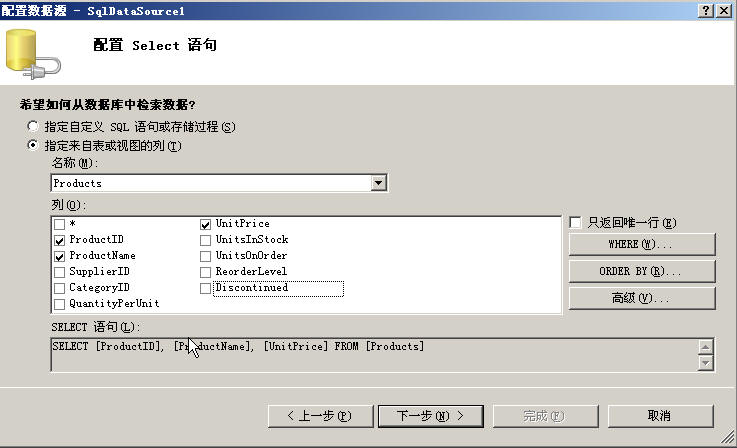
 <!DOCTYPE html PUBLIC "-//W3C//DTD XHTML 1.1//EN" "http://www.w3.org/TR/xhtml11/DTD/xhtml11.dtd"><html xmlns="http://www.w3.org/1999/xhtml"><head id="Head1" runat="server"> <title>示例13-3</title> <link id="InstanceStyle" href="StyleSheet.css" type="text/css" rel="stylesheet"></head><body> <form id="form1" runat="server"> <div> <fieldset style=" 620px"> <legend class="mainTitle">实现匿名用户向注册用户迁移</legend> <table border="0" cellpadding="5" width="620px"> <tr> <td style="font-size:small;">当前用户是:<asp:Label ID="lbUserName" runat="server"></asp:Label> </td> <td> <asp:LinkButton ID="lbtLogin" runat="server" CssClass="littleTitle" OnClick="lbtLogin_Click">登录</asp:LinkButton> <asp:LinkButton ID="lbtLogout" runat="server" CssClass="littleTitle" OnClick="lbtLogout_Click">退出</asp:LinkButton></td> </tr> <tr> <td colspan="2"><hr /> </td> </tr> <tr align="center"> <td> <p class="littleTitle"> 待售商品列表</p> </td> <td> <p class="littleTitle"> 购物车</p> </td> </tr> <tr> <td> <asp:SqlDataSource ID="SqlDataSource1" runat="server" ConnectionString="<%$ ConnectionStrings:NorthwindConnectionString %>" SelectCommand="SELECT [ProductID], [ProductName], [UnitPrice] FROM [Products]"></asp:SqlDataSource> <asp:GridView ID="ProductGrid" runat="server" Width="300px" AllowPaging="True" AutoGenerateColumns="False" BackColor="White" BorderColor="#CC9966" BorderStyle="None" BorderWidth="1px" CellPadding="4" DataKeyNames="ProductID" DataSourceID="SqlDataSource1" Font-Size="Small" PageSize="5"> <FooterStyle BackColor="#FFFFCC" ForeColor="#330099" /> <RowStyle BackColor="White" ForeColor="#330099" /> <Columns> <asp:CommandField ButtonType="Image" SelectImageUrl="~/Images/button_buy.gif" ShowSelectButton="True" /> <asp:BoundField DataField="ProductName" HeaderText="商品名称" SortExpression="ProductName" /> <asp:BoundField DataField="UnitPrice" DataFormatString="{0:c}" HeaderText="单价" SortExpression="UnitPrice" /> </Columns> <PagerStyle BackColor="#FFFFCC" ForeColor="#330099" HorizontalAlign="Center" /> <SelectedRowStyle BackColor="#FFCC66" Font-Bold="True" ForeColor="#663399" /> <HeaderStyle BackColor="#990000" Font-Bold="True" ForeColor="#FFFFCC" /> </asp:GridView> </td> <td valign="top"> <asp:GridView ID="CartGrid" AutoGenerateColumns="False" DataKeyNames="ID" CellPadding="4" Width="320px" runat="Server" BackColor="White" BorderColor="#CC9966" BorderStyle="None" BorderWidth="1px" Font-Size="Small"> <Columns> <asp:ButtonField CommandName="select" Text="Remove" ButtonType="Image" ImageUrl="~/Images/button_del.gif" /> <asp:BoundField DataField="Name" HeaderText="商品名称" /> <asp:BoundField DataField="Price" HeaderText="单价" DataFormatString="{0:c}" /> <asp:BoundField DataField="Quantity" HeaderText="数量" /> </Columns> <FooterStyle BackColor="#FFFFCC" ForeColor="#330099" /> <RowStyle BackColor="White" ForeColor="#330099" /> <PagerStyle BackColor="#FFFFCC" ForeColor="#330099" HorizontalAlign="Center" /> <SelectedRowStyle BackColor="#FFCC66" Font-Bold="True" ForeColor="#663399" /> <HeaderStyle BackColor="#990000" Font-Bold="True" ForeColor="#FFFFCC" /> </asp:GridView> <asp:Label ID="lblTotal" runat="Server" CssClass="littleTitle" /></td> </tr> </table> </fieldset> </div> </form></body></html>
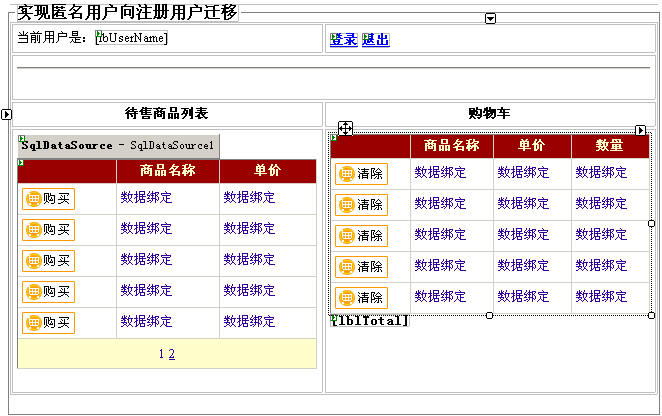
1
using System;2
using System.Data;3
using System.Configuration;4
using System.Web;5
using System.Web.Security;6
using System.Web.UI;7
using System.Web.UI.WebControls;8
using System.Web.UI.WebControls.WebParts;9
using System.Web.UI.HtmlControls;10
11
public partial class _Default : System.Web.UI.Page12
{13
 protected void Page_Load(object sender, EventArgs e)
14
 {
{
15
16
 }
}17
protected void lbtLogin_Click(object sender, EventArgs e)18
{19
Response.Redirect("Login.aspx");20
}21
protected void lbtLogout_Click(object sender, EventArgs e)22
{23
FormsAuthentication.SignOut();24
}25
 }
}26
Login页面的前后代码如下:
<%@ Page Language="C#" AutoEventWireup="true" CodeFile="Login.aspx.cs" Inherits="Login" %>
<!DOCTYPE html PUBLIC "-//W3C//DTD XHTML 1.1//EN" "http://www.w3.org/TR/xhtml11/DTD/xhtml11.dtd">
<html xmlns="http://www.w3.org/1999/xhtml">
<head runat="server">
<title>示例13-3</title>
<link id="InstanceStyle" href="StyleSheet.css" type="text/css" rel="stylesheet">
</head>
<body>
<form id="form1" runat="server">
<div>
<fieldset style=" 260px">
<legend class="mainTitle">站点登录</legend>
<br />
<p style="font-size: small">提示:用户名是Tom,密码是Tom@Tom.com</p>
<asp:Login ID="Login1" runat="server" Font-Size="Small" LoginButtonText="提交" PasswordLabelText="密码:" TitleText="" UserNameLabelText="用户名:" FailureText="输入不正确." RememberMeText="下次自动登录">
<TextBoxStyle Width="150px" />
<TitleTextStyle Font-Bold="True" />
<CheckBoxStyle HorizontalAlign="Right" />
</asp:Login>
</fieldset>
</div>
</form>
</body>
</html>
Login页面没有后台代码,该页面需要用到一个成员用户管理类别的控件:Login1,请注意。
以上就是页面上主要两个页面的设计情况,再就是些样式设计StyleSheet.css和Web.config如下:
1
body2
{3
}4
.mainTitle5
{6
font-size: 12pt;7
font-weight: bold;8
font-family: 宋体;9
}10
.commonText11
{12
font-size: 11pt;13
font-family: 宋体;14
}15
.littleTitle16
{17
font-size: 10pt;18
font-family: 宋体;19
font-weight:bold;20
}21
1
<?xml version="1.0"?>2
3
<configuration xmlns="http://schemas.microsoft.com/.NetConfiguration/v2.0">4
<appSettings/>5
<connectionStrings>6
<add name="NorthwindConnectionString" connectionString="Data Source=ROGER;Initial Catalog=Northwind;Integrated Security=True" providerName="System.Data.SqlClient"/>7
</connectionStrings>8
<system.web>9
10
<authentication mode="Forms">11
<forms loginUrl="Login.aspx"></forms>12
</authentication>13
14
<compilation debug="true"/>15
</system.web>16
</configuration>注意:以上数据库连接字符串需要自己配置,这里配置是Windows登录,而且Data Source根据每台机器自己配置。
以上由Web.Config可以看出,此时页面验证方式是Forms。
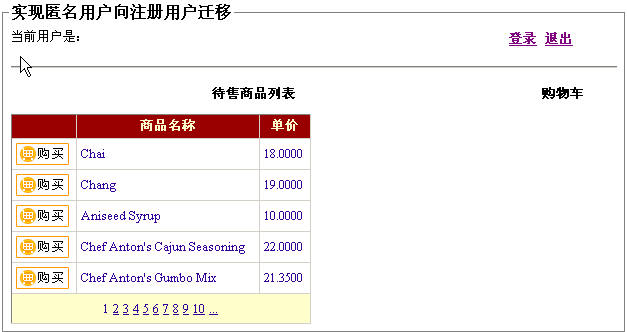
此时运行Default.aspx页面是可以出现下图左边购物车的数据,该数据来自Northwind数据库,因为界面上通过SqlDataSource控件进行数据沟通的,如下两个图
此时在登录界面(Login.aspx)进行登录是无法实现的,因为此时未引入Profile概念,那么此概念将在下面介绍。
ASP.NET 2.0在处理用户配置信息方面基本抛弃了ASP.NET 1.X的做法,其提供的个性化用户配置功能可以实现将用户配置信息与单个用户关联,并采取持久化方式存储信息。理解这个概念需要注意以下四点:一是配置信 息可以是与任何用户有关的信息。二是所存储的信息可以是可以是任何数据类型的对象,比如甚至可以是复杂的自定义数据类型。三是单个用户可以是注册用户,也 可以是匿名用户。四是默认情况下,持久存储采用SQL Server数据库方式,并且无需自行创建或维护数据库,这些工作都有ASP.NET 2.0自动完成。
使用个性化用户配置功能主要包括如下两个核心的步骤:首先,配置应用程序以便启用和定义要为 用户存储和跟踪的配置信息。这些工作在Web.config文件的<Profile>中轻松完成。然后,使用与用户配置功能有关的强类型 API实现对用户配置信息的存储、访问和管理等。
那么,下面先来配置Web.config文件,加入如下代码:
1
<?xml version="1.0"?>2
3
<configuration xmlns="http://schemas.microsoft.com/.NetConfiguration/v2.0">4
<appSettings/>5
<connectionStrings>6
<add name="NorthwindConnectionString" connectionString="Data Source=ROGER;Initial Catalog=Northwind;Integrated Security=True" providerName="System.Data.SqlClient"/>7
</connectionStrings>8
<system.web>9
10
<anonymousIdentification enabled="true"/>11
<profile>12
<properties>13
<add name="ShoppingCart" type="ShoppingCart" serializeAs="Binary" allowAnonymous="true"/>14
</properties>15
</profile>16
17
<authentication mode="Forms">18
<forms loginUrl="Login.aspx"></forms>19
</authentication>20
21
<compilation debug="true"/>22
</system.web>23
</configuration>注意:上述红色部分代码(10~15行)是新加入的配置节
10行:标注是否需要对匿名用户进行身份记录
Profile 节包括<properties>和<providers>两大子配置节,我们先看<properties>,13行 此处是我们准备存储的ShoppingCart类,这个类用来记录购物车信息,type="ShoppingCart" 就是指向待会建立的类名叫ShoppingCart,后面二个属性表明这个类是可序列化为二进制,并且运行匿名用户访问的。
下面在App_Code目录下建立ShoppingCart类,代码如下:
1
using System;2
using System.Collections;3
4
[Serializable]5
public class ShoppingCart6
{7
public Hashtable _CartItems = new Hashtable();8
// 创建属性CartItems,用于获取购物车中所有商品9
public ICollection CartItems10
{11
get { return _CartItems.Values; }12
}13
14
// 创建属性Total,用于获取购物车中商品总价15
public decimal Total16
{17
get18
{19
decimal sum = 0;20
foreach (CartItem item in _CartItems.Values)21
{22
sum += item.Price * item.Quantity;23
} 24
return sum;25
}26
}27
// 实现将商品添加到购物车中28
public void AddItem(int ID, string Name, decimal Price)29
{30
CartItem item = (CartItem)_CartItems[ID];31
if (item == null)32
{33
_CartItems.Add(ID, new CartItem(ID, Name, Price));34
} 35
else36
{37
item.Quantity++;38
_CartItems[ID] = item;39
}40
}41
// 从购物车中删除商品42
public void RemoveItem(int ID)43
{44
CartItem item = (CartItem)_CartItems[ID];45
if (item == null)46
{47
return;48
} 49
item.Quantity--;50
if (item.Quantity == 0)51
{52
_CartItems.Remove(ID);53
}54
else55
{56
_CartItems[ID] = item;57
} 58
}59
}60
61
//实现表示商品的业务实体类62
[Serializable]63
public class CartItem64
{65
private int _ID;66
private string _Name;67
private decimal _Price;68
private int _Quantity = 1;69
// 创建属性ID70
public int ID71
{72
get { return _ID; }73
}74
// 创建属性Name75
public string Name76
{77
get { return _Name; }78
}79
// 创建属性Price80
public decimal Price81
{82
get { return _Price; }83
}84
// 创建属性Quantity85
public int Quantity86
{87
get { return _Quantity; }88
set { _Quantity = value; }89
}90
// 创建类构造函数91
public CartItem(int ID, string Name, decimal Price)92
{93
_ID = ID;94
_Name = Name;95
_Price = Price;96
}97
}这个类需要我们了解非泛型集合哈希表的用法。
编译并运行后,点击登录按钮,按照提示进行登录操作,当然此时无法登录成功,因为我们还未配置用户名,然而经过此次不成功的登录并退出后,马上会发 现在App_Data目录中ASP.NET 2.0已经为我们建立了一个名为ASPNETDB.mdf的数据库。那么我们此时可以建立"Tom"这个用户了,步骤如下:
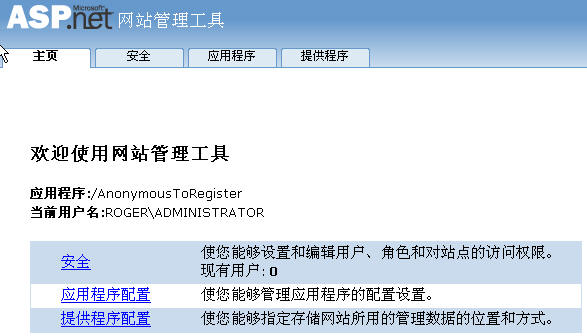
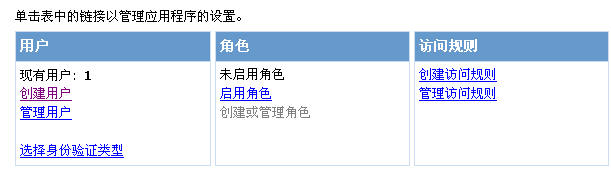
1.单击"网站"菜单下的"ASPNET配置"子菜单,弹出如下界面:
点击"安全"->"创建用户",并按照刚才未登录成功的提示用户和密码创建这个用户,其他信息自己随便填写。
创建好的用户现在有一个了,注意此时还未启用角色管理,如图:
双击ASPNETDB.MDF数据库,打开里面的ASPNET_USERS表,会发现现在多了一个刚注册的用户。
那么现在开始构建购物车相关代码,以上Default.aspx.cs中代码无需变动,只需将ProductGrid和CartGrid这两个GridView控件设置各自的OnSelectedIndexChanged事件分别指向AddCartItem和RemoveCartItem方法,用于分别加入购物车和从购物车删除功能。请看如下两个代码片段:
<asp:GridView ID="ProductGrid" runat="server" OnSelectedIndexChanged="AddCartItem"
Width="300px" AllowPaging="True" AutoGenerateColumns="False" BackColor="White"
BorderColor="#CC9966" BorderStyle="None" BorderWidth="1px" CellPadding="4" DataKe............
<asp:GridView ID="CartGrid" AutoGenerateColumns="False" DataKeyNames="ID" OnSelectedIndexChanged="RemoveCartItem"
CellPadding="4" Width="320px" runat="Server" BackColor="White" BorderColor="#CC9966"................
现在Default页面的后台代码如下:
1
using System;2
using System.Data;3
using System.Configuration;4
using System.Web;5
using System.Web.Security;6
using System.Web.UI;7
using System.Web.UI.WebControls;8
using System.Web.UI.WebControls.WebParts;9
using System.Web.UI.HtmlControls;10
11
public partial class _Default : System.Web.UI.Page12
{13
protected void Page_Load(object sender, EventArgs e)14
{15
if (!Page.IsPostBack)16
{17
BindShoppingCart();18
}19
}20
// 显示Profile对象中保存的购物车信息21
protected void BindShoppingCart()22
{23
//如果Profile中存储的购物车的商品不为空,则进行数据绑定并计算总价24
if (Profile.ShoppingCart != null)25
{26
CartGrid.DataSource = Profile.ShoppingCart.CartItems;27
CartGrid.DataBind();28
lblTotal.Text = "总价:" + Profile.ShoppingCart.Total.ToString("c");29
}30
}31
// 将选中商品添加到购物车中32
protected void AddCartItem(object sender, EventArgs e)33
{34
// 获取被选中数据行35
GridViewRow row = ProductGrid.SelectedRow;36
// 获取主键ID的值37
int ID = (int)ProductGrid.SelectedDataKey.Value;38
// 获取商品名称39
String Name = row.Cells[1].Text;40
// 获取商品单价41
decimal Price = Decimal.Parse(row.Cells[2].Text, System.Globalization.NumberStyles.Currency);42
// 如果Profile中存储的购物车对象为null,则创建一个相应对象43
if (Profile.ShoppingCart == null)44
{45
Profile.ShoppingCart = new ShoppingCart();46
}47
// 利用前面获取的数据,在Profile对象购物车中添加被选中的商品48
Profile.ShoppingCart.AddItem(ID, Name, Price);49
// 显示购物车数据50
BindShoppingCart();51
}52
// 将选中商品从购物车中删除53
protected void RemoveCartItem(object sender, EventArgs e)54
{55
// 获取被选中商品的主键ID56
int ID = (int)CartGrid.SelectedDataKey.Value;57
// 利用ID,从Profile对象购物车中删除该商品58
Profile.ShoppingCart.RemoveItem(ID);59
// 显示购物车数据60
BindShoppingCart();61
}62
63
protected void Page_PreRender(object sender, EventArgs e)64
{65
if (Profile.IsAnonymous)66
{67
lbUserName.Text = "匿名用户";68
lbtLogout.Visible = false;69
}70
else71
{72
lbUserName.Text = Profile.UserName;73
lbtLogin.Visible = false;74
}75
}76
protected void lbtLogin_Click(object sender, EventArgs e)77
{78
Response.Redirect("Login.aspx");79
}80
protected void lbtLogout_Click(object sender, EventArgs e)81
{82
FormsAuthentication.SignOut();83
}84
}现在我们在Default.aspx.cs中可以使用profile这个类了,因为我们在Web.config中已经加入了Profile配置节的定义了。
再次编译运行,我们会发现可以开始在匿名身份下进行购物车的商品添加操作了,我们加入一个商品,并退出, 待下次重新用匿名身份运行时,仍然能看到以前购物车里选择的商品。那么此时ASP.NET 2.0真正把匿名用户当一个状态用户来保存了,那么这些信息存在哪儿呢?答案就在ASPNETDB数据库的表aspnet_Profile表中,我们可以 看到最近这个匿名用户登录的情况,并且在PropertyNames字段可以看到购物车信息。注意:此时ASP.NET 2.0为这个匿名用户生成了唯一的UserId,并且在ASPNET_Users表中此UserId也生成了另一条记录,这两个表通过这个字段关联的,可 见,ASP.NET 2.0已经把这个匿名用户同刚才注册用户"Tom"都当作用户来管理了,但区别是两者在ASPNET_Users表中 IsAnonymous(是否是匿名用户)字段值是不同的。
再次运行网站,仍然看到匿名用户的购物信息,但此时点击"登录"按钮进入登录页面 (Login.aspx),输入正确的用户名和密码,如果都正确,界面上Login控件所在的"提交"按钮会自动关联ASPNETDB数据库,进行登录验 证,所以Login页面无需任何代码。那么此时当输入用户名密码都正确后,进入购物车页面,会发现,匿名用户变成了注册用户名,然而,刚才匿名购物的信息 没有了,也就是此时购物车是空的。按理说,匿名用户登录成功后,应该把购物信息带入到注册用户中去,这就是所谓的匿名用户的迁移问题!但此时无法实现,其实还有最后一道代码编写任务,那就是:
在网站下新建一个全局应用程序类---Global.asax,去掉所有代码并写入如下代码:
1
<%@ Application Language="C#" %>2
3
<script RunAt="server">4
5
void Profile_MigrateAnonymous(Object sender, ProfileMigrateEventArgs pe)6
{7
//获取匿名用户的Profile对象8
ProfileCommon anonProfile = Profile.GetProfile(pe.AnonymousID);9
//如果总价为不为0(说明匿名用户进行了选择),则将匿名用户的Profile存储起来10
if (anonProfile.ShoppingCart.Total != 0)11
{ 12
Profile.ShoppingCart = anonProfile.ShoppingCart; 13
} 14
//删除匿名用户的用户数据(从aspnet_Users表)15
Membership.DeleteUser(pe.AnonymousID);16
//删除匿名用户的Profle数据(从aspnet_Profile表)17
ProfileManager.DeleteProfile(pe.AnonymousID);18
//删除匿名用户标识19
AnonymousIdentificationModule.ClearAnonymousIdentifier(); 20
}21
</script>22
加入上述代码后,,再次运行并登录成功,会发现匿名用户的购物信息已经迁移到注册用户这边来了,那么我们的目的也达到了。下面是对上述代码的详细解释:
Profile_MigrateAnonymous事件:
当用户以匿名身份选择商品,并通过登录站点成为注册用户过程中,会引发一个重要的事件MigrateAnonymous,该事件的处理程序是Profile_MigrateAnonymous。
ProfileCommon 类解释:
在运行时,ASP.NET 编译系统使用 profile 节中指定的信息生成一个名为 ProfileCommon 的类,该类派生自 ProfileBase。ProfileCommon 类定义基于配置文件的 profile 节中定义的属性。该类允许你访问并修改各个配置文件的值。为每个用户配置文件创建一个此类的实例,并且您可以通过 HttpContext.Profile 属性以代码访问各个配置文件值。有关 ASP.NET 2.0 中新增的配置文件功能的更多信息,请参见 ASP.NET 配置文件属性。
小结:经过上述步骤,可以将一个未使用任何用户管理的网站利用ASP.NET 2.0内置的功能配置成用户管理模式。关键是理解Profile配置节的功能以及匿名用户迁移代码的写法。
问题思考:那么上述自动生成的数据库是否能在SQL Server2005中找到呢?现在还只是实现了用户的管理,那么权限管理怎么做?这些问题将在下篇中介绍。
摘自 http://www.cnblogs.com/Rogerliu/archive/2008/08/30/1279847.html
本文作者写的比较详细了 更多请参考 http://msdn.microsoft.com/zh-cn/library/d8b58y5d%28v=VS.80%29.aspx
附:
MVC下实现匿名用户向注册用户的迁移
添加头文件
using System.Web.Profile;
using System.Web.Security;
void Profile_MigrateAnonymous(Object sender, ProfileMigrateEventArgs pe)
{
//获取匿名用户的Profile对象
ProfileBase profileBase = ProfileBase.Create(pe.AnonymousID);
//获取当前用户的Profile对象
ProfileBase profile = HttpContext.Current.Profile as ProfileBase;
if (profileBase.GetPropertyValue("ShoppingCart") != null)
{
profile.SetPropertyValue("ShoppingCart", profileBase.GetPropertyValue("ShoppingCart"));
}
//删除匿名用户的用户数据(从aspnet_Users表)
Membership.DeleteUser(pe.AnonymousID);
//删除匿名用户的Profle数据(从aspnet_Profile表)
ProfileManager.DeleteProfile(pe.AnonymousID);
//删除匿名用户标识
AnonymousIdentificationModule.ClearAnonymousIdentifier();
}