Keep UINavigationBar at the top (Don't scroll with keyboard)
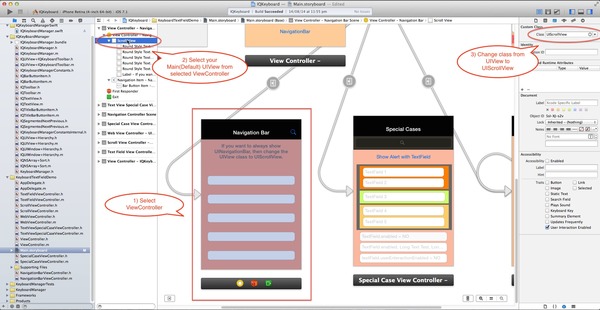
If you don't want to hide the default UINavigationBar of UINavigationController when keyboardManager slides up the view, then just change the UIView class to UIScrollView from the storyboard or xib. If you are using Autoresizing then you must set correct contentSize of scrollView or if you are using Autolayout then make sure scrollView is able to get it's contentSize from constraints.
If you are not using storyboard or xib and creating your view programmatically. Then you need to override '-(void)loadView' method of UIViewController, and need to set an UIScrollView instance to self.view.
    -(void)loadView
    {
        UIScrollView *scrollView = [[UIScrollView alloc] initWithFrame:[[UIScreen mainScreen] bounds]];
        scrollView.contentSize = CGSizeMake(CONTENT_WIDTH, CONTENT_HEIGHT); //You may not need this code if you are working with Autolayout and scrollView is able to get it's contentSize from constraints.
        self.view = scrollView;
    }
Working with TopLayoutGuide and BottomLayoutGuide
Technically IQKeyboardManager moves upwards/downwards of currently presentedViewController's view. So if you're pinning your UITextfield/UITextView with TopLayoutGuide/BottomLayoutGuide then you're saying Keep x distance from screen top(I don't care about where is self.view)'. In this case your view is moved upwards but textField remains at same position and keeping x distance from screen top.
To fix it, just let IQKeyboardManager know the constraint which is pinned with TopLayoutGuide/BottomLayoutGuide, just map TopLayoutGuide/BottomLayoutGuide constraint with IQLayoutGuideConstraint. Here is the screenshot:- 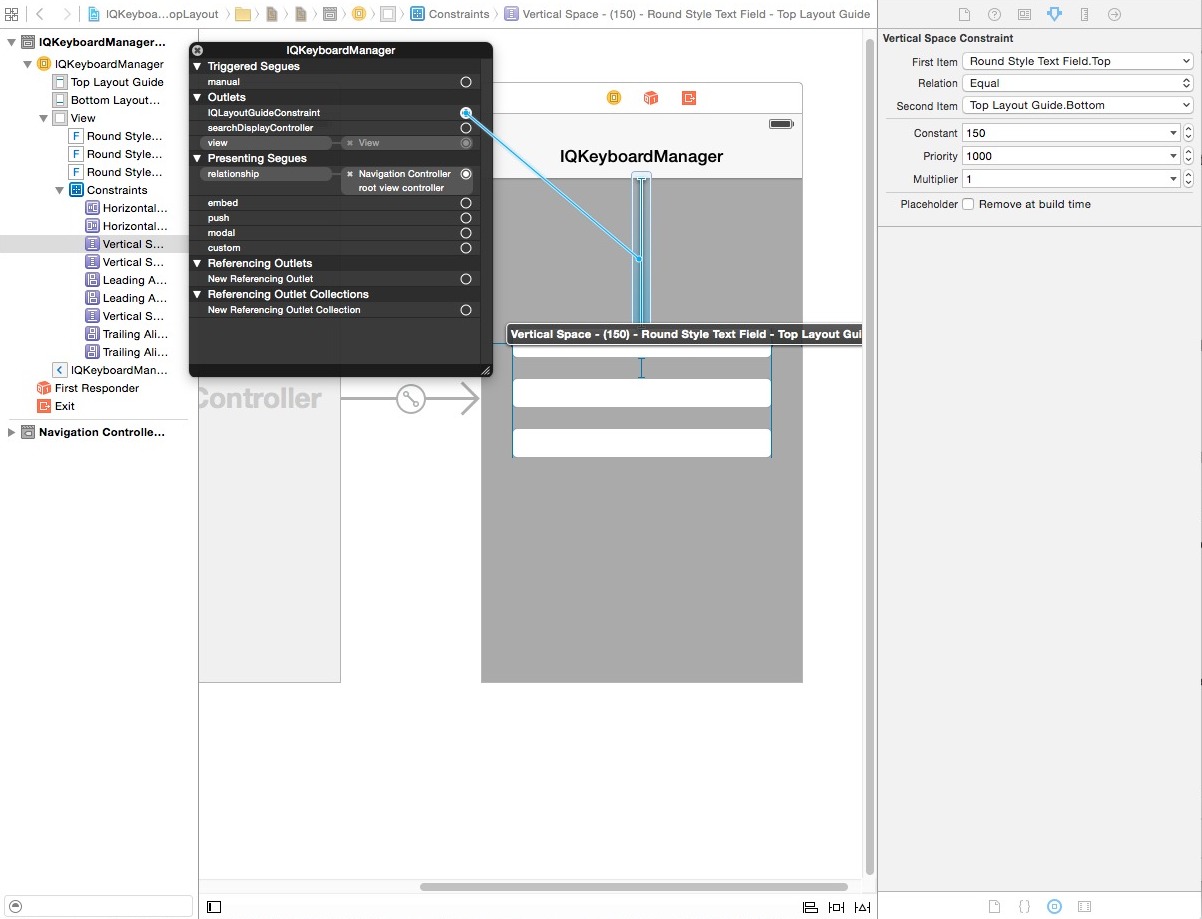
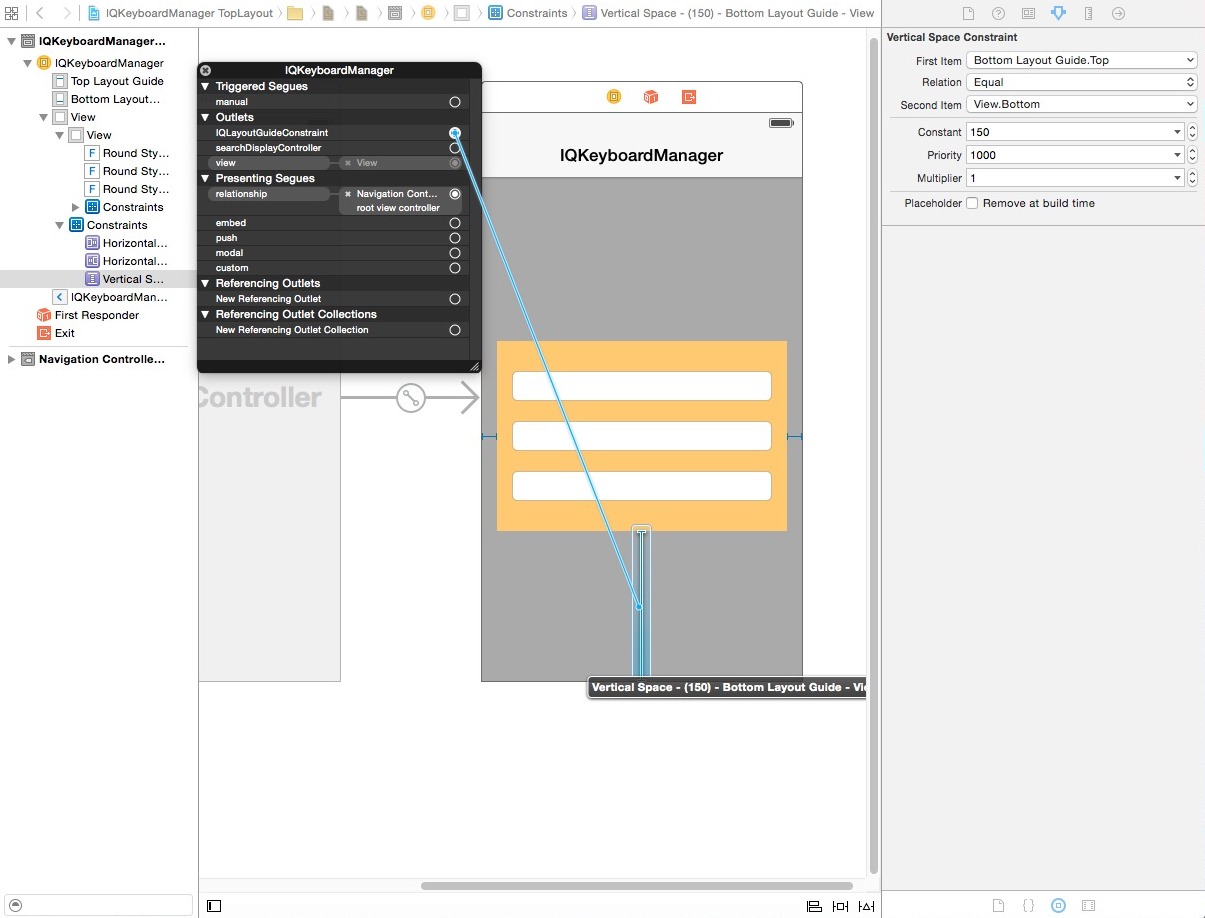
If your textFields are inside any UIView and your UIView is pinned with TopLayoutGuide/BotomLayoutGuide then also you can map TopLayoutGuide/BottomLayoutGuide constraint with IQLayoutGuideConstraint. here are the screenshots:- 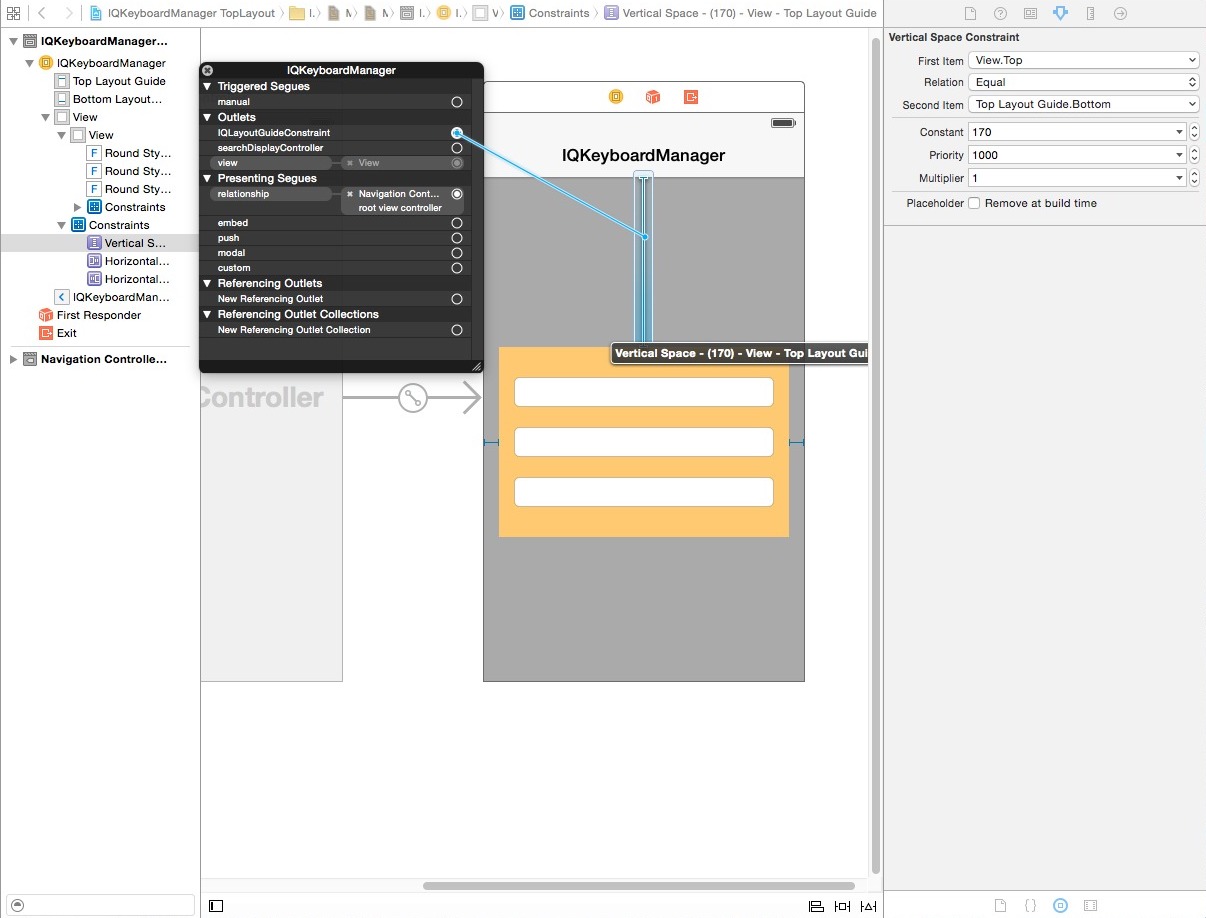
Working with Full Screen UITextView
Often we have a situation where a full screen UITextView need to show in full screen mode with keyboard handling. To deal with this kind of situation, here is an easy workaround.
Assuming that UITextView needs to be displayed in full screen within a ViewController View and default UINavigationBar of UINavigationController is displaying at at the top of ViewController. Assuming that Adjust Sroll View Insetscheckmark is ticked. Add these constraint to UITextView:-

- Top Space to SuperView
- Leading Space to SuperView
- Trailing Space to SuperView
- Bottom Space to Bottom Layout Guide (Important)
Connect bottom layout guide constraint with IQLayoutGuideConstraint and that's all. You have a full working UITextViewController.

Working with Chat Screen UITableView
Often we have another situation where we have to implement our own Chat Style Screen with keyboard handling. To deal with this kind of situation, here is an easy workaround.
Assuming that ChatViewController is subclass of UIViewController not UITableViewController. Assuming that ChatViewController has UITableView at top and UIView at bottom. Bottom UIView contains a UITextField/UITextViewwith a Send button. Assuming that default UINavigationBar of UINavigationController is displaying at at the top of ChatViewController. Assuming that Adjust Sroll View Insets checkmark is ticked. Add these constraint to UITableView:-

- Top Space to SuperView
- Leading Space to SuperView
- Trailing Space to SuperView
- Bottom Space to bottom UIView
Add thse constraint to bottom UIView
- Leading Space to SuperView
- Trailing Space to SuperView
- Bottom Space to Bottom Layout Guide (Important)
Connect bottom layout guide constraint with IQLayoutGuideConstraint.
Map UITextField/UITextView Outlet with a textField object in ChatViewController.
Add this two line in viewDidLoad
    self.textField.inputAccessoryView = [[UIView alloc] init];  //This will remove toolbar which have done button.
    self.textField.keyboardDistanceFromTextField = 8; //This will modify default distance between textField and keyboard. For exact value, please manually check how far your textField from the bottom of the page. Mine was 8pt.
That's all. You have a working keyboard handling with ChatViewController.
Enable/Disable distance handling between different ViewController's
(#117, #139, #516, #541, #572)
If you would like to ignore IQKeyboardManager.enabled property for some ViewController and would like to enable/disable IQKeyboardManager between different ViewController's then add ViewController class to disabledDistanceHandlingClassesor enabledDistanceHandlingClasses NSMutableSet property.
Objective-C
- (BOOL)application:(UIApplication *)application didFinishLaunchingWithOptions:(NSDictionary *)launchOptions
{
    [[IQKeyboardManager sharedManager].enabledDistanceHandlingClasses addObject:[EnabledViewController class]];
    [[IQKeyboardManager sharedManager].disabledDistanceHandlingClasses addObject:[DisabledViewController class]];
    return YES;
}
Swift
    func application(application: UIApplication, didFinishLaunchingWithOptions launchOptions: [NSObject: AnyObject]?) -> Bool {
        IQKeyboardManager.sharedManager().enable = true
        IQKeyboardManager.sharedManager().enabledDistanceHandlingClasses.append(EnabledViewController.self)
        IQKeyboardManager.sharedManager().disabledDistanceHandlingClasses.append(DisabledViewController.self)
        return true
    }
Enable/Disable UIToolbar between different ViewController's
If you would like to ignore IQKeyboardManger.enableAutoToolbar property for some ViewController and would like to enable/disable Auto Toolbar between different ViewController's then add ViewController class to disabledToolbarClasses or enabledToolbarClasses NSMutableSet property.
Objective-C
- (BOOL)application:(UIApplication *)application didFinishLaunchingWithOptions:(NSDictionary *)launchOptions
{
    [[IQKeyboardManager sharedManager].enabledToolbarClasses addObject:[ToolbarEnabledViewController class]];
    [[IQKeyboardManager sharedManager].disabledToolbarClasses addObject:[ToolbarDisabledViewController class]];
    return YES;
}
Swift
    func application(application: UIApplication, didFinishLaunchingWithOptions launchOptions: [NSObject: AnyObject]?) -> Bool {
        IQKeyboardManager.sharedManager().enable = true
        IQKeyboardManager.sharedManager().enabledToolbarClasses.append(ToolbarEnabledViewController.self)
        IQKeyboardManager.sharedManager().disabledToolbarClasses.append(ToolbarDisabledViewController.self)
        return true
    }
Show Previous/Next arrow buttons for textField which are not direct disblings
(#154, #179, #380, #406, #503, #517, #524, #537, #540, #549)
If your textFields are on different View and Previous/Next arrow are not visible to navigate between textField. Then you should put those all Views inside IQPreviousNextView like this:-

If you would like to use your own SpecialView (subclass of UIView) instead of default IQPreviousNextView then you can add your own SpecialView class to toolbarPreviousNextAllowedClasses NSMutableSet property.
Objective-C
- (BOOL)application:(UIApplication *)application didFinishLaunchingWithOptions:(NSDictionary *)launchOptions
{
    [[IQKeyboardManager sharedManager].toolbarPreviousNextAllowedClasses addObject:[SpecialView class]];
    return YES;
}
Swift
    func application(application: UIApplication, didFinishLaunchingWithOptions launchOptions: [NSObject: AnyObject]?) -> Bool {
        IQKeyboardManager.sharedManager().enable = true
        IQKeyboardManager.sharedManager().toolbarPreviousNextAllowedClasses.append(SpecialView.self)
        return true
    }
Hide UIToolbar for specific UITextField/UITextView
If you don't want to add automatic toolbar over keyboard for specific textField then you should add a new UIView as it's toolbar like this
textField.inputAccessoryView = [[UIView alloc] init];
Change UIToolbar Done button text or replace it with some other icon
If you would like to change toolbar Done button text then you can use toolbarDoneBarButtonItemText property to do the same
[IQKeyboardManager sharedManager].toolbarDoneBarButtonItemText = @"Save";
or if you would like to replace this with an image then you should could do like this:-
[IQKeyboardManager sharedManager].toolbarDoneBarButtonItemImage = [UIImage imageNamed:@"save"];
Full customise control over previous/next/done button for specific UITextField/UITextView
(#40)
If you need full control over the previous/next/done button then you should use the UIView category methods to add toolbar over your textField. The UIView category methods are defined in IQUIView+IQKeyboardToolbar.h file.
You may need to import IQUIView+Hierarchy category
#import "IQUIView+Hierarchy.h"
Then add custom toolbar like this.
-(void)viewDidLoad
{
    [super viewDidLoad];

    //Adding done button for textField1
    [textField1 addDoneOnKeyboardWithTarget:self action:@selector(doneAction:)];

    //Adding previous/next/done button for textField2
    [textField2 addPreviousNextDoneOnKeyboardWithTarget:self previousAction:@selector(previousAction:) nextAction:@selector(nextAction:) doneAction:@selector(doneAction:)];

    //Adding cancel/done button for textField3
    [textField3 addCancelDoneOnKeyboardWithTarget:self cancelAction:@selector(cancelAction:) doneAction:@selector(doneAction:)];
}

/*!	previousAction. */
-(void)previousAction:(UIBarButtonItem*)button
{
    //previousAction
}

/*!	nextAction. */
-(void)nextAction:(UIBarButtonItem*)button
{
    //nextAction
}

/*!	doneAction. */
-(void)doneAction:(UIBarButtonItem*)barButton
{
    //doneAction
}

/*!	cancelAction. */
-(void)cancelAction:(UIBarButtonItem*)barButton
{
    //cancelAction
}
Use keyboard toolbar placeholder as action button
If you would like to use keyboard toolbar placeholder text as action buttons to do something special.


This is now very easy with just 2 lines of code like this:-
- (void)viewDidLoad
{
    [super viewDidLoad];

    [textField4 setTitleTarget:self action:@selector(savedUsersAction:)];  //This will convert toolbar placeholder to button
    textField4.placeholderText = @"Saved Users";  //This is optional (If you would like to override default placeholder text)
}

-(void)savedUsersAction:(UIButton*)sender
{
    //Do your custom work here
    ...
}
Get notified when tapping on previous/next/done button for specific UITextField/UITextView
If you only would like to get notified when user taps on previous/next/done button then register customised target. Note that this will not override default behaviour of prevous/next/done button but this will notify you when user taps on those buttons.
You may need to import IQUIView+Hierarchy category
#import "IQUIView+Hierarchy.h"
Then register custom selector.
- (void)viewDidLoad
{
    [super viewDidLoad];

    [textField setCustomPreviousTarget:self action:@selector(previousAction:)];
    [textField setCustomNextTarget:self action:@selector(nextAction:)];
    [textField setCustomDoneTarget:self action:@selector(doneAction:)];
}

/*!	previousAction. */
-(void)previousAction:(UIBarButtonItem*)button
{
    //previousAction
}

/*!	nextAction. */
-(void)nextAction:(UIBarButtonItem*)button
{
    //nextAction
}

/*!	doneAction. */
-(void)doneAction:(UIBarButtonItem*)barButton
{
    //doneAction
}
Hide Previous/Next arrow of UIToolbar
If you don't want to show Previous/Next arrow with toolbar and only want to show *Done button only, then set shouldHidePreviousNext to NO.
- (BOOL)application:(UIApplication *)application didFinishLaunchingWithOptions:(NSDictionary *)launchOptions
{
    [IQKeyboardManager sharedManager].shouldHidePreviousNext = YES;
    return YES;
}
Keyboard Return Key Handling
If you would like to use keyboard Return Key as Next/Done button, then you can use IQKeyboardReturnKeyHandler.
Create an instance variable of IQKeyboardReturnKeyHandler and instantiate it in viewDidLoad with ViewController object like this
@implementation ViewController
{
    IQKeyboardReturnKeyHandler *returnKeyHandler;
}

- (void)viewDidLoad
{
    [super viewDidLoad];

    returnKeyHandler = [[IQKeyboardReturnKeyHandler alloc] initWithViewController:self];
}

-(void)dealloc
{
    returnKeyHandler = nil;
}
It assign all the responderView delegates to self, and change keybord Return Key to Next key. If you would like to get callback of textField delegate methods then you should make returnKeyHandler.delegate = self.
原文链接:
https://github.com/hackiftekhar/IQKeyboardManager/blob/master/MANUAL%20MANAGEMENT.md