lightning的组件区分标准组件、自定义组件和AppExchange组件。标准组件由SF提供,自定义组件由developer自行开发,AppExchange组件由合作伙伴建立。下面我们写一个简单的列表demo来学习下自定义开发组件Component。
第一步:新建一个对象:电影,API:Movie__c,下表是其相关的字段
| 字段名 | 字段API | 字段类型 | 描述 |
| 电影名称 | Name | 文本 | |
| 主演 | ToStar__c | 文本(255) | |
| 主题曲 | Theme__c | 文本(255) | |
| 导演 | Director__c | 文本(255) | |
| 上映时间 | ShowTime__c | 日期 |
第二步:创建一个Component,命名为MyTest_Movie
这时候想必已经有注意到在右侧栏有一列属性如下图:
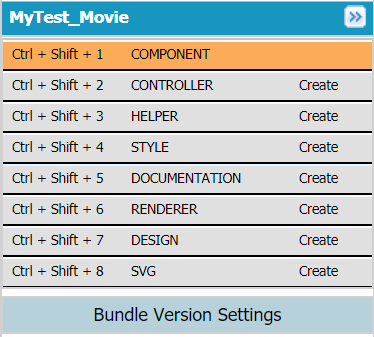
可以点击这些选项卡看看里面都是什么内容
COMPONENT:
类似与H5页面,将H5页面进行框架式(aura)封装,并能够与Js Controller和Helper进行交互,通过Css进行渲染,也可以调用slds提供的标准样式, 理解为view,叫做组件;
CONTROLLRT:
view层的控制层,能够与view层进行数据交互,是对Js的封装,进行异步页面处理,能够调用helper层的逻辑;
HELPER:
从开发规范来说,是逻辑层,将逻辑代码封装在此供Js Controller进行调用,可以写一些公共方法,同时可以进行与后台apex类进行交互;
STYLE:
针对cmp组件进行渲染,实现页面效果;
简单说,每一个选项卡对应的都是Component的一个子文件,把这些合并在一起我们称之为Bundle。Bundle翻译过来是一批,捆之类的词,也就是说,一个Bundle是包含了component,controller,Helper,Style等文件的一个集合。
下面我们完善MyTest_Movie.cmp
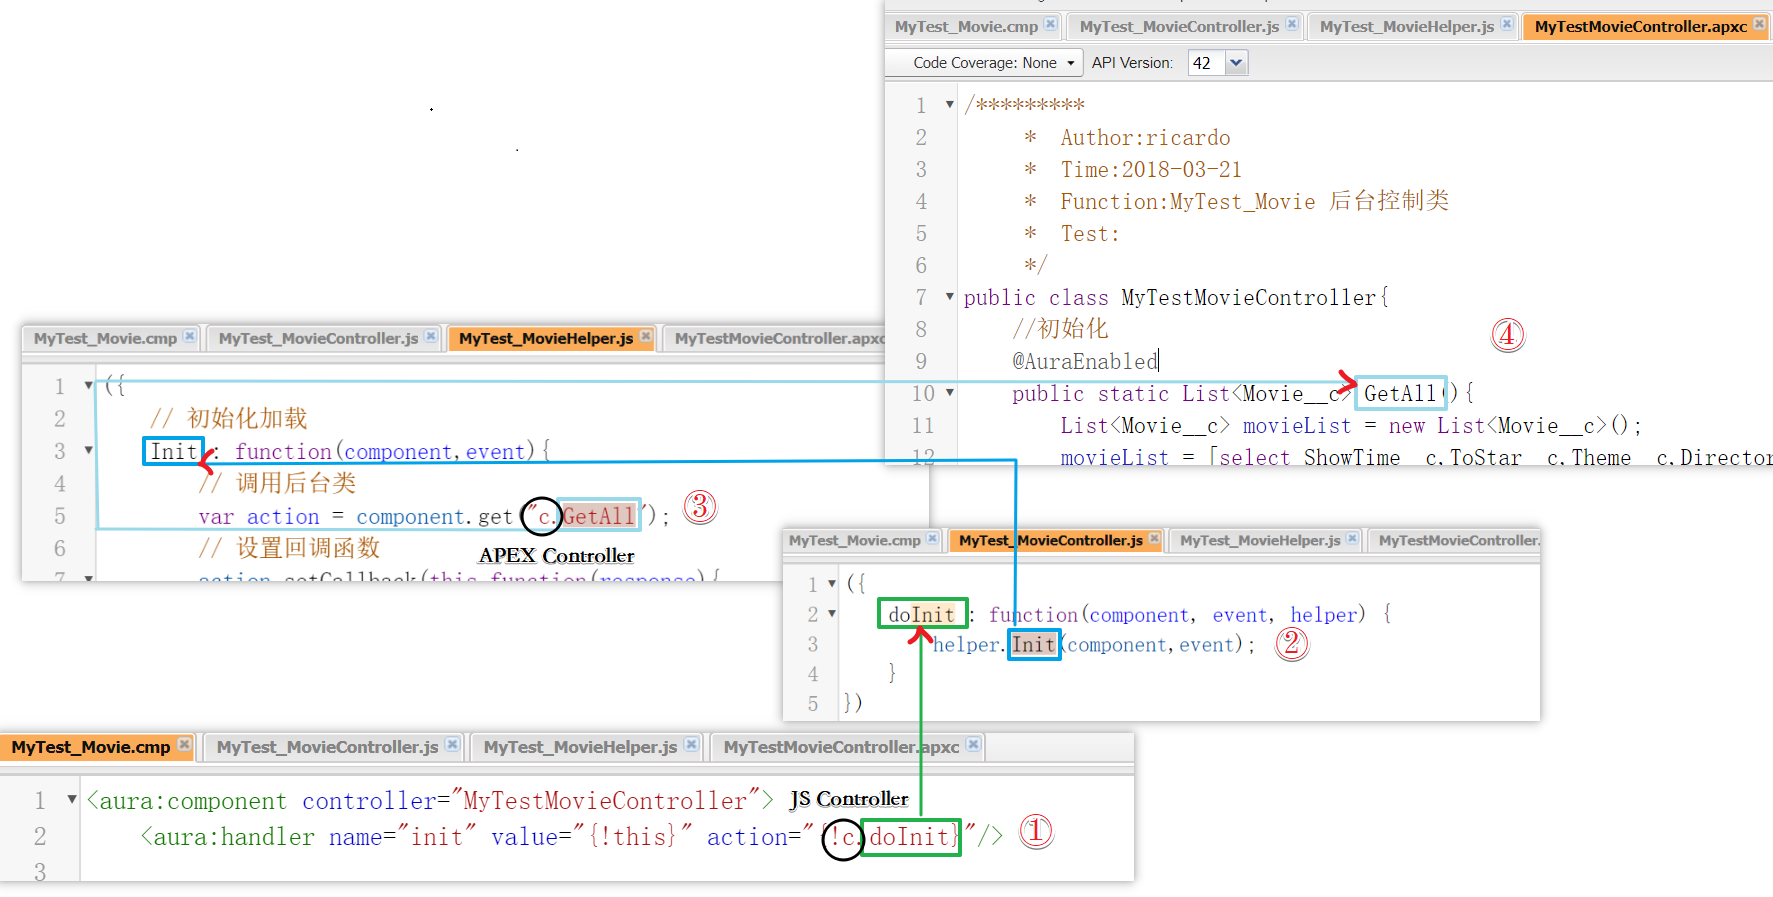
1 <aura:component controller="MyTestMovieController"> 2 <aura:handler name="init" value="{!this}" action="{!c.doInit}"/> 3 4 <aura:attribute name="results" type="List" description="电影列表"/> 5 <aura:attribute name="count" type="Integer" default="0" description="电影记录数"/> 6 <div> 7 8 <table id="mTable"> 9 <thead> 10 <tr> 11 <th><div>电影名</div></th> 12 <th><div>导演</div></th> 13 <th><div>主演</div></th> 14 <th><div>主题曲</div></th> 15 <th><div>上映时间</div></th> 16 </tr> 17 </thead> 18 <tbody> 19 <aura:iteration items="{!v.results}" var="item"> 20 <tr> 21 <td><div>{!item.Name}</div></td> 22 <td><div>{!item.Director__c}</div></td> 23 <td><div>{!item.To_Star__c}</div></td> 24 <td><div>{!item.Theme__c}</div></td> 25 <td> 26 <lightning:formattedDateTime value="{!item.Release_Time__c}" year="numeric" month="numeric" day="numeric" /> 27 </td> 28 </tr> 29 </aura:iteration> 30 </tbody> 31 </table> 32 <div> </div> 33 <span style="float:right;">共{!v.count}条记录</span> 34 </div> 35 </aura:component>
其中的 “<aura:handler name="init" value="{!this}" action="{!c.doInit}"/>”调用了MyTest_MovieController.js中的doInit方法,其中"c"代表的
JS文件中的Controller,其中MyTest_MovieController.js文件如下
1 ({
2     doInit : function(component, event, helper) {
3
4     }
5 })
可以看到现在的doInit方法是空的,然后我们将MyTest_Movie添加到应用程序MyTest.app中进行查看,(Ctrl+Shift+A查看当前所有lightning组件)
<aura:application >
    <c:MyTest_Movie />
</aura:application>
点击预览,界面如下

界面效果可以说是很简陋了,然后呢,我们在MyTest_Movie.css中添加一点点样式,设置全局默认字体大小与颜色,控制表格样式,看看CSS是如何控制这个页面显示的
 1 .THIS {
 2     font-size: 12px;
 3     color:red;
 4 }
 5 .THIS table th{
 6    border: 1px solid blue;
 7    color:blue;
 8    padding:15px;
 9    border-width:1px 1px 1px 1px;
10 }
其中要注意的是,“.THIS”是lightning的component的选择器,必须有,不写则会提示错误
|
Failed to save MyTest_Movie.css: Issue(s) found by CSS Parser (0Ad7F000000rGrH): CSS selector must begin with '.cMyTest_Movie' or '.THIS' (line 5, col 1)
|
重新预览页面效果

第三步是创建一个Apex类,MyTestMovieController
 1 /*********
 2      *  Author:ricardo
 3      *  Time:2018-03-21
 4      *  Function:MyTest_Movie 后台控制类
 5      *  Test:
 6      */
 7 public class MyTestMovieController{
 8     //初始化
 9     @AuraEnabled
10     public static List<Movie__c> GetAll(){
11         List<Movie__c> movieList = new List<Movie__c>();
12         movieList = [select ShowTime__c,ToStar__c,Theme__c,Director__c,Name from Movie__c limit 50];
13         return movieList;
14     }
15 }
接下来完善MyTest_MovieController.js
1 ({
2     doInit : function(component, event, helper) {
3         helper.Init(component,event);
4     }
5 })
完善MyTest_MovieHelper.js
 1 ({
 2     // 初始化加载
 3     Init : function(component,event){
 4         // 调用后台类
 5         var action = component.get("c.GetAll");
 6         // 设置回调函数
 7         action.setCallback(this,function(response){
 8             // 返回状态
 9             var state = response.getState();
10             if(state == 'SUCCESS'){
11                 var movieList = response.getReturnValue();
12                 if(movieList == 0){
13                     component.set("v.message",true);
14                 }else{
15                     component.set("v.message",false);
16                 }
17                 //参数传递
18                 component.set("v.results",movieList);20                 component.set("v.count",movieList.length);
21             }
22         });
23         // 队列处理
24         $A.enqueueAction(action);
25     }
26 })
此时初始页面就开发完成了,我们可以查看存储在系统中的电影列表了

到这里为止,我们从系统中获取数据,并显示在页面已经完成了(虽然页面丑的令人难以直视QAQ),那么接下来我们将回顾下这段代码中的运行流程。
不同于传统的MVC架构,Salesforce的lightning使用的架构是VCCM架构
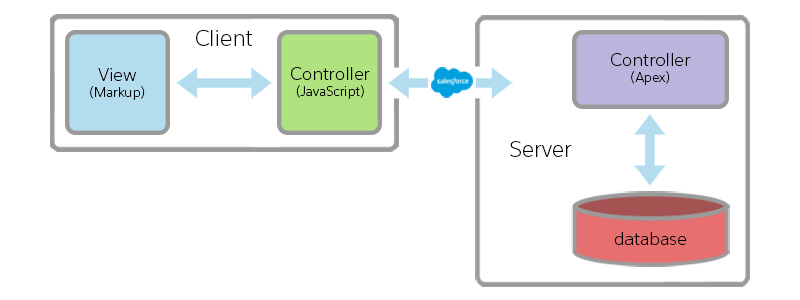
数据从服务器的数据库(M)到页面(V)上被显示出来还经过了后台控制器(APEX Controller)与前端控制器(JAVASCRIPT Controller)两层控制。以上面的Movie为例
具体的运行过程如图所示,需要注意一点的是,APEX类中的方法需要与lightning组件进行交互,则必须加注解: @AuraEnabled
最后,对于这个简陋的页面,我们来使用一次lightning自带的样式库修饰一番
1 <aura:component controller="MyTestMovieController"> 2 <aura:handler name="init" value="{!this}" action="{!c.doInit}"/> 3 4 <aura:attribute name="results" type="List" description="电影列表"/> 5 <aura:attribute name="count" type="Integer" default="0" description="电影记录数"/> 6 <div> 7 8 <table class="slds-table slds-table--bordered slds-table--cell-buffer"> 9 <thead> 10 <tr class="slds-text-title--caps"> 11 <th scope="col"><div class="slds-truncate">电影名</div></th> 12 <th scope="col"><div class="slds-truncate">导演</div></th> 13 <th scope="col"><div class="slds-truncate">主演</div></th> 14 <th scope="col"><div class="slds-truncate">主题曲</div></th> 15 <th scope="col"><div class="slds-truncate">上映时间</div></th> 16 </tr> 17 </thead> 18 <tbody> 19 <aura:iteration items="{!v.results}" var="item"> 20 <tr> 21 <td><div class="slds-truncate">{!item.Name}</div></td> 22 <td><div class="slds-truncate">{!item.Director__c}</div></td> 23 <td><div class="slds-truncate">{!item.ToStar__c}</div></td> 24 <td><div class="slds-truncate">{!item.Theme__c}</div></td> 25 <td> 26 <lightning:formattedDateTime value="{!item.ShowTime__c}" year="numeric" month="numeric" day="numeric" /> 27 </td> 28 </tr> 29 </aura:iteration> 30 </tbody> 31 </table> 32 <div> </div> 33 <span class="slds-size_small" style="float:right;">共{!v.count}条记录</span> 34 </div> 35 </aura:component>
最后要注意的一点是,给组件加上相关的样式后,在预览之前,要给MyTest.app继承lightning的样式库文件:extends="force:slds"
<aura:application extends="force:slds">
    <c:MyTest_Movie />
</aura:application>
预览相关页面如下

总结:本篇主要介绍了component组件的基本开发,以及组件与后台之间的数据交互问题,有错误的地方欢迎指出,有疑问的欢迎在评论区留言