1.新建工程
新建一个MFC ActiveX ControlWizard,取名:Clock,完成,编译运行,点击黑三角块,选择ActiveX Control Test Coontainer,再选择Edit –> Insert Control… -> Clock Control -> OK。
注:在编译的时候,VC自动给生成的ActiveX控件注册了,在运行框中输入:
Regsvr32 /u D:\c programs\C_WORKSPACE\Clock\Debug\Clock.ocx 即可反注册。
2.编辑时钟控件
void CClockCtrl::OnDraw(
CDC* pdc, const CRect& rcBounds, const CRect& rcInvalid)
{
// TODO: Replace the following code with your own drawing code.
//pdc->FillRect(rcBounds, CBrush::FromHandle((HBRUSH)GetStockObject(WHITE_BRUSH)));//填充背景
//pdc->Ellipse(rcBounds); //画椭圆
CTime time=CTime::GetCurrentTime();//获取当前系统时间
CString str=time.Format("%H:%M:%S");//将时间格式化并存放到字符串变量中
pdc->TextOut(0,0,str);//在(0,0)的位置将时间输出
}
在CClockCtrl类上添加消息处理函数WM_CREATE和WM_TIMER,编辑:
int CClockCtrl::OnCreate(LPCREATESTRUCT lpCreateStruct)
{
if (COleControl::OnCreate(lpCreateStruct) == -1)
return -1;
SetTimer(1,1000,NULL);//设置时间间隔
return 0;
}
void CClockCtrl::OnTimer(UINT nIDEvent)
{
// TODO: Add your message handler code here and/or call default
//Invalidate();//使窗口无效,让窗口重绘
InvalidateControl();//使整个时钟控件重绘
COleControl::OnTimer(nIDEvent);
}
运行,添加控件,测试。也可以在其它程序中测试,如在VB中测试。
3.给控件添加背景色与前景色
ClassWizard…. -> Automation -> Add Property…. -> 再选择一种属性,这样添加BackColor和ForeColor,并选中Stock选项。
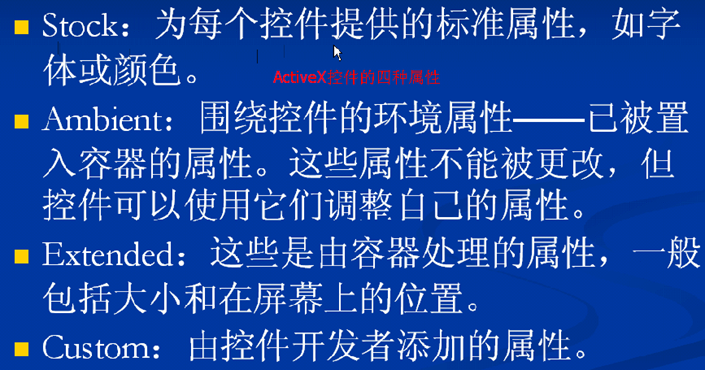
ActiveX控件的四种属性:
在CClockCtrl::OnDraw函数中编辑:
void CClockCtrl::OnDraw(
CDC* pdc, const CRect& rcBounds, const CRect& rcInvalid)
{
// TODO: Replace the following code with your own drawing code.
//pdc->FillRect(rcBounds, CBrush::FromHandle((HBRUSH)GetStockObject(WHITE_BRUSH)));//填充背景
//pdc->Ellipse(rcBounds); //画椭圆
CBrush brush(TranslateColor(GetBackColor()));
//获得控件的背景色OLE_COLOR,并将其转换成COLORREF,再设置到创建的画刷上
pdc->FillRect(rcBounds, &brush);//填充背景色
//注意:SetBkColor()是用于设置背景色的属性值
pdc->SetBkMode(TRANSPARENT);//将文字的背景色设置成透明
pdc->SetTextColor(TranslateColor(GetForeColor()));//设置前景色
CTime time=CTime::GetCurrentTime();//获取当前系统时间
CString str=time.Format("%H:%M:%S");//将时间格式化并存放到字符串变量中
pdc->TextOut(0,0,str);//在(0,0)的位置将时间输出
}
4.在属性表中添加设置颜色的属性页
在ClockCtl.cpp中编辑:
// Property pages
// TODO: Add more property pages as needed. Remember to increase the count!
BEGIN_PROPPAGEIDS(CClockCtrl, 2)//2表示属性页的数量
PROPPAGEID(CClockPropPage::guid)
PROPPAGEID(CLSID_CColorPropPage) //添加颜色属性页
END_PROPPAGEIDS(CClockCtrl)
运行,测试OK !
5.自定义属性页
ClassWizard…. -> Automation -> Add Property…. -> 手动添加一种属性Interval ,类型选择short,implementation选择Member variable,编辑CClockCtrl::OnIntervalChanged函数:
void CClockCtrl::OnIntervalChanged()
{
// TODO: Add notification handler code
if(m_interval<0||m_interval>6000)
{
m_interval=1000;
}
else
{
m_interval=m_interval/1000*1000;//将用户的输入取整
KillTimer(1);//销毁先前的定时器
SetTimer(1,m_interval,NULL);//设置定时器
}
SetModifiedFlag();
}
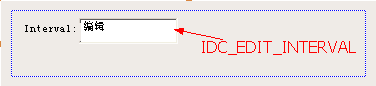
编辑IDD_PROPPAGE_CLOCK属性对话框,如下图:
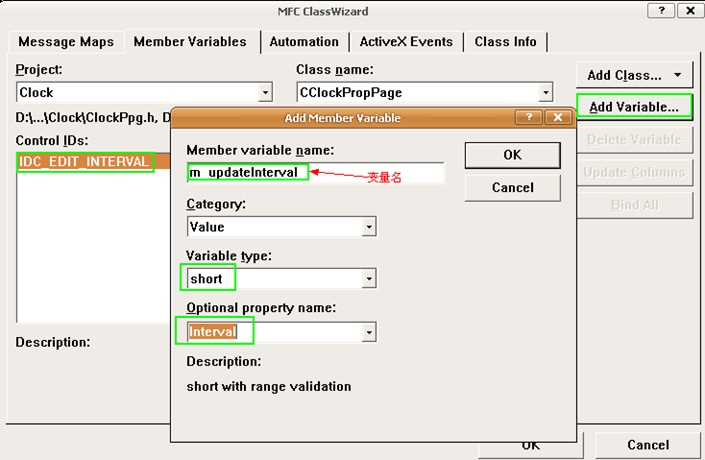
并对编辑框关联一个变量,右键-> ClassWizard… ,如下图:
6.给控件添加方法和事件
添加方法:
View->classwizard->Automation()->Add Method -> (Extendal name:Hello,Interval name:Hello,Return type:void)-> OK ->OK。
编辑CClockCtrl::Hello()函数:
void CClockCtrl::Hello()
{
MessageBox("Hello World !");
}
添加标准事件:
View->classwizard->ActiveX Events->(External name:Click,Implementation:Stock)->OK->OK。
添加自定义事件:
对DClockEvents->右键->Add Event… ->(External name:NewMinute),接着在CClockCtrl::OnDraw中编辑:
void CClockCtrl::OnDraw(
CDC* pdc, const CRect& rcBounds, const CRect& rcInvalid)
{
............
............
CTime time=CTime::GetCurrentTime();//获取当前系统时间
if(0==time.GetSecond())//当秒数到达,进入另一分钟时
{
FireNewMinute();//发出事件通知
}
CString str=time.Format("%H:%M:%S");//将时间格式化并存放到字符串变量中
pdc->TextOut(0,0,str);//在(0,0)的位置将时间输出
}
7.使控件自定义的属性持久保存
在CClockCtrl::DoPropExchange函数中编辑:
void CClockCtrl::DoPropExchange(CPropExchange* pPX)
{
ExchangeVersion(pPX, MAKELONG(_wVerMinor, _wVerMajor));
COleControl::DoPropExchange(pPX);
// TODO: Call PX_ functions for each persistent custom property.
PX_Short(pPx,"Interval",m_interval,1000);//使Interval属性具有持久性
}
并将CClockCtrl::OnCreate函数中修改:
SetTimer(1,m_interval,NULL);//设置时间间隔
在属性值改变时通知容器,在CClockCtrl::OnIntervalChanged函数中编辑:
void CClockCtrl::OnIntervalChanged()
{
..........
..........
SetTimer(1,m_interval,NULL);//设置定时器
BoundPropertyChanged(0x1);//通知容器调度ID为1的属性发生了改变
}
SetModifiedFlag();
}
调度id说明:
[ uuid(DA664AEC-9974-4A9E-9A14-9F29A64C9910),
helpstring("Dispatch interface for Clock Control"), hidden ]
dispinterface _DClock
{
properties:
// NOTE - ClassWizard will maintain property information here.
// Use extreme caution when editing this section.
//{{AFX_ODL_PROP(CClockCtrl)
[id(DISPID_BACKCOLOR), bindable, requestedit] OLE_COLOR BackColor;
[id(DISPID_FORECOLOR), bindable, requestedit] OLE_COLOR ForeColor;
[id(1)] short Interval; //1表示属性的调度ID
//}}AFX_ODL_PROP
methods:
// NOTE - ClassWizard will maintain method information here.
// Use extreme caution when editing this section.
//{{AFX_ODL_METHOD(CClockCtrl)
[id(2)] void Hello();
//}}AFX_ODL_METHOD
[id(DISPID_ABOUTBOX)] void AboutBox();
};
8.让时间值只在运行时走动
在CClockCtrl::OnTimer中编辑:
void CClockCtrl::OnTimer(UINT nIDEvent)
{
// TODO: Add your message handler code here and/or call default
if(AmbientUserMode())//如果返回为真,则表明是在运行时,重绘
{
//Invalidate();//使窗口无效,让窗口重绘
InvalidateControl();//使整个时钟控件重绘
}
COleControl::OnTimer(nIDEvent);
}
9.编写一个控件测试程序
新建一个基于对话框的MFC的对话框应用程序,取名ClockTest.
在对话框资源上右键->插入ActiveX控件… ->clock control …. ,然后再按ctrl+T测试。插入控件:Project->add to project->conponents and controls…-> Registered ActiveX Controls-> Clock Control->OK->OK,这样VC就会给这个工程添加一个CClock类,在资源中添加一个按钮,双击添加命令消息响应,在CClockTestDlg类上添加一个成员变量:
private:
CClock m_clock;
并在ClockTestDlg.h中包含一个:#include "clock.h" 头文件。
编辑CClockTestDlg::OnButton1:
void CClockTestDlg::OnButton1()
{
// TODO: Add your control notification handler code here
m_clock.Create("Clock",WS_CHILD|WS_VISIBLE,CRect(0,0,100,50),
this,123);//创建一个时钟控件
//m_clock.Hello();//调用ActiveX控件中的Hello方法
m_clock.SetBackColor(RGB(0,0,255));//设置背景色
m_clock.SetForeColor(RGB(255,0,0));//设置前景色
}
在程序中对控件的点击事件进行访问
在Clock控件上点右键->事件->(分别给Click、NewMinute添加消息响应),编辑:
void CClockTestDlg::OnClickClockctrl2()
{
MessageBox("控件被点击了");
}
void CClockTestDlg::OnNewMinuteClockctrl2()
{
MessageBox("New Minute");
}
运行, OK!!!