本文记录Ubuntu安装配置VSFTPD的步骤,为了提高信息传输安全加入TLS/SSL支持。
VSFTPD是洋文Very Secure File Transfer Protocol Daemon的首字母简写,它是开源的、轻量级的FTP服务器软件。
#1 安装VSFTPD
$ sudo apt-get install vsftpd
#2 配置VSFTPD
配置文件位于 /etc/vsftpd.conf:
$ sudo vim /etc/vsftpd.conf
禁止匿名用户登录:
anonymous_enable=NO
去掉下面两行的注释:
ascii_upload_enable=YES
ascii_download_enable=YES
去掉下面一行的注释并设置欢迎信息:
ftpd_banner=Welcome to My FTP, no porn and other stuff.
在文件尾添加一行:
use_localtime=YES
保存退出。
重启vsftpd服务:
$ sudo systemctl restart vsftpd

#3 创建FTP用户
为了提高安全不允许root用户访问ftp服务;我们需要创建普通用户:
$ sudo adduser ftp_test_user
设置密码和其他信息。
#4 测试FTP服务
本地测试:
$ sudo telnet localhost 21

上图显示我可以从本地成功访问FTP;执行 quit 退出。
使用其他机器访问FTP服务器(Linux 或 Mac OS X):
$ ftp Your_ftp_domain_or_IP
Connected to ftp.topspeedsnail.com.
220 Welcome to My FTP, no porn and other stuff.
Name (192.168.43.2:sk): ftp_test_user
331 Please specify the password.
Password:
230 Login successful.
Remote system type is UNIX.
Using binary mode to transfer files.
ftp>
quit 退出FTP客户端。
使用FileZilla访问FTP
如果你不熟悉ftp命令行客户端,你可以使用流行的FTP图形客户端FileZilla。
Ubuntu安装FileZilla:
$ sudo apt-get install filezilla
使用浏览器访问FTP
使用浏览器访问:ftp://Your_ftp_domain_or_IP;输入用户名密码。
#5 添加TLS/SSL支持
创建SSL证书:
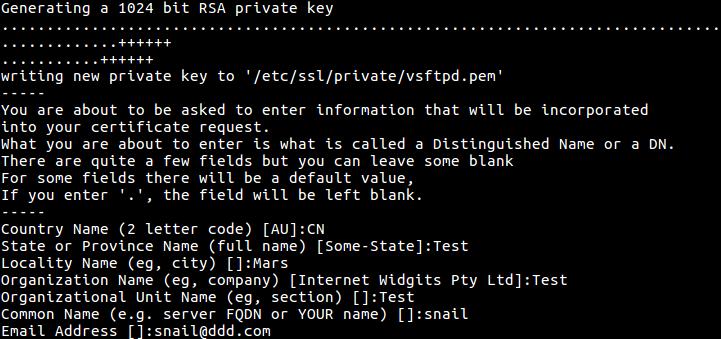
$ sudo openssl req -x509 -nodes -days 365 -newkey rsa:1024 -keyout /etc/ssl/private/vsftpd.pem -out /etc/ssl/private/vsftpd.pem
证书有效期365天;按照提示输入信息:

编辑 vsftpd 配置文件:
$ sudo vim /etc/vsftpd.conf
替换证书:
rsa_cert_file=/etc/ssl/private/vsftpd.pem
rsa_private_key_file=/etc/ssl/private/vsftpd.pem
开启SSL并强制vsftpd使用TLS连接:
ssl_enable=YES
allow_anon_ssl=NO
force_local_data_ssl=YES
force_local_logins_ssl=YES
ssl_tlsv1=YES
ssl_sslv2=NO
ssl_sslv3=NO
require_ssl_reuse=NO
ssl_ciphers=HIGH
如果你想允许FTP不使用SSL也能使用,去掉force***。
重启FTP服务:
$ sudo systemctl restart vsftpd
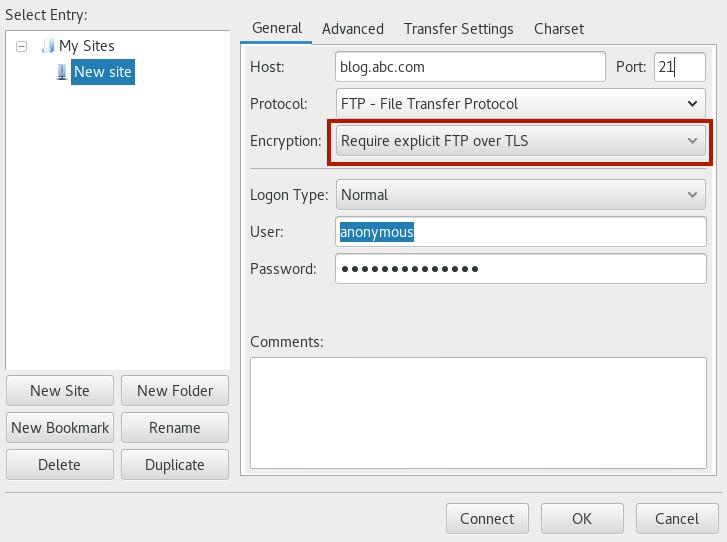
使用 FileZilla 登录FTP
连接时选择 Require explicit FTP over TLS 选项:

转自:http://www.linuxdiyf.com/linux/21544.html