一、 字符设备驱动之概念介绍
1、 应用程序、库、内核、驱动程序的关系
如下图,一个软件系统可以分为:应用程序、库、操作系统(内核)、驱动程序。
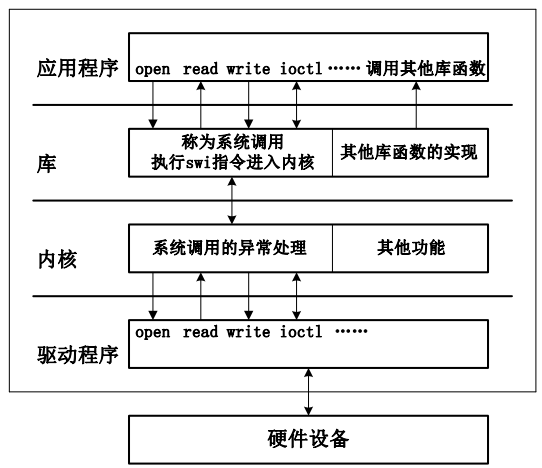
以点亮LED为例:
    1)应用程序使用库提供的 open 函数打开代表LED的设备文件
    2)库根据 open 函数传入的参数执行 "swi" 指令,这条指令会引起CPU异常,进入内核
    3)内核的异常处理函数根据这些参数找到相应的驱动程序,返回一个文件句柄给库,进而返回给应用程序
    4)应用程序得到文件句柄后,使用库提供的 write 或 ioclt 函数发出控制指令
    5)库根据 write 或 ioctl 传入的参数执行 "swi" 指令,这条指令会引起CPU异常,进入内核
    6)内核的异常处理函数根据这些参数调用驱动程序的相关函数,点亮LED
实际上,内核和驱动程序之间并没有界限,因为驱动程序最终是要编进内核去的。
2、 Linux 驱动程序的分类和开发步骤
A、 Linux 驱动程序的分类
Linux的外设可以分为3类:字符设备(character device)、块设备(block device)和网络接口(network interface)。
    字节设备是能够像字节流(文件)一样被访问的设备,就是说对它的读写是以字节为单位的。字符设备的驱动程序中实现了 open、close、read、write等系统调用。
    块设备的数据以块的形式存放,比如 NAND Flash 上的数据就是以页为单位存放的。应用程序也可以通过相应的设备文件(比如/dev/mtdblock0等)来调用open、close、read、write等系统调用。
    网络接口同时具有字符设备、块设备的部分特点。它的输入/输出是有结构的、成块的,它的块又不是固定的大小。
B、 Linux 驱动程序开发步骤
Linux 内核就是由各种驱动程序组成的,内核源码中有大约 85% 是各种驱动程序的代码。编写驱动程序的难点并不是硬件的具体操作,而是弄清楚现有驱动程序的框架,在这个框架中加入这个硬件。
    一般来说,编写 Linux 设备驱动程序流程如下:
    1)查看原理图、数据手册,了解设备的操作方法。
    2)在内核中找到相近的驱动程序,以它为模板进行开发,有时候需要从零开始。
    3)实现驱动程序的初始化:比如向内核注册这个驱动程序,这样应用程序传入文件名时,内核才能找到相应的驱动程序。
    4)设计所要实现的操作,比如:open、close、read、write等函数。
    5)实现中断服务(中断并不是每个设备驱动所必须的)。
    6)编译该驱动程序到内核中,或者用 insmod 命令加载。
    7)测试驱动程序。
二、 字符设备驱动程序之LED驱动程序(第二到四节课)

应用程序通过C库的 open 函数打开设备文件,打开文件后可获得属性(比如为(c)字符设备,主设备号为111)。应用程序通过C库进入到内核,内核最后会调用到驱动程序。
VFS(虚拟文件系统)怎么根据打开的设备找到驱动呢?
    字符设备就根据主设备号111在内核里面定义的字符设备数组里面找到 file_operation 这个结构体,这个结构的成员在我们的驱动里面实现。
    驱动程序里实现步骤:
    1、实现 led_open, led_read, led_write 函数。
    2、问:怎么告诉内核呢?答:a.定义一个 file_operation 结构,让这个的结构体里的成员函数(.open 和 .write)分别指向我们自己实现的 led_open, led_write 函数;b.在驱动的入口函数(比如:int first_chrdev_init(void))里面调用 register_chrdev(主设备号, 主设备名, &file_operation) 注册函数把这个结构体放到内核里面的字符设备数组里。
    3、问:内核怎么知道是(int first_chrdev_init(void))这个入口函数?答:需要用一个宏 (module_init(first_chrdev_init))来修饰一下,这宏是一个结构体,结构体里面有一个函数指针指向我们传入的入口函数,当我们去加载一个驱动程序(insmod)的时候,内核就会自动的找到这个结构体,然后调用里面的函数指针。
    注意:驱动程序和应用程序就是通过【设备类型和主设备号】联系起来的,与设备名称无关。
第一个驱动程序(first_chrdev.c)
#include <linux/module.h>
#include <linux/kernel.h>
#include <linux/fs.h>
#include <linux/init.h>
#include <linux/delay.h>
#include <asm/uaccess.h>
#include <asm/irq.h>
#include <asm/io.h>
#include <asm/arch/regs-gpio.h>
#include <asm/hardware.h>


static int first_chrdev_open(struct inode *inode, struct file *file)
{
    printk("first_chrdev_open

");
    return 0;
}


static ssize_t first_chrdev_write(struct file *file, const char __user *buf, size_t count, loff_t * ppos)
{
    printk("first_chrdev_write

");
    return 0;
}


static struct file_operations first_chrdev_fops = {
    .owner  =   THIS_MODULE,    /* 这是一个宏,推向编译模块时自动创建的__this_module变量 */
    .open   =   first_chrdev_open,
    .write    =    first_chrdev_write,
};


int major;
static int first_chrdev_init(void)
{
    /* 0表示让系统自动为我们分配一个从1到255的主设备号*/
    major = register_chrdev(0, "first_chrdev", &first_chrdev_fops);  //注册
    return 0;
}

static void first_chrdev_exit(void)
{
    unregister_chrdev(major, "first_chrdev");                    //卸载

}

module_init(first_chrdev_init);
module_exit(first_chrdev_exit);

MODULE_LICENSE("GPL");
第一个测试程序(first_chrdev_test.c)
#include <sys/types.h>
#include <sys/stat.h>
#include <fcntl.h>
#include <stdio.h>

int main(int argc, char **argv)
{
    int fd;
    int val = 1;
    fd = open("/dev/xyz",O_RDWR);
    if(fd < 0)
    {
        printf("can't open!
");
    }
    write(fd, &val, 4);

    return 0;
}
first_chrdev的Makefile
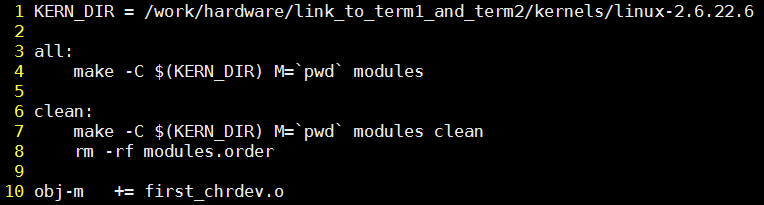
编译驱动程序时会依赖与内核,
    -C表示 指定进入指定的目录即KERN_DIR,是内核源代码目录,调用该目录顶层下的Makefile,目标为modules。
    M=$(shell pwd) | `pwd`选项让该Makefile在构造modules目标之前返回到模块源代码目录并在当前目录生成obj-m指定的xxx.o目标模块。
    clean这个目标表示将模块清理掉。
    obj-m += xxx.o即指定当前目录要生成的目标模块,然后modules目标指向obj-m变量中设定的模块。
编译模块、拷贝文件
在make和编译(arm-linux-gcc -o first_chrdev_test fist first_chrdev_test.c)之后将其(first_chrdev.ko 和 first_chrdev_test)拷贝到挂接的文件系统下。
测试:
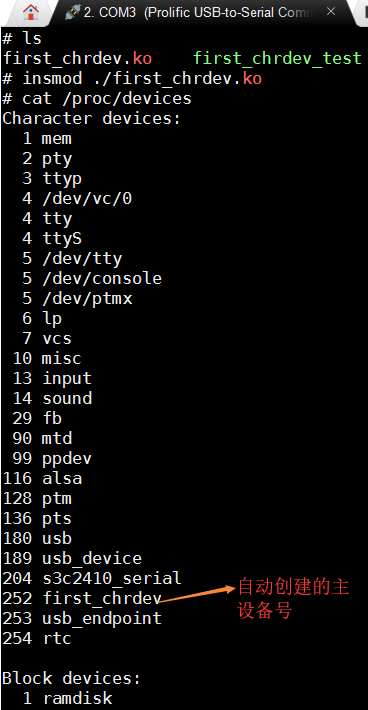
cat /proc/devices:表示内核目前所支持的设备,第一列表示主设备号,第二列表示主设备名

insmod ./first_chrdev.ko:加载驱动,也就意味着会调用moudle_init函数
lsmod:用于查看所加载的驱动

rmmod ./first_chrdev.ko:卸载驱动,也就意味着会调用moudle_exit函数
注意:此时运行测试程序会出错

原因:没有设备结点,也就是没有(/dev/xyz)这个文件
解决办法:手动创建一个设备结点
mknod /dev/xyz c 252 0 :手动创建一个字符类型,主设备号为252,次设备号为0的设备结点

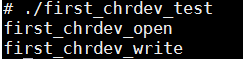
再次执行测试程序
问:每次驱动程序自动分配主设备号后我们都要使用(cat /proc/devices)命令来查看主设备号后再手工创建设备结点吗?
解决办法:使用mdev根据系统信息创建设备结点
定义下面两个变量
    static struct class *firstdrv_class;   定义一个类
    static struct class_device    *firstdrv_class_devs;   定义一个设备
自动创建设备的驱动程序(led_chrdev.c)
#include <linux/module.h>
#include <linux/kernel.h>
#include <linux/fs.h>
#include <linux/init.h>
#include <linux/delay.h>
#include <asm/uaccess.h>
#include <asm/irq.h>
#include <asm/io.h>
#include <asm/arch/regs-gpio.h>
#include <asm/hardware.h>
static struct class *led_chrdev_class; //定义一个类
static struct class_device *led_chrdev_class_dev; //定义一个设备
volatile unsigned int *gpfcon = NULL;
volatile unsigned int *gpfdat = NULL;
static int led_chrdev_open(struct inode *inode, struct file *file)
{
printk("led_chrdev_open
");
*gpfcon &= ~((3<<(4*2)) | (3<<(5*2)) | (3<<(6*2)));
*gpfcon |= ((1<<(4*2)) | (1<<(5*2)) | (1<<(6*2)));
return 0;
}
static ssize_t led_chrdev_write(struct file *file, const char __user *buf, size_t count, loff_t * ppos)
{
int val;
printk("led_chrdev_write
");
copy_from_user(&val, buf, count); //从用户空间到内核空间,buf:应用程序传入的值
if(val == 1)
{
//open led
*gpfdat &= ~((1<<4) | (1<<5) | (1<<6));
}
else
{
//close led
*gpfdat |= ((1<<4) | (1<<5) | (1<<6));
}
return 0;
}
static struct file_operations led_chrdev_fops = {
.owner = THIS_MODULE, /* 这是一个宏,推向编译模块时自动创建的__this_module变量 */
.open = led_chrdev_open,
.write = led_chrdev_write,
};
int major;
static int led_chrdev_init(void)
{
major = register_chrdev(0, "led_chrdev", &led_chrdev_fops); //在内核的字符设备数组中注册一个file_operation结构
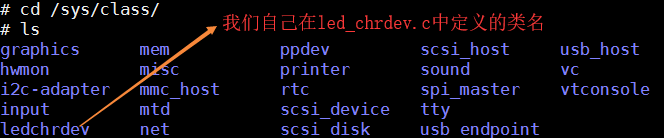
led_chrdev_class = class_create(THIS_MODULE, "ledchrdev"); //创建一个类:会自动的在(/sys/class)目录下自动创建一个(ledchrdev)这个类。
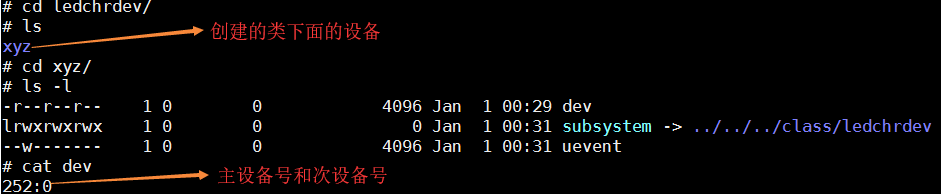
//自动创建一个设备:会自动的在(/sys/class/ledchrdev)这个目录里面创建一个(xyz)文件夹,这个文件夹内有一个(dev)文件,它的内容是(252:0)主设备号和此设备号。
led_chrdev_class_dev = class_device_create(led_chrdev_class, NULL, MKDEV(major, 0), NULL, "xyz");
gpfcon = (volatile unsigned int *)ioremap(0x56000050, 16);
gpfdat = gpfcon + 1;
return 0;
}
static void led_chrdev_exit(void)
{
unregister_chrdev(major, "led_chrdev"); //卸载:从内核的字符设备数组中一主设备号找到这一项把它卸载
class_device_unregister(led_chrdev_class_dev); //删除自动创建的设备
class_destroy(led_chrdev_class); //摧毁自动创建的类
iounmap(gpfcon);
}
module_init(led_chrdev_init);
module_exit(led_chrdev_exit);
MODULE_LICENSE("GPL");
测试程序(led_dev_test.c)
#include <sys/types.h>
#include <sys/stat.h>
#include <fcntl.h>
#include <stdio.h>

int main(int argc, char **argv)
{
    int fd;
    int val = 1;
    fd = open("/dev/xyz",O_RDWR);
    if(fd < 0)
    {
        printf("can't open!
");
    }
    if(argc != 2)
    {
        printf("Usage :

");
        printf("%s <on/off>

", argv[0]);
        return 0;
    }

    if(strcmp(argv[1], "on") ==0)
    {
        val = 1;
    }
    else
    {
        val = 0;
    }
    write(fd, &val, 4);
    return 0;
}
测试
- 修改Makefile
- 编译并拷贝到(first_fs)目录
- 加载模块(insmod ./led_chrdev.ko)
- 运行测试程序(./led_dev_test)
注意1:使用虚拟地址的好处:读写内存更安全,由于系统和 mmu 的限制,使得这个过程无法操作到其它进程的数据。
注意2:此时可以直接运行测试程序,因为系统已经帮我们自动创建了设备结点。

问:这个设备结点在单板上是怎么被创建出来的呢?
答:led_chrdev_class=class_create(THIS_MODULE, "ledchrdev")这个函数会自动的在(/sys/class)目录下创建一个(ledchrdev)类;led_chrdev_class_dev=class_device_create(led_chrdev_class, NULL, MKDEV(major, 0), NULL, "xyz")这个函数会自动的在(/sys/class/ledchrdev)目录下创建一个(xyz)设备,并且该文件夹下有一个(dev)文件保存有该设备的主设备号和次设备号
问:为什么(/sys)目录下的信息已更改,mdev就能自动去生成呢?
答:因为在我们脚本文件(/etc/init.d/rcS)中使用了mdev机制,mdev:mdev是udev的一个简化版,在(/sys)目录根据系统信息自动的创建设备结点

<wiz_tmp_tag id="wiz-table-range-border" contenteditable="false" style="display: none;">