1 Glance基本框架图

|
组件 |
描述 |
|
A client |
任何使用Glance服务的应用。 |
|
REST API |
通过REST方式暴露Glance的使用接口。 |
|
Database Abstraction Layer (DAL) |
介于Glance和数据库之间的应用程序编程接口。 |
|
Glance Domain Controller |
一个中间件,实现了Glance的主要功能,比如授权、通知、规则、数据库连接等功能。 |
|
Glance Store |
负责与各种后端存储类型进行交互,提供了一个统一的接口来访问后端存储。 |
|
Registry Layer |
通过使用单独的服务用于domain和DAL之间的安全交互的一个可选层。 |
2 Glance体系结构图
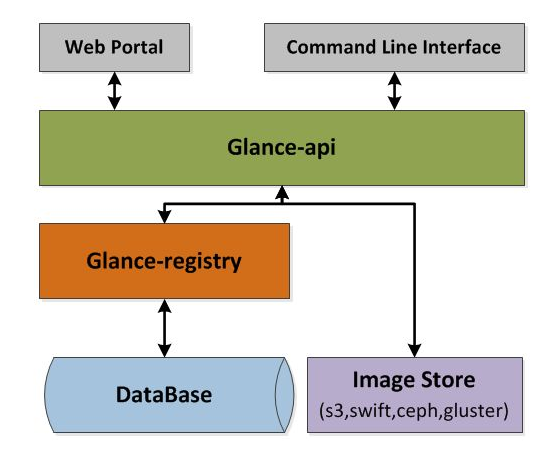
由上图可以看出Glance组件主要由glance-api和glance-registry两个服务组成,glance-api是进入Glance的入口,负责接收用户的RESTful请求,然后通过后台的Swift、Ceph等存储系统完成镜像的存储与获取。
与glance-api服务一样,glance-registry也是一个WSGI server服务,不过不同的是glance-registry处理的是与镜像元数据相关的RESTful请求。Glance-api接收到用户的RESTful请求后,如果该请求与元数据相关,则将其转发给glance-registry服务。
glance-registry会解析请求的内容,并与数据库进行交互,存取或更新镜像的元数据,这里的元数据是指保存在数据库中的关于镜像的一些信息,Glance的DB模块存储的仅仅是镜像的元数据。
3 Glance源码结构
看OpenStack的一个组件相关的代码结构时,一般都是先看该组件源码中的setup.cfg文件中的内容,特别是[entry_points]里console_scripts的内容,它写明glance的各项服务的入口点:
console_scripts =
   glance-api = glance.cmd.api:main
   glance-cache-prefetcher = glance.cmd.cache_prefetcher:main
   glance-cache-pruner = glance.cmd.cache_pruner:main
   glance-cache-manage = glance.cmd.cache_manage:main
   glance-cache-cleaner = glance.cmd.cache_cleaner:main
   glance-control = glance.cmd.control:main
   glance-manage = glance.cmd.manage:main
   glance-registry = glance.cmd.registry:main
   glance-replicator = glance.cmd.replicator:main
   glance-scrubber = glance.cmd.scrubber:main
   glance-glare = glance.cmd.glare:main
|
服务 |
描述 |
|
glance-cache-* |
4个对Image Cache进行管理的工具。 |
|
glance-manage |
用于Glance数据库的管理。 |
|
glance-replicator |
用于实现镜像的复制。 |
|
glance-scrubber |
用于清理已经删除的Image。 |
|
glance-control |
用于控制glance-api、glance-registry和glance-scrubber这三个服务进程的工具。 |
|
glance-glare |
Glare API服务,目前还在开发中。 |
4 Glance Domain model实现
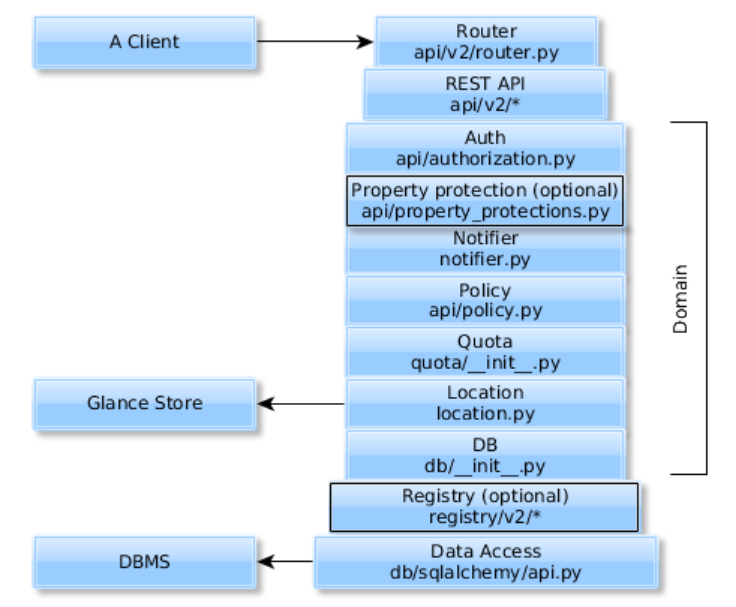
以下是domain model的各个层描述表:
|
层 |
描述 |
|
Authorization |
认证层:提供了一个镜像本身或其属性是否可以改变的验证 |
|
Property protection
|
属性保护层:该层是可选的,如果你在配置文件中设置了property_protection_file参数,它就变得可用。可以通过配置文件指明访问权限。 |
|
Notifier |
消息通知层:关于镜像变化的消息和使用镜像时发生的错误和警告都会被添加到消息队列中。 |
|
Policy |
规则定义层:定义镜像操作的访问规则,规则在/etc/policy.json文件中定义,该层进行监视并实施。 |
|
Quota |
配额限制层:如果管理者对某用户定义了镜像大小的镜像上传上限,则若该用户上传了超过该限额的镜像,则会上传失败。 |
|
Location |
镜像位置定位层:通过glance_store与后台存储进行交互,例如上传、下载和管理图像位置。 1. 添加新位置时检查位置URI是否正确; 2. 镜像位置改变时,删除存储后端保存的镜像数据; 3. 防止镜像位置重复; |
|
Database |
数据库层:实现与数据库进行交互的API。 |
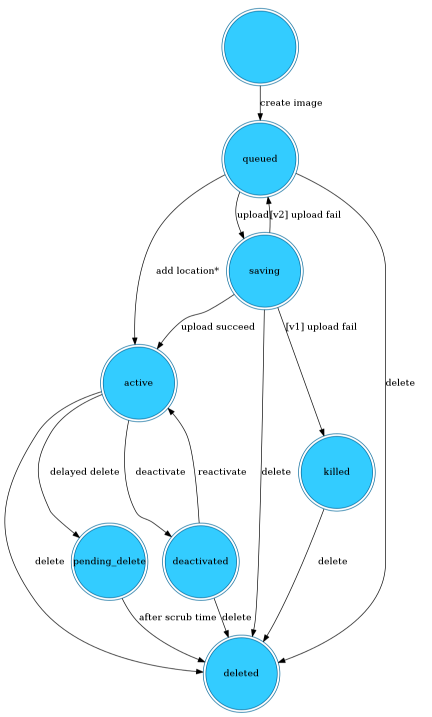
5 Glance的镜像介绍及镜像的状态转换
Image是Glance所管理的主要资源。类似于VMware的VM模板,它预先安装了OS。以下图是镜像的状态演变图。
|
镜像状态 |
描述 |
|
queued |
表示Glance注册表中已保留该图像标识,但还没有图像数据上传到Glance。 |
|
saving |
表示图像的原始数据正在上传到Glance。 |
|
active |
表示在Glance中完全可用的图像。 |
|
deactivated |
表示不允许任何非管理员用户访问图像数据。 |
|
killed |
表示在上载图像数据期间发生错误,并且图像不可读。 |
|
deleted |
Glance保留了关于图像的信息,但不再可用。 此状态下的图像将在以后自动删除。 |
|
pending_delete |
Glance尚未删除图像数据。 处于此状态的图像无法恢复。 |
6 Glance的Task
一般来说,对Image的操作有import、export、clone等几种。Glance把这些操作统一起来抽象出了Task的概念来方便管理。Task是针对Image的异步操作,具有的一些属性包括id、owner、状态等。Glance同时也实现了统一的JSON格式的API来操作这些Task,比如创建、删除、查询状态等。
在Glance中的任务状态有以下几种:
|
任务状态 |
描述 |
|
pending |
表示该任务标识符已被保留给Glance中的任务。 还没有开始处理。 |
|
processing |
表示该任务正在执行中。 |
|
success |
表示该任务在Glance中已经成功运行。 |
|
failure |
表示执行任务期间发生错误,并且无法继续处理。 |
7 Glance组件重要流程分析
7.1 Glance服务启动过程
Glance服务主要包括两个服务,一个是glance-api服务,一个是glance-registry服务。
glance-api服务启动时,其入口是/cmd/api.py里的main函数并给相对应的代码加上了注释:
def main():
    try:
        # 初始化glance.common.config模块的CONF对象
        config.parse_args()
        # 更新所有默认配置值,比如更新oslo.middleware模块的默认值
        config.set_config_defaults()
        # 设置glance.common.wsgi模块的eventlet对象的hub的实现方式,比如poll或select
        wsgi.set_eventlet_hub()
        # 启动该服务日志模块
        logging.setup(CONF, 'glance')
        # 配置该服务事件通知功能的默认值
        notifier.set_defaults()

        # 创建该服务的事件通知功能
        if cfg.CONF.profiler.enabled:
            _notifier = osprofiler.notifier.create("Messaging",
                                                   oslo_messaging, {},
                                                   notifier.get_transport(),
                                                   "glance", "api",
                                                   cfg.CONF.bind_host)
            osprofiler.notifier.set(_notifier)
            osprofiler.web.enable(cfg.CONF.profiler.hmac_keys)
        else:
            osprofiler.web.disable()

        # 初始化glance.common.wsgi模块的Server类
        server = wsgi.Server(initialize_glance_store=True)
        # 用给定的应用程序启动wsgi服务
        server.start(config.load_paste_app('glance-api'), default_port=9292)
        # 等待所有服务运行完毕
        server.wait()
    except KNOWN_EXCEPTIONS as e:
        fail(e)

if __name__ == '__main__':
    main()
对于这行代码:
config.load_paste_app('glance-api'),
它的功能是根据paste配置文件建立并返回一个WSGI应用程序。glance-api的paste配置文件是源代码中的/etc/glance-api-paste.ini,并根据传入的参数”glance-api”来找到对应的配置:
[pipeline:glance-api]
pipeline = cors healthcheck http_proxy_to_wsgi versionnegotiation osprofiler unauthenticated-context rootapp
[composite:rootapp]
paste.composite_factory = glance.api:rootapp
/: apiversions
/v1: apiv1app
/v2: apiv2app

[app:apiversions]
paste.app_factory = glance.api.versions:create_resource

[app:apiv1app]
paste.app_factory = glance.api.v1.router:API.factory

[app:apiv2app]
paste.app_factory = glance.api.v2.router:API.factory
从该配置文件我们可以看到返回的wsgi应用程序是一个经过了多个中间件(比如cors healthcheck等等)包装的,只有最后一个rootapp不是中间件,该rootapp也可以看到其section类型是composite的,可以看到它会调用glance.api模块的root_app_factory函数:
def root_app_factory(loader, global_conf, **local_conf):
    if not CONF.enable_v1_api and '/v1' in local_conf:
        del local_conf['/v1']
    if not CONF.enable_v2_api and '/v2' in local_conf:
        del local_conf['/v2']
    return paste.urlmap.urlmap_factory(loader, global_conf, **local_conf)
我们主要关注的是v2版本的,可以知道其对应的是glance.api.v2.router:API类:
class API(wsgi.Router):
    """WSGI router for Glance v2 API requests."""
    def __init__(self, mapper):
        custom_image_properties = images.load_custom_properties()
        reject_method_resource = wsgi.Resource(wsgi.RejectMethodController())

        schemas_resource = schemas.create_resource(custom_image_properties)
        mapper.connect('/schemas/image',
                       controller=schemas_resource,
                       action='image',
                       conditions={'method': ['GET']},
                       body_reject=True)
        mapper.connect('/schemas/image',
                       controller=reject_method_resource,
                       action='reject',
                       allowed_methods='GET')
这里只列出一部分,重点是看mapper.connect里的格式,它描述的是请求API对应的controller和action。
glance-registry服务启动时跟glance-api类似,不过glance-api的监听端口是9292,glance-registry的监听端口是9191。
7.2 列举镜像过程
当我们使用命令openstack image list查看镜像文件时,从后台日志中可以看到这个请求GET /v2/images,该请求会在route.py进行匹配,可以知道它使用的是images这个controller的index函数:
mapper.connect('/images',
               controller=images_resource,
               action='index',
               conditions={'method': ['GET']})
从index函数中我们可以看到以下关键代码:
image_repo = self.gateway.get_repo(req.context)
images = image_repo.list(marker=marker, limit=limit,
                         sort_key=sort_key,
                         sort_dir=sort_dir,
                         filters=filters,
                         member_status=member_status)
if len(images) != 0 and len(images) == limit:
    result['next_marker'] = images[-1].image_id
result['images'] = images
return result
我们需要再看看get_repo函数:
def get_repo(self, context):
    image_repo = glance.db.ImageRepo(context, self.db_api)
    store_image_repo = glance.location.ImageRepoProxy(
        image_repo, context, self.store_api, self.store_utils)
    quota_image_repo = glance.quota.ImageRepoProxy(
        store_image_repo, context, self.db_api, self.store_utils)
    policy_image_repo = policy.ImageRepoProxy(
        quota_image_repo, context, self.policy)
    notifier_image_repo = glance.notifier.ImageRepoProxy(
        policy_image_repo, context, self.notifier)
    if property_utils.is_property_protection_enabled():
        property_rules = property_utils.PropertyRules(self.policy)
        pir = property_protections.ProtectedImageRepoProxy(
            notifier_image_repo, context, property_rules)
        authorized_image_repo = authorization.ImageRepoProxy(
            pir, context)
    else:
        authorized_image_repo = authorization.ImageRepoProxy(
            notifier_image_repo, context)

    return authorized_image_repo
可以看到这里经过了多个类的封装,其实就是glance domain module的实现,返回时是一个经过多个类封装后的对象,这里封装的类都是继承自domain_proxy.Repo基类的:
class Repo(object):
    def __init__(self, base, item_proxy_class=None, item_proxy_kwargs=None):
        self.base = base
        self.helper = Helper(item_proxy_class, item_proxy_kwargs)

    def get(self, item_id):
        return self.helper.proxy(self.base.get(item_id))

    def list(self, *args, **kwargs):
        items = self.base.list(*args, **kwargs)
        return [self.helper.proxy(item) for item in items]
所以它能够做到把方法一层一层往上传递。
glance domain model的各层的实现功能上面我们已经讲过了,这里主要针对该list来讲,从源代码来看,该list方法继承类有重写list方法的层有auth层、policy层和db层,首先在auth层,该层调用到policy层,该层进行权限检查,查看此行为是否有权限,然后传递到db层,我们主要看下db层的list方法实现:
def list(self, marker=None, limit=None, sort_key=None,
         sort_dir=None, filters=None, member_status='accepted'):
    sort_key = ['created_at'] if not sort_key else sort_key
    sort_dir = ['desc'] if not sort_dir else sort_dir
    db_api_images = self.db_api.image_get_all(
        self.context, filters=filters, marker=marker, limit=limit,
        sort_key=sort_key, sort_dir=sort_dir,
        member_status=member_status, return_tag=True)
    images = []
    for db_api_image in db_api_images:
        db_image = dict(db_api_image)
        image = self._format_image_from_db(db_image, db_image['tags'])
        images.append(image)
    return images
这些代码中最重要的代码是image_get_all方法的调用,返回的是从数据库中查询到的image的信息。
image_get_all方法实现是在glancedbsqlalchemyapi.py文件中,sqlalchemy模块是对数据库的操作进行了封装的,这里不详细描述它里面的实现细节。
7.3 上传镜像过程
就通过命令行开启debug模式上传镜像,比如:
openstack image create "oop" --file test_image.img --disk-format raw --container-format bare --public --debug
从输出的内容可以看到该命令执行一共发出了三个请求:
(1)第一个请求:GET call to glance-api for http://controller:9292/v2/schemas/image used request id req-507983f9-643a-4330-a658-5b9f6803e91d
通过glance/api/v2/routesr.py.API定义的路由映射可知,该请求会对应到/v2/schemas.py.Controller类的image函数:
def image(self, req):
    return self.image_schema.raw()
image_schema的raw方法实现:
def raw(self):
    raw = super(PermissiveSchema, self).raw()
    raw['additionalProperties'] = {'type': 'string'}
    return raw
Schema的raw方法实现:
def raw(self):
    raw = {
        'name': self.name,
        'properties': self.properties,
        'additionalProperties': False,
    }
    if self.definitions:
        raw['definitions'] = self.definitions
    if self.required:
        raw['required'] = self.required
    if self.links:
        raw['links'] = self.links
    return raw
从上述代码可以知道获得的是镜像所支持的属性字典定义,调用者就可以根据这些信息来验证用户输入的参数是否有效。
(2)第二个请求:POST call to glance-api for http://controller:9292/v2/images used request id req-e4cdac4f-8294-4a14-8308-1fbd46f3ce9c HTTP/1.1 201 Created
通过glance/api/v2/routesr.py.API定义的路由映射可知它这里是调用了/v2/images.py.ImageController类的create函数:
def create(self, req, image, extra_properties, tags):
    image_factory = self.gateway.get_image_factory(req.context)
    image_repo = self.gateway.get_repo(req.context)
    try:
        image = image_factory.new_image(extra_properties=extra_properties,
                                        tags=tags, **image)
        image_repo.add(image)

    return image
这里返回了两个对象image_factory和image_repo,也是经过了glance domain module封装的对象。
在image_factory对象所对应的责任链上,我们这里只看db层new_image方法实现即可,其它层都是一些校验检查之类的:
def new_image(self, image_id=None, name=None, visibility='shared',
              min_disk=0, min_ram=0, protected=False, owner=None,
              disk_format=None, container_format=None,
              extra_properties=None, tags=None, **other_args):
    extra_properties = extra_properties or {}
    self._check_readonly(other_args)
    self._check_unexpected(other_args)
    self._check_reserved(extra_properties)

    if image_id is None:
        image_id = str(uuid.uuid4())
    created_at = timeutils.utcnow()
    updated_at = created_at
    status = 'queued'

    return Image(image_id=image_id, name=name, status=status,
                 created_at=created_at, updated_at=updated_at,
                 visibility=visibility, min_disk=min_disk,
                 min_ram=min_ram, protected=protected,
                 owner=owner, disk_format=disk_format,
                 container_format=container_format,
                 extra_properties=extra_properties, tags=tags or [])
可以看到new_image函数最终会返回一个image对象,对象里面包含了该镜像的属性值,比如镜像id,镜像创建时间等等,并且将该对象的状态置为queued。
在image_repo对象对应的责任链上,我们主要看location和db层。
location 层的add方法的实现:
def add(self, image):
    result = super(ImageRepoProxy, self).add(image)
    self._set_acls(image)
    return result
可以看到先调用了db 层的add方法,查看db层的add方法实现:
def add(self, image):
    # 获取到对应数据库相关字段的属性组合成字典返回
    image_values = self._format_image_to_db(image)
    if (image_values['size'] is not None
       and image_values['size'] > CONF.image_size_cap):
        raise exception.ImageSizeLimitExceeded
    # the updated_at value is not set in the _format_image_to_db
    # function since it is specific to image create
    image_values['updated_at'] = image.updated_at
    # 根据image_values字典中的值创建一个image对象
    new_values = self.db_api.image_create(self.context, image_values)
    self.db_api.image_tag_set_all(self.context,
                                  image.image_id, image.tags)
    image.created_at = new_values['created_at']
    image.updated_at = new_values['updated_at']
主要看self.db_api.image_create函数的实现:
def image_create(context, values, v1_mode=False):
    """Create an image from the values dictionary."""
    image = _image_update(context, values, None, purge_props=False)
    if v1_mode:
        image = db_utils.mutate_image_dict_to_v1(image)
    return image
这个函数的主要实现在于_image_update的实现,这个函数的实现比较长,我只写出比较重要的代码:
def _image_update(context, values, image_id, purge_props=False,
                  from_state=None):
    # 获取一个跟数据库表有关系对象映射的对象
    image_ref = models.Image()
    # 将values对象里的键值对更新到image_ref对象中
    image_ref.update(values)
    values = _validate_image(image_ref.to_dict())
    _update_values(image_ref, values)
    # 将image_ref中的值插入到数据库表中,save里的实现是数据库表和python对象的        关系对象映射里的实现
    image_ref.save(session=session)
    return image_get(context, image_ref.id)

这里看下image_get函数的实现:
def image_get(context, image_id, session=None, force_show_deleted=False,
              v1_mode=False):
    # 根据image_id从数据库中查找出对应的镜像信息并以对象形式返回
    image = _image_get(context, image_id, session=session,
                       force_show_deleted=force_show_deleted)
    # 为图像的位置字段生成合适的字典列表,比如镜像的url,其实就是将上面的image对象里包含的值全部展开,变成字典形式的字符串返回
    image = _normalize_locations(context, image.to_dict(),
                                 force_show_deleted=force_show_deleted)
    if v1_mode:
        image = db_utils.mutate_image_dict_to_v1(image)
    return image
现在回到location层的add函数中,接着是执行self._set_acls(image)代码,下面是_set_acls函数的实现:
def _set_acls(self, image):
    public = image.visibility == 'public'
    member_ids = []
    if image.locations and not public:
        member_repo = _get_member_repo_for_store(image,
                                                 self.context,
                                                 self.db_api,
                                                 self.store_api)
        member_ids = [m.member_id for m in member_repo.list()]
    # 调用store.set_acls,设置image的读写权限(这里的set_als的实现是在glance_store项目代码里的)
    for location in image.locations:
        self.store_api.set_acls(location['url'], public=public,
                                read_tenants=member_ids,
                                context=self.context)
可以说这第二个请求基本上都是跟创建镜像的元数据相关,并将其保存到数据库中,但后面也看到会需要跟glance-store项目进行交互进行镜像的读写权限的设置。
glance-store 向 glance-api 提供文件 backend.py 作为 store 操作的统一入口。
(2)第三个请求:PUT call to glance-api for
http://controller:9292/v2/images/251c497f-2482-426f-9403-f026529c9e3b/file used request id req-0cc373cf-5917-41c4-8349-29ad8d14c757
通过glance/api/v2/routesr.py.API定义的路由映射可知它这里是调用了/v2/image_data.py.ImageDataController类的upload函数,这里只列出一些重要代码:
def upload(self, req, image_id, data, size):
    # 跟之前一样,获取一个经过多层封装的责任链对象
    image_repo = self.gateway.get_repo(req.context)
    # 根据image_id从数据库中取出image的信息并以对象形式返回,且该对象也经过了多层的封装
    image = image_repo.get(image_id)
    image.status = 'saving'
    # 更新数据库条目
    image_repo.save(image, from_state='queued')
    # set_data的调用也会在domain model各层中传递,该实现是使用了Helper代理类实现的
    image.set_data(data, size)
    # 更新数据库条目,比如状态此时会更新为saving状态
    image_repo.save(image, from_state='saving')
这里我们主要关注location层的set_data的实现,因为是在该层将镜像数据通过glance-store的相关接口存储到后端存储的,只列出关键性代码:
def set_data(self, data, size=None):
    # 调用glance-store项目的接口来存储镜像并接收返回值
    location, size, checksum, loc_meta = self.store_api.add_to_backend(
        CONF,
        self.image.image_id,
        # 这里使用了eventle库来读取要上传的镜像数据
        utils.LimitingReader(utils.CooperativeReader(data),
                         CONF.image_size_cap),
        size,
        context=self.context,
        verifier=verifier)
    # 将存储后返回的数据进行更新
    self.image.locations = [{'url': location, 'metadata': loc_meta,
                             'status': 'active'}]
    self.image.size = size
    self.image.checksum = checksum
    # 镜像status的状态更改为active
    self.image.status = 'active'
上面最主要的代码是store_api.add_to_backend的调用,该项目代码实现是在glance-store项目里,以下列出该函数的实现:
def add_to_backend(conf, image_id, data, size, scheme=None, context=None,
                   verifier=None):
    if scheme is None:
        # 从配置文件中获取默认的存储方式是什么,比如rbd
        scheme = conf['glance_store']['default_store']
    # 根据schema的类型获取对应的后端存储对象
    store = get_store_from_scheme(scheme)
    # 每个存储后端对象的add()方法的调用的封装
    return store_add_to_backend(image_id, data, size, store, context,
                                verifier)
查看store_add_to_backend函数的实现,这里只列出关键代码:
def store_add_to_backend(image_id, data, size, store, context=None,
                         verifier=None):
    # 调用后端存储对象的add方法存储镜像数据
    (location, size, checksum, metadata) = store.add(image_id,
                                                     data,
                                                     size,
                                                     context=context,
                                                     verifier=verifier)
    return (location, size, checksum, metadata)
因为我们后端存储使用的是Ceph的rbd存储,所以我们直接看块存储的add方法实现,只列出关键代码:
def _create_image(self, fsid, conn, ioctx, image_name,
                  size, order, context=None):
    # 创建一个rbd image对象
    loc = self._create_image(fsid, conn, ioctx, image_name,
                             image_size, order)
    # 往rbd image对象中写数据
    with rbd.Image(ioctx, image_name) as image:
        bytes_written = 0
        offset = 0
        chunks = utils.chunkreadable(image_file,
                                     self.WRITE_CHUNKSIZE)
        for chunk in chunks:
            if image_size == 0:
                chunk_length = len(chunk)
                length = offset + chunk_length
                bytes_written += chunk_length
                LOG.debug(_("resizing image to %s KiB") %
                          (length / units.Ki))
                image.resize(length)
            LOG.debug(_("writing chunk at offset %s") %
                      (offset))
            offset += image.write(chunk, offset)
            checksum.update(chunk)
            if verifier:
                verifier.update(chunk)
        if loc.snapshot:
            image.create_snap(loc.snapshot)
            image.protect_snap(loc.snapshot)