Java 8
spring boot 2.5.2
spring cloud 2020.0.3
---
在前一篇文章中,已经介绍了 Web服务从配置服务器 获取 Git服务上的配置,不过,都是从 master分支上获取。
本文介绍更多 配置中心的使用场景。
目录
场景一:从master分支下获取服务各个profile的配置
场景三:根据spring.profiles.active从不同分支下获取配置
用到的服务:
configserver
web3-client
注意,本文使用的 git仓库 不是使用 HTTP 访问的,而是最原始的方式。
注意,本文基于自己 前一篇文章 所写,还会有下一篇。
场景一:从master分支下获取服务各个profile的配置
之前master下只有一个 web3-client.properties,再建立 两个文件:web3-client-dev.properties、web3-client-test.properties

更改其中的 message分别为:
# web3-client-dev.properties
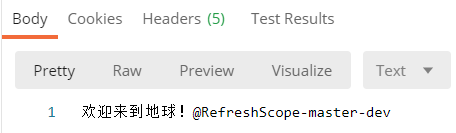
message=欢迎来到地球!@RefreshScope-master-dev
# web3-client-test.properties
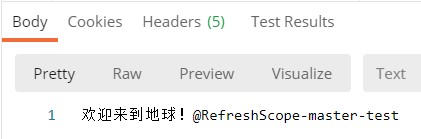
message=欢迎来到地球!@RefreshScope-master-test
启动web3-client项目时,使用参数 --spring.profiles.active=dev 或 test。
启动后,检查 接口获取的 message的值(下面是dev的,test类似):
注,在 场景一 中,相关服务的配置和 之前的文章相同。来自博客园
场景一服务配置
# configserver服务 部分配置
spring.cloud.config.server.git.uri=git@mylinux:/home/git/gitrepo/configserver.git
spring.cloud.config.server.git.username=git
spring.cloud.config.server.git.password=git

# web3-client服务 部分配置
spring.application.name=web3-client
spring.config.import=optional:configserver:http://localhost:10000/git的master下建立 web3-client 文件夹,再将之前的 3个properties文件 拷贝到其中:

修改三个 properties,在message属性后面添加 信息:来自博客园
message=欢迎来到地球!@RefreshScope in web3-client
message=欢迎来到地球!@RefreshScope-master-dev in web3-client
message=欢迎来到地球!@RefreshScope-master-test in web3-client
启动web3-client,检查 message的值。
结果:
获取的值 还是来自 configserver根目录下。
怎么使得 项目名下的目录生效呢?客户端 添加配置——spring.cloud.config.name:
# application.properties文件
# 错误-无效,导致获取配置文件失败
#spring.cloud.config.name={spring.application.name}
# 正确
spring.cloud.config.name=web3-client
配置后,成功获取 web3-client 中的配置文件中的配置(--spring.profiles.active=test)。
不过,去掉启动参数 --spring.profiles.active 时,获取的是 根目录下的 application.properties 中的值——此时使用默认的 profile=[default]。来自博客园
这样看来,场景二 只在 确定了 spring.profiles.active 时有效。
试验1:
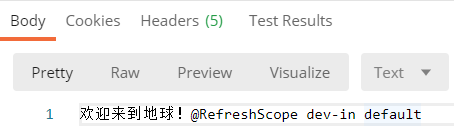
在 web3-client 目录下 添加 web3-client-default.properties,此时测试 无 spring.profiles.active 启动。
结果:无用。使用了 根目录下的 web3-client.properties 中的配置。
这么说来,default 是一个 特殊的 profile,按照默认的方式行事。
试验2:
删除 web3-client 下的 web3-client-dev.properties,使用 --spring.profiles.active=dev启动,检查。
结果:
使用了 根目录下的 web3-client-dev.properties 中的配置。
从上面两个试验来看,不同目录下的配置存在不同的优先级。来自博客园
注:有一个说法是 将 spring.cloud.* 的配置放到 bootstrap.properties 中,暂时不太清楚。见 后记
场景三:根据spring.profiles.active从不同分支下获取配置
注:清理掉 场景二配置的 spring.cloud.config.name。
配置的 spring.profiles.active 就是 分支名,再去不同分支 获取配置文件。
或要结合 spring.cloud.config.profile 一起使用。
步骤:
在仓库建立多个分支:dev、test。
在dev分支下建立文件 web3-client.properties、web3-client-dev.properties。来自博客园
在test分支下建立文件 web3-client-test.properties (没有 默认的 web3-client.properties)。
修改各个 properties文件中的 message属性值。
试验1:
dev分支下测试。
配置:
# application.properties
# 分支名
spring.cloud.config.label=dev
不添加 spring.profiles.active 启动——default。
结果:
获取的 message为
dev分支下 web3-client.properties 中的 message值。
试验2:
在试验1 的基础上,使用 spring.profiles.active=dev 启动。
结果:
成功获取到 dev分支下 web3-client-dev.properties 的 属性值。来自博客园
试验3:
test分支下测试:其中没有 默认的 web3-client.properties 文件。
无 spring.profiles.active 配置启动——默认。
结果:
发生异常,没有获取到 message值(@Value("${message}"))。
使用 --spring.profiles.active=test 启动。
结果:
启动成功,成功获取到 web3-client-test.properties 中的配置。来自博客园
这样看来,
配置 spring.cloud.config.name 后,获取配置 就只能在 这个分支下 寻找了!
注意,下面这种格式无法使用:
# application.properties
# 发生异常
spring.cloud.config.label={spring.profiles.active}在启动时,客户端服务会 加载 配置中心的配置,其中有下面这条日志:来自博客园
o.s.b.context.config.ConfigDataLoader    : Located environment: name=web3-client, profiles=[dev], label=dev,
version=f1253980dc71d00d83ff734b636128c2a518c60a, state=null
介绍如下,
name 为 服务名,默认为 spring.application.name的值,配置 spring.cloud.config.name 后,为后者的值,且指向 一个目录——可以没有;
profiles 默认为 spring.profiles.active的值,一个数组,配置 spring.cloud.config.profile后,为后者的值;
label 默认为 null,配置 spring.cloud.config.label 为 分支的值。来自博客园
试验1:
spring.cloud.config.label=dev,不配置 spring.cloud.config.profile,启动时 使用 --spring.profiles.active=test。
结果:
启动后 获取了 dev分支 下 默认的 web3-client.properties 的配置,,而不是 获取了 web3-client-test.properties 的配置——也没有这个文件(如果有呢?见 下方 进一步试验)。
此时,
配置 spring.cloud.config.profile=dev,
结果 获取了 web3-client-dev.properties 的配置。来自博客园
进一步试验:
在 dev分支下添加 web3-client-test.properties 文件(此时没有设置 spring.cloud.config.profile) 测试:
启动时,日志:
Located environment: name=web3-client, profiles=[test], label=dev, version=0b3131abeb5d100a598f26210229baec9d79e130, state=null启动后,获取message为:web3-client-test.properties 文件的配置。
欢迎来到地球!@RefreshScope dev-in test fileSpring Cloud官方文档 介绍的 application、label、profile 的关系:来自博客园
# Spring Cloud手册 Spring Cloud Config 中
/{application}/{profile}[/{label}]
/{application}-{profile}.yml
/{label}/{application}-{profile}.yml
/{application}-{profile}.properties
/{label}/{application}-{profile}.properties

# 官文说明
where application is injected as the spring.config.name in the SpringApplication (what is normally
application in a regular Spring Boot app), profile is an active profile (or comma-separated list of
properties), and label is an optional git label (defaults to master.)
本文将 客户端服务 从 配置中心 获取配置的 一些场景进行了试验,
可实现在 Git仓库 中更灵活地存放配置了。来自博客园
但这还是不够生产使用的,配置加解密、高可用配置、FailFast等,还得写一篇介绍了。
后记
配置文件中,获取配置用的是 spring.config.import,没有这个配置时,启动发生异常:
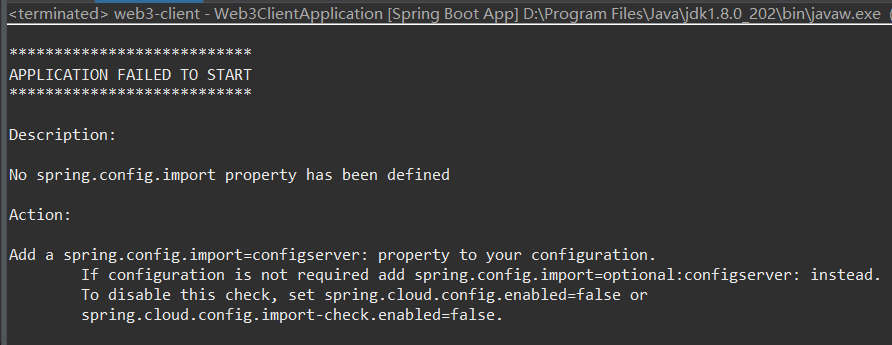
按照官方说明,spring.config.import 是在 Spring Boot 2.4 添加的,必须存在。
此时,要想使用 spring.cloud.config.uri 要怎么做呢?如下配置可行:
# 文件 application.properties
# Spring Boot 2.4+
spring.config.import=optional:configserver:

# 文件 application.properties 或者 bootstrap.properties,均可
# 注,下面的 CONFIGSERVER 是 配置中心服务 在 服务注册中心 注册的 应用名称
spring.cloud.config.uri=http://CONFIGSERVER
1、Spring Cloud配置中心(Config)配置文件命名跟git分支及配置读取的关系
3、书《Spring Cloud微服务实战》 by 翟永超
第8章 分布式配置中心:Spring Cloud Config
4、