Eclipse版本:2021-03 (4.19.0)
Java:8
Spring Boot:spring-boot-starter-parent#2.5.2(对于的spring-core/context/beans的版本为 5.3.8)
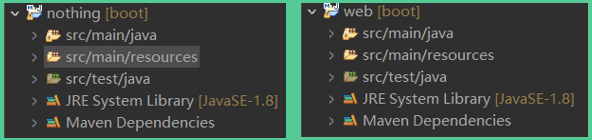
项目:nothing - 非Web项目,web - Web项目
技能GET:Debug(调试,Step Into/Over/Return)
目录
第一步) new SpringApplication(primarySources)
---
Spring Boot依赖于Spring Framework,而Spring Framework的核心是 Spring Core、Spring Context、Spring Beans。
Spring容器 是其中的核心,用来管理(装) Spring应用的 所有Bean及其关系,涉及到 BeanFactory、ApplicationContext 两个核心接口,其中,ApplicationContext 是 BeanFactory 的子孙接口。
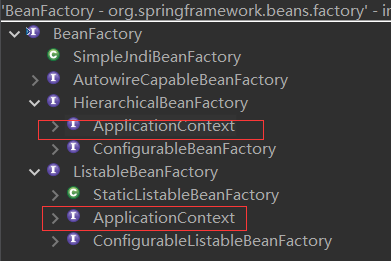
ApplicationContext 接口:
public interface ApplicationContext extends EnvironmentCapable, ListableBeanFactory, HierarchicalBeanFactory,
        MessageSource, ApplicationEventPublisher, ResourcePatternResolver {
    // ...
}
ApplicationContext 除了 Bean管理外,还有其它的功能,所以才继承了更多接口。
ApplicationContext 也有很多子孙接口及实现类,用来搭配不同的应用——非Web、Web-Servlet、Web-Reactive应用 3种(参考 WebApplicationType 枚举类)。
调用静态函数 SpringApplication#run
1 ConfigurableApplicationContext context = SpringApplication.run(NothingApplication.class, args);
2
3 ConfigurableApplicationContext context = SpringApplication.run(WebApplication.class, args);
其下调用了:
1 new SpringApplication(primarySources).run(args);
分为两步:
第一步)new SpringApplication(primarySources)
第二步).run(args)
启动完毕后,返回一个 ConfigurableApplicationContext 对象,这个对象是 ApplicationContext 接口的 子接口:
1 public interface ConfigurableApplicationContext extends ApplicationContext, Lifecycle, Closeable {
2 }
通过这个 ConfigurableApplicationContext 对象,可以获取 Spring容器中 所有Bean的信息,比如,总数、各个Bean的名称等。
非Web应用 Bean数量:
44

Web应用 Bean数量:
137
当然,ApplicationContext 在开发时还有更多用途。
下面分别介绍启动的两步对 ApplicationContext 的影响——主要是 容器中 Bean的变化。
第一步) new SpringApplication(primarySources)
添加断点:

开始调试(Debug As):

程序停止了上面。
点击 左上角的 Step Into,进入 SpringApplication 构造函数。再次Step Into 可以进入下面的构造函数:
 1     @SuppressWarnings({ "unchecked", "rawtypes" })
 2     public SpringApplication(ResourceLoader resourceLoader, Class<?>... primarySources) {
 3         this.resourceLoader = resourceLoader;
 4         Assert.notNull(primarySources, "PrimarySources must not be null");
 5         this.primarySources = new LinkedHashSet<>(Arrays.asList(primarySources));
 6         this.webApplicationType = WebApplicationType.deduceFromClasspath();
 7         this.bootstrapRegistryInitializers = getBootstrapRegistryInitializersFromSpringFactories();
 8         setInitializers((Collection) getSpringFactoriesInstances(ApplicationContextInitializer.class));
 9         setListeners((Collection) getSpringFactoriesInstances(ApplicationListener.class));
10         this.mainApplicationClass = deduceMainApplicationClass();
11     }
点击Step Over可以一步一步检查执行情况:构造函数会调到基本参数设置的地方,最后才进入 构造函数 上面的函数体。
第6行 判断 应用类型,结果是 前面提到的 3种。Step Over到这一行后,可以执行 Step Into 进入查看:
 1     static WebApplicationType deduceFromClasspath() {
 2         if (ClassUtils.isPresent(WEBFLUX_INDICATOR_CLASS, null) && !ClassUtils.isPresent(WEBMVC_INDICATOR_CLASS, null)
 3                 && !ClassUtils.isPresent(JERSEY_INDICATOR_CLASS, null)) {
 4             return WebApplicationType.REACTIVE;
 5         }
 6         for (String className : SERVLET_INDICATOR_CLASSES) {
 7             if (!ClassUtils.isPresent(className, null)) {
 8                 return WebApplicationType.NONE;
 9             }
10         }
11         return WebApplicationType.SERVLET;
12     }
在本文的项目中,nothing 返回的是 NONE,web返回的是 SERVLET。
项目不同,建立的 ApplicationContext 也不同,这也是上面 两个项目初始化时 容器中具有不同 Bean数量的原因。
查看完毕,可以点击Step Return直接返回。
SpringApplication 初始化最后是 设置 bootstrapRegistryInitializers、initializers、listeners,都会调用 getSpringFactoriesInstances 函数获取实例。
Step Over到最后一步时,可以查看 右边 this对象(SpringApplication对象)的各个参数的值:
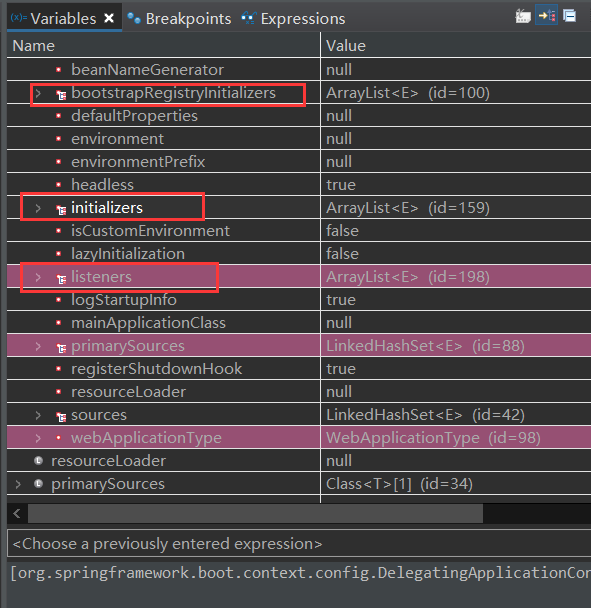
上面 红框中的 initializers、listeners 是有值的——在后面的步骤中会用到,bootstrapRegistryInitializers为空:
# initializers
[org.springframework.boot.context.config.DelegatingApplicationContextInitializer@55de24cc,
org.springframework.boot.autoconfigure.SharedMetadataReaderFactoryContextInitializer@dc7df28,
org.springframework.boot.context.ContextIdApplicationContextInitializer@30f842ca,
org.springframework.boot.context.ConfigurationWarningsApplicationContextInitializer@69c81773,
org.springframework.boot.rsocket.context.RSocketPortInfoApplicationContextInitializer@4d14b6c2,
org.springframework.boot.web.context.ServerPortInfoApplicationContextInitializer@7e990ed7,
org.springframework.boot.autoconfigure.logging.ConditionEvaluationReportLoggingListener@c05fddc]


# listeners
[org.springframework.boot.env.EnvironmentPostProcessorApplicationListener@25df00a0,
org.springframework.boot.context.config.AnsiOutputApplicationListener@4d15107f,
org.springframework.boot.context.logging.LoggingApplicationListener@7b4c50bc,
org.springframework.boot.autoconfigure.BackgroundPreinitializer@5884a914,
org.springframework.boot.context.config.DelegatingApplicationListener@50378a4,
org.springframework.boot.builder.ParentContextCloserApplicationListener@60f00693,
org.springframework.boot.ClearCachesApplicationListener@79207381,
org.springframework.boot.context.FileEncodingApplicationListener@491b9b8]
执行完毕, 即 SpringApplication 对象初始化完毕,接下来执行第二步——回到断点行时,再次执行 Step Into。
进入 run函数,来看看源码:
 1     public ConfigurableApplicationContext run(String... args) {
 2         StopWatch stopWatch = new StopWatch();
 3         stopWatch.start();
 4         DefaultBootstrapContext bootstrapContext = createBootstrapContext();
 5         ConfigurableApplicationContext context = null; // 需要返回的 ApplicationContext对象
 6         configureHeadlessProperty();
 7         SpringApplicationRunListeners listeners = getRunListeners(args);
 8         listeners.starting(bootstrapContext, this.mainApplicationClass); // 开始启动
 9         try {
10             ApplicationArguments applicationArguments = new DefaultApplicationArguments(args);
11             ConfigurableEnvironment environment = prepareEnvironment(listeners, bootstrapContext, applicationArguments);
12             configureIgnoreBeanInfo(environment);
13             Banner printedBanner = printBanner(environment); // 执行Banner输出,可以配置不输出
14             context = createApplicationContext(); // 重点1:创建ApplicationContext
15             context.setApplicationStartup(this.applicationStartup);
16             prepareContext(bootstrapContext, context, environment, listeners, applicationArguments, printedBanner); // 重点2:执行后,将主类对象添加到 spring容器
17             refreshContext(context); // 重点3:执行后更改了更多Context的属性,并添加了更多Bean!!!
18             afterRefresh(context, applicationArguments);
19             stopWatch.stop(); // 上下文启动完毕,下面 通知应用已启动 started
20             if (this.logStartupInfo) {
21                 new StartupInfoLogger(this.mainApplicationClass).logStarted(getApplicationLog(), stopWatch);
22             }
23             listeners.started(context);
24             callRunners(context, applicationArguments); // 运行 ApplicationRunner、CommandLineRunner
25         }
26         catch (Throwable ex) {
27             handleRunFailure(context, ex, listeners);
28             throw new IllegalStateException(ex);
29         }
30
31         try {
32             listeners.running(context); // 通知应用已运行起来了
33         }
34         catch (Throwable ex) {
35             handleRunFailure(context, ex, null);
36             throw new IllegalStateException(ex);
37         }
38         return context;
39     }
下面分析重点代码行。
11行: prepareEnvironment,,不同应用类型,有不同的 环境变量
 1     private ConfigurableEnvironment getOrCreateEnvironment() {
 2         if (this.environment != null) {
 3             return this.environment;
 4         }
 5         switch (this.webApplicationType) {
 6         case SERVLET:
 7             return new ApplicationServletEnvironment();
 8         case REACTIVE:
 9             return new ApplicationReactiveWebEnvironment();
10         default:
11             return new ApplicationEnvironment();
12         }
13     }
14行:createApplicationContext()
1     protected ConfigurableApplicationContext createApplicationContext() {
2         return this.applicationContextFactory.create(this.webApplicationType);
3     }
这里的create函数 是 ApplicationContextFactory接口 的 DEFAULT 对象,它根据不同的 webApplicationType 来创建不同的 ApplicationContext:
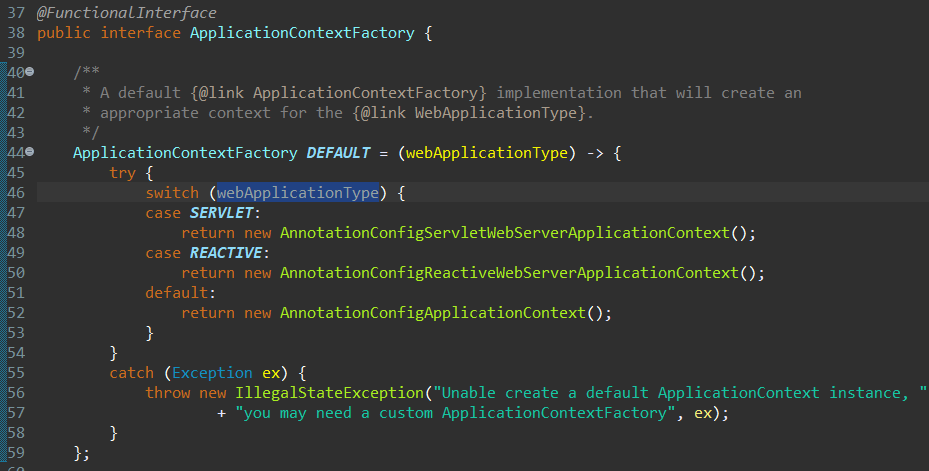
注意,这里无法使用 Step Over 进入 DEFAULT 对象的执行体。
非Web应用:
1     public AnnotationConfigApplicationContext() {
2         StartupStep createAnnotatedBeanDefReader = this.getApplicationStartup().start("spring.context.annotated-bean-reader.create");
3         this.reader = new AnnotatedBeanDefinitionReader(this);
4         createAnnotatedBeanDefReader.end();
5         this.scanner = new ClassPathBeanDefinitionScanner(this);
6     }
Web-Sevlet应用:
1     public AnnotationConfigServletWebServerApplicationContext() {
2         this.reader = new AnnotatedBeanDefinitionReader(this);
3         this.scanner = new ClassPathBeanDefinitionScanner(this);
4     }
Web-Reactive应用:
1     public AnnotationConfigReactiveWebServerApplicationContext() {
2         this.reader = new AnnotatedBeanDefinitionReader(this);
3         this.scanner = new ClassPathBeanDefinitionScanner(this);
4     }
执行完 第14行 后,context变量不再是 null了,其下的 beanFactory对象下的 beanDefinitionNames也要 5个对象了:
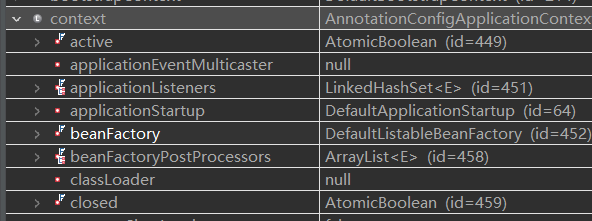
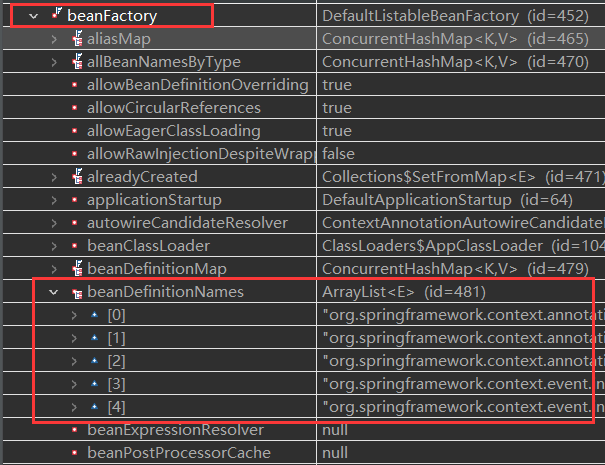
这个就是 Spring容器,更多的 Bean将在 后面的步骤中装入其中。
在 非Web、Web-Servlet应用 中,上面 beanDefinitionNames的 5个元素的值是相同的,列举如下:
org.springframework.context.annotation.internalConfigurationAnnotationProcessor
 org.springframework.context.annotation.internalAutowiredAnnotationProcessor
 org.springframework.context.annotation.internalCommonAnnotationProcessor
 org.springframework.context.event.internalEventListenerProcessor
 org.springframework.context.event.internalEventListenerFactory
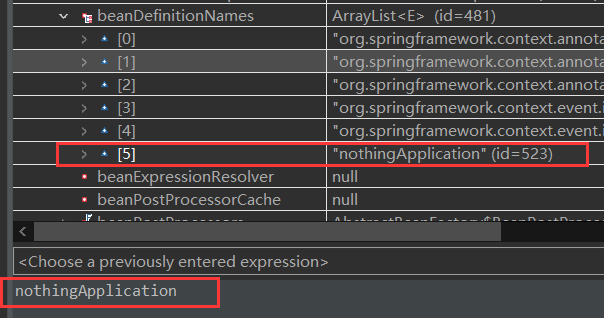
16行:prepareContext 函数调用,添加主类到容器
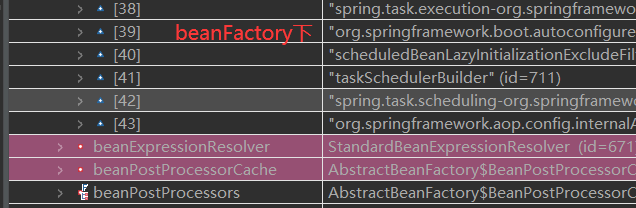
17行:refreshContext

24行:callRunners
 1     private void callRunners(ApplicationContext context, ApplicationArguments args) {
 2         List<Object> runners = new ArrayList<>();
 3         runners.addAll(context.getBeansOfType(ApplicationRunner.class).values());
 4         runners.addAll(context.getBeansOfType(CommandLineRunner.class).values());
 5         AnnotationAwareOrderComparator.sort(runners);
 6         for (Object runner : new LinkedHashSet<>(runners)) {
 7             if (runner instanceof ApplicationRunner) {
 8                 callRunner((ApplicationRunner) runner, args);
 9             }
10             if (runner instanceof CommandLineRunner) {
11                 callRunner((CommandLineRunner) runner, args);
12             }
13         }
14     }
上面运行完毕,返回context,此时,项目已成功启动。
更多问题:
1、这些Bean 是怎么找到的呢?
答案在 17行 refreshContext(context) 的执行过程中,可以更进一步 调试。由于没有外部配置文件,主要是根据 主类的配置(注解:默认 或 自定义的)去查找需要的 Bean。
2、怎么改造启动过程呢——为了更好地使用?
说明,
1、Debug的确挺好用的。除了在Debug前加断点,在Debug中也可以加断点,再控制执行到自己需要的行。
2、结合Spring相关文档,阅读源码时可以收获更多。因为,文档中还提到不少 可扩展的地方,结合在一起,就可以更好地使用Spring来开发应用了。
参考资料
非常好的一篇文章!必读!
3、