使用UIBezierPath画图步骤:
- 创建一个
UIBezierPath对象 - 调用
-moveToPoint:设置初始线段的起点 - 添加线或者曲线去定义一个或者多个子路径
改变UIBezierPath对象跟绘图相关的属性。如,我们可以设置画笔的属性、填充样式等
UIBezierPath创建方法介绍
我们先看看UIBezierPath类提供了哪些创建方式,这些都是工厂方法,直接使用即可。
+ (instancetype)bezierPath;
+ (instancetype)bezierPathWithRect:(CGRect)rect;
+ (instancetype)bezierPathWithOvalInRect:(CGRect)rect;
+ (instancetype)bezierPathWithRoundedRect:(CGRect)rect
                             cornerRadius:(CGFloat)cornerRadius;
+ (instancetype)bezierPathWithRoundedRect:(CGRect)rect
                        byRoundingCorners:(UIRectCorner)corners
                              cornerRadii:(CGSize)cornerRadii;
+ (instancetype)bezierPathWithArcCenter:(CGPoint)center
                                 radius:(CGFloat)radius
                             startAngle:(CGFloat)startAngle
                               endAngle:(CGFloat)endAngle
                              clockwise:(BOOL)clockwise;
+ (instancetype)bezierPathWithCGPath:(CGPathRef)CGPath;
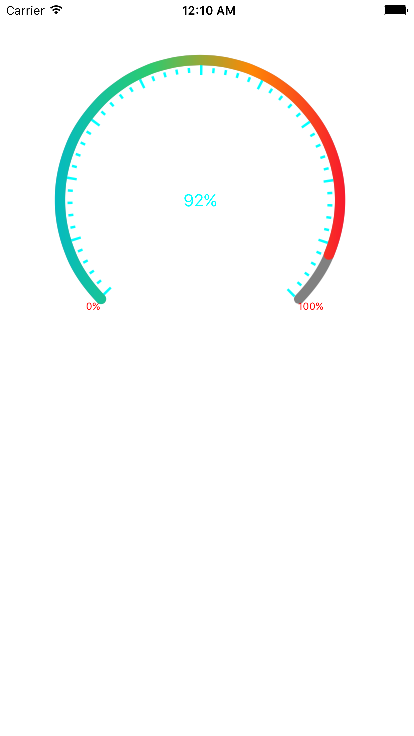
本文主要是利用下面的方法绘制圆形,进而形成动态的速度表盘形式:
+ (instancetype)bezierPathWithArcCenter:(CGPoint)center
                                 radius:(CGFloat)radius
                             startAngle:(CGFloat)startAngle
                               endAngle:(CGFloat)endAngle
                              clockwise:(BOOL)clockwise;
这个工厂方法用于画弧,参数说明如下:
center: 弧线中心点的坐标radius: 弧线所在圆的半径startAngle: 弧线开始的角度值endAngle: 弧线结束的角度值clockwise: 是否顺时针画弧线
UIBezierPath* outArc=[UIBezierPath bezierPathWithArcCenter:LuCenter radius:self.arcRadius startAngle:startAngle endAngle:endAngle clockwise:YES];
    CAShapeLayer* shapeLayer=[CAShapeLayer layer];
    shapeLayer.lineWidth=lineWitdth;
    shapeLayer.fillColor=filleColor.CGColor;
    shapeLayer.strokeColor=strokeColor.CGColor;
    shapeLayer.path=outArc.CGPath;
    shapeLayer.lineCap=kCALineCapRound;
    [self.layer addSublayer:shapeLayer];
CAShapeLayer有着几点很重要(使用CAShapeLayer与UIBezierPath可以实现不在view的drawRect方法中就画出一些想要的图形):
1. 它依附于一个给定的path,必须给与path,而且,即使path不完整也会自动首尾相接
2. strokeStart以及strokeEnd代表着在这个path中所占用的百分比
3. CAShapeLayer动画仅仅限于沿着边缘的动画效果,它实现不了填充效果
下面介绍一下速度表盘的实现过程:
- 画外围弧度
/**
 *  画弧度
 *
 *  @param startAngle  开始角度
 *  @param endAngle    结束角度
 *  @param lineWitdth  线宽
 *  @param filleColor  扇形填充颜色
 *  @param strokeColor 弧线颜色
 */
-(void)drawArcWithStartAngle:(CGFloat)startAngle endAngle:(CGFloat)endAngle lineWidth:(CGFloat)lineWitdth fillColor:(UIColor*)filleColor strokeColor:(UIColor*)strokeColor{
    //保存弧线宽度,开始角度,结束角度
    self.lineWidth=lineWitdth;
    self.startAngle=startAngle;
    self.endAngle=endAngle;
    self.arcAngle=endAngle-startAngle;
    self.arcRadius=Calculate_radius;
    self.scaleRadius=self.arcRadius-self.lineWidth;
    self.scaleValueRadius=self.scaleRadius-self.lineWidth;
    self.speedLabel.text=@"0%";


    UIBezierPath* outArc=[UIBezierPath bezierPathWithArcCenter:LuCenter radius:self.arcRadius startAngle:startAngle endAngle:endAngle clockwise:YES];
    CAShapeLayer* shapeLayer=[CAShapeLayer layer];
    shapeLayer.lineWidth=lineWitdth;
    shapeLayer.fillColor=filleColor.CGColor;
    shapeLayer.strokeColor=strokeColor.CGColor;
    shapeLayer.path=outArc.CGPath;
    shapeLayer.lineCap=kCALineCapRound;
    [self.layer addSublayer:shapeLayer];
}
- 绘制刻度,可以实现任意等分
/**
 *  画刻度
 *
 *  @param divide      刻度几等分
 *  @param remainder   刻度数
 *  @param strokeColor 轮廓填充颜色
 *  @param fillColor   刻度颜色
 */
-(void)drawScaleWithDivide:(int)divide andRemainder:(NSInteger)remainder strokeColor:(UIColor*)strokeColor filleColor:(UIColor*)fillColor scaleLineNormalWidth:(CGFloat)scaleLineNormalWidth scaleLineBigWidth:(CGFloat)scaleLineBigWidth{

    CGFloat perAngle=self.arcAngle/divide;
    //我们需要计算出每段弧线的起始角度和结束角度
    //这里我们从- M_PI 开始,我们需要理解与明白的是我们画的弧线与内侧弧线是同一个圆心
    for (NSInteger i = 0; i<= divide; i++) {

        CGFloat startAngel = (self.startAngle+ perAngle * i);
        CGFloat endAngel   = startAngel + perAngle/5;

        UIBezierPath *tickPath = [UIBezierPath bezierPathWithArcCenter:LuCenter radius:self.scaleRadius startAngle:startAngel endAngle:endAngel clockwise:YES];
        CAShapeLayer *perLayer = [CAShapeLayer layer];

        if((remainder!=0)&&(i % remainder) == 0) {
            perLayer.strokeColor = strokeColor.CGColor;
            perLayer.lineWidth   = scaleLineBigWidth;

        }else{
            perLayer.strokeColor = strokeColor.CGColor;;
            perLayer.lineWidth   = scaleLineNormalWidth;

        }

        perLayer.path = tickPath.CGPath;
        [self.layer addSublayer:perLayer];

    }
}
- 绘制刻度值,刻度值可以按照任意数值等分
/**
 *  画刻度值,逆时针设定label的值,将整个仪表切分为N份,每次递增仪表盘弧度的N分之1
 *
 *  @param divide 刻度值几等分
 */
-(void)DrawScaleValueWithDivide:(NSInteger)divide{
    CGFloat textAngel =self.arcAngle/divide;
    if (divide==0) {
        return;
    }
    for (NSUInteger i = 0; i <= divide; i++) {
        CGPoint point = [self calculateTextPositonWithArcCenter:LuCenter Angle:-(self.endAngle-textAngel*i)];
        NSString *tickText = [NSString stringWithFormat:@"%ld%%",(divide - i)*100/divide];
        //默认label的大小23 * 14
        UILabel *text = [[UILabel alloc] initWithFrame:CGRectMake(point.x - 8, point.y - 7, 30, 14)];
        text.text = tickText;
        text.font = [UIFont systemFontOfSize:10.f];
        text.textColor = [UIColor redColor];
        text.textAlignment = NSTextAlignmentLeft;
        [self addSubview:text];
    }
}
//默认计算半径-10,计算label的坐标
- (CGPoint)calculateTextPositonWithArcCenter:(CGPoint)center
                                       Angle:(CGFloat)angel
{
    CGFloat x = (self.scaleValueRadius+3*self.lineWidth)* cosf(angel);
    CGFloat y = (self.scaleValueRadius+3*self.lineWidth)* sinf(angel);
    return CGPointMake(center.x + x, center.y - y);
}
- 进度条曲线
/**
 *  进度条曲线
 *
 *  @param fillColor   填充颜色
 *  @param strokeColor 轮廓颜色
 */
- (void)drawProgressCicrleWithfillColor:(UIColor*)fillColor strokeColor:(UIColor*)strokeColor{
    UIBezierPath *progressPath  = [UIBezierPath bezierPathWithArcCenter:LuCenter radius:self.arcRadius startAngle:self.startAngle endAngle:self.endAngle clockwise:YES];
    CAShapeLayer *progressLayer = [CAShapeLayer layer];
    self.progressLayer = progressLayer;
    progressLayer.lineWidth = self.lineWidth+0.25f;
    progressLayer.fillColor = fillColor.CGColor;
    progressLayer.strokeColor = strokeColor.CGColor;
    progressLayer.path = progressPath.CGPath;
    progressLayer.strokeStart = 0;
    progressLayer.strokeEnd = 0.0;
    progressLayer.lineCap=kCALineCapRound;
    [self.layer addSublayer:progressLayer];
}
- 为进度条添加渐变图层,图层颜色是从左向右渐变
/**
 *  添加渐变图层
 *
 *  @param colorGradArray 颜色数组,如果想达到红-黄-红效果,数组应该是红,黄,红
 */
-(void)setColorGrad:(NSArray*)colorGradArray{
    //渐变图层
    CALayer *gradientLayer = [CALayer layer];
    CAGradientLayer *gradientLayer1 =  [CAGradientLayer layer];
    //增加渐变图层,frame为当前layer的frame
    gradientLayer1.frame = CGRectMake(0, 0, self.bounds.size.width, self.bounds.size.height);
    [gradientLayer1 setColors:colorGradArray];
    [gradientLayer1 setStartPoint:CGPointMake(0, 1)];
    [gradientLayer1 setEndPoint:CGPointMake(1, 1)];
    [gradientLayer addSublayer:gradientLayer1];

    [gradientLayer setMask:_progressLayer]; //用progressLayer来截取渐变层
    [self.layer addSublayer:gradientLayer];
}
个人写代码喜欢添加注释,可是在奈何文笔不行,表达不清,请移步到我的GitHub上下载Demo,如果有什么问题也可以给我发邮件,评论探讨。