Spring MVC是Spring Framework的一部分,是基于Java实现MVC的轻量级Web框架。Spring的web框架围绕DispatcherServlet设计, 作用是将请求分发到不同的处理器。
Spring MVC的特点:
1、轻量
2、高效
3、与Spring兼容性好
4、功能强大 : RESTful、数据验证、格式化、绑定机制、本地化、主题等
5、简洁灵活
Web项目中集成Spring MVC的示例:
1 新建Maven项目, 选择Webapp, 工程目录如下:

2 修改pom.xml, 添加依赖包
    <properties>
        <project.build.sourceEncoding>UTF-8</project.build.sourceEncoding>
        <spring.version>4.3.0.RELEASE</spring.version>
    </properties>

  <dependencies>
      <!--Spring框架核心库 -->
      <dependency>
          <groupId>org.springframework</groupId>
          <artifactId>spring-context</artifactId>
          <version>${spring.version}</version>
      </dependency>
      <!-- Spring MVC -->
      <dependency>
          <groupId>org.springframework</groupId>
          <artifactId>spring-webmvc</artifactId>
          <version>${spring.version}</version>
      </dependency>
      <!-- JSTL -->
      <dependency>
          <groupId>javax.servlet</groupId>
          <artifactId>jstl</artifactId>
          <version>1.2</version>
      </dependency>
  </dependencies>
3 修改web.xml文件, 增加SpringMVC的Servlet
<?xml version="1.0" encoding="UTF-8"?>
<web-app xmlns="http://xmlns.jcp.org/xml/ns/javaee"
         xmlns:xsi="http://www.w3.org/2001/XMLSchema-instance"
         xsi:schemaLocation="http://xmlns.jcp.org/xml/ns/javaee http://xmlns.jcp.org/xml/ns/javaee/web-app_3_1.xsd"
         version="3.1">

    <servlet>
        <servlet-name>springmvc</servlet-name>
        <servlet-class>org.springframework.web.servlet.DispatcherServlet</servlet-class>
        <load-on-startup>1</load-on-startup>
        <init-param>
            <param-name>contextConfigLocation</param-name>
            <param-value>classpath:springmvc-servlet.xml</param-value>
        </init-param>
    </servlet>

    <!--拦截所有请求 -->
    <servlet-mapping>
        <servlet-name>springmvc</servlet-name>
        <url-pattern>/</url-pattern>
    </servlet-mapping>

</web-app>
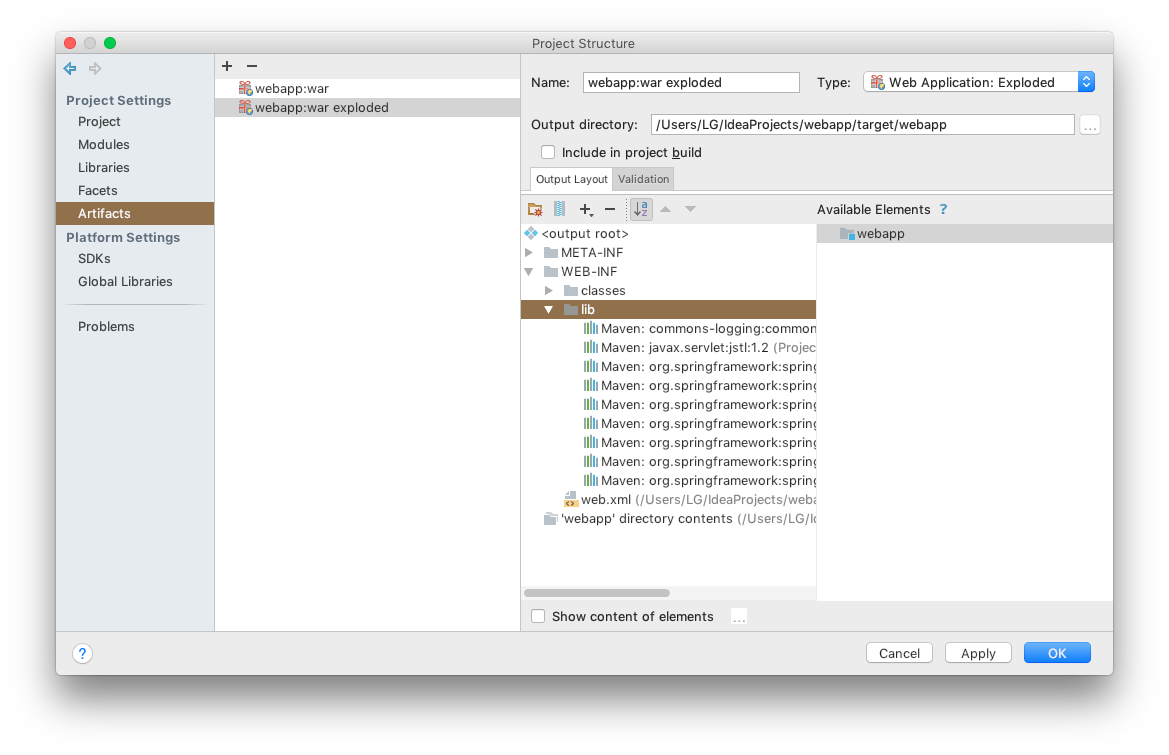
4 在resource目录中增加SpringMVC配置文件
<?xml version="1.0" encoding="UTF-8"?>
<beans xmlns="http://www.springframework.org/schema/beans"
       xmlns:xsi="http://www.w3.org/2001/XMLSchema-instance"
       xmlns:context="http://www.springframework.org/schema/context"
       xmlns:mvc="http://www.springframework.org/schema/mvc"
       xsi:schemaLocation="http://www.springframework.org/schema/beans
         http://www.springframework.org/schema/beans/spring-beans.xsd
        http://www.springframework.org/schema/context
        http://www.springframework.org/schema/context/spring-context-4.3.xsd
        http://www.springframework.org/schema/mvc
        http://www.springframework.org/schema/mvc/spring-mvc-4.3.xsd">

    <!-- 自动扫描包,实现支持注解的IOC -->
    <context:component-scan base-package="cn.luan.controller" />

    <!-- Spring MVC不处理静态资源 -->
    <mvc:default-servlet-handler />

    <!-- 支持mvc注解驱动 -->
    <mvc:annotation-driven />

    <!-- 视图解析器 -->
    <bean   class="org.springframework.web.servlet.view.InternalResourceViewResolver"
            id="internalResourceViewResolver">
        <property name="prefix" value="/WEB-INF/jsp/" />
        <property name="suffix" value=".jsp" />
    </bean>
</beans>
5 添加控制器类
package cn.luan.controller;

import org.springframework.stereotype.Controller;
import org.springframework.ui.Model;
import org.springframework.web.bind.annotation.RequestMapping;

/**
 * Created by LG on 2016/12/22.
 */
@Controller
@RequestMapping("/show")
public class ShowMsg {

    @RequestMapping("/showmsg1")
    public String showmsg1(Model model) {
        model.addAttribute("message", "this is a spring demo");
        return "showmsg";
    }

    @RequestMapping("/showmsg2")
    public String showmsg2(Model model) {
        model.addAttribute("message", "show message 2");
        return "showmsg";
    }
}
6 添加前台界面 jsp/showmsg.jsp
<%@ page language="java" contentType="text/html; charset=UTF-8" pageEncoding="UTF-8"%>
<%@ taglib prefix="c" uri="http://java.sun.com/jsp/jstl/core" %>
<!DOCTYPE html>
<html>
<head>
    <meta http-equiv="Content-Type" content="text/html; charset=UTF-8">
    <title>Test</title>
</head>
<body>
<h1>${message}</h1>
</body>
</html>
7 启动tomcat,发布应用
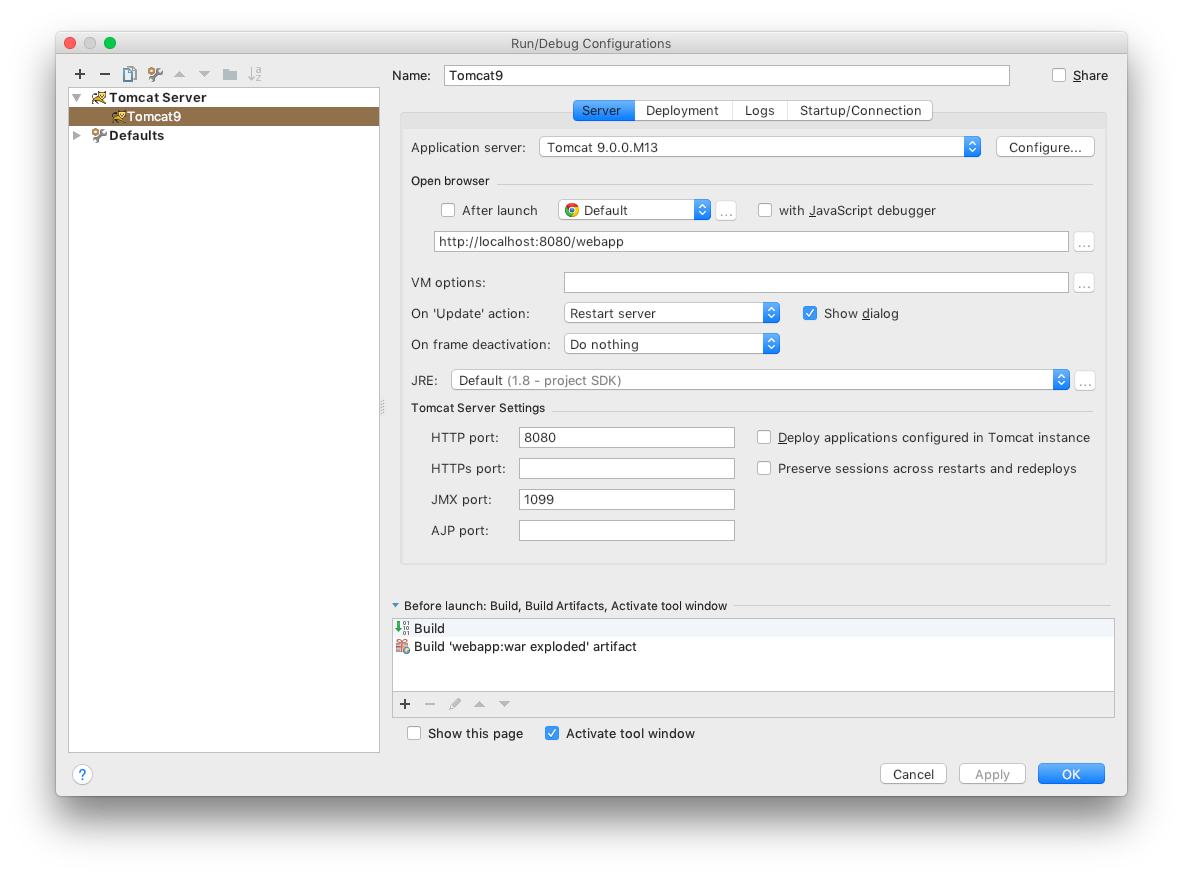

8 浏览器访问

end