由于spingcloud 版本更新比较快,此处重新整理一版:
版本: Java 8
spring boot <version> 2.1.15.RELEASE </version>
<spring-cloud.version>Greenwich.SR6</spring-cloud.version>
1.Euraka 的使用
1.1服务端: 概述: Eureka server ,健康检测, 安全认证
依赖:
        <dependency>
            <groupId>org.springframework.cloud</groupId>
            <artifactId>spring-cloud-starter-netflix-eureka-server</artifactId>
        </dependency>
      <!-安全 ->
        <dependency>
            <groupId>org.springframework.boot</groupId>
            <artifactId>spring-boot-starter-security</artifactId>
        </dependency>
     <!--健康检测 -->
        <dependency>
            <groupId>org.springframework.boot</groupId>
            <artifactId>spring-boot-starter-actuator</artifactId>
        </dependency>
主类:
@EnableEurekaServer
@SpringBootApplication
public class EurekaServceApplication {
    public static void main(String[] args) {
        SpringApplication.run(EurekaServceApplication.class, args);
    }
}
配置文件: application.yml
server:
  port: 8761
#需要导入spring-boot-starter-security
#为Euraka server 添加一个认证,当访问localhost:8761会要求验证
management:
  endpoint:
    health: #健康检测 查看 http://localhost:8761/actuator/health
      show-details: always
spring:
  application:
    name: micro-discovery-eureka
  security: #安全配置
    basic:
     enabled: true
    user:
      name: root
      password: root
eureka:
  client:
    service-url:
      #erueka server的地址,/eureka
      defaultZone: http://root:root@127.0.0.1:8761/eureka
    # 是否从eureka server注册,这里我们选择false
    fetch-registry: false
    # 是否从eureka server 中拉取服务
    register-with-eureka: false
添加配置类: springcloud升级到2.x后Eureka安全配置与1.x有部分变动,新版本的security默认开启csrf了,这里我们先关掉它,否则Eureka 服务端注册不上
新建一个配置类:
@EnableWebSecurity
@Configuration
public class WebSecurityConfig extends WebSecurityConfigurerAdapter {
    @Override
    protected void configure(HttpSecurity http) throws Exception {
        //关闭csrf
        http.csrf().disable();
        //开启认证
         http.authorizeRequests().anyRequest().authenticated().and().httpBasic();
    }
}
高可用配置:
spring:
  application:
    name: microservice-eureka-server
---
server:
  port: 8761   #指定端口
spring:
  profiles: peer1   #指定profile=peer1
#配置eureka的信息
eureka:
  instance:
    hostname: peer1   #指定当profile=peer1时,主机的名字是peer1
  client:
    service-url:
      defaultZone: http://peer2:8762/eureka,http://peer3:8763/eureka  #将自己注册到peer2这个Eureka服务上

---
server:
  port: 8762   #指定端口
spring:
  profiles: peer2   #指定profile=peer2
#配置eureka的信息
eureka:
  instance:
    hostname: peer2   #指定当profile=peer2时,主机的名字是peer2
  client:
    service-url:
      defaultZone: http://peer1:8761/eureka,http://peer3:8763/eureka   #将自己注册到peer1和peer2的Eureka服务上

---
server:
  port: 8763   #指定端口
spring:
  profiles: peer3   #指定profile=peer3
#配置eureka的信息
eureka:
  instance:
    hostname: peer3   #指定当profile=peer3时,主机的名字是peer3
  client:
    service-url:
      defaultZone: http://peer2:8762/eureka,http://peer1:8761/eureka   #将自己注册到peer2这个Eureka服务上
注意:多个注册地址之间使用","隔开,一定是英语的逗号,而且不能有空格
java -jar eureka-server-0.0.1-SNAPSHOT.jar --spring.profiles.active=peer1

java -jar eureka-server-0.0.1-SNAPSHOT.jar --spring.profiles.active=peer2

java -jar eureka-server-0.0.1-SNAPSHOT.jar --spring.profiles.active=peer3
到这时候,三台的集群也搭建成功了,再多的也不用说了吧,就是以此类推的。
Docker 版本
Dockerfile:
FROM frolvlad/alpine-oraclejre8:slim
VOLUME /tmp
ADD eureka-server-1.0.0.jar  app.jar

ENV AP_ENV=$AP_ENV
VOLUME /tmp/logs/

EXPOSE 8761
# ENTRYPOINT [ "sh", "-c", "java -Denv=$AP_ENV -Xmx64m -Xss256k  -jar app.jar --apollo.meta=${CONFIG_SERVERS} --eureka.client.serviceUrl.defaultZone=${EK_CLUSTER_URL}" ]
ENTRYPOINT ["sh", "docker-entrypoint.sh"]
docker-entrypoint.sh
# Licensed to the Apache Software Foundation (ASF) under one
# or more contributor license agreements.  See the NOTICE file
# distributed with this work for additional information
# regarding copyright ownership.  The ASF licenses this file
# to you under the Apache License, Version 2.0 (the
# "License"); you may not use this file except in compliance
# with the License.  You may obtain a copy of the License at
#
#     http://www.apache.org/licenses/LICENSE-2.0
#
# Unless required by applicable law or agreed to in writing, software
# distributed under the License is distributed on an "AS IS" BASIS,
# WITHOUT WARRANTIES OR CONDITIONS OF ANY KIND, either express or implied.
# See the License for the specific language governing permissions and
# limitations under the License.
#!/bin/sh

if [ x"$AP_ENV" = x ]
then
   echo "AP_ENV IS NULL , USE DEFAULT DEV AS DEFAULT !"
   echo "dev=$AP_ENV"
else
   echo "AP_ENV IS $AP_ENV !"
fi
if [ x"$AGENT_SERVICE_NAME" = x ]

then
  echo "No MS Trace Agent $AGENT_COLLECTOR_ADDRESS Setting, @@ NOT USE MS TRACE  !"
  java -Denv=$AP_ENV -jar /opt/app.jar --apollo.meta=$CONFIG_SERVERS
else
  echo " USE MS TRACE Agent to start the service !"
  java -Denv=$AP_ENV -javaagent:/usr/local/skyagent/skywalking-agent.jar=agent.service_name=$AGENT_SERVICE_NAME,collector.backend_service=$AGENT_COLLECTOR_ADDRESS $JAVA_OPTS -jar /opt/app.jar --apollo.meta=$CONFIG_SERVERS
fi
客户端:
依赖:
       <dependency>
            <groupId>org.springframework.cloud</groupId>
              <artifactId>spring-cloud-starter-netflix-eureka-client</artifactId>
        </dependency>

    <!--健康检测 -->
    <dependency>
        <groupId>org.springframework.boot</groupId>
        <artifactId>spring-boot-starter-actuator</artifactId>
      </dependency>
配置文件:application.yml
server:
  port: 9001
spring:
  application:
    name: micro-clent1_user
management:
  endpoints:
  web:
     exposure:
       include: '*'

  endpoint:
    health: #健康检测 查看 http://localhost:8761/actuator/health
      show-details: always
eureka:
  client:
    service-url:
      defaultZone: http://root:root@127.0.0.1:8761/eureka/
  instance:
   # 是否显示ip,如果不设置那么就会显示主机名,默认false
    prefer-ip-address: true
主类:
@EnableDiscoveryClient
@SpringBootApplication
public class EurekaServceApplication {
    public static void main(String[] args) {
        SpringApplication.run(EurekaServceApplication.class, args);
    }
}
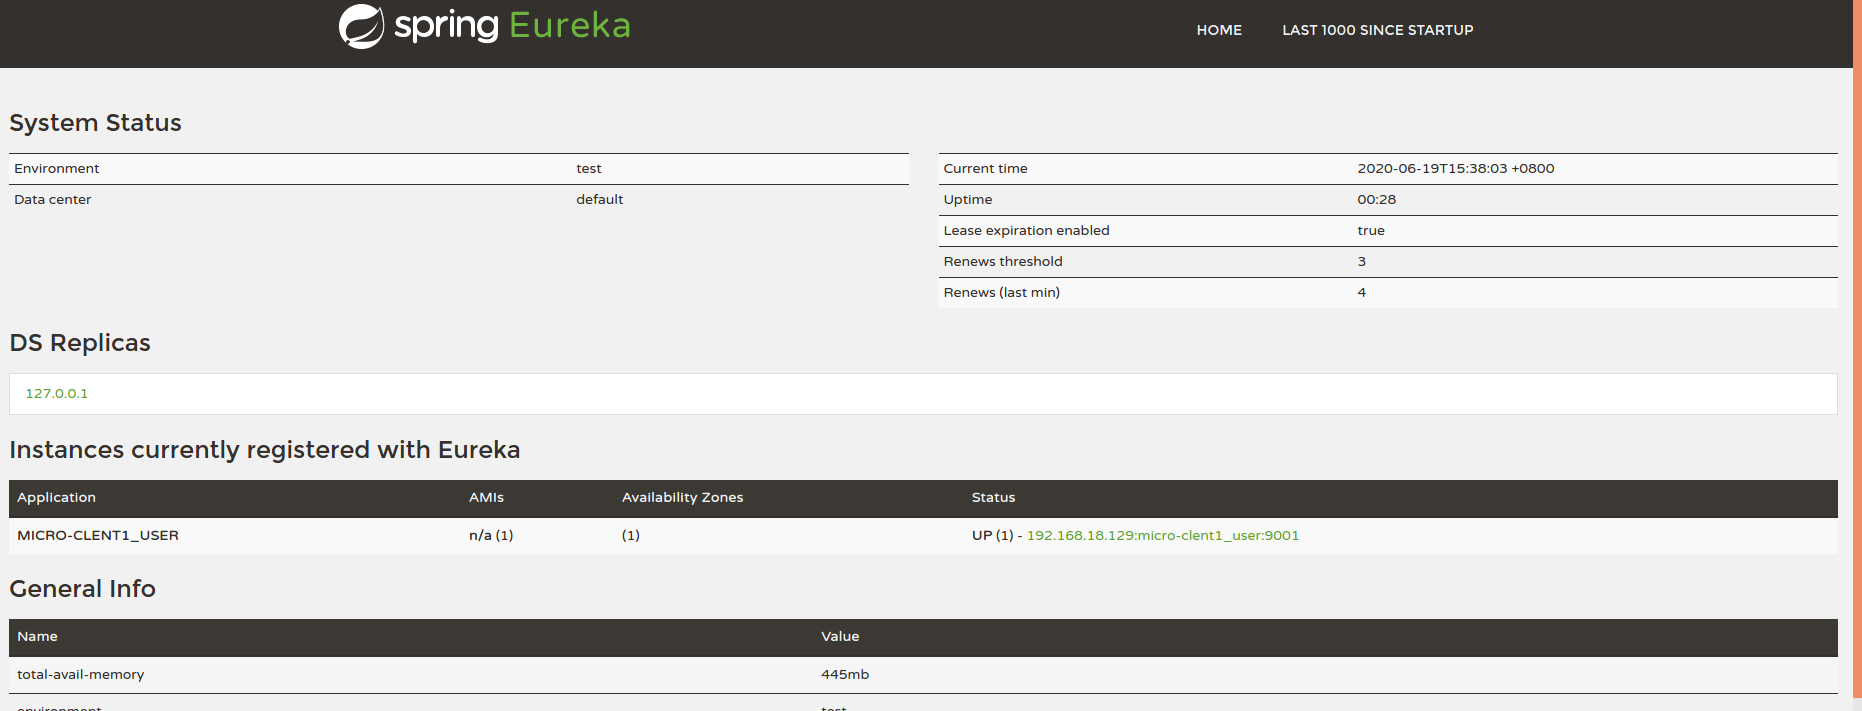
登录 http://localhost:8761