Ribbon 负载均衡机制
在上一章的 "Ribbon 框架简介及搭建(没有与SpringCloud整合,独立使用)" 中介绍了Ribbon框架及搭建使用,那么在这一章会讲一讲Ribbon的负载均衡的机制,以下的规则 笔者将会以通俗易懂的介绍给大家讲解。
Ribbon内置的负载均衡规则
1. RoundRobinRule
通过简单的轮询服务列表,来选择一个服务器
2. AvailabilityFilteringRule
对以下两种服务器忽略掉,就不会选择它们了。
2.2 在默认情况下连接失败3次,这个服务器就会被置为"短路"状态,这个状态将持续30秒。如果再连不上,那么这个状态的持续时间将会持续增加。
# 连接失败的次数,默认为3次
niws.loadbalancer.<clientName>.connectionFailureCountThreshold
# 一个实例可以保持"不可用"状态的最大周期,默认为30秒
niws.loadbalancer.<clientName>.circuitTripMaxTimeoutSeconds
# 最高并发数
<clientName>.<clientConfigNameSpace>.ActiveConnectionsLimit
3. WeightedRsponseTimeRule
会为每一个服务器赋予一个权重值,服务器响应时间越长,这个服务器的权重值就越少,权重有可能会决定服务器的选择(存在随机)
4. ZoneAvoidanceRule
以区域,可用的服务器为基础进行服务器的选择,使用Zone对服务器进行分类
5. BastAvailableRule
忽略那些短路的服务器,并选择并发数较低的服务器
6. RandomRule
随机选择一个可用的服务器
7. RetryRule
它是一个含有重试机制的选择逻辑
其他配置
NFLoadBalancerPingClassName:检查服务器是否存活
NFLoadBalanceClassName:指定负载均衡器的实现类,可以使用该配置自定义负载均衡器
NIWSServerListClassName:服务器列表的处理类,用来维护服务器列表的
NISServerListFilterClassName:服务器拦截类
这里我就不给大家一一贴配置了,感兴趣的可以到官网的wiki去看:https://github.com/Netflix/ribbon
首先需要创建一个Ribbon服务器,即使在上一章中写过,但是不免有一些懒懒的小伙伴(偷偷的告诉大家,笔者也是其中之一,恨不得直接复制粘贴(*^_^*))。
1:创建Ribbon服务器(一个单纯的SpringBoot程序)
pom.xml
<dependencies>
    <dependency>
        <groupId>org.springframework.boot</groupId>
        <artifactId>spring-boot-starter-web</artifactId>
        <version>1.5.7.RELEASE</version>
    </dependency>
</dependencies>
为了方便Ribbon客户端测试,在这里建一个实体类:Person.java
public class Person {
    private String url;// 处理请求的服务器url
    private String message;// 提示信息

    public String getUrl() {
        return url;
    }
    public void setUrl(String url) {
        this.url = url;
    }
    public String getMessage() {
        return message;
    }
    public void setMessage(String message) {
        this.message = message;
    }
}
PersonController.java
@RestController
public class PersonController {

    @RequestMapping(value="/getPerson", method=RequestMethod.GET, produces=MediaType.APPLICATION_JSON_VALUE)
    public Person getPerson(HttpServletRequest request){
        Person p = new Person();
        p.setMessage("请求成功");
        p.setUrl(request.getRequestURL().toString());
        return p;
    }
}
启动类:Application.java(因为要测试负载均衡,所有这里需要启动多个服务,以下配置以手动输入端口号方式启动)
@SpringBootApplication
public class Application {

    public static void main(String[] args) {
        Scanner scan = new Scanner(System.in);
        String port = scan.nextLine();
        new SpringApplicationBuilder(Application.class).properties("server.port="+port).run(args);
    }
}
本次启动以端口:8080、8081分别启动,稍后我们配置完客户端 统一测试(配置后,将服务启动)
2:创建Ribbon客户端
pom.xml 中只需要引入核心及客户端的依赖即可
<dependency>
    <groupId>com.netflix.ribbon</groupId>
    <artifactId>ribbon-core</artifactId>
    <version>2.2.5</version>
</dependency>
<dependency>
    <groupId>com.netflix.ribbon</groupId>
    <artifactId>ribbon-httpclient</artifactId>
    <version>2.2.5</version>
</dependency>
上面的配置与上一章的内容完全一样,那么接下来的内容大家就要注意了,也是本次讲解的重点。(本次的事例有轮询 + 自定义负载均衡器 + 访问服务)
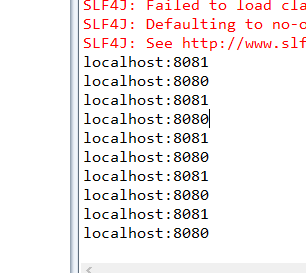
使用默认的轮询规则
|
 |
使用自定义负载均衡器
/***
 * 自定义负载均衡器,这里需要实现“IRule”接口
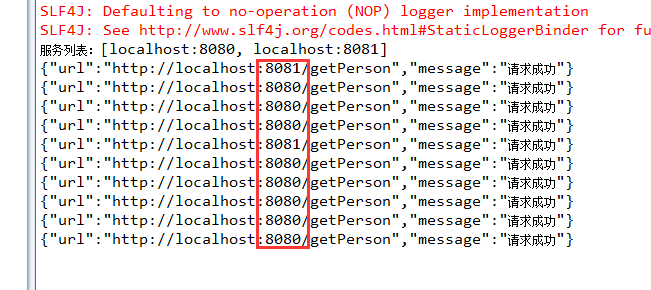
 * 比如端口为8081的服务器是新买的,不想让它处理太多的任务,那么可以用随机数去控制它的访问量
 * @author lpx
 *
 */
public class MyRule implements IRule{

    private ILoadBalancer lb;// 声明负载均衡器接口

    @Override
    public Server choose(Object key) {
        // 获取服务器列表
        List<Server> servers = lb.getAllServers();
        // 生产随机数
        Random r = new Random();
        int rand = r.nextInt(10);
        if(rand > 7){
            return getServerByPort(servers, 8081);
        }else{
            return getServerByPort(servers, 8080);
        }
    }
    /**
     * 根据传入的端口号,返回服务对象
     * @param servers
     * @param port
     * @return
     */
    private Server getServerByPort(List<Server> servers, int port){
        for(Server s : servers){
            if(s.getPort() == port){
                return s;
            }
        }
        return null;
    }
    @Override
    public void setLoadBalancer(ILoadBalancer lb) {
        this.lb = lb;
    }
    @Override
    public ILoadBalancer getLoadBalancer() {
        return this.lb;
    }
}
public static void main(String[] args) throws Exception { // 创建负载均衡器 BaseLoadBalancer blb = new BaseLoadBalancer(); // 创建自定义负载均衡器 MyRule myRule = new MyRule(); // 设置负载均衡器 myRule.setLoadBalancer(blb); // 设置负载均衡器规则 blb.setRule(myRule); // 设置服务器列表 List<Server> servers = new ArrayList<Server>(); servers.add(new Server("localhost", 8080)); servers.add(new Server("localhost", 8081)); blb.setServersList(servers); for(int i=0; i<10; i++){ Server s = blb.chooseServer(null); System.out.println(s); } } |

|
使用自定义负载均衡器访问服务
public static void main(String[] args) throws Exception { // 写入服务列表 ConfigurationManager.getConfigInstance().setProperty("my-client.ribbon.listOfServers", "localhost:8080,localhost:8081"); // 配置规则类 ConfigurationManager.getConfigInstance().setProperty("my-client.ribbon.NFLoadBalancerRuleClassName", MyRule.class.getName()); // 输出服务列表 System.out.println("服务列表:" + ConfigurationManager.getConfigInstance().getProperty("my-client.ribbon.listOfServers")); // 创建客户端 RestClient client = (RestClient) ClientFactory.getNamedClient("my-client"); // 创建request对象 HttpRequest request = HttpRequest.newBuilder().uri(new URI("/getPerson")).build(); // 多次访问测试 for (int i = 0; i < 10; i++) { // 创建response对象 HttpResponse response = client.executeWithLoadBalancer(request); // 接收请求结果 String json = response.getEntity(String.class); // 打印结果 System.out.println(json); } } |
 |
OK,以上就是本文的全部内容(负载均衡规则的机制 + 自定义负载均衡规则 + 访问服务),如果笔者有写的不对的地方还望大家提出,蟹蟹!!!