第一章:同源策略
1.1-Ajax请求限制问题
Ajax 只能向自己的服务器发送请求。比如现在有一个A网站、有一个B网站,A网站中的 HTML 文件只能向A网站服务器中发送 Ajax 请求,B网站中的 HTML 文件只能向 B 网站中发送 Ajax 请求,但是 A 网站是不能向 B 网站发送 Ajax请求的,同理,B 网站也不能向 A 网站发送 Ajax请求。
原因:同源策略的规定
1.2-什么是同源策略
同源策略(Same origin policy)是一种约定,它是浏览器最核心也最基本的安全功能,如果两个页面拥有相同的协议、域名和端口,那么这两个页面就属于同一个源,其中只要有一个不相同,就是不同源。
1.3-同源策略的目的
同源政策是为了保证用户信息的安全,防止恶意的网站窃取数据。最初的同源政策是指 A 网站在客户端设置的 Cookie,B网站是不能访问的。
随着互联网的发展,同源政策也越来越严格,在不同源的情况下,其中有一项规定就是无法向非同源地址发送Ajax 请求,如果请求,浏览器就会报错。
第二章:跨域解决方案-JSONP
2.1-什么是JSONP
JSONP(JSON with Padding)是JSON的一种“使用模式”,可用于解决主流浏览器的跨域数据访问的问题。由于同源策略,一般来说位于 server1.example.com 的网页无法与不是 server1.example.com的服务器沟通,而 HTML 的<script> 元素是一个例外。利用 <script> 元素的这个开放策略,网页可以得到从其他来源动态产生的 JSON 资料,而这种使用模式就是所谓的 JSONP。用 JSONP 抓到的资料并不是 JSON,而是任意的JavaScript,用 JavaScript 直译器执行而不是用 JSON 解析器解析。
2.2-JSONP的实现步骤
一. 将不同源的服务器端请求地址写在 script 标签的 src 属性中
<script src="www.example.com"></script>
二. 服务器端响应数据必须是一个函数的调用,真正要发送给客户端的数据需要作为函数调用的参数。
const data = 'fn({name: "小明", age: "10"})';
res.send(data);
三. 在客户端全局作用域下定义函数 fn
function fn (data) { }
四. 在 fn 函数内部对服务器端返回的数据进行处理
function fn (data) { console.log(data); }
2.3-JSONP代码实现
web1: 提供接口 http://localhost:4001/test
接口程序
const express = require('express')
const app = express();

app.get('/test', (req, res) => {
  res.send('fn({name:"bruce",age:10})')
})


app.listen(4001, "localhost")
web2: 发送请求 http://localhost/index.html
服务器部署程序
const express = require('express')
const path = require('path')


const app = express();
app.use(express.static(path.join(__dirname, '/public')))


app.listen(80, "localhost")
前端页面程序
  <button id="btn">发送请求</button>
  <script>
    // 定义全局函数 fn 处理请求的数据
    function fn(data) {
      console.log(data);
    }
    // 点击按钮发送请求
    btn.onclick = function(){
      var script = document.createElement('script')  // 创建script标签
      script.src = 'http://localhost:4001/test';   // 设置请求地址
      document.body.appendChild(script);      // 追加到页面中,返回的结果会自动调用全局函数fn
      script.onload = function(){ // 脚本加载完毕后,移除脚本
        document.body.removeChild(script)
      }
    }
  </script>
2.4-JSONP 封装
jsonp脚本封装
(function (window) {
  /**
   *
   * @param {*} options  配置参数
   * options.url 请求地址
   * options.data 请求参数,对象格式:{key:value,key:value}
   * options.success 请求数据处理程序  第一个参数标识响应的数据
   */
  function jsonp(options) {
    var params;
    /*处理请求参数 */
    if (options.data) {
      var arr = [];
      for (var key in options.data) {
        arr.push(key + '=' + options.data[key])
      }
      params = arr.join('&');
    }
    /*创建全局的处理程序-处理响应的结果 */
    var fnName = 'jsonp' + Date.now() + (Math.random() + '').replace('.', '');
    window[fnName] = options.success;
    /*创建script标签,并设置请求路径和参数 */
    var script = document.createElement('script');
    options.url = options.url + '?callback=' + fnName;
    if (params) {
      options.url += '&' + params;
    }
    script.src = options.url;
    /*追加到页面中 */
    document.body.appendChild(script);
    /*页面加载完毕后,移除script和处理响应的方法,因为是一次性的使用,所以要移除 */
    script.onload = function () {
      document.body.removeChild(script);
      delete window[fnName];
    }

  }
  window.jsonp = jsonp;
})(window)
web01提供接口 http://localhost:4001/test1
const express = require('express')
const app = express();

app.get('/test1', (req, res) => {
  res.jsonp(req.query);
})


app.listen(4001, "localhost")
web02调用接口http://localhost/index.html
  <button id="btn">发送请求</button>
  <script src="./jsonp.js"></script>
  <script>
    // 点击按钮发送请求
    btn.onclick = function(){
      jsonp({
        url:'http://localhost:4001/test1',
        data: {name:'admin',age:10},
        success:function(data){
          console.log(data);
        }
      })
    }
  </script>
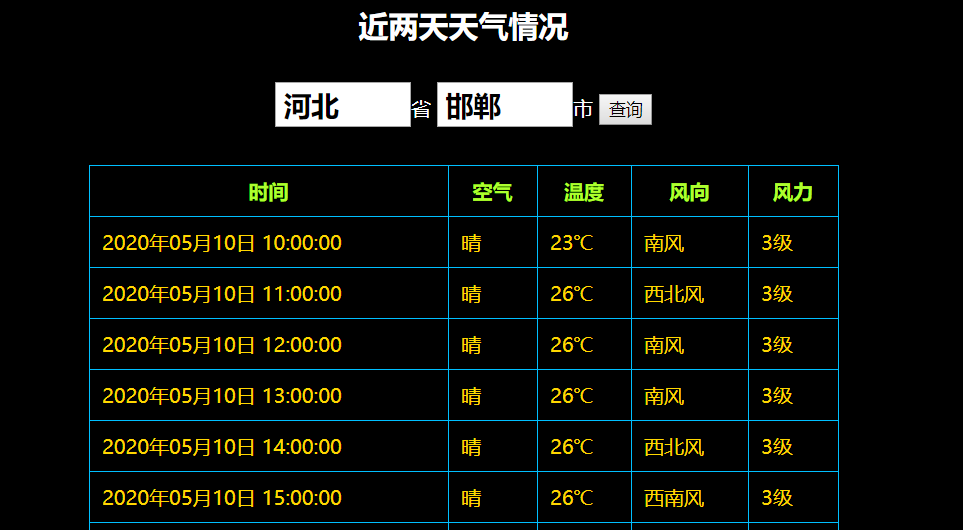
2.5-JSONP案例
需求
调用腾讯天气接口,获取天气信息
接口文档
腾讯天气接口
| 参数名 | 必选 | 类型 | 说明 |
|---|---|---|---|
| source | 是 | String | pc、xw |
| weather_type | 是 | String | forecast_1h 未来48小时 forecast_24h 未来7天 两个都传用 |分割 |
| province | 是 | String | 省份 如:河北省 |
| city | 是 | string | 城市 如:邯郸市 |
- 返回值
    myJsonp017363176455629659({
        "data": {
            "forecast_1h": {
                "0": {
                    "degree": "20",     // 温度
                    "update_time": "20190529100000",  // 更新时间
                    "weather": "多云",     // 天气 weather
                    "weather_code": "01",
                    "weather_short": "多云",
                    "wind_direction": "西风",  // 风向
                    "wind_power": "5"         // 风力
                },
                "1": {
                    "degree": "21",
                    "update_time": "20190529110000",
                    "weather": "多云",
                    "weather_code": "01",
                    "weather_short": "多云",
                    "wind_direction": "西风",
                    "wind_power": "5"
                },

            }
        },
        "message": "OK",
        "status": 200
    })
代码
  <h2>近两天天气情况</h2>
  <div>
    <input type="text" id="province" value="河北">省
    <input type="text" id="city" value="邯郸">市
    <button id="btn">查询</button>
  </div>
  <table>
    <thead>
      <th>时间</th>
      <th>空气</th>
      <th>温度</th>
      <th>风向</th>
      <th>风力</th>
    </thead>
    <tbody id="tbody"></tbody>
  </table>
  <!-- 天气列表模板 -->
  <script type="text/html" id="list">
    {{each list}}
    <tr>
      <td>{{dateFormat($value.update_time)}}</td>
      <td>{{$value.weather}}</td>
      <td>{{$value.degree}}℃</td>
      <td>{{$value.wind_direction}}</td>
      <td>{{$value.wind_power}}级</td>
    </tr>
    {{/each}}
  </script>
  <script src="./jsonp.js"></script>
  <script src="./template-web.js"></script>
  <script>
    // 日期处理格式
    function dateFormat(str) {
      // 20200510100000
      var arr = str.match(/d{2}/g);
      return arr[0] + arr[1] + '年' + arr[2] + '月' + arr[3] + '日 ' + arr[4] + ':' + arr[5] + ':' + arr[6];

    }
    // 在模块引擎中模板中使用外部全局变量
    template.defaults.imports.dateFormat = dateFormat;
    // 点击按钮查询
    btn.onclick = function () {
      // jsonp请求腾讯天气
      jsonp({
        url: 'https://wis.qq.com/weather/common',
        data: {
          source: 'pc',
          weather_type: 'forecast_1h',
          province: province.value,
          city: city.value
        },
        success: function (data) {
          var html = template('list', { list: data.data.forecast_1h })
          tbody.innerHTML = html;
        }
      })
    }
    btn.onclick();
  </script>
第三章:跨域解决方案-CORS
3.1-什么是CORS
CORS:全称为 Cross-origin resource sharing,即跨域资源共享,它允许浏览器向跨域服务器发送 Ajax 请求,克服了 Ajax 只能同源使用的限制。

3.2-Node中配置CORS
Node 服务器端设置响应头示例代码:
// 请求拦截
app.use((req, res, next) => {
  // 允许所有的其他源跨域访问
  res.header('Access-Control-Allow-Origin', '*')
  // 允许的访问方式
  res.header('Access-Control-Allow-Methods', 'GET,POST,DELETE,PUT')
  //允许的header类型
  res.header("Access-Control-Allow-Headers", "content-type")
  // 允许携带cookie,注意Access-Control-Allow-Origin此时不能使用通配符*
  res.header("Access-Control-Allow-Credentials", true)
  next();
})
注意:
-
在使用Ajax技术发送跨域请求时,默认情况下不会在请求中携带cookie信息。
-
XMLHttpRequest实例的withCredentials属性,指定在涉及到跨域请求时,是否携带cookie信息,默认值为false
-
同时,若需要携带cookie,后端也需要配置响应头
Access-Control-Allow-Credentials:true允许客户端发送请求时携带cookie
3.3-示例代码
需求

输入账号和密码
点击登录按钮,输出登录信息
点击检测登录状态按钮,输出是否登录
web01 接口程序
const express = require('express')
const app = express();
const formidable = require('formidable')
// 导入express-session模块
const session = require('express-session')
// session的名称
let identityKey = 'skey';

//使用session
app.use(session({
  name: identityKey,
  secret: 'appkey', // 用来对session id相关的cookie进行签名
  // store: new FileStore(), // 本地存储session(文本文件,也可以选择其他store,比如redis的)
  saveUninitialized: false, // 是否自动保存未初始化的会话,建议false
  resave: false, // 是否每次都重新保存会话,建议false
  cookie: {
    maxAge: 10 * 1000 // 有效期,单位是毫秒
  }
}));


// 请求拦截
app.use((req, res, next) => {
  // 允许所有的其他源跨域访问
  res.header('Access-Control-Allow-Origin', 'http://localhost')
  // 允许的访问方式
  res.header('Access-Control-Allow-Methods', 'GET,POST,DELETE,PUT')
  //允许的header类型
  res.header("Access-Control-Allow-Headers", "content-type")
  // 允许携带cookie,注意Access-Control-Allow-Origin此时不能使用通配符*
  res.header("Access-Control-Allow-Credentials", true)
  next();
})

app.post('/login', (req, res) => {
  const form = new formidable.IncomingForm()

  form.parse(req, (err, fields, files) => {
    if (fields.username == 'admin' && fields.pwd == '111') {
      req.session.isLogin = true;
    }
    res.send(fields);
  })
})

app.get('/check', (req, res) => {
  if (req.session.isLogin) {
    res.send('已经登录')
  } else {
    res.send('未登录')
  }
})


app.listen(4001, "localhost")
web02 前端页面程序
  <form id="loginData">
    账户:<input type="text" name="username">
    密码:<input type="password" name="pwd">
  </form>
  <button id="goLogin">登录</button>
  <button id="checkLogin">检测登录状态</button>
  <script src="./myajax.js"></script>
  <script>
    goLogin.onclick = function(){
       var xhr = new XMLHttpRequest();
       xhr.withCredentials = true;
       xhr.open('post',"http://localhost:4001/login");
       var formData = new FormData(loginData);
       xhr.send(formData)
       xhr.onload = function(){
         console.log(xhr.responseText)
       }
    }
    checkLogin.onclick = function(){
       var xhr = new XMLHttpRequest();
       xhr.open('get',"http://localhost:4001/check");
       xhr.withCredentials = true;
       xhr.send();
       xhr.onload = function(){
         console.log(xhr.responseText)
       }
    }

  </script>
第四章:服务端跨域解决方案
同源政策是浏览器给予Ajax技术的限制,服务器端是不存在同源政策限制。
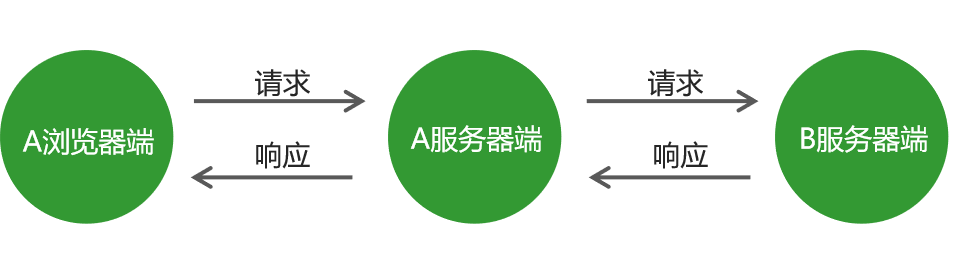
在Node中需要使用第三方模块request
web01 程序
后端
const express = require('express')
const path = require('path')
const request = require('request')

const app = express();
app.use(express.static(path.join(__dirname, '/public')))

app.get('/test', (req, res) => {
  request('http://localhost:4001/test02', (err, response, body) => {
    console.log(body) // 其他服务端接口响应的数据
    res.send('ok');
  })
})

app.listen(80, "localhost")
前端
  <script src="./myajax.js"></script>
  <script>
    ajax({
      url:'http://localhost/test',
      success:function(data) {
        console.log(data);
      }
    })
  </script>
web02 接口程序
const express = require('express')
const app = express();
const formidable = require('formidable')
app.get('/test02', (req, res) => {
  res.jsonp('ok');
})
app.listen(4001, "localhost")