上半部分内容链接 : https://www.cnblogs.com/lowmanisbusy/p/9069330.html
四.json和jsonpath的使用
JSON(JavaScript Object Notation) 是一种轻量级的数据交换格式,它使得人们很容易的进行阅读和编写。同时也方便了机器进行解析和生成。适用于进行数据交互的场景,比如网站前台与后台之间的数据交互。
JSON和XML的比较可谓不相上下。
Python 2.7中自带了JSON模块,直接import json就可以使用了。
官方文档:http://docs.python.org/library/json.html
Json在线解析网站:http://www.json.cn/#
JSON
json简单说就是javascript中的对象和数组,所以这两种结构就是对象和数组两种结构,通过这两种结构可以表示各种复杂的结构
对象:对象在js中表示为
{ }括起来的内容,数据结构为{ key:value, key:value, ... }的键值对的结构,在面向对象的语言中,key为对象的属性,value为对应的属性值,所以很容易理解,取值方法为 对象.key 获取属性值,这个属性值的类型可以是数字、字符串、数组、对象这几种。数组:数组在js中是中括号
[ ]括起来的内容,数据结构为["Python", "javascript", "C++", ...],取值方式和所有语言中一样,使用索引获取,字段值的类型可以是 数字、字符串、数组、对象几种。
import json
json模块提供了四个功能:dumps、dump、loads、load,用于字符串 和 python数据类型间进行转换。
1. json.loads()
把Json格式字符串解码转换成Python对象 从json到python的类型转化对照如下:
# json_loads.py

import json

strList = '[1, 2, 3, 4]'

strDict = '{"city": "北京", "name": "大猫"}'

json.loads(strList)
# [1, 2, 3, 4]

json.loads(strDict) # json数据自动按Unicode存储
# {u'city': u'u5317u4eac', u'name': u'u5927u732b'}
2. json.dumps()
实现python类型转化为json字符串,返回一个str对象 把一个Python对象编码转换成Json字符串
从python原始类型向json类型的转化对照如下:
# json_dumps.py

import json
import chardet

listStr = [1, 2, 3, 4]
tupleStr = (1, 2, 3, 4)
dictStr = {"city": "北京", "name": "大猫"}

json.dumps(listStr)
# '[1, 2, 3, 4]'
json.dumps(tupleStr)
# '[1, 2, 3, 4]'

# 注意:json.dumps() 序列化时默认使用的ascii编码
# 添加参数 ensure_ascii=False 禁用ascii编码,按utf-8编码
# chardet.detect()返回字典, 其中confidence是检测精确度

json.dumps(dictStr)
# '{"city": "\u5317\u4eac", "name": "\u5927\u5218"}'

chardet.detect(json.dumps(dictStr))
# {'confidence': 1.0, 'encoding': 'ascii'}

print json.dumps(dictStr, ensure_ascii=False)
# {"city": "北京", "name": "大刘"}

chardet.detect(json.dumps(dictStr, ensure_ascii=False))
# {'confidence': 0.99, 'encoding': 'utf-8'}
chardet是一个非常优秀的编码识别模块,可通过pip安装
3. json.dump()
将Python内置类型序列化为json对象后写入文件
# json_dump.py

import json

listStr = [{"city": "北京"}, {"name": "大刘"}]
json.dump(listStr, open("listStr.json","w"), ensure_ascii=False)

dictStr = {"city": "北京", "name": "大刘"}
json.dump(dictStr, open("dictStr.json","w"), ensure_ascii=False)
4. json.load()
读取文件中json形式的字符串元素 转化成python类型
# json_load.py

import json

strList = json.load(open("listStr.json"))
print strList

# [{u'city': u'u5317u4eac'}, {u'name': u'u5927u5218'}]

strDict = json.load(open("dictStr.json"))
print strDict
# {u'city': u'u5317u4eac', u'name': u'u5927u5218'}
JsonPath
JsonPath 是一种信息抽取类库,是从JSON文档中抽取指定信息的工具,提供多种语言实现版本,包括:Javascript, Python, PHP 和 Java。
JsonPath 对于 JSON 来说,相当于 XPATH 对于 XML。
下载地址:https://pypi.python.org/pypi/jsonpath
安装方法:点击
Download URL链接下载jsonpath,解压之后执行python setup.py install
JsonPath与XPath语法对比:
Json结构清晰,可读性高,复杂度低,非常容易匹配,下表中对应了XPath的用法。
| XPath | JSONPath | 描述 |
|---|---|---|
/ |
$ |
根节点 |
. |
@ |
现行节点 |
/ |
.or[] |
取子节点 |
.. |
n/a | 取父节点,Jsonpath未支持 |
// |
.. |
就是不管位置,选择所有符合条件的条件 |
* |
* |
匹配所有元素节点 |
@ |
n/a | 根据属性访问,Json不支持,因为Json是个Key-value递归结构,不需要。 |
[] |
[] |
迭代器标示(可以在里边做简单的迭代操作,如数组下标,根据内容选值等) |
| | | [,] |
支持迭代器中做多选。 |
[] |
?() |
支持过滤操作. |
| n/a | () |
支持表达式计算 |
() |
n/a | 分组,JsonPath不支持 |
示例:
我们以拉勾网城市JSON文件 http://www.lagou.com/lbs/getAllCitySearchLabels.json 为例,获取所有城市。
# jsonpath_lagou.py

import urllib2
import jsonpath
import json
import chardet

url = 'http://www.lagou.com/lbs/getAllCitySearchLabels.json'
request =urllib2.Request(url)
response = urllib2.urlopen(request)
html = response.read()

# 把json格式字符串转换成python对象
jsonobj = json.loads(html)

# 从根节点开始,匹配name节点
citylist = jsonpath.jsonpath(jsonobj,'$..name')

print citylist
print type(citylist)
fp = open('city.json','w')

content = json.dumps(citylist, ensure_ascii=False)
print content

fp.write(content.encode('utf-8'))
fp.close()
注意事项:
json.loads() 是把 Json格式字符串解码转换成Python对象,如果在json.loads的时候出错,要注意被解码的Json字符的编码。
如果传入的字符串的编码不是UTF-8的话,需要指定字符编码的参数 encoding
dataDict = json.loads(jsonStrGBK);
-
dataJsonStr是JSON字符串,假设其编码本身是非UTF-8的话而是GBK 的,那么上述代码会导致出错,改为对应的:
dataDict = json.loads(jsonStrGBK, encoding="GBK"); -
如果 dataJsonStr通过encoding指定了合适的编码,但是其中又包含了其他编码的字符,则需要先去将dataJsonStr转换为Unicode,然后再指定编码格式调用json.loads()
``` python
dataJsonStrUni = dataJsonStr.decode("GB2312"); dataDict = json.loads(dataJsonStrUni, encoding="GB2312");
##字符串编码转换

这是中国程序员最苦逼的地方,什么乱码之类的几乎都是由汉字引起的。
其实编码问题很好搞定,只要记住一点:

####任何平台的任何编码 都能和 Unicode 互相转换

UTF-8 与 GBK 互相转换,那就先把UTF-8转换成Unicode,再从Unicode转换成GBK,反之同理。


``` python
# 这是一个 UTF-8 编码的字符串
utf8Str = "你好地球"

# 1. 将 UTF-8 编码的字符串 转换成 Unicode 编码
unicodeStr = utf8Str.decode("UTF-8")

# 2. 再将 Unicode 编码格式字符串 转换成 GBK 编码
gbkData = unicodeStr.encode("GBK")

# 1. 再将 GBK 编码格式字符串 转化成 Unicode
unicodeStr = gbkData.decode("gbk")

# 2. 再将 Unicode 编码格式字符串转换成 UTF-8
utf8Str = unicodeStr.encode("UTF-8")
decode的作用是将其他编码的字符串转换成 Unicode 编码
encode的作用是将 Unicode 编码转换成其他编码的字符串
一句话:UTF-8是对Unicode字符集进行编码的一种编码方式
<<<<<<<<<<<<<<<<<<<邪恶的分割线>>>>>>>>>>>>>>>>>>>>
四.使用xpath对页面数据进行解析
xpath是最常用的一种对页面数据进行解析提取的一种方式,如果打算从事爬虫方向的程序员,建议学好xpath解析式
我们可以先将 HTML文件 转换成 XML文档,然后用 XPath语法 查找 HTML 节点或元素。
什么是XML
- XML 指可扩展标记语言(EXtensible Markup Language)
- XML 是一种标记语言,很类似 HTML
- XML 的设计宗旨是传输数据,而非显示数据
- XML 的标签需要我们自行定义。
- XML 被设计为具有自我描述性XML 和 HTML 的区别
XML 和 HTML 的区别
| 数据格式 | 描述 | 设计目标 |
|---|---|---|
| XML | Extensible Markup Language (可扩展标记语言) |
被设计为传输和存储数据,其焦点是数据的内容。 |
| HTML | HyperText Markup Language (超文本标记语言) |
显示数据以及如何更好显示数据。 |
| HTML DOM | Document Object Model for HTML (文档对象模型) |
通过 HTML DOM,可以访问所有的 HTML 元素,连同它们所包含的文本和属性。可以对其中的内容进行修改和删除,同时也可以创建新的元素。 |
XML文档示例
<?xml version="1.0" encoding="utf-8"?>

<bookstore>

  <book category="cooking">
    <title lang="en">Everyday Italian</title>
    <author>Giada De Laurentiis</author>
    <year>2005</year>
    <price>30.00</price>
  </book>

  <book category="children">
    <title lang="en">Harry Potter</title>
    <author>J K. Rowling</author>
    <year>2005</year>
    <price>29.99</price>
  </book>

  <book category="web">
    <title lang="en">XQuery Kick Start</title>
    <author>James McGovern</author>
    <author>Per Bothner</author>
    <author>Kurt Cagle</author>
    <author>James Linn</author>
    <author>Vaidyanathan Nagarajan</author>
    <year>2003</year>
    <price>49.99</price>
  </book>

  <book category="web" cover="paperback">
    <title lang="en">Learning XML</title>
    <author>Erik T. Ray</author>
    <year>2003</year>
    <price>39.95</price>
  </book>

</bookstore>
HTML DOM 模型示例
HTML DOM 定义了访问和操作 HTML 文档的标准方法,以树结构方式表达 HTML 文档。
XML的节点关系
1. 父(Parent)
每个元素以及属性都有一个父。
下面是一个简单的XML例子中,book 元素是 title、author、year 以及 price 元素的父:
<?xml version="1.0" encoding="utf-8"?>

<book>
  <title>Harry Potter</title>
  <author>J K. Rowling</author>
  <year>2005</year>
  <price>29.99</price>
</book>
2. 子(Children)
元素节点可有零个、一个或多个子。
在下面的例子中,title、author、year 以及 price 元素都是 book 元素的子:
<?xml version="1.0" encoding="utf-8"?>

<book>
  <title>Harry Potter</title>
  <author>J K. Rowling</author>
  <year>2005</year>
  <price>29.99</price>
</book>
3. 同胞(Sibling)
拥有相同的父的节点
在下面的例子中,title、author、year 以及 price 元素都是同胞:
<?xml version="1.0" encoding="utf-8"?>

<book>
  <title>Harry Potter</title>
  <author>J K. Rowling</author>
  <year>2005</year>
  <price>29.99</price>
</book>
4. 先辈(Ancestor)
某节点的父、父的父,等等。
在下面的例子中,title 元素的先辈是 book 元素和 bookstore 元素:
<?xml version="1.0" encoding="utf-8"?>

<bookstore>

<book>
  <title>Harry Potter</title>
  <author>J K. Rowling</author>
  <year>2005</year>
  <price>29.99</price>
</book>

</bookstore>
5. 后代(Descendant)
某个节点的子,子的子,等等。
在下面的例子中,bookstore 的后代是 book、title、author、year 以及 price 元素:
<?xml version="1.0" encoding="utf-8"?>

<bookstore>

<book>
  <title>Harry Potter</title>
  <author>J K. Rowling</author>
  <year>2005</year>
  <price>29.99</price>
</book>

</bookstore>
什么是XPath?
XPath (XML Path Language) 是一门在 XML 文档中查找信息的语言,可用来在 XML 文档中对元素和属性进行遍历。
W3School官方文档:http://www.w3school.com.cn/xpath/index.asp
选取节点
XPath 使用路径表达式来选取 XML 文档中的节点或者节点集。这些路径表达式和我们在常规的电脑文件系统中看到的表达式非常相似。
下面列出了最常用的路径表达式:
| 表达式 | 描述 |
|---|---|
| nodename | 选取此节点的所有子节点。 |
| / | 从根节点选取。 |
| // | 从匹配选择的当前节点选择文档中的节点,而不考虑它们的位置。 |
| . | 选取当前节点。 |
| .. | 选取当前节点的父节点。 |
| @ | 选取属性。 |
在下面的表格中,我们已列出了一些路径表达式以及表达式的结果:
| 路径表达式 | 结果 |
|---|---|
| bookstore | 选取 bookstore 元素的所有子节点。 |
| /bookstore | 选取根元素 bookstore。注释:假如路径起始于正斜杠( / ),则此路径始终代表到某元素的绝对路径! |
| bookstore/book | 选取属于 bookstore 的子元素的所有 book 元素。 |
| //book | 选取所有 book 子元素,而不管它们在文档中的位置。 |
| bookstore//book | 选择属于 bookstore 元素的后代的所有 book 元素,而不管它们位于 bookstore 之下的什么位置。 |
| //@lang | 选取名为 lang 的所有属性。 |
谓语(Predicates)
谓语用来查找某个特定的节点或者包含某个指定的值的节点,被嵌在方括号中。
在下面的表格中,我们列出了带有谓语的一些路径表达式,以及表达式的结果:
| 路径表达式 | 结果 |
|---|---|
| /bookstore/book[1] | 选取属于 bookstore 子元素的第一个 book 元素。 |
| /bookstore/book[last()] | 选取属于 bookstore 子元素的最后一个 book 元素。 |
| /bookstore/book[last()-1] | 选取属于 bookstore 子元素的倒数第二个 book 元素。 |
| /bookstore/book[position()<3] | 选取最前面的两个属于 bookstore 元素的子元素的 book 元素。 |
| //title[@lang] | 选取所有拥有名为 lang 的属性的 title 元素。 |
| //title[@lang=’eng’] | 选取所有 title 元素,且这些元素拥有值为 eng 的 lang 属性。 |
| /bookstore/book[price>35.00] | 选取 bookstore 元素的所有 book 元素,且其中的 price 元素的值须大于 35.00。 |
| /bookstore/book[price>35.00]/title | 选取 bookstore 元素中的 book 元素的所有 title 元素,且其中的 price 元素的值须大于 35.00。 |
选取未知节点
XPath 通配符可用来选取未知的 XML 元素。
| 通配符 | 描述 |
|---|---|
| * | 匹配任何元素节点。 |
| @* | 匹配任何属性节点。 |
| node() | 匹配任何类型的节点。 |
在下面的表格中,我们列出了一些路径表达式,以及这些表达式的结果:
| 路径表达式 | 结果 |
|---|---|
| /bookstore/* | 选取 bookstore 元素的所有子元素。 |
| //* | 选取文档中的所有元素。 |
| //title[@*] | 选取所有带有属性的 title 元素。 |
选取若干路径
通过在路径表达式中使用“|”运算符,您可以选取若干个路径。
实例
在下面的表格中,我们列出了一些路径表达式,以及这些表达式的结果:
| 路径表达式 | 结果 |
|---|---|
| //book/title | //book/price | 选取 book 元素的所有 title 和 price 元素。 |
| //title | //price | 选取文档中的所有 title 和 price 元素。 |
| /bookstore/book/title | //price | 选取属于 bookstore 元素的 book 元素的所有 title 元素,以及文档中所有的 price 元素。 |
XPath的运算符
下面列出了可用在 XPath 表达式中的运算符:
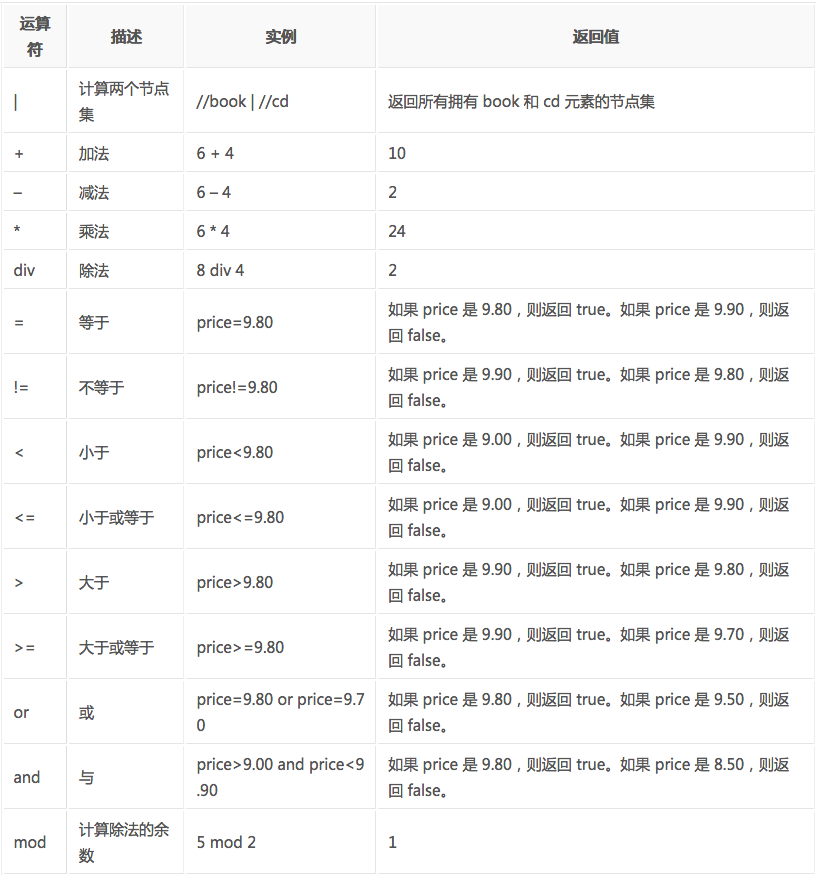
这些就是XPath的语法内容,在运用到Python抓取时要先转换为xml。
lxml 是 一个HTML/XML的解析器,主要的功能是如何解析和提取 HTML/XML 数据。
lxml和正则一样,也是用 C 实现的,是一款高性能的 Python HTML/XML 解析器,我们可以利用之前学习的XPath语法,来快速的定位特定元素以及节点信息。
lxml python 官方文档:http://lxml.de/index.html
需要安装C语言库,可使用 pip 安装:pip install lxml (或通过wheel方式安装)
初步使用
我们利用它来解析 HTML 代码,简单示例:
# lxml_test.py

# 使用 lxml 的 etree 库
from lxml import etree

text = '''
<div>
    <ul>
         <li class="item-0"><a href="link1.html">first item</a></li>
         <li class="item-1"><a href="link2.html">second item</a></li>
         <li class="item-inactive"><a href="link3.html">third item</a></li>
         <li class="item-1"><a href="link4.html">fourth item</a></li>
         <li class="item-0"><a href="link5.html">fifth item</a> # 注意,此处缺少一个 </li> 闭合标签
     </ul>
 </div>
'''
#利用etree.HTML,将字符串解析为HTML文档
html = etree.HTML(text)

# 按字符串序列化HTML文档
result = etree.tostring(html)

print(result)
输出结果
<html><body>
<div>
    <ul>
         <li class="item-0"><a href="link1.html">first item</a></li>
         <li class="item-1"><a href="link2.html">second item</a></li>
         <li class="item-inactive"><a href="link3.html">third item</a></li>
         <li class="item-1"><a href="link4.html">fourth item</a></li>
         <li class="item-0"><a href="link5.html">fifth item</a></li>
</ul>
 </div>
</body></html>
lxml 可以自动修正 html 代码,例子里不仅补全了 li 标签,还添加了 body,html 标签。
文件读取:
除了直接读取字符串,lxml还支持从文件里读取内容。我们新建一个hello.html文件:
<!-- hello.html -->

<div>
    <ul>
         <li class="item-0"><a href="link1.html">first item</a></li>
         <li class="item-1"><a href="link2.html">second item</a></li>
         <li class="item-inactive"><a href="link3.html"><span class="bold">third item</span></a></li>
         <li class="item-1"><a href="link4.html">fourth item</a></li>
         <li class="item-0"><a href="link5.html">fifth item</a></li>
     </ul>
 </div>
再利用 etree.parse() 方法来读取文件。
# lxml_parse.py

from lxml import etree

# 读取外部文件 hello.html
html = etree.parse('./hello.html')
result = etree.tostring(html, pretty_print=True)

print(result)
输出结果与之前相同:
<html><body>
<div>
    <ul>
         <li class="item-0"><a href="link1.html">first item</a></li>
         <li class="item-1"><a href="link2.html">second item</a></li>
         <li class="item-inactive"><a href="link3.html">third item</a></li>
         <li class="item-1"><a href="link4.html">fourth item</a></li>
         <li class="item-0"><a href="link5.html">fifth item</a></li>
</ul>
 </div>
</body></html>
XPath实例测试
1. 获取所有的 <li> 标签
# xpath_li.py

from lxml import etree

html = etree.parse('hello.html')
print type(html)  # 显示etree.parse() 返回类型

result = html.xpath('//li')

print result  # 打印<li>标签的元素集合
print len(result)
print type(result)
print type(result[0])
输出结果:
<type 'lxml.etree._ElementTree'>
[<Element li at 0x1014e0e18>, <Element li at 0x1014e0ef0>, <Element li at 0x1014e0f38>, <Element li at 0x1014e0f80>, <Element li at 0x1014e0fc8>]
5
<type 'list'>
<type 'lxml.etree._Element'>
2. 继续获取<li> 标签的所有 class属性
# xpath_li.py

from lxml import etree

html = etree.parse('hello.html')
result = html.xpath('//li/@class')

print result
输出结果:
['item-0', 'item-1', 'item-inactive', 'item-1', 'item-0']
3. 继续获取<li>标签下href属性 为 link1.html 的 <a> 标签
# xpath_li.py

from lxml import etree

html = etree.parse('hello.html')
result = html.xpath('//li/a[@href="link1.html"]')

print result
运行结果
[<Element a at 0x10ffaae18>]
4. 获取<li> 标签下的所有 <span> 标签
# xpath_li.py

from lxml import etree

html = etree.parse('hello.html')

#result = html.xpath('//li/span')
#注意这么写是不对的:
#因为 / 是用来获取子元素的,而 <span> 并不是 <li> 的子元素,所以,要用双斜杠

result = html.xpath('//li//span')

print result
运行结果
[<Element span at 0x10d698e18>]
5. 获取 <li> 标签下的<a>标签里的所有 class
# xpath_li.py

from lxml import etree

html = etree.parse('hello.html')
result = html.xpath('//li/a//@class')

print result
运行结果
['blod']
6. 获取最后一个 <li> 的 <a> 的 href
# xpath_li.py

from lxml import etree

html = etree.parse('hello.html')

result = html.xpath('//li[last()]/a/@href')
# 谓语 [last()] 可以找到最后一个元素

print result
运行结果
['link5.html']
8. 获取 class 值为 bold 的标签名
# xpath_li.py

from lxml import etree

html = etree.parse('hello.html')

result = html.xpath('//*[@class="bold"]')

# tag方法可以获取标签名
print result[0].tag
运行结果
span
案例:使用XPath的的爬虫
现在我们用的XPath来做一个简单的爬虫,我们尝试爬取某个贴吧里的所有帖子,并且将该这个帖子里每个楼层发布的图片下载到本地。
# tieba_xpath.py


#!/usr/bin/env python
# -*- coding:utf-8 -*-

import os
import urllib
import urllib2
from lxml import etree

class Spider:
    def __init__(self):
        self.tiebaName = raw_input("请需要访问的贴吧:")
        self.beginPage = int(raw_input("请输入起始页:"))
        self.endPage = int(raw_input("请输入终止页:"))

        self.url = 'http://tieba.baidu.com/f'
        self.ua_header = {"User-Agent" : "Mozilla/5.0 (compatible; MSIE 9.0; Windows NT 6.1 Trident/5.0;"}

        # 图片编号
        self.userName = 1

    def tiebaSpider(self):
        for page in range(self.beginPage, self.endPage + 1):
            pn = (page - 1) * 50 # page number
            word = {'pn' : pn, 'kw': self.tiebaName}

            word = urllib.urlencode(word) #转换成url编码格式(字符串)
            myUrl = self.url + "?" + word

            # 示例:http://tieba.baidu.com/f? kw=%E7%BE%8E%E5%A5%B3 & pn=50
            # 调用 页面处理函数 load_Page
            # 并且获取页面所有帖子链接,
            links = self.loadPage(myUrl)  # urllib2_test3.py

    # 读取页面内容
    def loadPage(self, url):
        req = urllib2.Request(url, headers = self.ua_header)
        html = urllib2.urlopen(req).read()

        # 解析html 为 HTML 文档
        selector=etree.HTML(html)

        #抓取当前页面的所有帖子的url的后半部分,也就是帖子编号
        # http://tieba.baidu.com/p/4884069807里的 “p/4884069807”
        links = selector.xpath('//div[@class="threadlist_lz clearfix"]/div/a/@href')

        # links 类型为 etreeElementString 列表
        # 遍历列表,并且合并成一个帖子地址,调用 图片处理函数 loadImage
        for link in links:
            link = "http://tieba.baidu.com" + link
            self.loadImages(link)

    # 获取图片
    def loadImages(self, link):
        req = urllib2.Request(link, headers = self.ua_header)
        html = urllib2.urlopen(req).read()

        selector = etree.HTML(html)

        # 获取这个帖子里所有图片的src路径
        imagesLinks = selector.xpath('//img[@class="BDE_Image"]/@src')

        # 依次取出图片路径,下载保存
        for imagesLink in imagesLinks:
            self.writeImages(imagesLink)

    # 保存页面内容
    def writeImages(self, imagesLink):
        '''
            将 images 里的二进制内容存入到 userNname 文件中
        '''

        print imagesLink
        print "正在存储文件 %d ..." % self.userName
        # 1. 打开文件,返回一个文件对象
        file = open('./images/' + str(self.userName)  + '.png', 'wb')

        # 2. 获取图片里的内容
        images = urllib2.urlopen(imagesLink).read()

        # 3. 调用文件对象write() 方法,将page_html的内容写入到文件里
        file.write(images)

        # 4. 最后关闭文件
        file.close()

        # 计数器自增1
        self.userName += 1

# 模拟 main 函数
if __name__ == "__main__":

    # 首先创建爬虫对象
    mySpider = Spider()
    # 调用爬虫对象的方法,开始工作
    mySpider.tiebaSpider()
xpath解析式的使用的简单学习就到这里,学好xpath解析式,就能快速的在页面数据中获取到自己想要的数据,节省开发时间,在爬虫的开发过程中,数据解析式的确定往往才是最耗费时间的