在前一篇的博客中,我使用Xfire1.x来开发了WebServies的服务端。
但是如果你访问Apache的官网,可以看到xfire已经被合并了。
最新的框架叫做CXF。
Apache CXF = Celtix + XFire。
CXF 继承了 Celtix 和 XFire 两大开源项目的精华,
提供了对 JAX-WS 全面的支持,并且提供了多种 Binding 、DataBinding、Transport 以及各种 Format 的支持,并且可以根据实际项目的需要,采用代码优先(Code First)或者 WSDL 优先(WSDL First)来轻松地实现 Web Services 的发布和使用。
总之,就是cxf就是好啦。那么接下来我们使用cxf来开发一个webServices的服务端。体验CXF的好处。
-=+=--=+=--=+=--=+=--=+=--=+=--=+=--=+=-
服 务 端
-=+=--=+=--=+=--=+=--=+=--=+=--=+=--=+=-
环境:MyEclipse6.01+jdk5
1)首先,建一个web工程.
2)写好一个接口和服务类
//服务接口IHelloService.java
package com.pengzj.service;
import java.util.List;
import javax.jws.WebMethod;
import javax.jws.WebService;
/**
*
* @author atixujie#gz-accp
*
*/
@WebService
public interface IHelloService {
@WebMethod
public String sayHi(String uname);
}
//webServices的实现类IHelloServiceImpl .java
import com.pengzj.service.IHelloService;
@WebService
public class IHelloServiceImpl implements IHelloService{
@Override
@WebMethod
public String sayHi(String uname) {
return "Hello "+uname;
}
}
大家可以注意到,这里用到了webServices的注解。@WebService和@WebMethod.
3)导入CXF的jar包。
到apache的网站上下载CXF的包。
最新的版本是2.2.9 。当然如果你下载这个包就会比较麻烦。因为它需要最新的JDk(1.6.01都不行。要什么1.6.u11)的支持。
所以建议你还是下载2.0.4地址如下:
http://people.apache.org/dist/incubator/cxf/2.0.4-incubator/apache-cxf-2.0.4-incubator.zip
解压之后将lib文件夹下的jar包都复制到项目中。
4)配置CXF。
然后将web.xml的配置文件改成如下:
<display-name>cxf</display-name>
<description>cxf</description>
<servlet>
<description>Apache CXF Endpoint</description>
<servlet-name>cxf</servlet-name>
<servlet-class>
org.apache.cxf.transport.servlet.CXFServlet
</servlet-class>
<load-on-startup>1</load-on-startup>
</servlet>
<servlet-mapping>
<servlet-name>cxf</servlet-name>
<url-pattern>/services/*</url-pattern>
</servlet-mapping>
<session-config>
<session-timeout>60</session-timeout>
</session-config>
<listener>
<listener-class>
org.springframework.web.context.ContextLoaderListener
</listener-class>
</listener>
5)配置Spring的配置文件。
因为CXF集成了Spring。所以以上的配置要默认到WEB-INF/下找spring的配置文件applicationContext.xml。
所以我们要在WEB-INF下建立一个Spring的配置文件applicationContext.xml如下:
<?xml version="1.0" encoding="UTF-8"?>
<beans
xmlns="http://www.springframework.org/schema/beans"
xmlns:xsi="http://www.w3.org/2001/XMLSchema-instance"
xmlns:jaxws="http://cxf.apache.org/jaxws"
xsi:schemaLocation="http://www.springframework.org/schema/beanshttp://www.springframework.org/schema/beans/spring-beans-2.0.xsd
http://cxf.apache.org/jaxws
http://cxf.apache.org/schemas/jaxws.xsd">
<import resource="classpath:META-INF/cxf/cxf.xml"/>
<import resource="classpath:META-INF/cxf/cxf-extension-soap.xml"/>
<import resource="classpath:META-INF/cxf/cxf-servlet.xml"/>
<!-- 配置好webservices的类名和服务名 -->
<jaxws:endpoint id="hellows"
implementor="com.pengzj.service.impl.IHelloServiceImpl" address="/Hellows" />
</beans>
准备工作结束了。
部署,运行。在地址上输入:http://localhost:8080/cxfws_0619/services/
就应该可以看到一个超链接,点击可以看到如下的wsdl-xml文件
<?xml version="1.0" encoding="utf-8" ?>
+ <wsdl:definitions xmlns:wsdl="http://schemas.xmlsoap.org/wsdl/" xmlns:ns1="http://service.pengzj.com/" xmlns:soap="http://schemas.xmlsoap.org/wsdl/soap/" xmlns:tns="http://impl.service.pengzj.com/" xmlns:xsd="http://www.w3.org/2001/XMLSchema" name="IHelloServiceImplService" targetNamespace="http://impl.service.pengzj.com/">
ok.使用CXF开发服务端大功告成。
总结步骤:
1)建立web工程。导入cxf的jar包。
2)配置web.xml文件
3)配置spring的配置文件。同时配置好服务类的bean.
4)部署运行。
-=+=--=+=--=+=--=+=--=+=--=+=--=+=--=+=-
客 户 端
-=+=--=+=--=+=--=+=--=+=--=+=--=+=--=+=-
接下来客户端的调用从理论上来说可以使用任意的方式来调用。因为webServices的理念就是
服务端和客户端可以是异构平台。
在之前的博客中,使用XFIRE作为客户端。现在我们使用根据wsdl文件自动生成桩代码的形式来开发客户端。
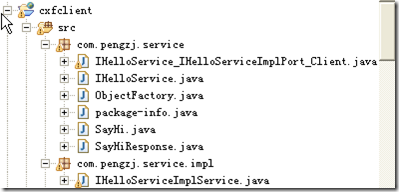
在cxf的包中解压后有一个bin目录。其中有一个wsdl2java.bat文件。这个文件可以帮助我们根据wsdl文件来生成客户端的stub。也就是桩代码。主要是生成和服务端一致的接口文件。
在dos下使用这个命令(实际上myclipse有这个插件)
wsdl2java -d d:src -client http://localhost:8080/cxfService_0617/services/Hellows?wsdl
就会在d盘的src文件夹下生成一些包和java文件。src文件夹你要预先建立好。
其中文件名最长的那个文件就是主应用程序。
args[0]表示wsdl文件的位置,你需要手动修改一下。
public final class IHelloService_IHelloServiceImplPort_Client {
private static final QName SERVICE_NAME = new QName("http://impl.service.pengzj.com/", "IHelloServiceImplService");
private IHelloService_IHelloServiceImplPort_Client() {
}
public static void main(String args[]) throws Exception {
String url="http://localhost:8080/cxfService_0617/services/Hellows?wsdl";
URL wsdlURL = null;
File wsdlFile = new File(url);
try {
if (wsdlFile.exists()) {
wsdlURL = wsdlFile.toURL();
} else {
wsdlURL = new URL(url);
}
} catch (MalformedURLException e) {
e.printStackTrace();
}
IHelloServiceImplService ss = new IHelloServiceImplService(wsdlURL, SERVICE_NAME);
IHelloService port = ss.getIHelloServiceImplPort();
{
System.out.println("Invoking sayHi...");
java.lang.String _sayHi_arg0 = "jack";
java.lang.String _sayHi__return = port.sayHi(_sayHi_arg0);
System.out.println("sayHi.result=" + _sayHi__return);
}
System.exit(0);
}
}
运行以上的程序结果为:
Invoking sayHi...
sayHi.result=Hello jack。
-----------------
恭喜你,成功了。
后续:因为我们在服务端的webServices方法比较简单,传递的是String,返回值也是string.
如果传入或返回的值带有自定义的数据类型。那么生成的客户端代码会更复杂。
不过,对于WebServices的服务,建议还是以传输一般数据格式为好,如果传递的复杂数据格式,那么要考虑改进设计。
