一 .案例
1.使用requuests(get,post) 和urllib 爬取数据
https://www.cnblogs.com/lovershowtime/p/11771338.html
简单爬取搜狗保存到本地

import requests
ret=requests.get(url="https://www.sogou.com")
aa=ret.text
print(ret.text)

with open("aa.html","w",encoding="utf-8") as f:
       f.write(aa)
get爬取搜狗输入的信息写入本地
import requests
wd=input("输入参数哈哈:")
param={
    'query':wd
}
ret=requests.get(url="https://www.sogou.com",params=param) #  params 参数动态数据封装成字典
print(ret)
fime=
# aa=ret.text  #  返回的是字符串
aa=ret.content  # 返回二进制数据
with open("bb.html","wb") as  f:
       f.write(aa)
       print("完成")
post爬取百度翻译数据

import requests
wd=input("输入参数哈哈:")
data={
    'query':wd
}
ret=requests.post(url="https://fanyi.baidu.com/sug",data=data)
print(ret.content) #b'{"errno":1001,"errmsg":"\u53c2\u6570\u9519\u8bef"}'     返回是二进制
print(ret.text) # {"errno":1001,"errmsg":"u53c2u6570u9519u8bef"}    返回二进制
print(ret.json())  # {'errno': 1001, 'errmsg': '参数错误'}   返回字典对象  但是需要返回来的数据是json数据不然会报错
get爬取豆瓣电影

# https://movie.douban.com/j/chart/top_list?type=20&interval_id=100%3A90&action=&start=140
import requests
date={
    'type':'5',
    'interval_id':'100:90',
    'action':'',
    'start':'1',
    'limit':'23'
}
res=requests.get(url="https://movie.douban.com/j/chart/top_list?",params=date)
print(res.json())
post爬取肯德基

# https://movie.douban.com/j/chart/top_list?type=20&interval_id=100%3A90&action=&start=140
import requests

keyword=input("请输入城市:")
date={
    'cname':'',
    'pid':'',
    'keyword':keyword,
    'pageIndex':'1',
    'pageSize':'10'
}
res=requests.post(url="http://www.kfc.com.cn/kfccda/ashx/GetStoreList.ashx?op=keyword",data=date)
print(res.url)
print(res.json())
post爬取化妆生成许可证详情   动态数据

# 获取动态数据  ajax             伪装浏览器反扒机制   http://125.35.6.84:81/xk/
import requests

headers={
        'User-Agent':'Mozilla/5.0 (Windows NT 10.0; WOW64) AppleWebKit/537.36 (KHTML, like Gecko) Chrome/74.0.3729.169 Safari/537.36'
    }
aa="http://125.35.6.84:81/xk/itownet/portalAction.do?method=getXkzsList"

id_list=[]
for page in range(1,11):
    data={
        'on':'true',
        'page':str(page),
        'pageSize':'5',
        'productName':'',
        'conditionType':'1',
        'applyname':'',
        'applysn':''

    }
    res = requests.post(url=aa, data=data,headers=headers).json()
    # print(res)
    # print(res["list"])

    for dic in res["list"]:
        id=dic["ID"]
        id_list.append(id)

print(id_list)
id_url='http://125.35.6.84:81/xk/itownet/portalAction.do?method=getXkzsById'
for li_id in id_list:
    id_data={
       'id':li_id
    }
    ret=requests.post(url=id_url,data=id_data,headers=headers).json()
    print(ret)
get爬取图片写入本地

import requests
import urllib
aa='http://d.hiphotos.baidu.com/album/pic/item/b58f8c5494eef01f8931cc7ae1fe9925bc317d6c.jpg?psign=8931cc7ae1fe9925bc315c6034a85edf8cb1cb1349545954'
headers={
        'User-Agent':'Mozilla/5.0 (Windows NT 10.0; WOW64) AppleWebKit/537.36 (KHTML, like Gecko) Chrome/74.0.3729.169 Safari/537.36'
    }
res=requests.get(url=aa,headers=headers).content
with open("./aa.jpg","wb") as f:
    f.write(res)

urllib.request.urlretrieve(url=aa,filename="./11.jpg") #   和上面一样
爬取登录抽屉点赞(get+post)


# 先查看首页
# 提交用户名和密码
# 一般  :直接发送请求 获取结果

 抽屉    套路:
       第一次登录成功 任意访问一个页面  这时候已经把cookies返回了  在第二登录要把cookies 带上 经行授权
      要是再次登陆要把cookie带上 在进行授权


import requests
# 1. 查看首页
r1 = requests.get(
    url='https://dig.chouti.com/',
    headers={
        'user-agent':'Mozilla/5.0 (Windows NT 6.1; Win64; x64) AppleWebKit/537.36 (KHTML, like Gecko) Chrome/63.0.3239.132 Safari/537.36'
    }
)


# 2. 提交用户名和密码
r2 = requests.post(
    url='https://dig.chouti.com/login',
    headers={
        'user-agent':'Mozilla/5.0 (Windows NT 6.1; Win64; x64) AppleWebKit/537.36 (KHTML, like Gecko) Chrome/63.0.3239.132 Safari/537.36'
    },
    data={   #登录发送 要把数据带上
        'phone':'8617380117935',
        'password':'lv5555555',
        'oneMonth':1
    },
    cookies=r1.cookies.get_dict()
)
print(r2.text)

print(r2.cookies.get_dict() )   # 这个cokies 混淆我们


# 3. 点赞
r3 = requests.post(
    url='https://dig.chouti.com/link/vote?linksId=20435396',  #点赞的url
    headers={
        'user-agent':'Mozilla/5.0 (Windows NT 6.1; Win64; x64) AppleWebKit/537.36 (KHTML, like Gecko) Chrome/63.0.3239.132 Safari/537.36'
    },
    cookies=r1.cookies.get_dict()  #   带r1cookie
)
print(r3.text)
print(r1.cookies.get_dict(),11111111111111111111111)
2. 使用requuests 正则爬取数据
https://www.cnblogs.com/lovershowtime/p/11776549.html
正则爬取糗事百科图片下载

# https://www.qiushibaike.com/

import re,os
import requests,urllib


url="https://www.qiushibaike.com/pic/page/%d/?s=5170552"
headers = {
    'user-agent': 'Mozilla/5.0 (Windows NT 10.0; WOW64) AppleWebKit/537.36 (KHTML, like Gecko) Chrome/74.0.3729.169 Safari/537.36'
}

if not os.path.exists("./img"):
    os.mkdir("./img")


start=int(input("请输入起始页:"))
end=int(input("请输入结束页:"))

for page in  range(start,end+1):
    new_url=format(url%page) # https://www.qiushibaike.com/pic/page/1/?s=5170552
    print(new_url)

    page_text=requests.get(url=new_url,headers=headers).text
    img_url_list=re.findall('<div class="thumb">.*?<img src="(.*?)" alt=.*?></div>',page_text,re.S)
    for img_url in img_url_list:
        img_urls='https'+img_url
        imgname=img_urls.split("/")[-1]
        imgpath="img/"+imgname
        urllib.request.urlretrieve(url=img_url,filename=imgpath)
        print("下载成功了")


# re.findall(正则匹配的格式,匹配的对象)
# . 任意字符
# * 零个或者多个字符
# ? 零个或者多个字符
#
# re.S  匹配包括换行在内的所有字符

aa="http://img95.699pic.com/photo/50045/7601.jpg_wh300.jpg"
print(aa.split("/"))

# print(aa.split("/")[-1])  #  7601.jpg_wh300.jpg
3. 使用requuests BeautifulSoup爬取数据
https://www.cnblogs.com/lovershowtime/p/11771726.html
爬取古诗词网内容写入本地

import re,os
import requests,urllib
from bs4 import BeautifulSoup

url="http://www.shicimingju.com/book/sanguoyanyi.html"
headers = {
    'user-agent': 'Mozilla/5.0 (Windows NT 10.0; WOW64) AppleWebKit/537.36 (KHTML, like Gecko) Chrome/74.0.3729.169 Safari/537.36'
}

pang_text=requests.get(url=url,headers=headers).text
sup=BeautifulSoup(pang_text,"lxml")
list_li=sup.select('.book-mulu>ul>li>a')

fp=open("aa.txt","w",encoding="utf-8")

for a in list_li:
    title=a.string
    print(title)
    urls_text='http://www.shicimingju.com'+a["href"]
    print(urls_text)   # http://www.shicimingju.com/book/nanbeishiyanyi/10.html

    pa_test=requests.get(url=urls_text,headers=headers).text
    sup = BeautifulSoup(pa_test, "lxml")
    cont=sup.find('div',class_='chapter_content').text
    fp.write(title+'
'+cont)
    print(title)

fp.close()
爬取汽车之家新闻 和下载图片到本地

import requests
from bs4 import BeautifulSoup  #  将html格式的字符串解析成对象 对象.fand   对象.find_all

response = requests.get("https://www.autohome.com.cn/news/")
response.encoding = 'gbk'

soup = BeautifulSoup(response.text,'html.parser')   # 解析
div = soup.find(name='div',attrs={'id':'auto-channel-lazyload-article'}) #  查找标签 这个标签里面包含了所有新闻
print(div)

li_list = div.find_all(name='li')

for li in li_list:
    title = li.find(name='h3')  # 找标题
    if not title:
        continue
    p = li.find(name='p')
    a = li.find(name='a')
    print(title.text)
    print(a.attrs.get('href'))  # 获取属性
    print(p.text,"1111111111111111111111111111111111111111111111")


    # 获取图片
    img = li.find(name='img')
    src = img.get('src')
    src = "https:" + src
    print(src,5555)

    # 再次发起请求,下载图片
    file_name = src.rsplit('/',maxsplit=1)[1]
    ret = requests.get(src)
    with open(file_name,'wb') as f:
        f.write(ret.content)
爬取抽屉标题内容标题

import requests
from bs4 import BeautifulSoup

r1 = requests.get(
    url='https://dig.chouti.com/',
    headers={
        'user-agent':'Mozilla/5.0 (Windows NT 6.1; Win64; x64) AppleWebKit/537.36 (KHTML, like Gecko) Chrome/63.0.3239.132 Safari/537.36'
    }
)

soup = BeautifulSoup(r1.text,'html.parser')

# 标签对象
content_list = soup.find(name='div',attrs={"class":"link-con"})
# print(content_list)
# [标签对象,标签对象]


item_list = content_list.find_all(name='div',attrs={'class':'link-detail'})
for item in item_list:
    a = item.find(name='a',attrs={'class':'link-title link-statistics'})
    print(a.text.strip())
    print(a["href"])
    # print(a.text)
4. 使用requuests Xpath爬取数据
https://www.cnblogs.com/lovershowtime/p/11777009.html
使用xpath爬取二手房信息

import requests
from  lxml import etree


url="https://cd.58.com/ershoufang/?utm_source=sem-sales-baidu-pc&spm=82881519251.21430224112&utm_campaign=sell&utm_medium=cpc&showpjs=pc_fg"

headers = {
              'user-agent': 'Mozilla/5.0 (Windows NT 6.1; Win64; x64) AppleWebKit/537.36 (KHTML, like Gecko) Chrome/63.0.3239.132 Safari/537.36'
          }


f=open("ab.txt","w",encoding="utf-8")
ret=requests.get(url=url,headers=headers).text
tree=etree.HTML(ret)
list_le=tree.xpath("//ul[@class='house-list-wrap']/li")
print(list_le)


for el in list_le:
    title=el.xpath("./div[2]/h2/a/text()")[0]  # 当前第二个div下的h2 下的a的文本
    price = el.xpath("./div[3]//text()")   # 当前第三个div下的 所有的文本
    pi=''.join(price)
    f.write(title+":"+pi+"
")

f.close()


# /html/body/div[5]/div[5]/div[1]/ul/li[1]/div[2]
#
# /html/body/div[5]/div[5]/div[1]/ul/li[1]/div[2]/h2
使用xpath爬取图片下载在本地

# http://pic.netbian.com/4kmeinv/
import urllib
import requests,os
from  lxml import etree


url="http://pic.netbian.com/4kmeinv/"

headers = {
    'user-agent': 'Mozilla/5.0 (Windows NT 6.1; Win64; x64) AppleWebKit/537.36 (KHTML, like Gecko) Chrome/63.0.3239.132 Safari/537.36'
}

if  not os.path.exists("./imgs"):
      os.mkdir("./imgs")

ret=requests.get(url=url,headers=headers)
# ret.encoding="utf-8"   一般解决方式
ret_li=etree.HTML(ret.text)
li_list=ret_li.xpath("//div[@class='slist']/ul/li")
for li in li_list:
    li_name=li.xpath("./a/b/text()")[0]
    # 处理乱码
    li_img_name=li_name.encode('ISO-8859-1').decode("gbk")      # 万能解决编码的问题  哪里乱码解决哪里     也可以使用全部

    img_url="http://http://pic.netbian.com/"+li.xpath("./a/img/@src")[0]


    img_path='./imgs/'+li_img_name+'.jpg'

    urllib.request.urlretrieve(url=img_url, filename=img_path)

    print( img_path,"下载完成")
# 爬取图片加密
# 数据加密(反扒机制)

# base64 返回是二进制
import urllib
import requests, os
from lxml import etree
import base64
url = "http://jandan.net/ooxx"
headers = {
    'user-agent': 'Mozilla/5.0 (Windows NT 6.1; Win64; x64) AppleWebKit/537.36 (KHTML, like Gecko) Chrome/63.0.3239.132 Safari/537.36'
}

ret = requests.get(url=url, headers=headers).text
print(ret)
ret_li=etree.HTML(ret)
li_list = ret_li.xpath("//span[@class='img_hash']/text()")
for img_hash in  li_list:
    img_url="http:"+base64.b64decode(img_hash).decode()   # 解析加密的图片路径   ()
    img_name=img_url.split("/")[-1]
    urllib.request.urlretrieve(url=img_url, filename=img_name)
爬取 下载简历模板

import urllib,random
import requests, os
from lxml import etree


headers = {
    'user-agent': 'Mozilla/5.0 (Windows NT 6.1; Win64; x64) AppleWebKit/537.36 (KHTML, like Gecko) Chrome/63.0.3239.132 Safari/537.36'
}

url = "http://sc.chinaz.com/jianli/free_%d.html"     # 页吗

for page in  range(1,4):
    if page==1:
         new_url="http://sc.chinaz.com/jianli/free.html"  # 免费模板
    else:
        new_url=format(url%page)


    ret = requests.get(url= new_url, headers=headers)
    ret.encoding='utf-8'   #解决乱码的问题
    tree=etree.HTML(ret.text)
    div_list=tree.xpath("//div[@id='container']/div")
    for div in div_list:
        det_url=div.xpath("./a/@href")[0]        #  定位连接中href属性
        name=div.xpath("./a/img/@alt")[0]        # 定义到图片的名字
        print(name)
        #
        dat_page=requests.get(url=det_url,headers=headers).text
        trees = etree.HTML(dat_page)
        dowloand_list=trees.xpath("//div[@class='clearfix mt20 downlist']/ul/li/a/@href")

        dow_url=random.choice(dowloand_list)
        data=requests.get(url=dow_url,headers=headers).content


        fileName=name+".rar"
        with open(fileName,"wb") as f:
            f.write(data)
            print(fileName,"下载成功了哈哈哈")


问题:往往在进行大量请求发送的时候 经常会报一个这样的错误 HTTPconnrctionFool....with url

   原因:
        1 : 每次数据传输前客服端要和服务器端建立tcp连接 为了节省传输消耗的时间 默认是keep-alive 即连接一次
             然而如果迟迟不断连接的化,则连接池满后则无法产生新的连接对象 导致请求无法发送
        2. IP 被封
        3. 请求过于频繁


   解决方法:
      设置请求头中conntection的值设为close 表示每次请求成功后断开连接
      更换ip
      每次请求之间使用sleep进行等待时间间隔
爬取城市数据

import urllib,random
import requests, os
from lxml import etree


headers = {
    'user-agent': 'Mozilla/5.0 (Windows NT 6.1; Win64; x64) AppleWebKit/537.36 (KHTML, like Gecko) Chrome/63.0.3239.132 Safari/537.36'
}
url="https://www.aqistudy.cn/historydata/"
ret=requests.get(url=url,headers=headers).text
tree=etree.HTML(ret)

li_lit=tree.xpath("//div[@class='bottom']/ul/li | //div[@class='bottom']/ul/div[2]/li")    # Xpath表达式

for li in  li_lit:
    cont=li.xpath("./a/text()")[0]
    print(cont)
4. 代理IP使用(用户代理 和代理池)
用户代理池

# # http://www.goubanjia.com/   全网代理IP        https://www.kuaidaili.com/  快代理
# # 反扒机制代理ip
# 设置请求的代理ip
# # 代理ip的类型必须和请求url的协议保存一至
import requests

方式一: IP代理构建

url="https://www.baidu.com/s?wd=ip"
headers={
        'User-Agent':'Mozilla/5.0 (Windows NT 10.0; WOW64) AppleWebKit/537.36 (KHTML, like Gecko) Chrome/74.0.3729.169 Safari/537.36'
    }
ret=requests.get(url=url,headers=headers,proxies={"https":'222.184.59.8:808'}).text
print(ret)
with open("./ip.html","w",encoding="utf-8") as f:
    f.write(ret)
方式二: IP代理构建实战(urllib模块)

import urllib.request
ip='119.23.79.199:3128'
proxy=urllib.request.ProxyHandler({"http":ip})
openers=urllib.request.build_opener(proxy,urllib.request.HTTPHandler)
urllib.request.install_opener(openers)
url="http://www.baidu.com"
data=urllib.request.urlopen(url).read().decode("utf-8","ignore")
print(len(data))
f=open("bb.html",'w',encoding="utf-8")
f.write(data)
f.close()
方式一:构建代理池

# ip代理池的构建 适用于代理ip稳定的情况下
import random
import urllib.request

# 代理池
pools=[
    "119.23.79.199:3128",
    "221.224.163.54:808",
    "210.26.64.44:3128",
    "27.191.234.69:9999",
]

def ip(pools):
   ips=random.choice(pools)

   proxy = urllib.request.ProxyHandler({"http": ips})
   openers = urllib.request.build_opener(proxy, urllib.request.HTTPHandler)
   urllib.request.install_opener(openers)

for i in  range(0,5):
    try:                           # 代理池ip不稳定需要异常捕获
        ip(pools)
        url = "http://www.baidu.com"
        data = urllib.request.urlopen(url).read().decode("gbk", "ignore")
        print(len(data))
        f=open("ss.html","w")
        f.write(data)
    except Exception as err:
        print(err,"1111")
方式二: 代理池 Ip代理 接口调用法 这种代理适用于代理ip稳定


import random
import urllib.request
def ip():
                                                # 这是大象代理ip接口      http://daxiangdaili.com/api
   ips=urllib.request.urlopen("http://www.daxiangdaili.com/ip/?tid=559126871522587&num=2").read().decode("utf-8", "ignore")
   proxy = urllib.request.ProxyHandler({"http": ips})
   openers = urllib.request.build_opener(proxy, urllib.request.HTTPHandler)
   urllib.request.install_opener(openers)


for i in  range(0,5):
    try:                           # 代理池ip不稳定需要异常捕获
        ip()
        url = "http://www.baidu.com"
        data = urllib.request.urlopen(url).read().decode("gbk", "ignore")
        print(len(data))
        f=open("ss.html","w")
        f.write(data)
    except Exception as err:
        print(err,"1111")
方式三: 代理池 Ip代理
from bs4 import BeautifulSoup
import requests
import random

# 2获取网页内容函数
headers={
        'User-Agent':'Mozilla/5.0 (Windows NT 10.0; WOW64) AppleWebKit/537.36 (KHTML, like Gecko) Chrome/74.0.3729.169 Safari/537.36'
    }


def getHTMLText(url,proxies):
    try:
        r = requests.get(url,proxies=proxies)
        r.raise_for_status()
        r.encoding = r.apparent_encoding
    except:
        return 0
    else:
        return r.text

# 3.从代理ip网站获取代理ip列表函数,并检测可用性,返回ip列表

def get_ip_list(url):
    web_data = requests.get(url,headers)
    soup = BeautifulSoup(web_data.text, 'html')
    ips = soup.find_all('tr')
    ip_list = []
    for i in range(1, len(ips)):
        ip_info = ips[i]
        tds = ip_info.find_all('td')
        ip_list.append(tds[1].text + ':' + tds[2].text)
#检测ip可用性,移除不可用ip:(这里其实总会出问题,你移除的ip可能只是暂时不能用,剩下的ip使用一次后可能之后也未必能用)
    for ip in ip_list:
        try:
          proxy_host = "https://" + ip
          proxy_temp = {"https": proxy_host}
          res = urllib.urlopen(url, proxies=proxy_temp).read()
        except Exception as e:
          ip_list.remove(ip)
          continue
    return ip_list
# 4.从ip池中随机获取ip列表

def get_random_ip(ip_list):
    proxy_list = []
    for ip in ip_list:
        proxy_list.append('http://' + ip)
    proxy_ip = random.choice(proxy_list)
    proxies = {'http': proxy_ip}
    return proxies


# 5.调用代理
if __name__ == '__main__':
    url = 'http://www.xicidaili.com/nn/'
    ip_list = get_ip_list(url)
    proxies = get_random_ip(ip_list)
    print(proxies)
5.使用模拟登录 爬取数据
人人网模拟登录 抓包 验证码获取(使用了云打码平台http://www.yundama.com/) session使用
# http://www.yundama.com/   云打码
# Superme888888@outlook.com
# supreme9999
# @_XJQ1995110
# 17380117935

# # http://www.renren.com/SysHome.do
import requests,urllib
from  lxml import etree
session=requests.session() # 获取session对象


import http.client, mimetypes, urllib, json, time, requests

######################################################################
class YDMHttp:
    apiurl = 'http://api.yundama.com/api.php'
    username = ''
    password = ''
    appid = ''
    appkey = ''

    def __init__(self, username, password, appid, appkey):
        self.username = username
        self.password = password
        self.appid = str(appid)
        self.appkey = appkey

    def request(self, fields, files=[]):
        response = self.post_url(self.apiurl, fields, files)
        response = json.loads(response)
        return response

    def balance(self):
        data = {'method': 'balance', 'username': self.username, 'password': self.password, 'appid': self.appid,
                'appkey': self.appkey}
        response = self.request(data)
        if (response):
            if (response['ret'] and response['ret'] < 0):
                return response['ret']
            else:
                return response['balance']
        else:
            return -9001

    def login(self):
        data = {'method': 'login', 'username': self.username, 'password': self.password, 'appid': self.appid,
                'appkey': self.appkey}
        response = self.request(data)
        if (response):
            if (response['ret'] and response['ret'] < 0):
                return response['ret']
            else:
                return response['uid']
        else:
            return -9001

    def upload(self, filename, codetype, timeout):
        data = {'method': 'upload', 'username': self.username, 'password': self.password, 'appid': self.appid,
                'appkey': self.appkey, 'codetype': str(codetype), 'timeout': str(timeout)}
        file = {'file': filename}
        response = self.request(data, file)
        if (response):
            if (response['ret'] and response['ret'] < 0):
                return response['ret']
            else:
                return response['cid']
        else:
            return -9001

    def result(self, cid):
        data = {'method': 'result', 'username': self.username, 'password': self.password, 'appid': self.appid,
                'appkey': self.appkey, 'cid': str(cid)}
        response = self.request(data)
        return response and response['text'] or ''

    def decode(self, filename, codetype, timeout):
        cid = self.upload(filename, codetype, timeout)
        if (cid > 0):
            for i in range(0, timeout):
                result = self.result(cid)
                if (result != ''):
                    return cid, result
                else:
                    time.sleep(1)
            return -3003, ''
        else:
            return cid, ''

    def report(self, cid):
        data = {'method': 'report', 'username': self.username, 'password': self.password, 'appid': self.appid,
                'appkey': self.appkey, 'cid': str(cid), 'flag': '0'}
        response = self.request(data)
        if (response):
            return response['ret']
        else:
            return -9001

    def post_url(self, url, fields, files=[]):
        for key in files:
            files[key] = open(files[key], 'rb');
        res = requests.post(url, files=files, data=fields)
        return res.text


def getCode(username,pwd,codePath,codeType):
    # 用户名(普通用户)
    username = username
    # 密码
    password = pwd
    # 软件ID,开发者分成必要参数。登录开发者后台【我的软件】获得!
    appid =9406
    # 软件密钥,开发者分成必要参数。登录开发者后台【我的软件】获得!
    appkey = '4b671243618fff6a87ebbe33446d09e3'
    # 图片文件
    filename = codePath
    # 验证码类型,# 例:1004表示4位字母数字,不同类型收费不同。请准确填写,否则影响识别率。在此查询所有类型 http://www.yundama.com/price.html
    codetype = codeType
    # 超时时间,秒
    timeout = 80

    result=None
    # 检查
    if (username == 'username'):
        print('请设置好相关参数再测试')
    else:
        # 初始化
        yundama = YDMHttp(username, password, appid, appkey)

        # 登陆云打码
        uid = yundama.login();
        print('uid: %s' % uid)

        # 查询余额
        balance = yundama.balance();
        print('balance: %s' % balance)

        # 开始识别,图片路径,验证码类型ID,超时时间(秒),识别结果
        cid, result = yundama.decode(filename, codetype, timeout);
        print('cid: %s, result: %s' % (cid, result))
    return  result


# 模拟登录

url="http://www.renren.com/"
headers={
        'User-Agent':'Mozilla/5.0 (Windows NT 10.0; WOW64) AppleWebKit/537.36 (KHTML, like Gecko) Chrome/74.0.3729.169 Safari/537.36'
    }
ret=requests.get(url=url,headers=headers).text
terr=etree.HTML(ret)
code_img_url=terr.xpath("//*[@id='verifyPic_login']/@src")[0]    #  获取验证码
urllib.request.urlretrieve(url=code_img_url,filename="code.jpg")


# 识别验证码中的数据值  显示去识别
code_data=getCode("supreme9999","@_XJQ1995110","./code.jpg",2004)
print(code_data)


# 获取登录发送的数据
login_url="http://www.renren.com/ajaxLogin/login?1=1&uniqueTimestamp=2019100151870"
data={"email":"17380117935",
    "icode"    :code_data,
    "origURL":"http://www.renren.com/home",
    "domain":"renren.com",
    "key_id    ":1,
    "captcha_type":"web_login",
    "password":"7f68692e5e69afa1ba418b799ec63a0a",
    "rkey":"7f68692e5e69afa1ba418b799ec63a0a",
    "f":"http%3A%2F%2Fwww.renren.com%2F972764841%2Fprofile",
}
headers = {
              'user-agent': 'Mozilla/5.0 (Windows NT 6.1; Win64; x64) AppleWebKit/537.36 (KHTML, like Gecko) Chrome/63.0.3239.132 Safari/537.36'
          }


# requests登录 请求发送成功后cookies不会存储到requests中
# get_cont=requests.post(url=login_url,data=data,headers=headers)

# 该次请求登录会 产生的cookies 会被自动存储到session对象中  (注意只有登录成功后才会产生session)
session.post(url=login_url,data=data,headers=headers)


urls="http://www.renren.com/972764841/profile"  #登录成功后跳转到主页
pag_text=session.get(url=urls,headers=headers).text

with open("ren.html","w",encoding="utf-8") as f:
    f.write(pag_text)

模拟登录古诗文网
# http://www.yundama.com/   云打码
# Superme888888@outlook.com
# supreme9999
# @_XJQ1995110
# 17380117935

import http.client, mimetypes, urllib, json, time

import requests
from  lxml import etree
# 获取session对象


# 获取古诗文网
######################################################################
class YDMHttp:
    apiurl = 'http://api.yundama.com/api.php'
    username = ''
    password = ''
    appid = ''
    appkey = ''

    def __init__(self, username, password, appid, appkey):
        self.username = username
        self.password = password
        self.appid = str(appid)
        self.appkey = appkey

    def request(self, fields, files=[]):
        response = self.post_url(self.apiurl, fields, files)
        response = json.loads(response)
        return response

    def balance(self):
        data = {'method': 'balance', 'username': self.username, 'password': self.password, 'appid': self.appid,
                'appkey': self.appkey}
        response = self.request(data)
        if (response):
            if (response['ret'] and response['ret'] < 0):
                return response['ret']
            else:
                return response['balance']
        else:
            return -9001

    def login(self):
        data = {'method': 'login', 'username': self.username, 'password': self.password, 'appid': self.appid,
                'appkey': self.appkey}
        response = self.request(data)
        if (response):
            if (response['ret'] and response['ret'] < 0):
                return response['ret']
            else:
                return response['uid']
        else:
            return -9001

    def upload(self, filename, codetype, timeout):
        data = {'method': 'upload', 'username': self.username, 'password': self.password, 'appid': self.appid,
                'appkey': self.appkey, 'codetype': str(codetype), 'timeout': str(timeout)}
        file = {'file': filename}
        response = self.request(data, file)
        if (response):
            if (response['ret'] and response['ret'] < 0):
                return response['ret']
            else:
                return response['cid']
        else:
            return -9001

    def result(self, cid):
        data = {'method': 'result', 'username': self.username, 'password': self.password, 'appid': self.appid,
                'appkey': self.appkey, 'cid': str(cid)}
        response = self.request(data)
        return response and response['text'] or ''

    def decode(self, filename, codetype, timeout):
        cid = self.upload(filename, codetype, timeout)
        if (cid > 0):
            for i in range(0, timeout):
                result = self.result(cid)
                if (result != ''):
                    return cid, result
                else:
                    time.sleep(1)
            return -3003, ''
        else:
            return cid, ''

    def report(self, cid):
        data = {'method': 'report', 'username': self.username, 'password': self.password, 'appid': self.appid,
                'appkey': self.appkey, 'cid': str(cid), 'flag': '0'}
        response = self.request(data)
        if (response):
            return response['ret']
        else:
            return -9001

    def post_url(self, url, fields, files=[]):
        for key in files:
            files[key] = open(files[key], 'rb');
        res = requests.post(url, files=files, data=fields)
        return res.text


def getCode(username,pwd,codePath,codeType):
    # 用户名(普通用户)
    username = username
    # 密码
    password = pwd
    # 软件ID,开发者分成必要参数。登录开发者后台【我的软件】获得!
    appid =9406
    # 软件密钥,开发者分成必要参数。登录开发者后台【我的软件】获得!
    appkey = '4b671243618fff6a87ebbe33446d09e3'
    # 图片文件
    filename = codePath
    # 验证码类型,# 例:1004表示4位字母数字,不同类型收费不同。请准确填写,否则影响识别率。在此查询所有类型 http://www.yundama.com/price.html
    codetype = codeType
    # 超时时间,秒
    timeout = 80

    result=None
    # 检查
    if (username == 'username'):
        print('请设置好相关参数再测试')
    else:
        # 初始化
        yundama = YDMHttp(username, password, appid, appkey)

        # 登陆云打码
        uid = yundama.login();
        print('uid: %s' % uid)

        # 查询余额
        balance = yundama.balance();
        print('balance: %s' % balance)

        # 开始识别,图片路径,验证码类型ID,超时时间(秒),识别结果
        cid, result = yundama.decode(filename, codetype, timeout);
        print('cid: %s, result: %s' % (cid, result))
    return  result


# 获取验证码
s =requests.Session()
url="https://so.gushiwen.org/user/login.aspx?from=http://so.gushiwen.org/user/collect.aspx"
headers={
        'User-Agent':'Mozilla/5.0 (Windows NT 10.0; WOW64) AppleWebKit/537.36 (KHTML, like Gecko) Chrome/74.0.3729.169 Safari/537.36'
    }
ret=requests.get(url=url,headers=headers).text
terr=etree.HTML(ret)

img_src='https://so.gushiwen.org'+terr.xpath("//*[@id='imgCode']/@src")[0]
print(img_src)


img_data=s.get(url=img_src,headers=headers).content

with open("./cc.jpg","wb") as f:
    f.write(img_data)
img_text=getCode("Superme888888@outlook.com"," @_XJQ1995110","./cc.jpg",1004)

print(img_text)


# 模拟登录
url="https://so.gushiwen.org/user/login.aspx?from=http%3a%2f%2fso.gushiwen.org%2fuser%2fcollect.aspx "
date={ "__VIEWSTATE":"DmBrtFoRGX4MZ4I+urA1bNT3UpnZRkyA7O/9XO1azxff3G35mKDbCmAunAB+TZAZF6HpQunWGe82fhPXwgs/DVfRY9h/LBljRx97fxgOE7+AkMu12yNZsyIZs1I=",   # 这个可以去页面获取它是隐藏了的
        "__VIEWSTATEGENERATOR":"C93BE1AE",
        "from":"http://so.gushiwen.org/user/collect.aspx",
        "email":"Superme888888@outlook.com",
        "pwd":"@_XJQ1995110",
        "code":"f0r5",
        "denglu":"登录",
}


tesrs=s.post(url=url,headers=headers,data=date).text


with open("./aa.html","w",encoding="utf-8") as f:
     f.write(tesrs)

6.爬取图片(懒加载)
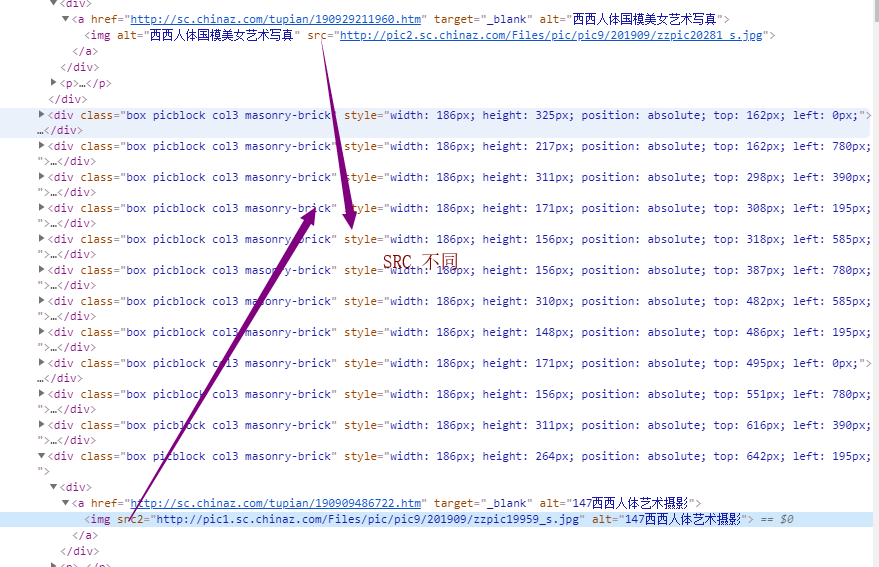
# 在网页源码中在img标签中首先会使用一个 伪类属性(通常会使用src2, originai...)
# 去存放正真的图片连接 并非直接放在src属性中 当图片出现在可视化区域中会动态将伪属性 替换成src属性 完成懒加载
url="http://sc.chinaz.com/tupian/xixirenti.html"
import requests
from  lxml import etree
headers = {
              'user-agent': 'Mozilla/5.0 (Windows NT 6.1; Win64; x64) AppleWebKit/537.36 (KHTML, like Gecko) Chrome/63.0.3239.132 Safari/537.36'
          }


ret=requests.get(url=url,headers=headers)
ret.encoding="utf-8"
tests=ret.text
tree=etree.HTML(tests)

div_list=tree.xpath("//div[@id='container']/div")

for div in div_list:
    img_url=div.xpath(".//img/@src")
    print(img_url)
    img_name= div.xpath(".//img/@alt")
    print(img_name)
# 爬取到的图片为空
url="http://sc.chinaz.com/tupian/xixirenti.html"
import requests
from  lxml import etree
headers = {
              'user-agent': 'Mozilla/5.0 (Windows NT 6.1; Win64; x64) AppleWebKit/537.36 (KHTML, like Gecko) Chrome/63.0.3239.132 Safari/537.36'
          }

ret=requests.get(url=url,headers=headers)
ret.encoding="utf-8"
tests=ret.text

tree=etree.HTML(tests)
div_list=tree.xpath("//div[@id='container']/div")
for div in div_list:
    a_url = div.xpath(".//a/@href")
    print(a_url)
    img_url=div.xpath(".//img/@src2")
    print(img_url)
    img_name= div.xpath(".//img/@alt")
    print(img_name)
import requests
import time
from lxml import etree  # xpath解析

# 定义站长素材图片的存储路径, 文件夹需要先创建好
IMAGE_PATH = 'img/'


def spider_image(page):
    if page == 1:
        url = 'http://sc.chinaz.com/tupian/'
    else:
        url = 'http://sc.chinaz.com/tupian/index_%s.html' % page
    # 定制请求头信息
    headers = {
        "User-Agent": "Mozilla/5.0 (Windows NT 10.0; Win64; x64) AppleWebKit/537.36 (KHTML, like Gecko)"
                      "Chrome/74.0.3729.108 Safari/537.36",
    }

    # 对页面发起请求
    response = requests.get(url=url, headers=headers)
    # 需要对响应的页面进行编码, 否则拿到的会是乱码的数据
    response.encoding = 'utf-8'

    # 解析数据,获取图片的img标签
    tree = etree.HTML(response.text)
    img_list = tree.xpath('//div[@id="container"]/div/div/a/img')

    # 循环遍历所有img标签
    for img in img_list:
        # 拿取图片标题
        title = img.xpath('./@alt')[0]

        """
        此处拿的src是懒加载时的图片路径,当使用get请求页面拿取到的时页面的源码,此时
        还没有动态加载页面,所以src还是懒加载的,只需要拿取懒加载的src2即可
        """
        src = img.xpath('./@src2')[0]

        # 访问图片页面
        res = requests.get(url=src, headers=headers)
        # 图片必须以二进制流来写入
        with open(IMAGE_PATH + '%s.jpg' % title, 'wb') as f:
            f.write(res.content)


if __name__ == '__main__':
    # 循环爬取指定页码的图片
    start_time = time.time()
    for i in range(1, 3):
        spider_image(i)
        time.sleep(2)
    end_time = time.time()
    print("总耗时:%s" % (end_time - start_time))