写项目遇到了一个裁剪图片的功能,然后对裁剪的图片进行打印,记录一下裁剪的思路和方法。
第一步,安装cropperjs插件:
yarn install cropperjs
下载 npm install vue-cropper --save
安装npm install vue-cropper
第二步:对裁剪进行样式布局:
<button type="primary" @click="openBtn()"/> //开始裁剪按钮
<img src="../assets/images/search/close.png" @click="cancelBtn()"/> //取消裁剪按钮
<img  src="../assets/images/search/sure.png" @click="determineBtn()"/>   //确定裁剪按钮


<div class="Tailoring" id="printTest">
<img style=" 100%;height: 100%;" :src="cropImg" alt="图片">  //裁剪后的图片
</div>
第三步:对js进行配置属性
data(){
return{
 option: {
        img: '', // 裁剪图片的地址
        info: true, // 裁剪框的大小信息
        outputSize: 0.8, // 裁剪生成图片的质量
        outputType: 'jpeg', // 裁剪生成图片的格式
        canScale: false, // 图片是否允许滚轮缩放
        autoCrop: false, // 是否默认生成截图框
        // autoCropWidth: 300, // 默认生成截图框宽度
        // autoCropHeight: 200, // 默认生成截图框高度
        fixedBox: false, // 固定截图框大小 不允许改变
        fixed: false, // 是否开启截图框宽高固定比例
        //fixedNumber: [7, 5], // 截图框的宽高比例
        full: true, // 是否输出原图比例的截图
        canMoveBox: true, // 截图框能否拖动
        original: false, // 上传图片按照原始比例渲染
        centerBox: false, // 截图框是否被限制在图片里面
        infoTrue: true // true 为展示真实输出图片宽高 false 展示看到的截图框宽高
      },
      cropImg: null,
}
第四步,写回执图片,开始裁剪,取消裁剪,以及确定裁剪的点击事件:
//绘制图片
  drawImg(href) {
      this.$nextTick(() => {
        let canvas = document.getElementById('cropper')
        if (canvas) {
          canvas.width = 720
          canvas.height = 480
          let ctx = canvas.getContext('2d')
          ctx.clearRect(0, 0, canvas.width, canvas.height)
          let img = new Image()
          img.crossOrigin = 'Anonymous'
          img.src = href || cropper
          img.onload = function () {
            ctx.drawImage(img, 0, 0, canvas.width, canvas.height)
          }
        }
      })
    },
//开始裁剪点击事件
openBtn(){
 this.option.autoCrop = true;    //显示裁剪框
 this.$refs.cropper.refresh();
}
//取消裁剪点击事件
  cancelBtn() {
      this.$refs.cropper.clearCrop();  //清除截图
      this.cropImg = "";               //清空截图看图片
    },
//确定裁剪点击事件
 determineBtn() {
      let _this = this
      this.$refs.cropper.getCropBlob(data => {
        var href = window.URL.createObjectURL(data);this.cropImg = href;
      })
      console.log(href);
      this.cancelCropper()
    },
裁剪有几种方法,我用的是其中的一种,具体的可以查看:https://my729.github.io/picture-crop-demo/dist/index.html。
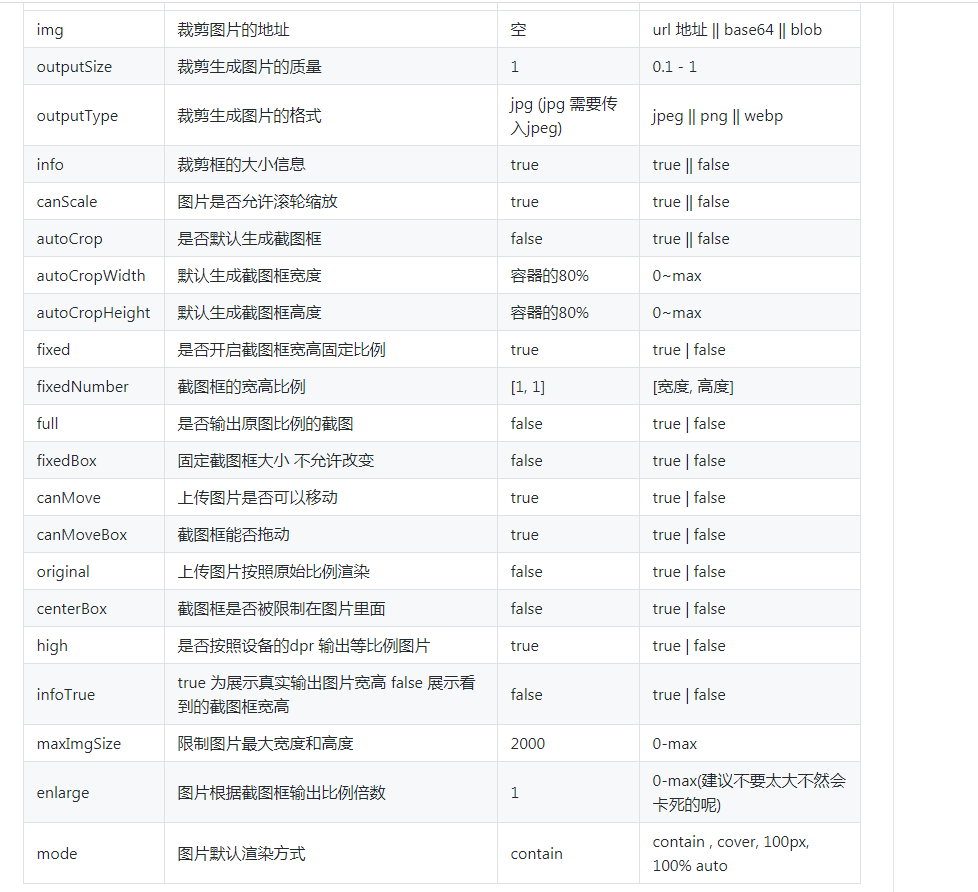
对弈裁剪的一些配置, 我只是针对我写的功能的需要做了一些配置,具体的配置有:
以及内置方法的调用:
this.$refs.cropper.startCrop() 开始截图
this.$refs.cropper.stopCrop() 停止截图
this.$refs.cropper.clearCrop() 清除截图
this.$refs.cropper.changeScale() 修改图片大小 正数为变大 负数变小
this.$refs.cropper.getImgAxis() 获取图片基于容器的坐标点
this.$refs.cropper.getCropAxis() 获取截图框基于容器的坐标点
this.$refs.cropper.goAutoCrop 自动生成截图框函数
this.$refs.cropper.rotateRight() 向右边旋转90度
this.$refs.cropper.rotateLeft() 向左边旋转90度
更加详细的配置可以参考官网给的配置:https://github.com/xyxiao001/vue-cropper