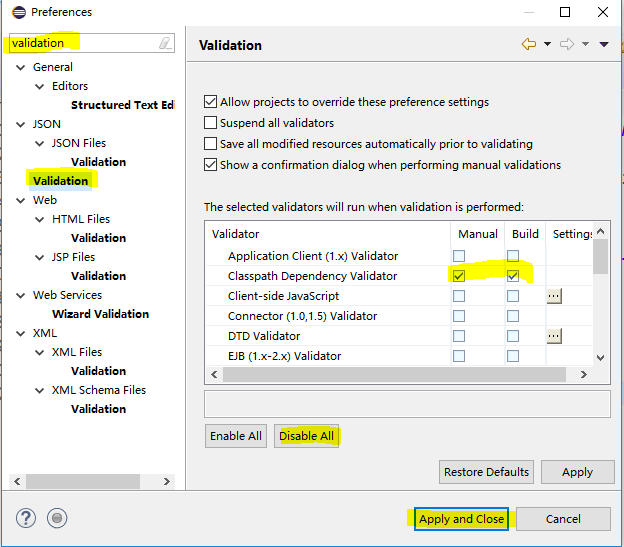
把这里的只勾选这一行,Eclipse启动就快了。也不会有不该报错的报错。
index.jsp
<%@ page language="java" contentType="text/html; charset=UTF-8" pageEncoding="UTF-8" isELIgnored="false"%> <% String basePath = request.getScheme()+"://"+request.getServerName()+":"+request.getServerPort() +request.getContextPath()+"/"; %> <!DOCTYPE html> <html> <head> <base href="<%=basePath %>"> <meta http-equiv="Content-Type" content="text/html; charset=UTF-8"> <title>new jsp</title> </head> <body> <form action="<%=basePath %>logon2.htm" method=post> <label>用户名:</label><input type="text" name="username"><br> <label>密 码:</label><input type="password" name="password"><br> <label>年 龄:</label><input type="text" name="age"><br> <input type="submit" value="提交"> </form> </body> </html>
FrontController.java
package cn.java.controller;

import org.springframework.stereotype.Controller;
import org.springframework.web.bind.annotation.RequestMapping;
import org.springframework.web.bind.annotation.RequestMethod;

@Controller // 在一个普通类上一行加上@Controller就变成了Servlet了,就无需extends继承Servlet了。
public class FrontController {

    @RequestMapping(value="/login.html") //为当前方法配置一个对外访问的虚拟路径,@RequestMapping是springmvc框架特有的,并可以处理get和post请求
    public void Login() {
        System.out.println("登录成功");
    }


    //Servlet只能写一个方法,而用了springmvc可以写多个方法
    @RequestMapping(value= {"/register.htm","abc.html","hello.html"})  //可以配置很多个虚拟路径
    public void Register() {
        System.out.println("注册成功");
    }

    @RequestMapping(value= "/logon.htm")
    public void Logon(String username,String password) { //在进入地址http://localhost:8080/springMVC/logon.html?username=wang&password=123后得到的结果直接把username的值和password的值传到方法里去了,而Servlet是要用request来取值的,springmvc简单了很多
        System.out.println("用户名为" + username);
        System.out.println("密码为" + password);
    }

    @RequestMapping(value= "/logon2.htm",method=RequestMethod.POST)
    public String Logon2(User u) { //在进入地址http://localhost:8080/springMVC/logon2.html?username=wang&password=123后得到的结果直接把username的值和password的值传到类名为User中去了,User类中写好了username和password两个属性,还有setter getter方法,可以直接传进User对象中去,并且可以转好类型
        System.out.println(u);
        return "/success.jsp";
    }
}
方法执行完跳转到其他页面:return "/success.jsp";
如果想用post传输方法,就在@RequestMapping里用method=RequestMethod.POST
这样就只支持post而不支持get了
web.xml
<?xml version="1.0" encoding="UTF-8"?>
<web-app xmlns:xsi="http://www.w3.org/2001/XMLSchema-instance"
xmlns="http://java.sun.com/xml/ns/javaee"
xsi:schemaLocation="
http://java.sun.com/xml/ns/javaee
http://java.sun.com/xml/ns/javaee/web-app_3_0.xsd"
id="WebApp_ID"
version="3.0">
  <display-name>springMVC</display-name>
  <welcome-file-list>
    <welcome-file>index.html</welcome-file>
    <welcome-file>index.htm</welcome-file>
    <welcome-file>index.jsp</welcome-file>
    <welcome-file>default.html</welcome-file>
    <welcome-file>default.htm</welcome-file>
    <welcome-file>default.jsp</welcome-file>
  </welcome-file-list>

  <!-- 配置springMVC的核心控制器类:DispatcherServlet -->
  <servlet>
      <servlet-name>dispatcherServlet</servlet-name>
      <!-- 按住ctrl + shift + H 输入DispatcherServlet,ok后在文件右键复制路径,粘贴到下面 -->
      <servlet-class>org.springframework.web.servlet.DispatcherServlet</servlet-class>
      <!-- 将DispatcherServlet和springmvc.xml文件关联起来 -->
      <init-param>
          <param-name>contextConfigLocation</param-name>
          <!-- param-value:给springmvc起一个文件名,固定写法,不能改 -->
          <param-value>classpath:springmvc.xml</param-value>
      </init-param>
  </servlet>

  <servlet-mapping>
      <servlet-name>dispatcherServlet</servlet-name>
      <!-- /*代表全部都拦截,/代表当前项目,*代表所有的,  如果是*.htm,那就拦截所有htm文件 -->
      <url-pattern>*.htm</url-pattern>
  </servlet-mapping>
</web-app>