直接安装:
https://github.com/IntelRealSense/librealsense/blob/master/doc/distribution_linux.md#installing-the-packages
sudo apt-key adv --keyserver keys.gnupg.net --recv-key F6E65AC044F831AC80A06380C8B3A55A6F3EFCDE || sudo apt-key adv --keyserver hkp://keyserver.ubuntu.com:80 --recv-key
Ubuntu 16 LTS:
sudo add-apt-repository "deb http://realsense-hw-public.s3.amazonaws.com/Debian/apt-repo xenial main" -u
Ubuntu 18 LTS:
sudo add-apt-repository "deb http://realsense-hw-public.s3.amazonaws.com/Debian/apt-repo bionic main" -u
sudo apt-get install librealsense2-dkms
sudo apt-get install librealsense2-utils
sudo apt-get install librealsense2-dev
sudo apt-get install librealsense2-dbg
一、SDK安装
https://github.com/IntelRealSense/librealsense/blob/master/doc/installation.md
1、更新Ubuntu发行版,包括获取最新的稳定内核:
sudo apt-get update && sudo apt-get upgrade && sudo apt-get dist-upgrade
2、下载source
git clone https://github.com/IntelRealSense/librealsense.git
cd librealsense3、安装依赖项(此时不能插realsense)
sudo apt-get install git libssl-dev libusb-1.0-0-dev pkg-config libgtk-3-dev
####Ubuntu16.04 :
sudo apt-get install libglfw3-dev
4、运行位于librealsense根目录的英特尔Realsense权限脚本:
./scripts/setup_udev_rules.sh
5、Build and apply patched kernel modules
./scripts/patch-realsense-ubuntu-lts.sh
6、通过检查生成的日志以及内核日志中的最新条目来检查修补模块的安装:
sudo dmesg | tail -n 507、基于cmake的编译
mkdir build
cd build
cmake ../ -DBUILD_EXAMPLES=true
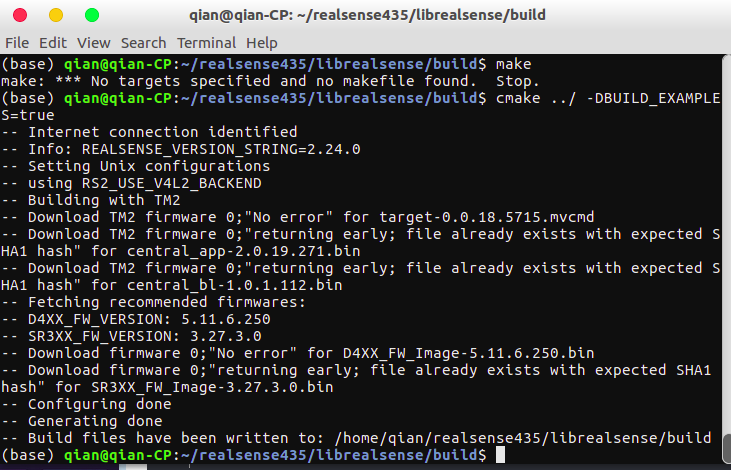
说明创建成功
####重新编译并安装librealsense二进制文件:
sudo make uninstall && make clean && make && sudo make install
8、测试安装SDK是否成功
把摄像头插上USB3.0的口上,并运行:
realsense-viewer
二、ROS环境配置(参考:https://github.com/intel-ros/realsense)
1、Create a catkin workspace
mkdir -p ~/catkin_ws/src
cd ~/catkin_ws/src/
2、Clone the latest Intel® RealSense™ ROS from here into 'catkin_ws/src/'
git clone https://github.com/IntelRealSense/realsense-ros.git
cd realsense-ros/
git checkout `git tag | sort -V | grep -P "^d+.d+.d+" | tail -1`
cd ..
3、
- Make sure all dependent packages are installed. You can check .travis.yml file for reference.
- Specifically, make sure that the ros package ddynamic_reconfigure is installed. If ddynamic_reconfigure cannot be installed using APT, you may clone it into your workspace 'catkin_ws/src/' from here (Version 0.2.0)
catkin_init_workspace
cd ..
catkin_make clean
catkin_make -DCATKIN_ENABLE_TESTING=False -DCMAKE_BUILD_TYPE=Release
catkin_make install
echo "source ~/catkin_ws/devel/setup.bash" >> ~/.bashrc
source ~/.bashrc
4.1、To start the camera node in ROS:
roslaunch realsense2_camera rs_camera.launch
This will stream all camera sensors and publish on the appropriate ROS topics.
Other stream resolutions and frame rates can optionally be provided as parameters to the 'rs_camera.launch' file.
The "/camera" prefix is the default and can be changed. Check the rs_multiple_devices.launch file for an example. If using D435 or D415, the gyro and accel topics wont be available. Likewise, other topics will be available when using T265 (see below).
4.3、Launch parameters
参考:https://github.com/intel-ros/realsense
4.4、RGBD Point Cloud
Here is an example of how to start the camera node and make it publish the RGBD point cloud using aligned depth topic.
roslaunch realsense2_camera rs_camera.launch filters:=pointcloud
Then open rviz to watch the pointcloud:
rs-enumerate-devices | grep Serial