Spring配置
查看配置文件中的标签:
可以看到常用的就只有四个标签!
1、别名(alias)
如果添加了别名,我们也可以使用别名获取到这个对象
<alias name="user" alias="userNew"/>
2、Bean的配置
-
id:bean的唯一标识符,也就是相当于我们学的对象名
-
class:bean 对象对应的全限定名:包名 + 类型
-
name:也是别名,而且可以提示去多个别名
<bean id="user" class="com.star.pojo.User" name="user2 u2,u3;u4">
    <property name="name" value="zhangsan"/>
</bean>
3、import
将多个配置文件导入,合并为一个
比如一个项目中有多人开发,这三个人负责不同的类开发,不同的类需要注册再在不同的bean中,我们就可以利用import将所有人的beans.xml合并为一个总的!
<import resource="beans.xml"/>
<import resource="beans2.xml"/>
<import resource="beans3.xml"/>
使用的时候直接使用总的配置!
依赖注入
1、构造器注入
上一篇中IOC创建对象的方式已经说过;
2、Set方式注入
- 依赖注入:Set注入!
- 依赖:bean对象的创建依赖于容器!
- 注入:bean对象中的所有属性,由容器来注入!
我们来编写个中数据类型的注入
1、编写实体类
package com.star.pojo;

import lombok.Setter;
import lombok.ToString;

import java.util.*;

//导入lombok.jar包
@Setter
@toString
public class Student {

    private String name;
    private Address address;//对象
    private String[] books;//数组
    private List<String> hobbys;//list
    private Map<String,String> card;//map
    private Set<String> games;//set
    private String wife;//设空值
    private Properties info;//Properties
}
其中Address是对象
package com.star.pojo;

public class Address {
    private String address;

    public String getAddress() {
        return address;
    }

    public void setAddress(String address) {
        this.address = address;
    }
}
2、注入信息applicationContext.xml
<?xml version="1.0" encoding="UTF-8"?>
<beans xmlns="http://www.springframework.org/schema/beans"
       xmlns:xsi="http://www.w3.org/2001/XMLSchema-instance"
       xsi:schemaLocation="http://www.springframework.org/schema/beans
        https://www.springframework.org/schema/beans/spring-beans.xsd">

    <bean id="student" class="com.star.pojo.Student">
        <property name="name" value="陌星"/>

        <property name="address" ref="adr"/>

        <property name="books" >
            <array>
                <value>水浒传</value>
                <value>西游记</value>
                <value>红楼梦</value>
            </array>
        </property>

        <property name="list">
            <list>
                <value>list1</value>
                <value>list2</value>
                <value>list3</value>
            </list>
        </property>

        <property name="map">
            <map>
                <entry key="key1" value="value1"/>
                <entry key="key2" value="value2"/>
                <entry key="key3" value="value3"/>
            </map>
        </property>

        <property name="set">
            <set>
                <value>set1</value>
                <value>set2</value>
                <value>set3</value>
            </set>
        </property>

        <property name="wife">
            <null/>
        </property>

        <property name="info">
            <props>
                <prop key="id">3180</prop>
                <prop key="name">wyx</prop>
                <prop key="sex">boy</prop>
                <prop key="hobby">LOL</prop>
            </props>
        </property>
    </bean>

    <bean id="adr" class="com.star.pojo.Address">
        <property name="address" value="北京"/>
    </bean>

</beans>
3、测试(导入junt.jar包)
    @Test
    public void studentTest(){
        ClassPathXmlApplicationContext context = new ClassPathXmlApplicationContext("applicationContext.xml");
        Student student = (Student) context.getBean("student");
        System.out.println(student.toString());
    }
测试结果:

3、拓展方式注入
我们可以使用p命令空间和c命令空间注入!
配置文件
    <!--p命名空间注入,可以直接注入属性的值:property-->
    <bean id="user" class="com.star.pojo.User" p:name="陌星" p:age="18"/>

    <!--c命名空间注入,通过构造器注入:construct-args-->
    <bean id="user2" class="com.star.pojo.User" c:age="18" c:name="LenStar"/>
测试
@Test
public void test2(){
    ApplicationContext context = new ClassPathXmlApplicationContext("applicationContext.xml");
    User user = context.getBean("user2", User.class);
    System.out.println(user);
}
注意:p命令和c命令空间不能直接使用,需要导入xml约束!
xmlns:c="http://www.springframework.org/schema/c"
xmlns:p="http://www.springframework.org/schema/p"
4、bean的作用域
我们查看bean标签中的scope属性可以看到

有这四种作用域!
prototype:每次创建新对象
<bean id="student" class="com.star.pojo.Student" scope="prototype"/>
测试
    @Test
    public void studentTest(){
        ClassPathXmlApplicationContext context = new ClassPathXmlApplicationContext("applicationContext.xml");
        Student student1 = (Student) context.getBean("student");
        Student student2 = (Student) context.getBean("student");
        System.out.println(student1.hashCode());
        System.out.println(student2.hashCode());
    }
测试结果:
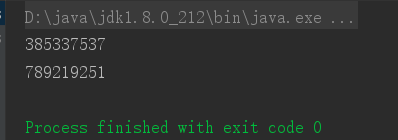
可以看到,hashCode不一样即为两个对象!
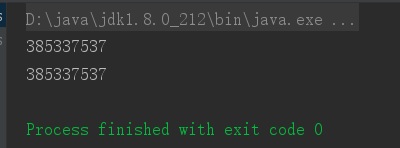
singleton:在容器中只有一个对象(默认)
<bean id="student" class="com.star.pojo.Student" scope="singleton"/>
测试结果:
request/session:在web中使用!