一、Spring Security 简介
1、Spring Security是一个能够为基于Spring的企业应用系统提供声明式的安全访问控制解决方案的安全框架。它提供了一组可以在Spring应用上下文中配置的Bean,充分利用了Spring IoC,DI(控制反转Inversion of Control ,DI:Dependency Injection 依赖注入)和AOP(面向切面编程)功能,为应用系统提供声明式的安全访问控制功能,减少了为企业系统安全控制编写大量重复代码的工作。
2、Spring Security是Spring Resource 社区的一个安全组件, Spring Security为JavaEE 企业级开发提供了全面的安全防护。安全防护是一个不断变化的目标, Spring Security 通过版本不断迭代来实现这一目标 Spring Security 采用“安全层”的念使每一层都尽可能安全,连续的安全层可以达到全面的防护。Spring Security 可以在 Controller 层、 Service 层、 DAO 层等以加注解的方式来保护应用程序的安全。 Spring Security 提供了细粒度的权限控制,可以精细到每一个API 接口、每一个业务的方法或者每一操作数据库的 DAO 层的方法。 Spring Security 提供的是应用程序层的安全解决方案,一个系统的安全还需要考虑传输层和系统层的安全,例如采用 Htpps 协议 服务器部署防火墙等。
3、使用Spring Security有很多原因,其中一个重要原因是它对环境的无依赖性、低代码耦合性。将工程重现部署到一个新的服务器上,不需要为Spring Security做什么工作。Spring Security提供了数十个安全模块,模块与模块间的耦合性低,模块之间可以自由组合来实现特定需求的安全功能。具有较高的可定制性。总而Spring Security具有很好的可复用可定制性。
4、在安全方面有两个主要的领域,认证 ”,即你是谁;授权”,即你拥有什么权限。Spring Security的主要目标就是在这两个领域。“认证是认证主体的过程中,通常是指可以在应用程序中执行操作的用户、设备或其他系统。“授权”是指决定是否允许己认证的主体执行某一项操作。
5、安全框架多种多样那为什么选择Spring Security作为微服务开发的安全框架呢?JavaEE 有另一个优秀的安全框架 Apache Shiro, Apache Shiro在企业级的项目开发中十分受欢迎,一般使用在单体服务中。但在微服务架构中,目前版本 Apache Shiro是无能为力的。Spring Security来自Spring Resource社区采用了注解的方式控制权限。熟悉Spring 开发者很容易上手Spring Security。另外一个原因就是Spring Security易于应用于Spring Boot,也易于集成到采用Spring Cloud 建的微服务系统中。
二、Spring Security提供的安全模块
  1)HTTP BASIC头认证( 基于 IETF RFC的标准)。
  2)HTTP Digest头认证( 基于 IETF RFC 的标准)。
  3)HTTPX.509 客户端证书交换认证( 基于 IETF RFC 标准〉。
  4)LDAP种通用的跨平台身份验证,特别是在大型软件架构中〉。
  5)基于表单的验证。
  6)OpenID 验证。
  7)基于预先建立的请求头的验证。
  8)Jasig Central Authentication Service也被称作 CAS,是一个流行的开源单点登录系统。
  9)远程方法调用(RMI)和 HttpInvoker (Spring远程协议)的认证。
  10)自动“记住我”的身份验证。
  11)匿名验证( 允许每 次未经身份验证的调用)。
  12)Run-as身份验证(每 次调用都需要提供身份标识〉。
  13)Java认证和授权服务。
  14)Java EE容器认证。
  15)Kerberos。
  16)Java开源的单点登录*。
  17)OpenNMS网络管理平台*。
  18)AppFuse*。
  19)AndroMDA*。
  20)MuleESB*。
  21)Direct Web Request(DWR)*。
  22)Grails*。
  23)Tapestry*。
  24)JTrac*。
  25)Jasypt*。
  26)Roller*。
  27)Elastic Path*。
  28)Atlassian Crowd*。
  29)自己创建的认证系统。
官网版:
  1)HTTP BASIC authentication headers (an IETF RFC-based standard)
  2)HTTP Digest authentication headers (an IETF RFC-based standard)
  3)HTTP X.509 client certificate exchange (an IETF RFC-based standard)
  4)LDAP (a very common approach to cross-platform authentication needs, especially in large environments)
  5)Form-based authentication (for simple user interface needs)
  6)OpenID authentication
  7)Authentication based on pre-established request headers (such as Computer Associates Siteminder)
  8)Jasig Central Authentication Service (otherwise known as CAS, which is a popular open source single sign-on system)
  9)Transparent authentication context propagation for Remote Method Invocation (RMI) and HttpInvoker (a Spring remoting protocol)
  10)Automatic "remember-me" authentication (so you can tick a box to avoid re-authentication for a predetermined period of time)
  11)Anonymous authentication (allowing every unauthenticated call to automatically assume a particular security identity)
  12)Run-as authentication (which is useful if one call should proceed with a different security identity)
  13)Java Authentication and Authorization Service (JAAS)
  14)Java EE container authentication (so you can still use Container Managed Authentication if desired)
  15)Kerberos
  16)Java Open Source Single Sign-On (JOSSO) *
  17)OpenNMS Network Management Platform *
  18)AppFuse *
  19)AndroMDA *
  20)Mule ESB *
  21)Direct Web Request (DWR) *
  22)Grails *
  23)Tapestry *
  24)JTrac *
  25)Jasypt *
  26)Roller *
  27)Elastic Path *
  28)Atlassian Crowd *
  29)Your own authentication systems (see below)
三、Spring Boot Security和Spring Security的区别
1、Spring Security的依赖。
    <dependency>
      <groupId>org.springframework.security</groupId>
      <artifactId>spring-security-config</artifactId>
      <version>5.0.3.RELEASE</version>
    </dependency>
    <dependency>
      <groupId>org.springframework.security</groupId>
      <artifactId>spring-security-web</artifactId>
      <version>5.0.3.RELEASE</version>
    </dependency>
2、Spring Boot Security的依赖。
  <dependency>
      <groupId>org.springframework.boot</groupId>
      <artifactId>spring-boot-starter</artifactId>
      <version>2.0.0.RELEASE</version>
    </dependency>
    <dependency>
      <groupId>org.springframework</groupId>
      <artifactId>spring-aop</artifactId>
      <version>5.0.4.RELEASE</version>
    </dependency>
    <dependency>
      <groupId>org.springframework.security</groupId>
      <artifactId>spring-security-config</artifactId>
      <version>5.0.3.RELEASE</version>
    </dependency>
    <dependency>
      <groupId>org.springframework.security</groupId>
      <artifactId>spring-security-web</artifactId>
      <version>5.0.3.RELEASE</version>
    </dependency>
3、总结:所以说重依赖上来看,Spring Boot Security只是对Spring Security的封装而已,仅此而已。其中注意加入了aop和spring boot的起步依赖。
四、案例.
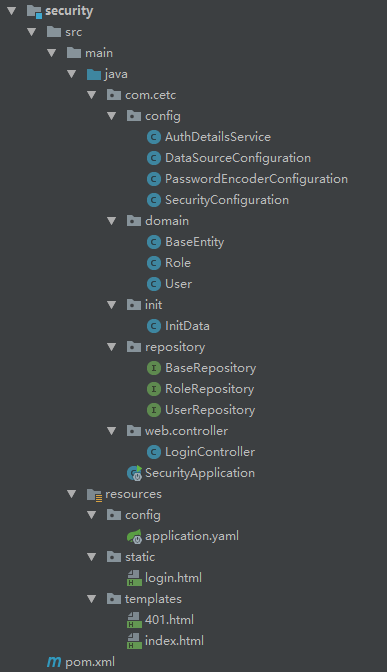
1、目录结构
2、依赖
     <dependency>
            <groupId>org.springframework.boot</groupId>
            <artifactId>spring-boot-starter-web</artifactId>
        </dependency>
        <dependency>
            <groupId>org.springframework.boot</groupId>
            <artifactId>spring-boot-starter-security</artifactId>
        </dependency>
        <dependency>
            <groupId>org.springframework.boot</groupId>
            <artifactId>spring-boot-starter-thymeleaf</artifactId>
        </dependency>
        <dependency>
            <groupId>org.thymeleaf.extras</groupId>
            <artifactId>thymeleaf-extras-springsecurity4</artifactId>
        </dependency>
        <dependency>
            <groupId>org.springframework.boot</groupId>
            <artifactId>spring-boot-starter-data-jpa</artifactId>
        </dependency>
        <dependency>
            <groupId>mysql</groupId>
            <artifactId>mysql-connector-java</artifactId>
        </dependency>
3、application.yaml配置
server:
  port: 8693
spring:
  application:
    name: security
  thymeleaf:
    encoding: UTF-8
    mode: HTML5
    cache: false
  datasource:
    driver-class-name: com.mysql.jdbc.Driver
    url: jdbc:mysql://127.0.0.1/security?useUnicode=true&characterEncoding=utf-8
    username: root
    password: root
  jpa:
    hibernate:
      ddl-auto: update
      naming:
        physical-strategy: org.springframework.boot.orm.jpa.hibernate.SpringPhysicalNamingStrategy
        implicit-strategy: org.springframework.boot.orm.jpa.hibernate.SpringImplicitNamingStrategy
    show-sql: true
    database: mysql
    database-platform: org.hibernate.dialect.MySQL5InnoDBDialect
4、第一部分,配置部分config
package com.cetc.config;

import org.springframework.beans.factory.annotation.Autowired;
import org.springframework.context.annotation.Configuration;
import org.springframework.security.config.annotation.authentication.builders.AuthenticationManagerBuilder;
import org.springframework.security.config.annotation.method.configuration.EnableGlobalMethodSecurity;
import org.springframework.security.config.annotation.web.builders.HttpSecurity;
import org.springframework.security.config.annotation.web.configuration.EnableWebSecurity;
import org.springframework.security.config.annotation.web.configuration.WebSecurityConfigurerAdapter;
import org.springframework.security.crypto.password.PasswordEncoder;

@Configuration
@EnableWebSecurity
//开启注解的使用
@EnableGlobalMethodSecurity(prePostEnabled = true, securedEnabled = true)
public class SecurityConfiguration extends WebSecurityConfigurerAdapter {

    //认证过程
    @Autowired
    private AuthDetailsService authDetailsService;

    //加密方式,可以使用默认,或者其他方式
    @Autowired
    private PasswordEncoder passwordEncoder;

    @Override
    protected void configure(AuthenticationManagerBuilder auth) throws Exception {
//        在内存中进行认证
//        auth.inMemoryAuthentication().withUser("admin").password(passwordEncoder.encode("admin")).authorities("ADMIN");
//        auth.inMemoryAuthentication().withUser("user").password(passwordEncoder.encode("user")).authorities("USER");
        auth.userDetailsService(authDetailsService).passwordEncoder(passwordEncoder);
    }

    @Override
    protected void configure(HttpSecurity http) throws Exception {
        http
            .csrf().disable()
            .authorizeRequests()
            .antMatchers("/login.html").permitAll()
//           注意如果是使用数据库时,数据库一定要使用ROLE_作为前缀。具体验证参考SecurityContextHolderAwareRequestFilter
//           .antMatchers("/").hasRole("ADMIN")
            //这里使用认证的方式,是和数据库一样的管理方式。
            .antMatchers("/").hasAuthority("ADMIN")
            .anyRequest().authenticated()
        .and()
            .formLogin()
            .loginPage("/login.html")
            .loginProcessingUrl("/login")
            .defaultSuccessUrl("/")
        .and()
            .exceptionHandling().accessDeniedPage("/no-permission")
        .and()
            .logout()
            .logoutSuccessUrl("/")
            .deleteCookies("JSESSIONID")
        .and()
            .httpBasic().disable();
    }
}
说明:SecurityContextHolderAwareRequestFilter用户过滤用户角色的Filter,部分参数如下:

package com.cetc.config;

import com.cetc.domain.User;
import com.cetc.repository.UserRepository;
import org.springframework.beans.factory.annotation.Autowired;
import org.springframework.security.core.authority.SimpleGrantedAuthority;
import org.springframework.security.core.userdetails.UserDetails;
import org.springframework.security.core.userdetails.UserDetailsService;
import org.springframework.security.core.userdetails.UsernameNotFoundException;
import org.springframework.stereotype.Service;
import org.springframework.transaction.annotation.Transactional;
import org.springframework.util.CollectionUtils;

import java.util.ArrayList;
import java.util.List;

@Service
@Transactional
public class AuthDetailsService implements UserDetailsService {

    @Autowired
    private UserRepository userRepository;

    @Override
    public UserDetails loadUserByUsername(String username) throws UsernameNotFoundException {
        User user = userRepository.findByUsername(username);
        if (user == null) {
            //注意这里是不能报出来的,由于DaoAuthenticationProvider中的hideUserNotFoundExceptions为true
            throw new UsernameNotFoundException("用户不存在");
        }
        List<SimpleGrantedAuthority> authorities = new ArrayList<>();
        if (!CollectionUtils.isEmpty(user.getRoles())) {
            user.getRoles().forEach(role -> {
                SimpleGrantedAuthority authority = new SimpleGrantedAuthority(role.getRoleType());
                authorities.add(authority);
            });
        }
        return new org.springframework.security.core.userdetails.User(user.getUsername(), user.getPassword(), authorities);
    }
}
package com.cetc.config;

import org.springframework.context.annotation.Bean;
import org.springframework.context.annotation.Configuration;
import org.springframework.security.crypto.bcrypt.BCryptPasswordEncoder;
import org.springframework.security.crypto.password.PasswordEncoder;

@Configuration
public class PasswordEncoderConfiguration {

    @Bean
    public PasswordEncoder passwordEncoder() {
        return new BCryptPasswordEncoder();
    }
}
数据库的配置:
package com.cetc.config;

import org.springframework.boot.autoconfigure.domain.EntityScan;
import org.springframework.context.annotation.Configuration;
import org.springframework.data.jpa.repository.config.EnableJpaAuditing;
import org.springframework.data.jpa.repository.config.EnableJpaRepositories;
import org.springframework.transaction.annotation.EnableTransactionManagement;

@Configuration
@EntityScan(basePackages = {"com.cetc.domain"}) //指定实体扫描路径
@EnableJpaRepositories(basePackages = {"com.cetc.repository"}) //指定repository扫描路径
@EnableJpaAuditing //开启jpa的审计功能BaseEntity中的@CreatedDate/@LastModifiedDate等
@EnableTransactionManagement //开启事务
public class DataSourceConfiguration {

}
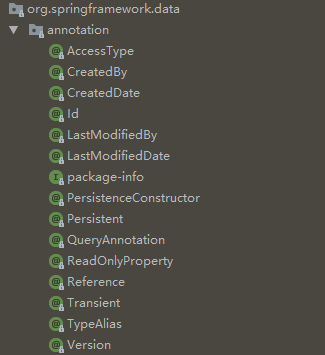
说明:@EnableJpaAuditing主要是是一下注解起作用,记住配合@EntityListeners(AuditingEntityListener.class)使用。
5、第二部分实体domain
package com.cetc.domain;

import org.springframework.data.annotation.CreatedDate;
import org.springframework.data.annotation.LastModifiedDate;
import org.springframework.data.jpa.domain.support.AuditingEntityListener;

import javax.persistence.*;

@MappedSuperclass
//实体回调监听的时候使用,审计回调,加入相关注解的数据
@EntityListeners(AuditingEntityListener.class)
public class BaseEntity {

    @Id
    @GeneratedValue(strategy = GenerationType.AUTO)
    private Long id;

    @CreatedDate
    private Long createDate;

    @LastModifiedDate
    private Long lastUpdateDate;

    public Long getId() {
        return id;
    }

    public void setId(Long id) {
        this.id = id;
    }

    public Long getCreateDate() {
        return createDate;
    }

    public void setCreateDate(Long createDate) {
        this.createDate = createDate;
    }

    public Long getLastUpdateDate() {
        return lastUpdateDate;
    }

    public void setLastUpdateDate(Long lastUpdateDate) {
        this.lastUpdateDate = lastUpdateDate;
    }
}
package com.cetc.domain;

import javax.persistence.*;
import java.util.List;

@Entity
@Table
public class User extends BaseEntity{

    private String username;

    private String password;

    @ManyToMany
    @JoinTable(name = "user_role",
            joinColumns = {@JoinColumn(name = "user_id")},
            inverseJoinColumns = {@JoinColumn(name = "role_id")})
    private List<Role> roles;

    public String getUsername() {
        return username;
    }

    public void setUsername(String username) {
        this.username = username;
    }

    public String getPassword() {
        return password;
    }

    public void setPassword(String password) {
        this.password = password;
    }

    public List<Role> getRoles() {
        return roles;
    }

    public void setRoles(List<Role> roles) {
        this.roles = roles;
    }
}
package com.cetc.domain;

import javax.persistence.Entity;
import javax.persistence.ManyToMany;
import javax.persistence.Table;
import java.util.List;

@Entity
@Table
public class Role extends BaseEntity{

    private String roleName;

    private String roleType;

    @ManyToMany(mappedBy = "roles")
    private List<User> users;

    public String getRoleName() {
        return roleName;
    }

    public void setRoleName(String roleName) {
        this.roleName = roleName;
    }

    public String getRoleType() {
        return roleType;
    }

    public void setRoleType(String roleType) {
        this.roleType = roleType;
    }

    public List<User> getUsers() {
        return users;
    }

    public void setUsers(List<User> users) {
        this.users = users;
    }

}
6、第三部分repository
package com.cetc.repository;


import org.springframework.data.jpa.repository.JpaRepository;
import org.springframework.data.jpa.repository.JpaSpecificationExecutor;
import org.springframework.data.repository.NoRepositoryBean;

@NoRepositoryBean
interface BaseRepository<T, I> extends JpaRepository<T, I>, JpaSpecificationExecutor<T>{

}
package com.cetc.repository;

import com.cetc.domain.User;

public interface UserRepository extends BaseRepository<User, Long>{

    User findByUsername(String username);

}
package com.cetc.repository;

import com.cetc.domain.Role;

public interface RoleRepository extends BaseRepository<Role, Long>{

}
7、第四部分controller
package com.cetc.web.controller;

import org.springframework.stereotype.Controller;
import org.springframework.web.bind.annotation.GetMapping;

@Controller
public class LoginController {

    @GetMapping("/")
    public String index() {
        return "index";
    }

    @GetMapping("/no-permission")
    public String noLogin() {
        return "401";
    }
}
8、第五部分页面部分。
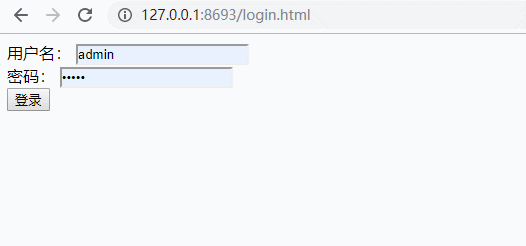
1)login.html
<!DOCTYPE html>
<html lang="en">
<head>
    <meta charset="UTF-8">
    <title>登录</title>
</head>
<body>
    <form action="/login" method="post">
        <div>
            <label>用户名:</label>
            <input type="text" name="username">
        </div>
        <div>
            <label>密码:</label>
            <input type="password" name="password">
        </div>
        <div>
            <input type="submit" value="登录">
        </div>
    </form>
</body>
</html>
2)index.html
<!DOCTYPE html>
<html lang="en">
<head>
    <meta charset="UTF-8">
    <title>主页</title>
</head>
<body>
    <h2>欢迎来到主页!!!</h2>
    <a href="/logout">登出</a>
</body>
</html>
3)401.html
<!DOCTYPE html>
<html lang="en">
<head>
    <meta charset="UTF-8">
    <title>401</title>
</head>
<body>
    <h2>401, 没有权限!!!</h2>
</body>
</html>
五、测试。
六、总结。
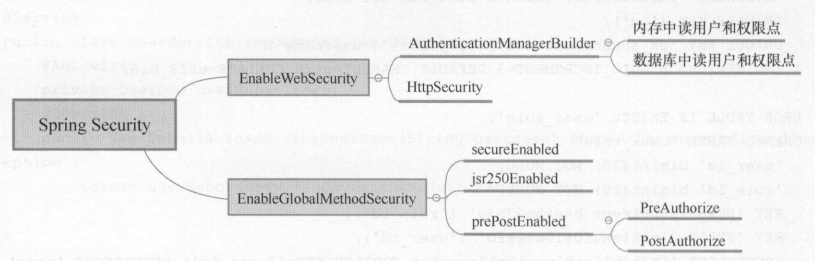
使用Spring Security还是比较简单的,没有想象中那么复杂。首先引入Spring Security的依赖,然后写一个配置类,该配置类继承了WebSecurityConfigurerAdapter并在该配置类上加@EnableWebSecurity注解开启Web Security。再需要AuthenticationManagerBuilder,AuthenticationManagerBuilder配置了读取用户的认证信息的方式,可以从内存中读取,也可以从数据库中读取,或者用其他的方式。其次 ,需要配置HttpSecurity, HttpSecurity配置了请求的认证规则,即哪些 URI 请求需要认证、哪些不需要,以及需要拥有什么权限才能访问,如果需要开启方法级别的安全配置,需要通过在配置类上加EnableGlobalMethodSecurity注解开启 ,方法级别上的安全控制支持secureEnabled、jsr250Enabled、prePostEnabled方式,用的最多的是prePostEnabled。其中prePostEnabled包括PreAuthorize、PostAuthorize两种形式,一般只用到PreAuthorize这种方式。
七、本文涉及的东西非常有限,如果需要了解更多可以参考:
官网:https://docs.spring.io/spring-security/site/docs/5.0.3.RELEASE/reference/htmlsingle/
涉及到的详细配置:https://www.cnblogs.com/ll409546297/p/10267926.html 这里涉及的东西会更多。
八、本文源码地址:https://github.com/lilin409546297/spring-cloud/tree/master/security