这一节写一个JPA的HelloWorld来体验一下。
一、建立工程
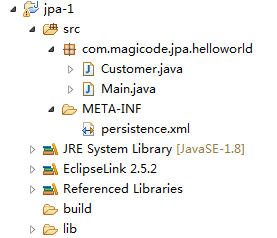
按照 1、创建一个JPA project(解决“at least one user library must be selected”问题)中说的步骤建立一个JPA project。创建过程极其简单,就是 New → JPA project 就可以了。当然,如果在创建的过程中出现了at least one user library must be selected 问题,而user library中又没有选项的时候可以参看第一节后面的解决方案(如果想给动态web工程创建JPA环境也参照这一节)。然后在工程中创建一个lib目录用于放置第三方jar包。工程结构如下:
二、添加必须的jar包
JPA是一个标准,其有很多种实现,如Hibernate,OpenJPA,TopLink等。之前学习过Hibernate,那么就用Hibernate的实现来进行学习。
要用到的jar包有:
①、hibernate-release-4.3.10.Finallib equired 文件夹下的所有jar包
②、hibernate-release-4.3.10.Finallibjpa 文件夹下的所有jar包
③、MySQL 的jdbc驱动包 mysql-connector-java-5.1.7-bin.jar
三、创建实体(entity)类Customer.java
在创建实体类的时候会用到一些注解,这些注解在下一节进行讲解。不过这些注解的作用很容易理解。下面是Customer的代码:
 1 package com.magicode.jpa.helloworld;
 2
 3 import javax.persistence.Column;
 4 import javax.persistence.Entity;
 5 import javax.persistence.GeneratedValue;
 6 import javax.persistence.GenerationType;
 7 import javax.persistence.Id;
 8 import javax.persistence.Table;
 9
10 /**
11  * @Entity 用于注明该类是一个实体类
12  * @Table(name="t_customer") 表明该实体类映射到数据库的 t_customer 表
13  */
14 @Table(name="t_customer")
15 @Entity
16 public class Customer {
17
18     private Integer id;
19     private String lastName;
20
21     private String email;
22     private int age;
23
24     /**
25      * @GeneratedValue(strategy=GenerationType.AUTO) 指明主键生成策略为AUTO
26      * @Id 表明实体类的主键
27      */
28     @GeneratedValue(strategy=GenerationType.AUTO)
29     @Id
30     public Integer getId() {
31         return id;
32     }
33
34     /**
35      * @Column 指明lastName属性映射到表的 LAST_NAME 列中
36      * 同时还可以指定其长度、能否为null等数据限定条件
37      */
38     @Column(name="LAST_NAME", length=50, nullable=false)
39     public String getLastName() {
40         return lastName;
41     }
42
43     public String getEmail() {
44         return email;
45     }
46
47     public int getAge() {
48         return age;
49     }
50
51     public void setId(Integer id) {
52         this.id = id;
53     }
54
55     public void setLastName(String lastName) {
56         this.lastName = lastName;
57     }
58
59     public void setEmail(String email) {
60         this.email = email;
61     }
62
63     public void setAge(int age) {
64         this.age = age;
65     }
66
67 }
四、修改配置文件persistence.xml
 1 <?xml version="1.0" encoding="UTF-8"?>
 2 <persistence version="2.0"
 3     xmlns="http://java.sun.com/xml/ns/persistence" xmlns:xsi="http://www.w3.org/2001/XMLSchema-instance"
 4     xsi:schemaLocation="http://java.sun.com/xml/ns/persistence http://java.sun.com/xml/ns/persistence/persistence_2_0.xsd">
 5
 6     <!-- 注意这里的 persistence-unit标签的name属性值,main函数中会用到它 -->
 7     <persistence-unit name="jpa-1" transaction-type="RESOURCE_LOCAL">
 8
 9         <!-- 配置使用什么样的ORM产品作为JPA的实现
10             1、实际上配置的是 javax.persistence.spi.PersistenceProvider 接口的实现类
11             2、若JPA项目中只有一个JPA的实现产品,则可以不配置provider节点
12         -->
13         <provider>org.hibernate.jpa.HibernatePersistenceProvider</provider>
14
15         <!-- 添加持久化类 -->
16         <class>com.magicode.jpa.helloworld.Customer</class>
17
18         <properties>
19             <!-- 连接数据库的基本信息 -->
20             <property name="javax.persistence.jdbc.driver" value="com.mysql.jdbc.Driver" />
21             <property name="javax.persistence.jdbc.url" value="jdbc:mysql:///jpa" />
22             <property name="javax.persistence.jdbc.user" value="root" />
23             <property name="javax.persistence.jdbc.password" value="tiger123" />
24
25             <!-- 配置JPA实现产品的基本属性:配置Hibernate的基本属性 -->
26             <property name="hibernate.format_sql" value="true" />
27             <property name="hibernate.show_sql" value="true" />
28             <property name="hibernate.hbm2ddl.auto" value="update" />
29
30         </properties>
31
32     </persistence-unit>
33 </persistence>
五、编写测试主函数Main.java。一共分为7个步骤进行:
 1 package com.magicode.jpa.helloworld;
 2
 3 import javax.persistence.EntityManager;
 4 import javax.persistence.EntityManagerFactory;
 5 import javax.persistence.EntityTransaction;
 6 import javax.persistence.Persistence;
 7
 8 public class Main {
 9
10     public static void main(String[] args) {
11
12         /*
13          * 1、获取EntityManagerFactory实例
14          * 利用Persistence类的静态方法,结合persistence.xml中
15          * persistence-unit标签的name属性值得到
16          */
17         EntityManagerFactory emf =
18                 Persistence.createEntityManagerFactory("jpa-1");
19
20         // 2、获取EntityManager实例
21         EntityManager em = emf.createEntityManager();
22
23         // 3、开启事物
24         EntityTransaction transaction = em.getTransaction();
25         transaction.begin();
26
27         // 4、调用EntityManager的persist方法完成持久化过程
28         Customer customer = new Customer();
29         customer.setAge(9);
30         customer.setEmail("Tom@163.com");
31         customer.setLastName("Tom");
32         em.persist(customer);
33
34         // 5、提交事物
35         transaction.commit();
36         // 6、关闭EntityManager
37         em.close();
38         // 7、关闭EntityManagerFactory
39         emf.close();
40
41     }
42
43 }
可以看出:EntityManagerFactory 的功能类似于 Hibernate 中的 SessionFactory; EntityManager 的功能类似于 Hibernate 中的Session。
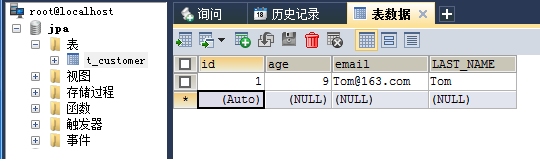
六、运行结果
运行mian方法,JPA就会自动的连接到数据库jpa中,同时创建一个t_customer数据表。有一个需要注意的地方:需要手动创建一个数据库jpa。JPA会自动帮我们创建数据表,但是它不会自动创建数据库。
main方法运行以后创建的数据表t_customer,并把一个Customer对象进行了持久化: