首先致谢:
http://blog.csdn.net/fan7983377/article/details/51604657
参考自: http://www.jianshu.com/p/0acc12c29c1b
现在越来越多的软件都开始使用沉浸式状态栏了,下面总结一下沉浸式状态栏的两种使用方法
注意!沉浸式状态栏只支持安卓4.4及以上的版本
状态栏:4.4上是渐变色,5.0上是完全透明,本文模拟器为4.4演示
效果图:
注意!两种方法的区别:
第一种:为顶部栏跟随当前activity的布局文件的背景的颜色,使用方便,不过也有点问题就是,如果有底部虚拟导航键的话,导航键的背景跟顶部的颜色一样,比如:
第二种:是通过设置顶部栏的颜色来显示的,可以解决第一种的不足,比如:
第一种方法:
第一、首先在values、values-v19、values-v21文件夹下的styles.xml都设置一个 Translucent System Bar 风格的Theme:
values/style.xml:
<style name="TranslucentTheme" parent="AppTheme">
    <!--在Android 4.4之前的版本上运行,直接跟随系统主题-->
</style>
values-v19/style.xml:
<style name="TranslucentTheme" parent="Theme.AppCompat.Light.DarkActionBar">
    <item name="android:windowTranslucentStatus">true</item>
    <item name="android:windowTranslucentNavigation">true</item>
</style>
values-v21/style.xml:
<style name="TranslucentTheme" parent="Theme.AppCompat.Light.DarkActionBar">
    <item name="android:windowTranslucentStatus">false</item>
    <item name="android:windowTranslucentNavigation">true</item>
    <!--Android 5.x开始需要把颜色设置透明,否则导航栏会呈现系统默认的浅灰色-->
    <item name="android:statusBarColor">@android:color/transparent</item>
</style>
第二、在清单文件中配置需要沉浸式状态栏的activity加入theme
<activity android:name=".ImageActivity" android:theme="@style/TranslucentTheme" />
<activity android:name=".ColorActivity" android:theme="@style/TranslucentTheme" />
第三、在Activity的布局文件中的跟布局加入“android:fitsSystemWindows=”true””,但是,这里需要区分一下,就是背景是图片还是纯色:
1.当背景为图片时,布局可以这么写:
<?xml version="1.0" encoding="utf-8"?>
<RelativeLayout xmlns:android="http://schemas.android.com/apk/res/android"
    android:layout_width="match_parent"
    android:layout_height="match_parent"
    android:background="@drawable/imgs_bj"
    android:fitsSystemWindows="true">

</RelativeLayout>
效果:

2.当背景为纯色,我们需要对布局划分一下,标题布局与内容布局,先把根布局背景设置成标题布局的背景色,然后标题背景色可以不用设置直接使用根布局的背景色,最后内容布局背景色设置为白色
<?xml version="1.0" encoding="utf-8"?>
<LinearLayout xmlns:android="http://schemas.android.com/apk/res/android"
    android:layout_width="match_parent"
    android:layout_height="match_parent"
    android:background="@color/colorPrimary"  //根布局背景设置成“标题布局”想要的颜色
    android:fitsSystemWindows="true"
    android:orientation="vertical">

    <!--标题布局-->
    <RelativeLayout
        android:layout_width="match_parent"
        android:layout_height="55dp"
        android:background="@color/color_31c27c">

        <TextView
            android:layout_width="wrap_content"
            android:layout_height="wrap_content"
            android:layout_centerInParent="true"
            android:text="这是标题"
            android:textColor="@android:color/white"
            android:textSize="20sp" />

    </RelativeLayout>

    <!--内容布局-->
    <LinearLayout
        android:layout_width="match_parent"
        android:layout_height="match_parent"
        android:background="@android:color/white"  //内容区域背景设置成白色
        android:gravity="center"
        android:orientation="vertical">

        <Button
            android:layout_marginTop="120dp"
            android:layout_width="wrap_content"
            android:layout_height="wrap_content"
            android:padding="8dp"
            android:text="显示信息"
            android:onClick="showMsg"
            />
    </LinearLayout>

</LinearLayout>
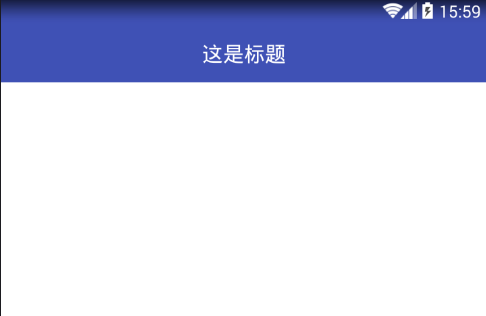
效果图:
好了,以上就是沉浸式状态栏实现的全过程,但是还有一点值得注意的就是,如果我们activity比较多,每一个页面都添加android:fitsSystemWindows="true" 比较麻烦,我们需要改动一下:
写一个基类BaseColorActivity.class,代码如下:
public abstract class BaseColorActivity extends AppCompatActivity {

    @Override
    protected void onCreate(Bundle savedInstanceState) {
        super.onCreate(savedInstanceState);
        //这一行注意!看本文最后的说明!!!!
        supportRequestWindowFeature(Window.FEATURE_NO_TITLE);

        setContentView(getLayoutResId());//把设置布局文件的操作交给继承的子类

        ViewGroup contentFrameLayout = (ViewGroup) findViewById(Window.ID_ANDROID_CONTENT);
        View parentView = contentFrameLayout.getChildAt(0);
        if (parentView != null && Build.VERSION.SDK_INT >= 14) {
            parentView.setFitsSystemWindows(true);
        }
    }

    /**
     * 返回当前Activity布局文件的id
     *
     * @return
     */
    abstract protected int getLayoutResId();

}
然后需要沉浸状态栏的activity继承该基类:
public class ColorActivity extends BaseColorActivity {

    @Override
    protected void onCreate(Bundle savedInstanceState) {
        super.onCreate(savedInstanceState);
        //这里不需要写setContentView()!
    }

    @Override
    protected int getLayoutResId() {
        //onCreate的方法中不需要写setContentView(),直接把当前activity的布局文件在这里返回就行了!
        return R.layout.activity_color;
    }
}
然后需要沉浸状态栏的activity的布局文件中就可以把android:fitsSystemWindows="true"这行代码给省略了!
第二种使用方法(未完):
写个工具类StatusBarCompat.class:
public class StatusBarCompat {

    private static final int INVALID_VAL = -1;
    private static final int COLOR_DEFAULT = Color.parseColor("#20000000");

    @TargetApi(Build.VERSION_CODES.LOLLIPOP)
    public static void compat(Activity activity, int statusColor)
    {

        //当前手机版本为5.0及以上
        if (Build.VERSION.SDK_INT >= Build.VERSION_CODES.LOLLIPOP)
        {
            if (statusColor != INVALID_VAL)
            {
                activity.getWindow().setStatusBarColor(statusColor);
            }
            return;
        }

        //当前手机版本为4.4
        if (Build.VERSION.SDK_INT >= Build.VERSION_CODES.KITKAT && Build.VERSION.SDK_INT < Build.VERSION_CODES.LOLLIPOP)
        {
            int color = COLOR_DEFAULT;
            ViewGroup contentView = (ViewGroup) activity.findViewById(android.R.id.content);
            if (statusColor != INVALID_VAL)
            {
                color = statusColor;
            }
            View statusBarView = new View(activity);
            ViewGroup.LayoutParams lp = new ViewGroup.LayoutParams(ViewGroup.LayoutParams.MATCH_PARENT,
                    getStatusBarHeight(activity));
            statusBarView.setBackgroundColor(color);
            contentView.addView(statusBarView, lp);
        }

    }

    public static void compat(Activity activity)
    {
        compat(activity, INVALID_VAL);
    }


    public static int getStatusBarHeight(Context context)
    {
        int result = 0;
        int resourceId = context.getResources().getIdentifier("status_bar_height", "dimen", "android");
        if (resourceId > 0)
        {
            result = context.getResources().getDimensionPixelSize(resourceId);
        }
        return result;
    }

}
使用方法:
在当前activity的onCreate中,调用方法StatusBarCompat.compat就可以了:
//第二个参数是想要设置的颜色
StatusBarCompat.compat(this, Color.RED);
如果嫌每个activity都要写有点麻烦,那就写个基类来完成这一步:
public class BaseActivity extends AppCompatActivity {

    @Override
    protected void onCreate(Bundle savedInstanceState) {
        supportRequestWindowFeature(Window.FEATURE_NO_TITLE);
        super.onCreate(savedInstanceState);

        StatusBarCompat.compat(this, Color.RED);
    }
}
然后每个activity的页面继承该BaseActivity就可以了!
未完待续…………………
关于上面代码中提示注意的那个地方的说明:
隐藏系统title注意的两点:
-
继承AppCompatActivity时使用:
supportRequestWindowFeature(Window.FEATURENOTITLE) -
继承activity时使用:
requestWindowFeature(Window.FEATURENOTITLE)