windows家庭版开启远程桌面
https://github.com/stascorp/rdpwrap
WSL安装VSCode
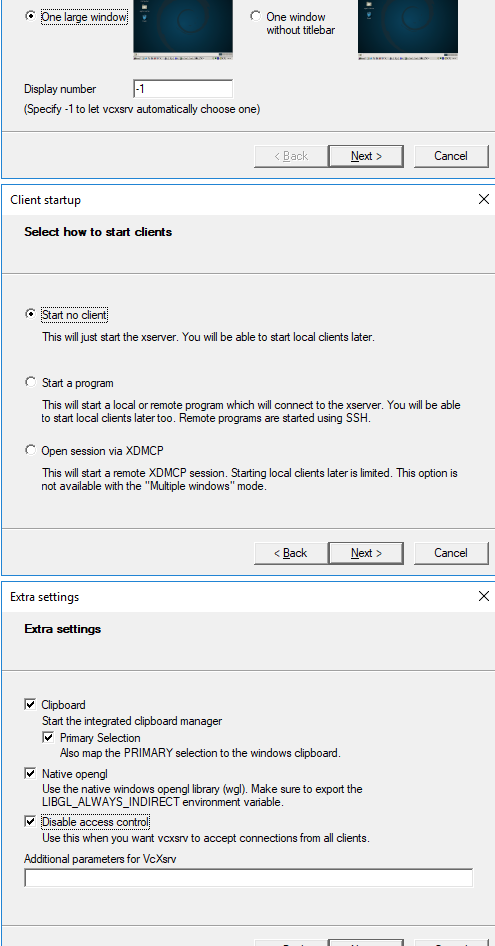
安装xserver
安装vcxsrv-64.1.20.0.1.installer.exe
安装Mobaxterm
已经装好了
配置WSL
换源
sudo nano /etc/apt/sources.list
mirrors.aliyun.com
导入字体
# 将windows的字体放入ubuntu里
sudo mkdir /usr/share/fonts/windows
sudo cp -r /mnt/c/Windows/Fonts/*.ttf /usr/share/fonts/windows/
fc-cache
安装依赖
sudo apt-get install --assume-yes xfce4
sudo apt-get install --assume-yes xorg-dev
安装VSCODE
curl https://packages.microsoft.com/keys/microsoft.asc | gpg --dearmor > microsoft.gpg
sudo mv microsoft.gpg /etc/apt/trusted.gpg.d/microsoft.gpg
sudo sh -c 'echo "deb [arch=amd64] https://packages.microsoft.com/repos/vscode stable main" > /etc/apt/sources.list.d/vscode.list'
sudo apt-get update
sudo apt-get install code
sudo nano ./.profile
# for vscode in WSL
export LIBGL_ALWAYS_INDIRECT=1
export DISPLAY=0:0
# export XMODIFIERS=@im=fcitx
# export GTK_IM_MODULE=fcitx
# export QT_IM_MODULE=fcitx
卸载和重装
在shell里 运行 wsl, bash, Linux系统名称(如 ubuntu)进入 Linux 系统。

以下命令都是在cmd / powershell 下运行来管理子系统:

// 设置默认运行的linux系统
wslconfig /setdefault <DistributionName>
// 卸载linux系统
wslconfig /unregister <DistributionName>
// 查看已安装的linux系统
wslconfig /list
// 设置默认登陆用户
ubuntu config --default-user root
在WSL里面随便搞,搞坏了直接把子系统删了重来就好了

// 删除 Ubuntu 子系统
wslconfig /unregister Ubuntu
安装好看的终端
bash -c "wget https://github.com/goreliu/wsl-terminal/releases/download/v0.8.11/wsl-terminal-0.8.11.7z && 7z x wsl-terminal-0.8.11.7z"
# https://goreliu.github.io/wsl-terminal/README.zh_CN.html
# 换配色
wget https://raw.githubusercontent.com/seebi/dircolors-solarized/master/dircolors.ansi-dark
mv dircolors.ansi-dark .dir_colors
# 编辑
nano ./.bashrc
if [ -f ~/.dir_colors ]; then
  eval `dircolors ~/.dir_colors`
fi
crt访问WSL
sudo apt-get remove openssh-server
sudo apt-get install openssh-server
# 修改 sshd 设置,添加以下配置到/etc/ssh/sshd_config
AllowUsers zhensheng
PasswordAuthentication yes
PermitRootLogin yes
# 重启 sshd
sudo service ssh --full-restart
Docker容器服务
# 这个网页下载http://mirrors.aliyun.com/docker-toolbox/windows/docker-toolbox/
# 到这个页面下载win10专用版 https://download.docker.com/win/stable/Docker%20for%20Windows%20Installer.exe
# windows 10专业版
# windows控制面板打开Hyper-V功能
# 安装即可
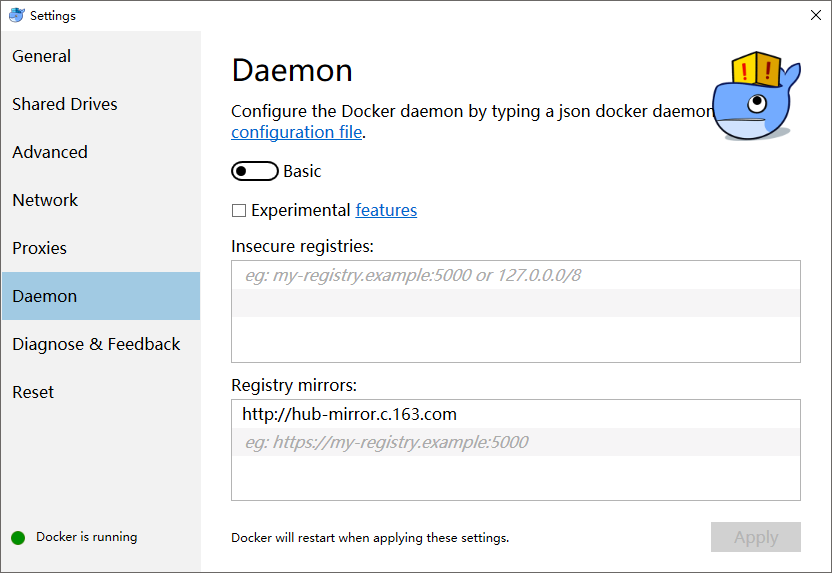
# 添加国内镜像,使用 /etc/docker/daemon.json(Linux) 或者 %programdata%dockerconfigdaemon.json(Windows) 来配置 Daemon。添加加速器也可以通过GUI
gitlab-ci
安装runner
登陆管理员账户,查看sharedrunner token
Specify the following URL during the Runner setup: http://10.10.10.108/
Use the following registration token during setup: WygPwqDHssWyMJHV_km_
- 注册
./gitlab-runner.exe register
# 首先选择shell,需要手动搭建ci服务器环境,且不能clean
# 以后再做docker
gitlab-runner install
gitlab-runner start
gitlab-runner stop
对于Ubuntu
curl -L https://packages.gitlab.com/install/repositories/runner/gitlab-runner/script.deb.sh | sudo bash
sudo apt install gitlab-runner
sudo gitlab-runner register
gitlab-jenkins-ci
jenkins插件
- gitlab-ci-plugin
注意,此插件非官方;gitlab-ce不支持jenkins-ci,gitlab-ee支持
配置要点
- gitlab-admin-area,允许给本机localhost发送webhook
- test报错403错误时Hook executed successfully but returned HTTP 403,我们须要进入jenkins 系统设置-Configure Global Security中,关闭(去掉勾选: 防止跨站点请求伪造),然后在点击gitlab webhooks test OK 返回201 成功,查看jenkins 项目自动构建啦
- You can set Secret Token as well and I think this method is better than two other options since no credential exposed or no too open policy.403 匿名无权限问题解决