Shiro简介
Apache Shiro是Java的一个安全框架,官网为shiro.apache.org,主要场景为控制登陆,判断用户是否有访问某个功能的权限等等。
Shiro的核心功能(入门知识,只介绍前两个)
-
认证
-
授权
-
会话管理
-
加密
引入jar包和配置web.xml
-
引入Shiro对应的jar包,下面给出Maven
<dependency> <groupId>org.apache.shiro</groupId> <artifactId>shiro-all</artifactId> <version>1.2.2</version> </dependency> -
在web.xml中配置spring框架提供的用于整合shiro框架的过滤器
	<!-- 配置shiro过滤器 -->
<filter>
	<filter-name>shiroFilter</filter-name>	  // 需要在spring的配置文件中创建一个bean(shiroFilter)
	<filter-class>org.springframework.web.filter.DelegatingFilterProxy</filter-class>
</filter>
<filter-mapping>
	<filter-name>shiroFilter</filter-name>
	<url-pattern>/*</url-pattern>
</filter-mapping>
下面我们将要进行Shiro的认证功能和授权功能的实现,代码比较多。
登录方法的实现
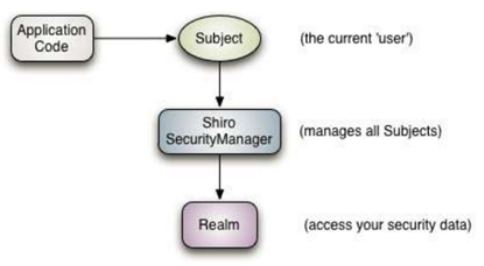
Shiro认证的流程
-
Application Code:应用程序代码, 即登录方法(登录方法不是直接查询数据库,而是调用Shiro框架提供的接口来实现)
-
Subject:框架提供的接口,代表当前用户对象
-
SecurityManager:框架提供的接口,代表安全管理器对象
-
Realm:可以开发人员编写(即认证和授权方法)
-
我们首先将登录方法按照Shiro指定的方式进行改进
public String login() { // 获取验证码 String validateCode = (String) ServletActionContext.getRequest().getSession().getAttribute("key"); // 判断验证码 if (StringUtils.isNotBlank(checkcode) && checkcode.equals(validateCode)) { // 获取getSubject对象,Shiro中代表当前用户对象 Subject subject = SecurityUtils.getSubject(); // 令牌 传递进去前台接受的账号和密码 AuthenticationToken token = new UsernamePasswordToken(model.getUsername(), MD5Utils.md5(model.getPassword()));// 创建用户名密码令牌对象 try { subject.login(token); // 调用内置的登录方法来实现检验 如果登陆错误就会抛出异常,返回登录页面 } catch (Exception e) { e.printStackTrace(); return LOGIN; } User user = (User) subject.getPrincipal(); // 登录成功后可以从subject取得登录对象 ServletActionContext.getRequest().getSession().setAttribute("loginUser", user); return HOME; } else { this.addActionError("输入验证码错误"); return LOGIN; } } -
然后编写
Realm继承AuthorizingRealm,即编写具体的认证和授权方法public class BOSRealm extends AuthorizingRealm { @Autowired private IUserDao userDao // 授权方法 protected AuthorizationInfo doGetAuthorizationInfo(PrincipalCollection arg0) { // 可以在这里将用户所属的权限查询出来,然后遍历赋值给info对象,这样就可以实现了授权 // 判断访问路径或者方法有没有权限的时候就是根据info中的数据来判断 info.addStringPermission("staff-list"); return info; } // 认证方法(登陆方法) protected AuthenticationInfo doGetAuthenticationInfo(AuthenticationToken arg0) throws AuthenticationException { System.out.println("认证..."); UsernamePasswordToken passwordToken = (UsernamePasswordToken) arg0; // 对象转换 String username = passwordToken.getUsername(); // 获得username User user = userDao.findByUsername(username); // 通过username从数据库中获取到User对象 if (user == null) { return null; } // 内置验证方法 (数据库中获取的对象,对象的密码, this.getName()) AuthenticationInfo authenticationInfo = new SimpleAuthenticationInfo(user, user.getPassword(), this.getName()); return authenticationInfo; } } -
到上面以后编码工作就完成了,剩下的就是进行配置了,首先将编写的
Realm注入到安全管理器,整合的是Spring,所以下面的配置都是在Spring配置文件中。<!-- 注册realm --> <bean id="bosRealm" class="lyh.bos.realm.BOSRealm"></bean> <!-- 注册安全管理器对象 --> <bean id="securityManager" class="org.apache.shiro.web.mgt.DefaultWebSecurityManager"> <property name="realm" ref="bosRealm"/> </bean> -
配置
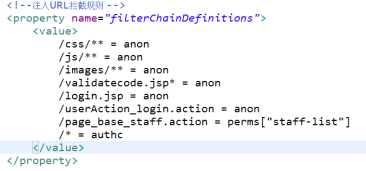
ShiroFilterFactoryBean,同时还可以配置一下URL拦截规则,注意这里的id要和web.xml中<filter-name>shiroFilter</filter-name>相同<!-- shiro 配置 --> <bean id="shiroFilter" class="org.apache.shiro.spring.web.ShiroFilterFactoryBean"> <!-- 此处为web.xml配置的拦截器 --> <!-- 注入安全管理器对象 --> <property name="securityManager" ref="securityManager"/> <!-- 注入相关页面访问URL --> <property name="loginUrl" value="/login.jsp"/> <!-- 登录页面 --> <property name="successUrl" value="/index.jsp"/> <!-- 登录成功的主页 --> <property name="unauthorizedUrl" value="/unauthorized.jsp"/> <!-- 权限不足转向的错误页面 --> <property name="unauthorizedUrl" value="/unauthorized.jsp"/> <!--注入URL拦截规则, --> <!-- anon 都可以访问 perms["staff-list"] 是否有staff-list权限 authc 登录才可以访问 --> <property name="filterChainDefinitions"> <value> /css/** = anon /admin/logout = logout <!-- 注销,访问这个路径,自动注销不需要自己编写方法 --> /images/** = anon /validatecode.jsp* = anon /login.jsp = anon /userAction_login.action = anon /page_base_staff.action = perms["staff-list"] <!-- 表示page_base_staff.action路径需要有staff-list权限才可访问 --> /* = authc </value> </property> </bean> -
Shiro还提供了使用
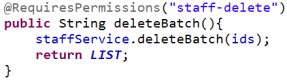
注解控制权限的方法,开启方式如下,同时,使用的注解权限还需要配置全局异常,用来捕获当权限不足抛出异常时转向的页面,这里使用的是SpringMVC,开启方式@RequiresPermissions("staff-list")<!-- 开启注解配置权限 --> <bean id="defaultAdvisorAutoProxyCreator" class="org.springframework.aop.framework.autoproxy.DefaultAdvisorAutoProxyCreator"> <!-- 必须使用cglib方式为 Action对象创建代理对象 --> <property name="proxyTargetClass" value="true"/> </bean> <!-- 配置shiro框架提供的切面类,用于创建代理对象 --> <bean class="org.apache.shiro.spring.security.interceptor.AuthorizationAttributeSourceAdvisor"/>// 配置全局异常处理器 <!-- 需要进行权限控制的页面访问 --> <global-results> <result name="login">/login.jsp</result> <result name="unauthorized">/unauthorized.jsp</result> </global-results> <!-- 全局异常处理 --> <global-exception-mappings> <exception-mapping result="unauthorized" exception="org.apache.shiro.authz.UnauthorizedException"></exception-mapping> </global-exception-mappings>
Shiro提供的控制权限的方式
-
URL权限拦截控制
-
方法注解权限控制
-
页面标签权限控制(当有对应的权限就显示对应的页面元素,没有权限则不显示), 需要在对应的页面引入Shiro的标签库
<%@ taglib prefix="shiro" uri="http://shiro.apache.org/tags" %>,可以用在HTMl也可以用在JS中。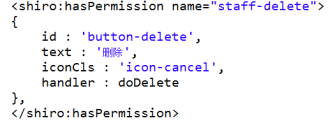
-
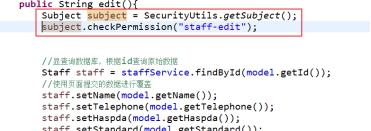
代码级别权限控制(在方法内添加代码)
Shiro整合ehcache缓存权限数据
如果访问一个页面就执行一次授权,就会访问数据库,浪费资源,所以我们可以使用ehcache来进行缓存权限,只要登录时进行一次授权,后面无需再次授权,直接使用缓存。
shiro自动整合ehcache,只需要简单配置就能使用。
- 在根目录下建立
ehcache.xml
<ehcache xmlns:xsi="http://www.w3.org/2001/XMLSchema-instance" xsi:noNamespaceSchemaLocation="../config/ehcache.xsd">
    <diskStore path="java.io.tmpdir"/>
    <defaultCache
            maxElementsInMemory="10000"
            eternal="false"
            timeToIdleSeconds="600"
            timeToLiveSeconds="600"
            overflowToDisk="true"
            maxElementsOnDisk="10000000"
            diskPersistent="false"
            diskExpiryThreadIntervalSeconds="120"
            memoryStoreEvictionPolicy="LRU"
            />

    <!--
    	内存中最多可以存储多少个数据
    	是否永久有效
    	空闲时间
    	存活时间
		内存空间不够是否存储到磁盘
    	磁盘最大存储个数
    	服务器重启,磁盘数据是否需要
    	线程
      	淘汰策略(最近最少使用)
     -->
</ehcache>
- 在spring配置文件中配置缓存管理器对象,并注入给安全管理器对象
        <!-- 注册ehcache -->
	<bean id="cacheManager" class="org.apache.shiro.cache.ehcache.EhCacheManager">
		<property name="cacheManagerConfigFile" value="classpath:ehcache.xml" />
	</bean>
- 将ehcache注入到shiro的配置管理器,shiro会自动使用缓存管理,在原来的管理器中添加
<property name="cacheManager" ref="cacheManager"/>一条语句即可。
        <!-- 注册安全管理器对象 -->
	<bean id="securityManager" class="org.apache.shiro.web.mgt.DefaultWebSecurityManager">
		<property name="realm" ref="bosRealm"/>
		<!-- 将ehcache注入shiro -->
		<property name="cacheManager" ref="cacheManager"/>
	</bean>