场景:从开始写代码至今,对于单元测试一直没有重视,但是也厌倦了了程序中的额System.out和log日志输出。单元测试使我看到了在开发过程中的安全性和便捷性,所以下决心好好整理下。
有感而发——《写有价值的单元测试》
1 基本概念
测试在软件生命周期中的重要性,不用我多说想必大家也都非常清楚。软件测试有很多分类,从测试的方法上可分为:黑盒测试、白盒测试、静态测试、动态测试等;从软件开发的过程分为:单元测试、集成测试、确认测试、验收、回归等。
在众多的分类中,与开发人员关系最紧密的莫过于单元测试了。像其他种类的测试基本上都是由专门的测试人员来完成,只有单元测试是完全由开发人员来完成的。那么今天我们就来说说什么是单元测试,为什么要进行单元测试,以及如更好的何进行单元测试。
1.1 什么是单元测试
单元测试(unit testing),是指对软件中的最小可测试单元进行检查和验证。比如我们可以测试一个类,或者一个类中的一个方法。
1.2 为什么要进行单元测试
为什么要进行单元测试?说白了就是单元测试有什么好处,其实测试的好处无非就是减少bug、提高代码质量、使代码易于维护等。单元测试有什么好处请看一下百度百科中归纳的四条:
1、它是一种验证行为。
程序中的每一项功能都是测试来验证它的正确性。它为以后的开发提供支援。就算是开发后期,我们也可以轻松的增加功能或更改程序结构,而不用担心这个过程中会破坏重要的东西。而且它为代码的重构提供了保障。这样,我们就可以更自由的对程序进行改进。
2、它是一种设计行为。
编写单元测试将使我们从调用者观察、思考。特别是先写测试(test-first),迫使我们把程序设计成易于调用和可测试的,即迫使我们解除软件中的耦合。
3、它是一种编写文档的行为。
单元测试是一种无价的文档,它是展示函数或类如何使用的最佳文档。这份文档是可编译、可运行的,并且它保持最新,永远与代码同步。
4、它具有回归性。
自动化的单元测试避免了代码出现回归,编写完成之后,可以随时随地的快速运行测试。
1.3 如何更好的进行单元测试
在讨论如何更好的进行单元测试之前,先来看看我们以前是怎么测试代码的。
以前是这样测试程序的:
public int add(int x,int y) {
        return x + y;
    }

    public static void main(String args[]) {
        int z = new Junit().add(2, 3);
        System.out.println(z);
    }
如上面所示,在测试我们写好的一个方法时,通常是用一个main方法调用一下我们要测试的方法,然后将结果打印一下。现在看来这种方式已经非常out了,所以出现了很多单元测试的工具,如:JUnit、TestNG等。借助它们可以让我们的单元测试变得非常方便、高效。今天就说说如何利用JUnit进行单元测试。
2 Junit4进行单元测试
用Junit进行单元测试很方便,尤其是Junit4引入了很多Annotation注解以后。
在测试之前首先要引入junit-4.10.jar
看测试的示例:
2.1 准备待测试类
package junit;


public class Calculator {

    public int add(int a, int b) {
        return a + b;
    }

    public int minus(int a, int b) {
        return a - b;
    }

    public int square(int n) {
        return n * n;
    }

    //Bug : 死循环
    public void squareRoot(int n) {
        for(; ;)
            ;
    }

    public int multiply(int a, int b) {
        return a * b;
    }

    public int divide(int a, int b) throws Exception {
        if (0 == b) {
            throw new Exception("除数不能为零");
        }
        return a / b;
    }
}
2.2 建立单元测试类
建好以后在该项目的“src”目录上右击,选择new——》JUnit Test Case,然后按下图填写必要信息:

说明:
1——填写单元测试类所在的包路径
2——填写测试类名称
3——会预先创建一些类,具体功能不清楚
4——选择要测试的类
点击“Next”,选择测试类中待测试的方法:

点击“Finish”即可。剩下的步骤就是填充测试方法。上面只是说明测试类的构造过程。
使用上面的方法,建立CalculatorTest测试类:
package junit;


import junit.framework.Assert;

import org.junit.After;
import org.junit.AfterClass;
import org.junit.Before;
import org.junit.BeforeClass;
import org.junit.Ignore;
import org.junit.Test;

public class CalculatorTest {


    private Calculator cal = new Calculator();

    @BeforeClass // 注意,这里必须是static...因为方法将在类被装载的时候就被调用(那时候还没创建实例)
    public static void before()
    {
        System.out.println("global");
    }

    @AfterClass
    public static void after() {
        System.out.println("global destroy");
    }

    @Before
    public void setUp() throws Exception {
        System.out.println("一个测试开始。。");
    }

    @After
    public void tearDown() throws Exception {
        System.out.println("一个测试结束");
    }

    @Test
    @Ignore
    public void testAdd() {
        int result = cal.add(1, 2);
        Assert.assertEquals(3, result);
    }

    @Test
    public void testMinus() {
        int result = cal.minus(5, 2);
        Assert.assertEquals(3, result);
    }

    @Test
    public void testMultiply() {
        int result = cal.multiply(4, 2);
        Assert.assertEquals(8, result);
    }

    @Test(timeout = 1000) // 单位为毫秒
    public void testSquareRoot() {
        cal.squareRoot(4);
    }

    @Test(expected = Exception.class)
    public void testDivide() throws Exception {
        System.out.println("teddd");
        cal.divide(4, 0);// 很简单的办法.......
    }

//  @Test
//  public void testDivide() {
//      int result = 0;
//      try {
//          result = cal.divide(10, 5);
//      } catch (Exception e) {
//          e.printStackTrace();
//          Assert.fail();// 如果这行没有执行。说明这部分正确。
//      }
//      Assert.assertEquals(2, result);
//  }
}
在Eclipse里Run As -> JUnit Test,运行测试类,Eclipse的JUnit的View显示如:
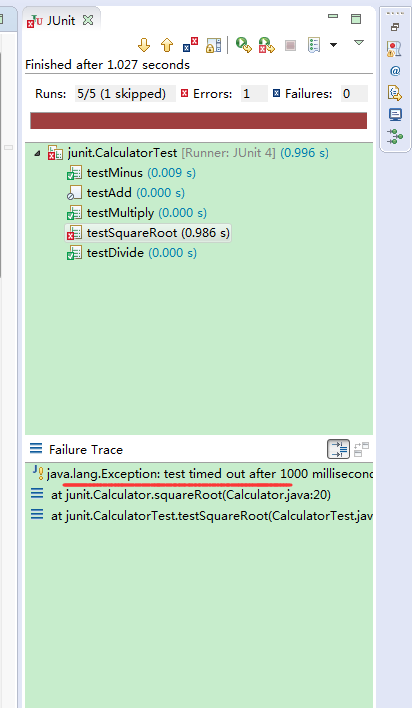
可以看到,CalculatorTest类中总共有5个测试用例,ignore了一个,3个测试用例通过,testSquareRoot测试不通过(因为超时),所以整个的测试结果飘红了。同时,控制台的输出结果为:

2.3 注解说明
各种注解的说明:
@Test:
表明该方法是一个测试方法

@BeforeClass 和 @AfterClass:
测试用例初始化时执行 @BeforeClass方法,当所有测试执行完毕之后,执行@AfterClass进行收尾工作。标注、@BeforeClass 和 @AfterClass的方法必须是static的,因为方法将在类被装载的时候就被调用,那时候还没创建测试对象实例。

@Before:
使用了该元数据的方法在每个测试方法执行之前都要执行一次。
@After:
使用了该元数据的方法在每个测试方法执行之后要执行一次。

@Test(expected=*.class) :
通过@Test元数据中的expected属性验证是否抛出期望的异常,expected属性的值是一个异常的类型,如果抛出了期望的异常,则测试通过,否则不通过。

@Test(timeout=xxx):
该元数据传入了一个时间(毫秒)给测试方法,如果测试方法在制定的时间之内没有运行完,则测试也失败。

@Ignore:
该元数据标记的测试方法在测试中会被忽略。同时可以为该标签传递一个String的参数,来表明为什么会忽略这个测试方法。比如:@lgnore("该方法还没有实现"),在执行的时候,仅会报告该方法没有实现,而不会运行测试方法。

在test方法内除了使用Assert的assertEquals()方法外,还能使用assertFalse()、assertTrue()、assertNull()、assertNotNull()、assertSame()、assertNotSame()等断言函数。而且如果使用的是Junit4,结合Hamcrest,使用
assertThat([value], [matcher statement])方法可以实现更灵活的断言判断(前提是引入hamcrest的jar包)。
例如:
// is匹配符表明如果前面待测的object等于后面给出的object,则测试通过
assertThat( testedObj, is( object) );

// containsString匹配符表明如果测试的字符串包含指定的子字符串则测试通过
 assertThat( testedString, containsString( "developerWorks" ) );

// greaterThan匹配符表明如果所测试的数值testedNumber大于16.0则测试通过
 assertThat( testedNumber, greaterThan(16.0) );

// closeTo匹配符表明如果所测试的浮点型数testedDouble在20.0±0.5范围之内则测试通过
assertThat( testedDouble, closeTo( 20.0, 0.5 ) );

//hasItem匹配符表明被测的迭代对象含有元素element项则测试通过assertThat(iterableObject, hasItem (element));

引入hamcrest-core-1.3.jar和hamcrest-library-1.3.jar
常用hamcrest断言的使用说明:
数值类型
//n大于1并且小于15,则测试通过
assertThat( n, allOf( greaterThan(1), lessThan(15) ) );
//n大于16或小于8,则测试通过
assertThat( n, anyOf( greaterThan(16), lessThan(8) ) );
//n为任何值,都测试通过
assertThat( n, anything() );
//d与3.0的差在±0.3之间,则测试通过
assertThat( d, closeTo( 3.0, 0.3 ) );
//d大于等于5.0,则测试通过
assertThat( d, greaterThanOrEqualTo (5.0) );
//d小于等于16.0,则测试通过
assertThat( d, lessThanOrEqualTo (16.0) );

字符类型
//str的值为“tgb”,则测试通过
assertThat( str, is( "tgb" ) );
//str的值不是“tgb”,则测试通过
assertThat( str, not( "tgb" ) );
//str的值包含“tgb”,则测试通过
assertThat( str, containsString( "tgb" ) );
//str以“tgb”结尾,则测试通过
assertThat( str, endsWith("tgb" ) );
//str以“tgb”开头,则测试通过
assertThat( str, startsWith( "tgb" ) );
//str忽略大小写后,值为“tgb”,则测试通过
assertThat( str, equalToIgnoringCase( "tgb" ) );
//str忽略空格后,值为“tgb”,则测试通过
assertThat( str, equalToIgnoringWhiteSpace( "tgb" ) );
//n与nExpected相等,则测试通过(对象之间)
assertThat( n, equalTo( nExpected ) );

collection类型
//map中包含key和value为“tgb”的键值对,则测试通过
assertThat( map, hasEntry( "tgb", "tgb" ) );
//list中包含“tgb”元素,则测试通过
assertThat( iterable, hasItem ( "tgb" ) );
//map中包含key为“tgb”的元素,则测试通过
assertThat( map, hasKey ( "tgb" ) );
//map中包含value为“tgb”的元素,则测试通过
assertThat( map, hasValue ( "tgb" ) );
2.4 进阶
上面的Caculator待测试类里,现在我如果想给square方法多弄几个测试用例,按照上面的方法,我应该写好几个@Test方法来测试,或者每次测完再改一下输入的值和期望得到的值,好麻烦。JUnit提供如下的测试:
package hamcrest;

import java.util.Arrays;
import java.util.Collection;

import junit.Calculator;
import junit.framework.Assert;

import org.junit.Test;
import org.junit.runner.RunWith;
import org.junit.runners.Parameterized;
import org.junit.runners.Parameterized.Parameters;

@RunWith(Parameterized.class)
public class CalculatorTest2{

    private Calculator cal = new Calculator();
    private int param;
    private int result;

    //构造函数,对变量进行初始化
    //定义一个待测试的类,并且定义两个变量,一个用于存放参数,一个用于存放期待的结果。
    public CalculatorTest2(int param, int result) {
           this.param = param;
           this.result = result;
    }

    @Parameters
    public static Collection data(){
        return Arrays.asList(new Object[][]{
            {2, 4},
            {0, 0},
            {-3, 9},
      });
    }

    @Test
    public void squareTest() {
        int temp = cal.square(param);
        Assert.assertEquals(result, temp);
    }
}
Eclipse里JUnit的运行结果显示为:

测试通过了,CalculatorTest2类里的parameter是每次的测试输入,result就是测试的结果。所有的测试输入和期望结果都在@Parameters标注的data函数的返回的Collection集合里,2的期望得到的平方结果值是4,0期望得到0,-3期望得到9。
把测试代码提交给JUnit框架后,框架如何来运行代码呢?答案就是——Runner。在JUnit中有很多个 Runner,他们负责调用测试代码,每一个Runner都有各自的特殊功能,要根据需要选择不同的Runner来运行测试代码。JUnit中有一个默认Runner,如果没有指定,那么系统自动使用默认 Runner来运行你的代码。这里参数化测试就没有再用默认的Runner了。
再看看打包测试测例子:
package hamcrest;

import junit.CalculatorTest;

import org.junit.runner.RunWith;
import org.junit.runners.Suite;


/**
 * 大家可以看到,这个功能也需要使用一个特殊的Runner,
 * 因此我们需要向@RunWith标注传递一个参数Suite.class。
 * 同时,我们还需要另外一个标注@Suite.SuiteClasses,
 * 来表明这个类是一个打包测试类。我们把需要打包的类作为参数传递给该标注就可以了。
 * 有了这两个标注之后,就已经完整的表达了所有的含义,因此下面的类已经无关紧要,
 * 随便起一个类名,内容全部为空既可
 *
 */
@RunWith(Suite.class)
@Suite.SuiteClasses({ CalculatorTest.class, CalculatorTest2.class })
public class AllCalculatorTests {

}
测试结果:

这个测试类包含了上面的CalculatorTest.class和CalculatorTest2.class里面所有的测试函数,它的目的就是进行打包所有的测试。
断言
所有的断言都包含在Assert类中
public class Assert extends java.lang.Object
这个类提供了很多有用的断言方法来编写测试用例。只有失败的断言才会被记录。Assert 类中的一些有用的方法列式如下:
1 void assertEquals(boolean expected, boolean actual)
检查两个变量或者等式是否平衡
2 void assertTrue(boolean expected, boolean actual)
检查条件为真
3 void assertFalse(boolean condition)
检查条件为假
4 void assertNotNull(Object object)
检查对象不为空
5 void assertNull(Object object)
检查对象为空
6 void assertSame(boolean condition)
assertSame() 方法检查两个相关对象是否指向同一个对象
7 void assertNotSame(boolean condition)
assertNotSame() 方法检查两个相关对象是否不指向同一个对象
8 void assertArrayEquals(expectedArray, resultArray)
assertArrayEquals() 方法检查两个数组是否相等