概述:
常用的注解有@Controller @Service @Repository @Component ;一般@Controller放在@Controller类上面即(表现层)标识表现层组件 ;@Service放在Service(业务层)的实现类上面,标识业务层组件 ;@Repository放在Repository(数据处理层)上面,标识持久层组件; @Component一般方式普通实体上面 基本组件,标识一个受到spring容器管理的组件;这几个没有明显区分,其实可以混用但是为了代码的可读性,一般都是按照前面的方式来处理;
基于注解方式配置bean,主要是通过 context:conponent-scan 来扫描 侦测 实例化 classpath下具有特定标识的组件;
一、配置bean:
步骤一、创建如下目录结构
此外除了5个jar包外,需要添加spring-aop。否则可能报错;
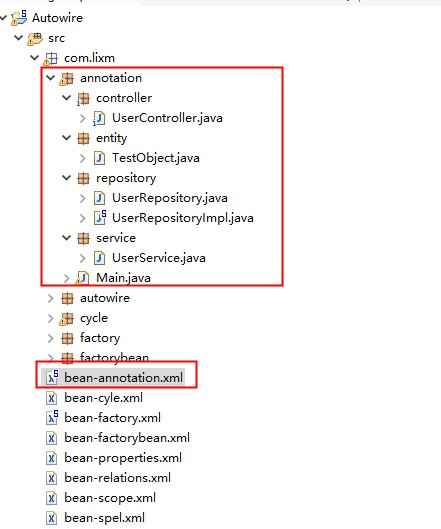
代码如下:
UserController:


 1 package com.lixm.annotation.controller;
 2
 3 import org.springframework.stereotype.Controller;
 4
 5 @Controller
 6 public class UserController {
 7
 8     public void execute() {
 9         System.out.println("usercontroller execute...");
10     }
11 }
TestObject:
1 package com.lixm.annotation.entity;
2
3 import org.springframework.stereotype.Component;
4
5 @Component
6 public class TestObject {
7
8 }
UserRepository:
1 package com.lixm.annotation.repository;
2
3 public interface UserRepository {
4
5     int save();
6
7 }
UserRepositoryImpl:
 1 package com.lixm.annotation.repository;
 2
 3 import org.springframework.stereotype.Repository;
 4
 5 @Repository(value = "userRepository")
 6 public class UserRepositoryImpl implements UserRepository {
 7
 8     @Override
 9     public int save() {
10         System.out.println("repository save...");
11         return 0;
12     }
13
14 }
UserService:
 1 package com.lixm.annotation.service;
 2
 3 import org.springframework.stereotype.Service;
 4
 5 import com.lixm.annotation.repository.UserRepository;
 6
 7 @Service
 8 public class UserService {
 9
10     private UserRepository userRepository;
11
12     public int add() {
13         userRepository.save();
14         System.out.println("userService add...");
15         return 0;
16     }
17
18 }
步骤二、测试配置的bean:
 1 public class Main {
 2     public static void main(String[] args) {
 3         ApplicationContext context = new ClassPathXmlApplicationContext("bean-annotation.xml");
 4         TestObject testObject = (TestObject) context.getBean("testObject");
 5         UserController userController = (UserController) context.getBean("userController");
 6         UserService userService = (UserService) context.getBean("userService");
 7         UserRepository userRepository = (UserRepository) context.getBean("userRepository");
 8         System.out.println(testObject);
 9         System.out.println(userController);
10         System.out.println(userService);
11         System.out.println(userRepository);
12         ((ConfigurableApplicationContext) context).close();
13     }
14
15 }
bean-annotation.xml
需要额外引入context命名空间
 1 <?xml version="1.0" encoding="UTF-8"?>
 2 <beans xmlns="http://www.springframework.org/schema/beans"
 3     xmlns:xsi="http://www.w3.org/2001/XMLSchema-instance"
 4     xmlns:context="http://www.springframework.org/schema/context"
 5     xsi:schemaLocation="http://www.springframework.org/schema/beans http://www.springframework.org/schema/beans/spring-beans.xsd
 6         http://www.springframework.org/schema/context http://www.springframework.org/schema/context/spring-context-4.3.xsd">
 7
 8 <!-- 指定spring ioc容器扫描的包 -->
 9 <context:component-scan base-package="com.lixm.annotation"></context:component-scan>
10
11 </beans>
运行结果为:
com.lixm.annotation.entity.TestObject@166fa74d
com.lixm.annotation.controller.UserController@40f08448
com.lixm.annotation.service.UserService@276438c9
com.lixm.annotation.repository.UserRepositoryImpl@588df31b
说明配置bean成功;
二、context:component-scan属性:
base-package :
指定需要扫描的基类包,spring容器会扫描这个基类包里机器子包中所有的类,扫描到具有特定标识符的类的上面会显示S;
需要扫描多个包时,用逗号分割;
1 <context:component-scan base-package="com.lixm.annotation"></context:component-scan>
resource-pattern
 1 <?xml version="1.0" encoding="UTF-8"?>
 2 <beans xmlns="http://www.springframework.org/schema/beans"
 3     xmlns:xsi="http://www.w3.org/2001/XMLSchema-instance"
 4     xmlns:context="http://www.springframework.org/schema/context"
 5     xsi:schemaLocation="http://www.springframework.org/schema/beans http://www.springframework.org/schema/beans/spring-beans.xsd
 6         http://www.springframework.org/schema/context http://www.springframework.org/schema/context/spring-context-4.3.xsd">
 7
 8 <!-- resource-pattern 属性过滤特定的类 这里只扫描 com.lixm.annotation.repository的包 -->
 9 <context:component-scan base-package="com.lixm.annotation" resource-pattern="repository/*.class"></context:component-scan>
10 </beans>
这里只扫描了repository包里面的class,如果直接运行上面的main方法会报错;原因是找不到对应的bean;
三、context:component-scan子节点:
exclude-filter 子节点指定排除哪些指定表达式的组件
这里排除了,@Repository注解标识的类
1 <context:component-scan base-package="com.lixm.annotation" use-default-filters="false">
2      <context:exclude-filter type="annotation" expression="org.springframework.stereotype.Repository"/>
3 </context:component-scan>
context:include-filter 子节点
 1 <?xml version="1.0" encoding="UTF-8"?>
 2 <beans xmlns="http://www.springframework.org/schema/beans"
 3     xmlns:xsi="http://www.w3.org/2001/XMLSchema-instance"
 4     xmlns:context="http://www.springframework.org/schema/context"
 5     xsi:schemaLocation="http://www.springframework.org/schema/beans http://www.springframework.org/schema/beans/spring-beans.xsd
 6         http://www.springframework.org/schema/context http://www.springframework.org/schema/context/spring-context-4.3.xsd">
 7
 8 <context:component-scan base-package="com.lixm.annotation" use-default-filters="false">
 9     <context:include-filter type="annotation" expression="org.springframework.stereotype.Repository"/>
10 </context:component-scan>
11 </beans>
子节点中常用type的说明:
1 <context:component-scan base-package="com.lixm.annotation" use-default-filters="false">
2     <context:include-filter type="assignable" expression="com.lixm.annotation.repository.UserRepository"/>
3 </context:component-scan>
只扫描com.lixm.annotation.repository.UserRepository类;
1 <context:component-scan base-package="com.lixm.annotation" >
2     <context:exclude-filter type="assignable" expression="com.lixm.annotation.repository.UserRepository"/>
3 </context:component-scan>
不扫描com.lixm.annotation.repository.UserRepository类
四、自动装配:
spring 使用@Autowired来实现实现bean的自动装配;
自动装配的实现:
在需要调用的bean的类上面加上@Autowired,现在在Controller方法中调用Service的方法;实现代码如下:
修改UserController
 1 package com.lixm.annotation.controller;
 2
 3 import org.springframework.beans.factory.annotation.Autowired;
 4 import org.springframework.stereotype.Controller;
 5
 6 import com.lixm.annotation.service.UserService;
 7
 8 @Controller
 9 public class UserController {
10
11
12     @Autowired(required = true)
13     private UserService userService;
14     public void execute() {
15         userService.add();
16         System.out.println("usercontroller execute...");
17     }
18 }
修改UserService
 1 package com.lixm.annotation.service;
 2
 3 import org.springframework.beans.factory.annotation.Autowired;
 4 import org.springframework.stereotype.Service;
 5
 6 import com.lixm.annotation.repository.UserRepository;
 7
 8 @Service
 9 public class UserService {
10
11     @Autowired
12     private UserRepository userRepository;
13
14     public int add() {
15         userRepository.save();
16         System.out.println("userService add...");
17         return 0;
18     }
19
20 }
测试自动装配:
 1     public static void main(String[] args) {
 2         ApplicationContext context = new ClassPathXmlApplicationContext("bean-annotation.xml");
 3         TestObject testObject = (TestObject) context.getBean("testObject");
 4         UserController userController = (UserController) context.getBean("userController");
 5         UserService userService = (UserService) context.getBean("userService");
 6         UserRepository userRepository = (UserRepository) context.getBean("userRepository");
 7         System.out.println(testObject);
 8         System.out.println(userController);
 9         System.out.println(userService);
10         System.out.println(userRepository);
11         userController.execute();
12         ((ConfigurableApplicationContext) context).close();
13
14     }
运行结果:
com.lixm.annotation.entity.TestObject@701fc37a
com.lixm.annotation.controller.UserController@4148db48
com.lixm.annotation.service.UserService@282003e1
com.lixm.annotation.repository.UserRepositoryImpl@7fad8c79
repository save...
userService add...
usercontroller execute...
执行了bean组件中的方法,说明装配成功;
关于@Autowired
1.使用位置:普通字段(即使是非public)一切具有参数的方法都可以应用@Autowired注解;
2.属性:value 和 require;
value是指定bean的名称,如果只有一个value属性,那么value可以省略;@Autowired("xXXX")等同于 @Autowired(“value="xXXX")
required 表示是否一定要装配该bean;required=true,表示必须有,如果容器中没有该bean,则报错;required=false,表示可以没有有,如果容器中没有该bean,也不报错。
required=true的集中情况:
- 如果查询bean结果刚好为一个,就将该bean装配给@Autowired指定的数据
- 如果查询bean的结果不止一个,那么@Autowired会根据名称来查找。
- 如果查询bean的结果为空,那么会抛出异常。解决方法时,使用required=false
3.配合@Qualifier的使用;
当有多个接口实现类的bean时,可以使用@Qualifier("beanName") 指定装配的bean
其他装配方式:
spring 还支持@Resource(如果没有bean名称,那么自动采用标注处的变量或方法名作为bean的名称) 、 @Inject(没有required属性)注解 推荐使用@Autowired
五、泛型的依赖注入
1.建立如下目录结构
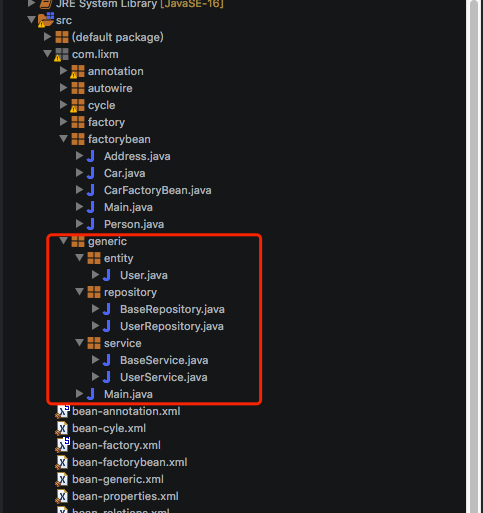
2.代码如下:
BaseRepository:
1 package com.lixm.generic.repository;
2
3 public class BaseRepository<T> {
4
5 }
BaseService:
 1 package com.lixm.generic.service;
 2
 3 import org.springframework.beans.factory.annotation.Autowired;
 4
 5 import com.lixm.generic.repository.BaseRepository;
 6
 7 public class BaseService<T> {
 8
 9     @Autowired
10     protected BaseRepository<T> repository;
11
12     public void add() {
13         System.out.println("add...");
14         System.out.println(repository);
15
16     }
17 }
UserRepository:
 1 package com.lixm.generic.repository;
 2
 3 import org.springframework.stereotype.Repository;
 4
 5 import com.lixm.generic.entity.User;
 6
 7 @Repository
 8 public class UserRepository extends BaseRepository<User> {
 9
10 }
UserService
 1 package com.lixm.generic.service;
 2
 3 import org.springframework.stereotype.Service;
 4
 5 import com.lixm.generic.entity.User;
 6
 7 @Service
 8 public class UserService extends BaseService<User> {
 9
10 }
User
1 package com.lixm.generic.entity;
2
3 public class User {
4
5 }
测试代码:
1     public static void main(String[] args) {
2
3         ApplicationContext context = new ClassPathXmlApplicationContext("bean-generic.xml");
4         UserService userService = (UserService) context.getBean("userService");
5         userService.add();
6
7         ((ConfigurableApplicationContext) context).close();
8     }
配置文件:
 1 <?xml version="1.0" encoding="UTF-8"?>
 2 <beans xmlns="http://www.springframework.org/schema/beans"
 3     xmlns:xsi="http://www.w3.org/2001/XMLSchema-instance"
 4     xmlns:context="http://www.springframework.org/schema/context"
 5     xsi:schemaLocation="http://www.springframework.org/schema/beans http://www.springframework.org/schema/beans/spring-beans.xsd
 6         http://www.springframework.org/schema/context http://www.springframework.org/schema/context/spring-context-4.3.xsd">
 7
 8
 9 <context:component-scan base-package="com.lixm.generic">
10
11 </context:component-scan>
12 </beans>
main方法的运行结果为:
add...
com.lixm.generic.repository.UserRepository@402c4085
说明repository是UserRepository。泛型的T依赖注入成功;