使用第三类包:NPOI
介绍
Github地址:https://github.com/tonyqus/npoi,Java POI项目的.NET版。
通过它可以在没有安装Office软件的情况下,快速的读写Office文档。
特点:
- 跨平台
- 支持Office2003及以后所有版本
- 支持Excel的大部分特性
- 开源
- 实例丰富
- 维护者是中国人,所以交流应该问题不大
Nuget包下载:https://www.nuget.org/packages/NPOI/
实践一:读取Excel数据
注意:行列开始索引为0,没有数据的Cell为NULL。
        /// <summary>
        /// 读取Excel所有单元格数据
        /// </summary>
        /// <param name="path">文件路径</param>
        /// <param name="sheetName">Sheet名</param>
        /// <param name="startRow">读取开始行位置</param>
        /// <param name="columns">读取列表</param>
        /// <returns>单元格列表</returns>
        public static async Task<IList<ICell>> ReadAllCellsAsync(string path, string sheetName, int startRow = 1, IList<int> columns = null)
        {
            var ret = new List<ICell>();

            await Task.Factory.StartNew(() =>
            {
                using (var file = new FileStream(path, FileMode.Open, FileAccess.Read))
                {
                    var book = WorkbookFactory.Create(file);
                    var sheet = book?.GetSheet(sheetName);
                    if (sheet != null)
                    {
                        for (int row = startRow - 1; row <= sheet.LastRowNum; row++)
                        {
                            var rowValue = sheet.GetRow(row);
                            if (rowValue == null)
                            {
                                continue;
                            }

                            if (columns == null || columns?.Count <= 0)
                            {
                                columns = Enumerable.Range(1, rowValue.LastCellNum + 1).ToList();
                            }

                            foreach (int col in columns)
                            {
                                var cell = rowValue.GetCell(col - 1);
                                if (cell == null)
                                {
                                    continue;
                                }

                                ret.Add(cell);
                            }
                        }
                    }
                    book?.Close();
                }
            });

            return ret;
        }
取Cell值扩展函数
        public static string GetCellValue(this ICell cell)
        {
            if (cell == null)
            {
                return string.Empty;
            }

            switch (cell.CellType)
            {
                case CellType.Formula:
                case CellType.String:
                    return cell.StringCellValue;
                case CellType.Numeric:
                    if (DateUtil.IsCellDateFormatted(cell))
                    {
                        return cell.DateCellValue.ToString();
                    }
                    else
                    {
                        return cell.NumericCellValue.ToString();
                    }
                case CellType.Boolean:
                    return cell.BooleanCellValue.ToString();
                default:
                    return string.Empty;
            }
        }
实践二:写Excel数据
1,创建Book。
        public static IWorkbook CreateBook(this string path)
        {
            IWorkbook book;
            string extension = Path.GetExtension(path);

            // HSSF => Microsoft Excel(xls形式)(excel 97-2003)
            // XSSF => Office Open XML Workbook形式(xlsx形式)(excel 2007+)
            if (extension == ".xls")
            {
                book = new HSSFWorkbook();
            }
            else
            {
                book = new XSSFWorkbook();
            }

            return book;
        }
2,创建Sheet。
var sheet = book.CreateSheet(“test”);
3,创建单元格。(为了不区分HSSHyperLink与XSSFHyperLink直接使用了设置函数形式)
ICellStyle hlink_style = book.CreateCellStyle();
IFont hlink_font = book.CreateFont();
hlink_font.Underline = FontUnderlineType.Single;
hlink_font.Color = IndexedColors.Blue.Index;
hlink_style.SetFont(hlink_font);

var row = sheet.GetRow(rowIndex) ?? sheet.CreateRow(rowIndex);
var cell = row.GetCell(columnIndex) ?? row.CreateCell(columnIndex);

cell.SetCellValue("test");

// OR hyperlink
var linkcell = row.GetCell(columnIndex) ?? row.CreateCell(columnIndex);
linkcell.SetCellFormula($"hyperlink("{linkValue}","{value}")");
linkcell.CellStyle = hlink_style;
4,创建合并单元格。
sheet.AddMergedRegion(new CellRangeAddress(rowStart, rowEnd, columnStart, columnEnd));
5,创建单元格数据入力规则。
        public static void WriteValidation(this ISheet sheet, int rowStart, int rowEnd, int columnStart, int columnEnd, string[] values)
        {
            var addressList = new CellRangeAddressList(rowStart, rowEnd, columnStart, columnEnd);
            var helper = sheet.GetDataValidationHelper();
            var dataValidation = helper.CreateValidation(helper.CreateExplicitListConstraint(values), addressList);

            if (dataValidation is XSSFDataValidation)
            {
                dataValidation.SuppressDropDownArrow = true;
                dataValidation.ShowErrorBox = true;
            }
            else
            {
                dataValidation.SuppressDropDownArrow = false;
            }
            dataValidation.EmptyCellAllowed = true;
            dataValidation.ShowPromptBox = true;
            sheet.AddValidationData(dataValidation);
        }
6,创建过滤器。
sheet.SetAutoFilter(new CellRangeAddress(row + 1, row + 1, 0, col - 1));
7,创建自动调整宽度。
 for (int i = 0; i <= col; i++)
{
    sheet.AutoSizeColumn(i, true);
}
8,单元格格式设置。
注意:如果所有单元格使用同一个ICellStyle实例,那CellStyle对象一样。
            var commonFont = book.CreateFont();
            commonFont.Color = IndexedColors.Black.Index;
            commonFont.FontHeightInPoints = 12;
            var Common= book.CreateCellStyle();
            Common.SetFont(commonFont);
            Common.BorderBottom = BorderStyle.Thin;
            Common.BorderLeft = BorderStyle.Thin;
            Common.BorderRight = BorderStyle.Thin;
            Common.BorderTop = BorderStyle.Thin;
            Common.WrapText = true;
            Common.Alignment = HorizontalAlignment.Left;
            Common.VerticalAlignment = VerticalAlignment.Center;


            var row = sheet.GetRow(rowIndex) ?? sheet.CreateRow(rowIndex);
            var cell = row.GetCell(columnIndex) ?? row.CreateCell(columnIndex);
            cell.CellStyle = Common;
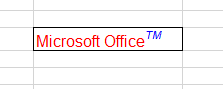
9,单元格部分文字颜色设置。
           int rowIndex = 10;
            int columnIndex = 5;

            var row = sheet.GetRow(rowIndex) ?? sheet.CreateRow(rowIndex);
            var cell = row.GetCell(columnIndex) ?? row.CreateCell(columnIndex);

            IRichTextString richText;
            if (sheet is HSSFSheet)
            {
                richText = new HSSFRichTextString("Microsoft OfficeTM");
            }
            else
            {
                richText = new XSSFRichTextString("Microsoft OfficeTM");
            }

            //apply font to "Microsoft Office"
            IFont redFont = workbook.CreateFont();
            redFont.FontHeightInPoints = 12;
            redFont.Color = IndexedColors.Red.Index;
            richText.ApplyFont(0, 16, redFont);

            //apply font to "TM"
            IFont blueFont = workbook.CreateFont();
            blueFont.TypeOffset = FontSuperScript.Super;
            blueFont.IsItalic = true;
            blueFont.Color = IndexedColors.Blue.Index;
            blueFont.FontHeightInPoints = 12;
            richText.ApplyFont(16, 18, blueFont);

            var style = workbook.CreateCellStyle();
            style.BorderBottom = BorderStyle.Thin;
            style.BorderLeft = BorderStyle.Thin;
            style.BorderRight = BorderStyle.Thin;
            style.BorderTop = BorderStyle.Thin;
            // 解决字体大小不一样问题
            richText.ApplyFont(style.FontIndex);
            cell.SetCellValue(richText);
            cell.CellStyle = style;
实行结果:
这样通过NPOI基本的Excel操作就没问题了。