一、Service简介
Service是Android程序中四大基础组件之一,它和Activity一样都是Context的子类,只不过它没有UI界面,是在后台运行的组件。
Service是Android中实现程序后台运行的解决方案,它非常适用于去执行那些不需要和用户交互而且还要求长期运行的任务。
Service默认并不会运行在子线程中,它也不运行在一个独立的进程中,它同样执行在UI线程中,因此,不要在Service中执行耗时的操作,除非你在Service中创建了子线程来完成耗时操作。
二、Service种类
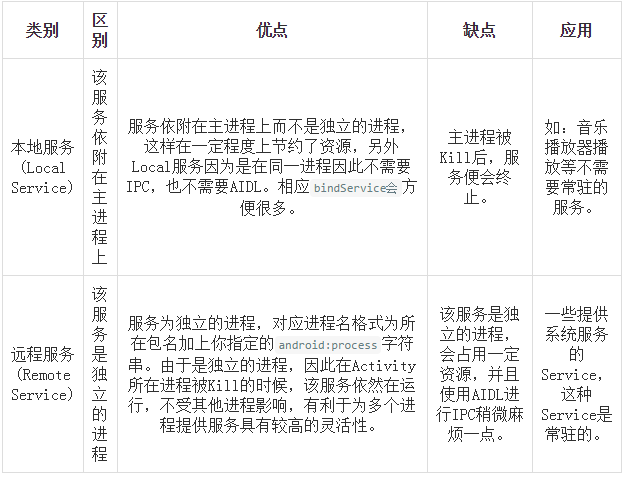
按运行地点分类:
按运行类型分类:

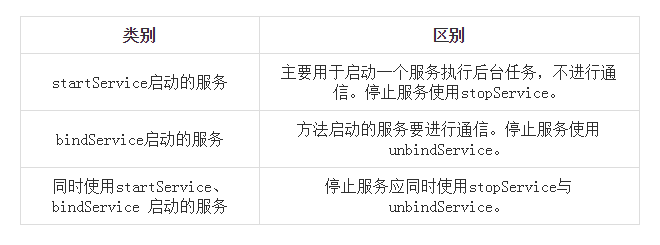
按使用方式分类:
三、Service生命周期

onCreate()
系统在Service第一次创建时执行此方法,来执行只运行一次的初始化工作。如果Service已经运行,这个方法不会被回调。
onStartCommand()
每次客户端调用startService()方法启动该Service都会回调该方法(多次调用)。一旦这个方法执行,Service就启动并在后台长期运行。通过调用stopSelf()或stopService()来停止服务。
onBind()
当组件调用bindService()想要绑定到Service时(比如想要执行进程间通信)系统调用此方法(一次调用,一旦绑定后,下次再调用bindService()不会回调该方法)。在你的实现中,必须提供一个返回一个IBinder来以使客户端能够使用它与Service通信,你必须总是实现这个方法,但是如果你不允许绑定,那么你应返回null。
onUnbind()
当前组件调用unbindService(),想要解除与Service的绑定时系统调用此方法(一次调用,一旦解除绑定,下次再调用unbindService()会抛出异常)
onDestroy()
系统在Service不再被使用并要销毁时调用此方法(一次调用)。Service应在此方法中释放资源,比如线程,已注册的侦听器,接收器等等,这是Service收到的最后一个调用
下面介绍三种不同情况下Service的生命周期情况
1.startService / stopService
生命周期顺序:
onCreate()-->onStartCommand()-->onDestroy()
如果一个Service被某个Activity调用Context.startService方法启动,那么不管是否有Activity使用bindService绑定或unbindService解除绑定该Service,该Service都在后台运行,知道被调用stopService,或自身的stopSelf方法。当然如果系统资源不足,Android系统也可能结束服务,还有一种方法关闭服务,在设置中,通过应用-->找到自己应用-->停止。
注意点:
①第一次startService会触发onCreate和onStartCommand方法,以后再服务运行过程中,每次startService都只会触发onStartCommand
②不论 startService 多少次,stopService 一次就会停止服务
2.bindService / unbindService
生命周期顺序
onCreate()-->onBind()-->onunBind()-->onDestroy()
如果一个Service在某个Activity中被调用bindService方法启动,不论bindService被调用几次,Service的onCreate方法只会执行一次,同时onStartCommand方法始终不会被调用。
当建立连接后,Service会一直运行,除非调用unbindService来解除绑定、断开连接或调用该Service的Context不存在了(如Activity被Finish——即通过bindService启动的Service的生命周期依附于启动它的Context),系统在这时会自动停止该Service。
注意点:
第一次bindService会触发onCreate和onBind,以后在服务运行过程中,每次bindService都不会出发任何回调。
3.混合型(上面两种方式的交互)
当一个Service在被启动(startService)的同时又被绑定(bindService),该Service将会一直在后台运行,并且不管调用几次,onCreate方法始终只会调用一次,onStartCommand的调用次数与startService调用的次数一致(使用bindService方法不会调用onStartCommand)。同时,调用unBindService将不会停止Service,必须调用stopService或Service自身的stopSelf来停止服务。
4. 在什么情况下使用 startService 或 bindService 或 同时使用startService 和 bindService?
①如果你只是想要启动一个后台服务长期进行某项任务,那么使用startService便可以了。
②如果你想要与正在运行的Service取得联系,那么有两种方法,一种是使用BroadCast,另外是使用bindService,前者的缺点是如果交流较为频繁,容易造成性能上的问题,并且BroadCastReceiver本身执行代码的时间是很短的(也许执行到一半,后面的代码便不会执行),二后者则没有这些问题,因此我们肯定选择bindService(这个时候你便同时在使用startService和bindService了,这在Activity中更新Service的某些运行状态是相当有用的)。
③如果你的服务只是公开一个远程接口,供连接上的客服端(android 的 Service 是C/S架构)远程调用执行方法。这个时候你可以不让服务一开始就运行,而只用 bindService ,这样在第一次 bindService 的时候才会创建服务的实例运行它,这会节约很多系统资源,特别是如果你的服务是Remote Service,那么该效果会越明显(当然在 Service 创建的时候会花去一定时间,你应当注意到这点)。
四、Service的几种典型使用实例
1.不可交互的后台服务
不可交互的后台服务即是最普通的Service,通过startService()方法开启。Service的生命周期非常简单,分别为onCreate、onStartCommand、onDestroy这三个。
创建服务类:
public class BackService extends Service{
    private Thread mThread;

    @Override
    public void onCreate(){
        super.onCreate();
    }

    @Nullable
    @Override
    public IBinder onBind(Intent intent){
        System.out.println("onBind");
        return null;
    }

    @Override
    public int onStartCommand(Intent intent, int flags, int startId){
        //执行耗时操作
        mThread = new Thread(){
            @Override
            public void run(){
                try{
                    while (true){
                        //等待停止服务
                        if (this.isInterrupted()){
                            throw new InterruptedException();
                        }
                        //执行耗时操作
                        System.out.println("执行耗时操作");
                    }
                }catch (InterruptedException e){
                    e.printStackTrace();
                }
            }
        };
        mThread .start();
        return super.onStartCommand(intent, flags, startId);
    }

    @Override
    public void onDestroy(){
        super.onDestroy();
        //停止线程
        mThread.interrupt();
    }
}
配置服务
<service android:name=".BackService">
</service>
如果想配置成远程服务,加入下代码:
android:process="remote"
配置好Service类,只需要在前台,调用startService()方法,就会启动耗时操作。
注意:
①不运行在一个独立的进程中,它同样执行在UI线程中,因此,在Service中创建了子线程来完成耗时操作。
②当Service关闭后,如果在onDestory()方法中不关闭线程,你会发现我们的子线程进行的耗时操作是一直存在的,此时关闭该子线程的方法需要直接关闭该应用程序。因此,在onDestory()方法中要进行必要的清理工作。
2.可交互的后台服务
可交互的后台服务是指前台页面可以调用后台服务的方法,通过bindService()方法开启。Service的生命周期很简单,分别为onCreate、onBind、onUnBind、onDestroy这四个。可交互的后台服务实现步骤是和不可交互的后台服务实现步骤是一样的,区别在于启动的方式和获得Service的代理对象。
创建服务类:
和普通Service不同在于这里返回一个代理对象,返回给前台进行获取,即前台可以获取该代理对象执行后台服务的方法。
public class BackService extends Service{

    @Override
    public void onCreate(){
        super.onCreate();
    }

    @Nullable
    @Override
    public IBinder onBind(Intent intent){
        //返回MyBinder对象
        return new MyBinder();
    }

    //需要返回给前台的Binder类
    class MyBinder extends Binder{
        public void showTip(){
            System.out.println("我是来此服务的提示");
        }
    }

    @Override
    public void onDestroy(){
        super.onDestroy();
    }
}
前台调用
通过以下方式绑定服务:
bindService(mIntent, con, BIND_AUTO_CREATE);
其中第二个参数:
private ServiceConnection con = new ServiceConnection(){
    @Override
    public void onServiceConnected(ConponentName name, IBinder service){
        BackService.MyBinder myBinder = (BackService.MyBinder) service;
        myBinder.showTip();
    }

    @Override
    public void onServiceDisconnected(ConponentName name){

    }
}
当建立绑定后,onServiceConnected中的service便是Service类中onBind的返回值。如此便可以调用后台服务类的方法,实现交互。
注意:
通过bindService启动的Service的生命周期依附于启动它的Context。因此当前台调用bindService的Context销毁后,那么服务会自动停止。
3.混合型后台服务
将上面两种启动方式结合起来就是混合性交互的后台服务了,即可以单独运行后台服务,也可以运行后台服务中提供的方法,其完整的生命周期是:
onCreate()-->onStartCommand()-->onBind()-->onUnBind()-->onDestroy()
4.前台服务
所谓前台服务只不是通过一定的方式将服务所在的进程级别提升了。前台服务会一直有一个正在运行的图标在系统的状态栏显示,非常类似于通知的效果。
由于后台服务优先级相对比较低,当系统出现内存不足的情况下,它就有可能会被回收掉,所以前台服务就是来弥补这个缺点的,它可以一直保持运行状态而不被系统回收。
创建服务类
前台服务创建很简单,其实就在Service的基础上创建一个Notification,然后使用Service的startForeground()方法即可启动为前台服务。
public class ForeService extends Service{
    @Nullable
    @Override
    public IBinder onBind(Intent intent) {
        return null;
    }

    @Override
    public void onCreate() {
        super.onCreate();
        beginForeService();
    }

    private void beginForeService(){
        //创建通知
        Notification.Builder mBuilder = new Noti .Builder(this)
                .setSmallIcon(R.mipmap.ic_launcher)
                .setContentText("2019-8-16")
                .setContentText("您有一条未读短信...");
        //创建点跳转的Intent(这个跳转是跳转到通知详情页)
        Intent intent = new Intent(this, NotificationShow.class);
        //创建通知详情页的栈
        TaskStackBuilder stackBuilder = TaskStackBuilder.create(this);
        //为其添加父栈 当从通知详情页回退时,将退到添加的父栈中
        stackBuilder.addParentStack(NotificationShow.class);
        PendingIntent pendingIntent = stackBuilder.getPengdingIntent(0,
                    FLAG_UPDATE_CURRENT);
        //设置跳转Intent到通知中
        mBuilder.setContentIntent(pendingIntent);
        //获取通知服务
        NotificationManager nm = (NotificationManager) getSystemService(Context.NOTIFICATION_SERVICE);
        //构建通知
        Notification notification = mBuilder.build();
        //显示通知
        nm.notify(0, notification);
        //启动前台服务
        startForeground(0, notification);
    }
}
启动前台服务
startService(new Intent(this, ForeService.class));
关于TaskStackBuilder 这一段,可能不是看的很明白,下面详细介绍。
TaskStackBuilder在Notification通知栏中的使用
首先是用于一般的PendingIntent来跳转
mBuilder = new NotificationCompat.Builder(this).setContent(view)
        .setSmallIcon(R.drawable.icon).setTicker("新资讯")
        .setWhen(System.currentTimeMillis())
        .setOngoing(false)
        .setAutoCancel(true);
Intent intent = new Intent(this, NotificationShow.class);
PendingIntent pendingIntent = PendingIntent.getActivity(this, 0, intent, PendingIntent.FLAG_UPDATE_CURRENT);
mBuilder.setContentIntent(pendingIntent);
这里是直接用PendingIntent来跳转到NotificationShow。
这里是直接用PendingIntent来跳转到NotificationShow。
在运行效果上来看,首先发送了一条Notification到通知栏上,然后这时,退出程序,即MainActivity已经不存在了,回到home主菜单,看到Notification仍然存在,当然,我们还没有点击或者cancel它,现在去点击Notification,跳转到NotificationShow界面,然后我们按下Back键,发现直接回到home菜单了。现在大多数android应用都是在通知栏中如果有Notification通知的话,点击它,然后会直接跳转到对应的应用程序的某个界面,这时如果回退,即按下Back键,会返回到该应用程序的主界面,而不是系统的home菜单。
所以用上面这种PendingIntent的做法达不到目的。这里我们使用TaskStackBuilder来做。
mBuilder = new NotificationCompat.Builder(this)
        .setContent(view)
        .setSmallIcon(R.drawable.icon).setTicker("新资讯")
        .setWhen(System.currentTimeMillis())
        .setOngoing(false)
        .setAutoCancel(true);
Intent intent = new Intent(this, NotificationShow.class);
TaskStackBuilder stackBuilder = TaskStackBuilder.create(this);
stackBuilder.addParentStack(NotificationShow.class);
stackBuilder.addNextIntent(intent);
PendingIntent pendingIntent = stackBuilder.getPendingIntent(0, PendingIntent.FLAG_UPDATE_CURRENT);
//PendingIntent pendingIntent = PendingIntent.getActivity(this, 0, intent, PendingIntent.FLAG_UPDATE_CURRENT);
mBuilder.setContentIntent(pendingIntent);
显示用TaskStackBuilder.create(this)创建一个stackBuilder实例,接下来addParentStack();
关于这个方法,我们查一下官方API文档:
Add the activity parent chain as specified by the parentActivityName attribute of the activity (or activity-alias) element in the application's manifest to the task stack builder
这句话意思是:为跳转后的activity添加一个父activity,在activity中的manifest中添加parentActivityName即可。
那么我们就在manifest文件中添加这个属性
<activity
    android:name="com.lvr.service.NotificationShow"
    android:parentActivityName=".MainActivity" >
</activity>
这里我让它的parentActivity为MainActivity,也就是说在NotificationShow这个界面点击回退时,会跳转到MainActivity这个界面,而不是像上面一样直接回到了home菜单。
注意:
通过 stopForeground()方法可以取消通知,即将前台服务降为后台服务。此时服务依然没有停止。通过stopService()可以把前台服务停止。
转载自:https://lrh1993.gitbooks.io/android_interview_guide/content/android/basis/service.html
当调用unbindService()停止服务,同时要在onDestory()方法中做好清理工作。