Spring Boot 中使用 spring-boot-devtools (使用 Gradle 作为构建工具)
本文使用 Gradle 作为构建工具,关于 Gradle 构建工具,可以理解为是 Maven 的升级版,我个人认为比 Maven 好的地方是 Gradle 的 Groovy 的语法,比起 Maven 的 xml 语法,看起来要简洁得多。
首先,我们引入阿里巴巴的 Maven 仓库,加快构建下载的速度
allprojects {
    repositories {
        maven { url 'http://maven.aliyun.com/nexus/content/groups/public/' }
    }
}
引入基本依赖
引入 Spring Boot 最最基础的依赖:
compile group: 'org.springframework.boot', name: 'spring-boot-starter-web', version: '1.5.2.RELEASE'
引入 spring-boot-devtools 的依赖:
compile("org.springframework.boot:spring-boot-devtools")
所以最后看起来是这样:
dependencies {
    testCompile group: 'junit', name: 'junit', version: '4.12'
    compile group: 'org.springframework.boot', name: 'spring-boot-starter-web', version: '1.5.2.RELEASE'
    compile("org.springframework.boot:spring-boot-devtools")
}
加入仓库(很重要,决定了 spring-boot-devtools 能否正确下载)
buildscript {
    ext {
        springBootVersion = '1.5.2.RELEASE'
    }
    repositories {
        // NOTE: You should declare only repositories that you need here
        mavenLocal()
        mavenCentral()
        maven{ url 'http://maven.aliyun.com/nexus/content/groups/public/'}
        maven { url "http://repo.spring.io/release" }
        maven { url "http://repo.spring.io/milestone" }
        maven { url "http://repo.spring.io/snapshot" }
    }
    dependencies {
        classpath("org.springframework.boot:spring-boot-gradle-plugin:${springBootVersion}")
    }
}
加入插件(很重要,决定了 spring-boot-devtools 能否正确下载)
这里就一句话,这句话,我测试了很久才发现这句话必须加上去。
apply plugin: 'spring-boot'
这时,我们就可以刷新 Gradle,看到所有的依赖都正常下载。
到这里配置文件的配置就告一段落了,下面我们还要配置 IntelliJ IDEA。
配置 IntelliJ IDEA
勾选 Build project automatically 选项前的单选按钮。

接下来的设置
1、mac 电脑按下 command + alt + shift + / 出现:
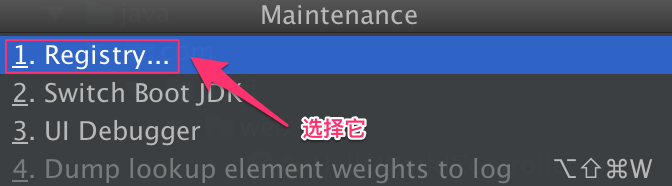
2、找到 “compiler.automake.allow.when.app.running” 这个选项,并且勾选:

此致,就大功告成了。
示例项目 GitHub 所在地址:https://github.com/weimingge14/SpringBootDevTool