文件结构:
files structure

HelloSpring.java (1)
 1 package test;
 2
 3 public class HelloSpring {
 4
 5     private String name;
 6
 7     public String getName() {
 8         return name;
 9     }
10
11     public void setName(String name) {
12         this.name = name;
13     }
14
15     public String hello(){
16         return "hello " + name ;
17     }
18
19 }
Tester.java
 1 package test;
 2
 3 public class Tester {
 4
 5     public static void main( String[] args){
 6
 7         HelloSpring helloSpring = new HelloSpring();
 8
 9         String name = "杨";
10         helloSpring.setName(name);
11
12         System.out.println( helloSpring.hello() );
13
14     }
15
16 }
运行:右键 Tester.java > Run As > 2 Java Application
run: right click Tester.java Run As > 2 Java Application

结果:
result

以上内容告一段落,下面把 name 属性的值写到配置文件里去。
so much here, follow is put the propertie of name into properties file
新建一 Name.properties 配置文件:
new file: Name.properties
目录结构:
file structure

右键 src > New > Others > File
right click src > New > Others > File
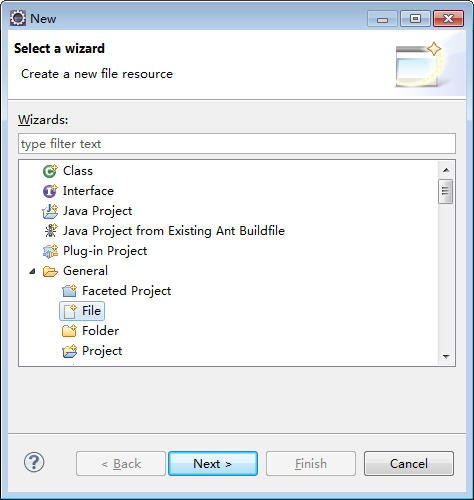
File name: Name.properties
内容:
content:
name=\u6768\u529b\u6743

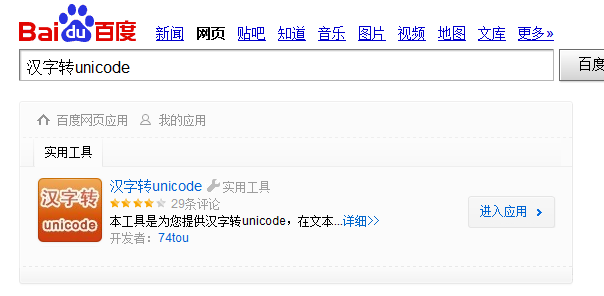
下面是汉字转 unicode 的方法:
mothed of trans from Chines to unicode:
[点击这里打开链接]
click here to open the url
点击 “进入应用” 按钮:
click the button which name is enter the application


转换结果:
result of trans:
\u6768\u529b\u6743
Tester.java :
 1 package test;
 2
 3 import java.io.IOException;
 4 import java.util.Properties;
 5
 6 public class Tester {
 7
 8     public static void main( String[] args){
 9
10         HelloSpring helloSpring = new HelloSpring();
11
12
13
14         String name = "杨1";
15
16         System.out.println( name );
17
18         Properties properties = new Properties();
19         try {
20             properties.load(Tester.class.getClassLoader().getResourceAsStream("Name.properties"));
21             name = properties.getProperty("name");
22         } catch (IOException e) {
23             // TODO Auto-generated catch block
24             e.printStackTrace();
25         }
26
27         helloSpring.setName(name);
28
29         System.out.println( helloSpring.hello() );
30
31     }
32
33 }
右键 right click and select Run As > Java Application ( Alt + Shift +x, j )

以上内容是 Spring 的一个思路:使用配置文件来代替代码。
the idea of above is : use the properties file instead the code.
让我们再次告一段落,下面感受 Spring ( 感觉春天 )。
so let's have a rest, later, let's enjoy the Spring .
引入3 个 jar 包
copy 3 jar files to lib

下载 DTD 文件:
download DTD file:
http://www.springframework.org/dtd/


拷贝到 WEB-INF 目录下:
copy the file to WEB-INF path:

右键 src > New > Others > XML File
right click "src" >New > Others > XML File

Next

Next

Next

Next

Finish
beans.xml
<?xml version="1.0" encoding="UTF-8"?>
<!DOCTYPE beans SYSTEM "../WebContent/WEB-INF/spring-beans-2.0.dtd" >
<beans></beans>
这个内容报错了:
something is wrong:


在网上搜了一下,先用这个:
search the Internet then use this:
1 <?xml version="1.0" encoding="UTF-8"?>
2 <!DOCTYPE beans PUBLIC "" "http://www.springframework.org/dtd/spring-beans.dtd" >
3 <beans></beans>
修改
update
1 <?xml version="1.0" encoding="UTF-8"?>
2 <!DOCTYPE beans PUBLIC "" "http://www.springframework.org/dtd/spring-beans.dtd" >
3 <beans>
4
5     <bean id="helloSpring" class="test.HelloSpring">
6         <property name="name" value="杨力权"></property>
7     </bean>
8
9 </beans>
第3版本的 Tester.java
3rd version of Tester.java
 1 package test;
 2
 3 import org.springframework.beans.factory.BeanFactory;
 4 import org.springframework.beans.factory.xml.XmlBeanFactory;
 5 import org.springframework.core.io.ClassPathResource;
 6 import org.springframework.core.io.Resource;
 7
 8 @SuppressWarnings("deprecation")
 9 public class Tester {
10
11     public static void main( String[] args){
12
13         Resource r = new ClassPathResource("beans.xml");
14         BeanFactory factory = new XmlBeanFactory(r);
15
16         HelloSpring helloSpring = (HelloSpring)factory.getBean("helloSpring");
17
18         System.out.println( helloSpring.hello() );
19
20     }
21
22 }
结果
result
