路由/菜单说明
配置文件路径
@/config/router.config.js
格式和说明
/**
 * 路由配置说明:
 * 建议:sider menu 请不要超过三级菜单,若超过三级菜单,则应该设计为顶部主菜单 配合左侧次级菜单
 *
 **/
 {
  redirect: noredirect,
  name: 'router-name',
  hidden: true,
  meta: {
    title: 'title',
    icon: 'a-icon',
    keepAlive: true,
    hiddenHeaderContent: true,
  }
}
{ Route } 对象
| 参数 | 说明 | 类型 | 默认值 |
|---|---|---|---|
| hidden | 控制路由是否显示在 sidebar | boolean | false |
| redirect | 重定向地址, 访问这个路由时,自定进行重定向 | string | - |
| name | 路由名称, 必须设置,且不能重名 | string | - |
| meta | 路由元信息(路由附带扩展信息) | object | {} |
| hideChildrenInMenu | 强制菜单显示为Item而不是SubItem(配合 meta.hidden) | boolean | - |
{ Meta } 路由元信息对象
| 参数 | 说明 | 类型 | 默认值 |
|---|---|---|---|
| title | 路由标题, 用于显示面包屑, 页面标题 *推荐设置 | string | - |
| icon | 路由在 menu 上显示的图标 | [string,svg] | - |
| keepAlive | 缓存该路由 | boolean | false |
| hidden | 配合hideChildrenInMenu使用,用于隐藏菜单时,提供递归到父菜单显示 选中菜单项_(可参考 个人页 配置方式)_ |
boolean | false |
| hiddenHeaderContent | *特殊 隐藏 PageHeader 组件中的页面带的 面包屑和页面标题栏 | boolean | false |
| permission | 与项目提供的权限拦截匹配的权限,如果不匹配,则会被禁止访问该路由页面 | array | [] |
路由自定义
Icon请引入自定义svgIcon 文件,然后传递给路由的meta.icon参数即可
路由例子
const asyncRouterMap = [
  {
    path: '/',
    name: 'index',
    component: BasicLayout,
    meta: { title: '首页' },
    redirect: '/dashboard/analysis',
    children: [
      {
        path: '/dashboard',
        component: RouteView,
        name: 'dashboard',
        redirect: '/dashboard/workplace',
        meta: {title: '仪表盘', icon: 'dashboard', permission: ['dashboard']},
        children: [
          {
            path: '/dashboard/analysis',
            name: 'Analysis',
            component: () => import('@/views/dashboard/Analysis'),
            meta: {title: '分析页', permission: ['dashboard']}
          },
          {
            path: '/dashboard/monitor',
            name: 'Monitor',
            hidden: true,
            component: () => import('@/views/dashboard/Monitor'),
            meta: {title: '监控页', permission: ['dashboard']}
          },
          {
            path: '/dashboard/workplace',
            name: 'Workplace',
            component: () => import('@/views/dashboard/Workplace'),
            meta: {title: '工作台', permission: ['dashboard']}
          }
        ]
      },

      // result
      {
        path: '/result',
        name: 'result',
        component: PageView,
        redirect: '/result/success',
        meta: { title: '结果页', icon: 'check-circle-o', permission: [ 'result' ] },
        children: [
          {
            path: '/result/success',
            name: 'ResultSuccess',
            component: () => import(/* webpackChunkName: "result" */ '@/views/result/Success'),
            // 该页面隐藏面包屑和页面标题栏
            meta: { title: '成功', hiddenHeaderContent: true, permission: [ 'result' ] }
          },
          {
            path: '/result/fail',
            name: 'ResultFail',
            component: () => import(/* webpackChunkName: "result" */ '@/views/result/Error'),
            // 该页面隐藏面包屑和页面标题栏
            meta: { title: '失败', hiddenHeaderContent: true, permission: [ 'result' ] }
          }
        ]
      },
      ...
    ]
  },
]
- 请注意
component: () => import('..')方式引入路由的页面组件为 懒加载模式。具体可以看 Vue 官方文档- 增加新的路由应该增加在 '/' (index) 路由的
children内- 子路由的父级路由必须有
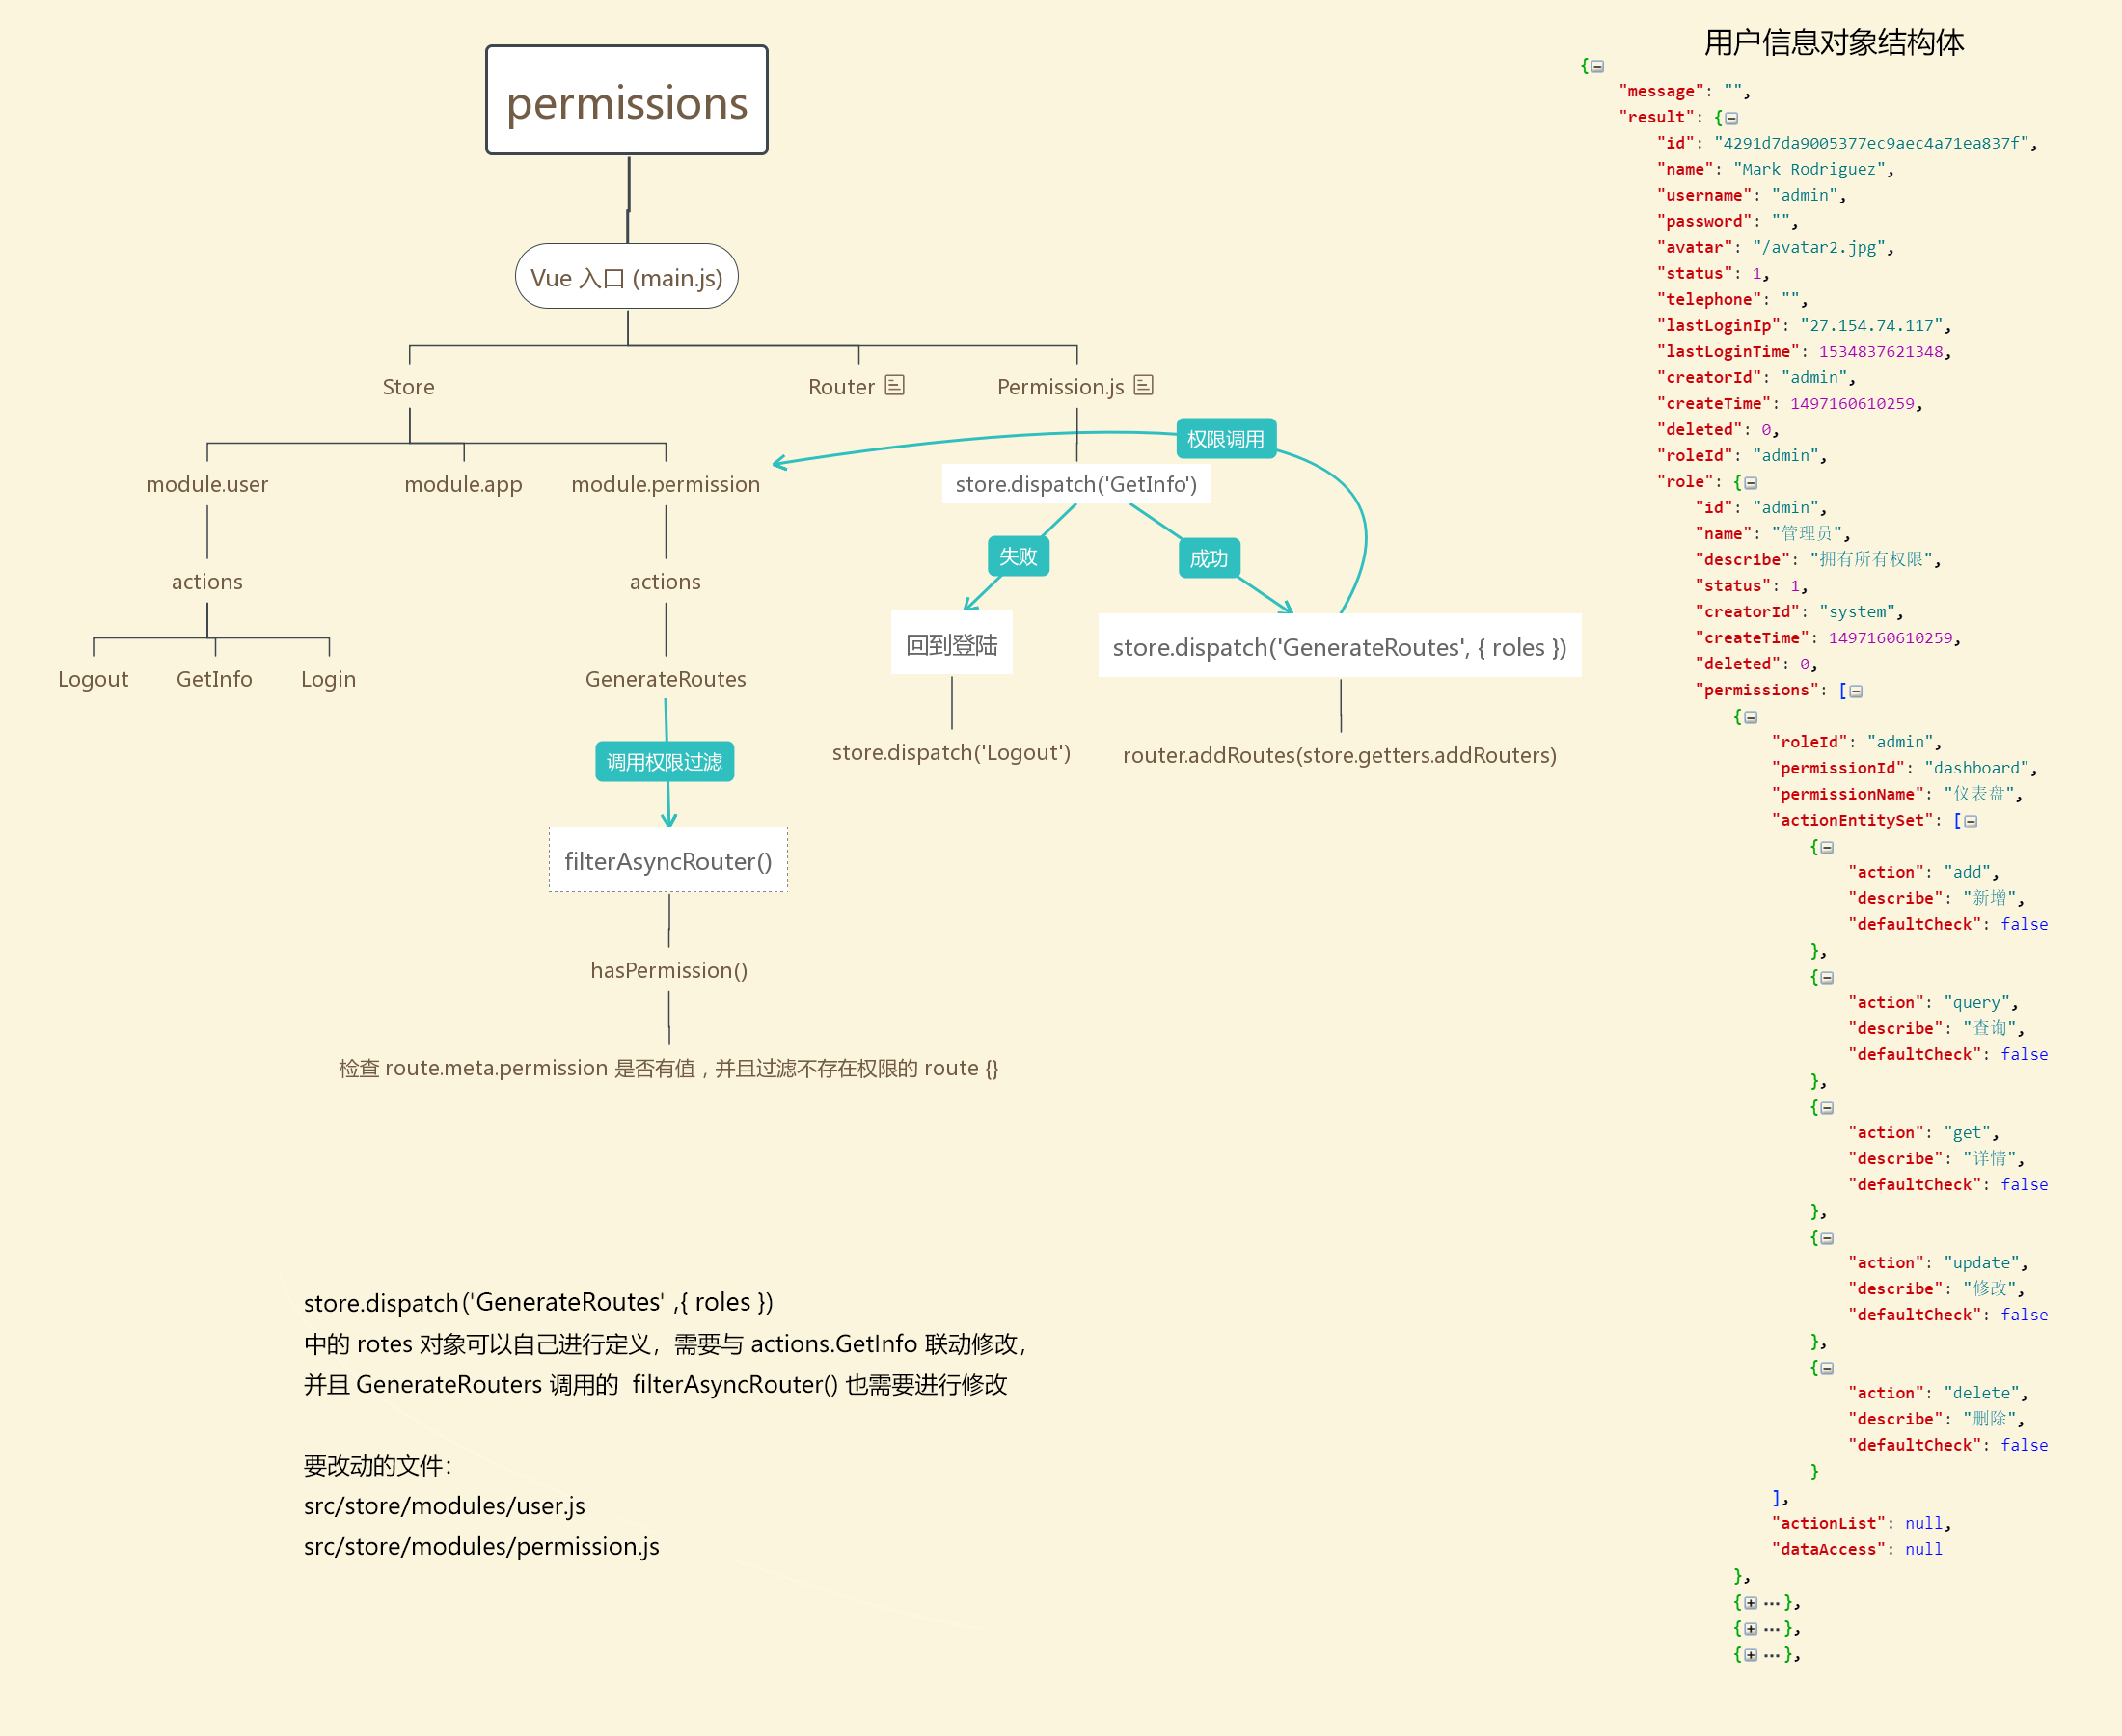
router-view才能让子路由渲染出来,请仔细查阅 vue-router 文档permission可以进行自定义修改,只需要对这个模块进行自定义修改即可 src/store/modules/permission.js#L10
附权限路由结构:
第二种前端路由由后端动态生成的设计,可以前往官网文档 https://pro.loacg.com/docs/authority-management 参考