之前已经介绍了$location服务的基本用法:angular学习笔记(三十一)-$location(1).
这篇是上一篇的进阶,介绍$location的配置,兼容各版本浏览器,等.
*注意,这里介绍的是基于angular-1.3.2版本的,低版本的$location可能会有问题.
hashbang模式和history api创建单页应用
首先,$location是用在单页应用里的...(废话,angular就是用在单页的)...所以,$location处理的是url改变,但是不刷新页面的情况.那么我们知道,不刷新页面但是请求ajax改变url,需要存入历史记录.这样的话,需要使用html5的history api,但是对于不支持history api的浏览器(也就是ie8,9吧,反正ie7angular本来就不支持,而且看了花瓣网,它在ie7,8,也没有使用单页,而是新开链接),则需要使用hashbang模式.
什么叫hashbang模式?在网上查阅了很多也没有查到具体的说明.只能按照自己理解的来总结:
比如一个url: http://localhost:801/$location/index.html,这个页面,在垃圾浏览器里,需要实现发送ajax,改变url,但是不刷新页面,并且可以使用后退前进按钮,怎么做呢? 就在url后面使用'#'加一个标识符'!',再加上路径,参数,哈希值等...这样,因为使用了'#',所以页面不会刷新,而url也改变了,可以存入历史记录.其中'#'代表了hash,'!'代表了bang,所以这种模式被称为hashbang模式.注意,'!'不是固定的,可以是任意的标识符,也可以为空的.而且,当我刷新http://localhost:801/$location/index.html#!/foo?name=code_bunny#bunny时,可以访问到http://localhost:801/$location/index.html.
这就是我自己总结的传统的hashbang模式.而使用HTML5 history api,则不需要'#'和标示符.只需要直接在url后面加上路径,参数,哈希值,等...但是当我刷新http://localhost:801/$location/index.html/foo?name=code_bunny#bunny时,是不能访问到http://localhost:801/$location/index.html页面的,需要服务端进行配置,使应用能够接受来自http://localhost:801/$location/index.html/foo?name=code_bunny#bunny的请求.
介绍完了hashbang和history api,接下来来看下angular是怎么处理它们的.
配置$location服务
可以看到,在 angular学习笔记(三十一)-$location(1)这篇文章里,所有例子的url都是带有#的,(bang标识符为空),无论在任何浏览器里,它都是这样的,而没有使用history api. 如果需要使用history api,或者配置bang标识符,可以对$location服务进行配置:
var locationApp = angular.module('locationApp',[]);
locationApp.config(function($locationProvider){
    $locationProvider.html5Mode(true).hashPrefix('!');
});
$locationProvider有两个方法可以配置:
$locationProvider.html5Mode(boolean || obj)
1.$locationProvider.html5Mode(true): 开启html5的history api
2.$locationProvider.html5Mode(false): 关闭html5的history api
3.$locationProvider.html5Mode({enabled:true}): 同1
4.$locationProvider.html5Mode({enabled:false}): 同2(默认配置)
5.$locationProvider.html5Mode({requireBase:true}): 设置为'需要定义base href'标签(后面会讲到base href标签)
6.$locationProvider.html5Mode({requireBase:false}): 设置为'不需要定义base href'标签(后面会讲到base href标签)
$locationProvider.hashPrefix('string')
设置bang标识符.不设置的话,默认为空
base href属性的定义
在介绍hashbang和histroy api的时候,我把url分成了两部分颜色显示,第一部分是浅绿色的,第二部分是深绿色的.浅绿色的是固定不变的,而深绿色的,是可以改变的.也就是$location.url()
那么浏览器是如何知道固定的是什么的呢? 就是通过设置base href属性:
在head标签里添加如下标签:
<base href="/$location/base/">
这样,浏览器就知道,不变的部分是 http://localhost:801/$location/base/.注意,一定要有'/'开头,'/'结尾,否则在垃圾浏览器里会有问题.因为它不会自己给它加上'/',但如果你定义的base href是'/$location/base/index.html',那是可以的.
另外,定义了这个base href以后,页面里所有的js,css,都是这个base href的相对路径.
前面提到了$locationProvider.html5Mode的参数的requireBase属性,就是用来定义是否页面中一定要定义base href标签的.
如果不定义,它会自己把页面的根目录作为固定部分,比如 http://localhost:801/$location/base/index.html, 它会认为固定部分是http://localhost:801
总结一下,base href的值,应该是域名部分后面的整个路径部分,以/开始,/结尾,注意一定要加这个属性!!!实际工作中很容易忘记加它导致路由不生效也不报错.被坑过很多次了!!!
a链接的跳转
页面的url改变,肯定是点击了某些元素,最常见的自然是a链接,a链接本来的作用是跳转页面,但在单页应用中,我们只需要让它改变url后面的$location.url()部分,而不刷新页面.所以,a链接可以这么写:
<a href="some1?foo=bar">/some1?foo=bar</a>
<a href="some2?foo=bar#myhash">/some2?foo=bar#myhash</a>
angular会自动处理浏览器的兼容问题.假设点击第一个链接:
在高级浏览器里,url会变成: http://localhost:801/$location/base/some1?foo=bar
在垃圾浏览器里,url会变成: http://localhost:801/$location/base/#!/some1?foo=bar
注意事项:
1.href值以'/'开头,会跳转刷新页面.
2.a链接带有target属性,会跳转刷新页面.
3.外链的话,直接写绝对地址即可跳转刷新页面
$location的双向数据绑定
下面这段代码演示了如何实现让$location.url和地址栏的url双向绑定:
<input type="text" ng-model="location" ng-model-options="{getterSetter:true}"/>
$scope.location=function(newLocation){
    return $location.url(newLocation);
};
综合实例
最后,我用所有关于$location的知识写一个demo:
这个实例在angular学习笔记(三十一)-$location(1)的基础上新增了本篇讲到的知识:
1.添加base href标签
2.hashbang和html5 history api处理浏览器兼容
3.$location双向数据绑定
4.a链接改变url
html:
<!DOCTYPE html>
<html ng-app="locationApp">
<head>
  <title>21.1 $location</title>
  <meta charset="utf-8">
  <base href="/$location/base/">
  <script src="../angular-1.3.2.js"></script>
  <script src="../script.js"></script>
</head>

<body ng-controller="locationCtrl">

  <input type="text" ng-model="location" ng-model-options="{getterSetter:true}"/>

  <p>完整url路径: <span>{{absurl}}</span></p>

  <p>url路径(当前url#后面的内容,包括参数和哈希值): <span>{{url}}</span>
    <button ng-click="changeUrl()">改变</button>
  </p>

  <p>相对路径(也就是当前url#后面的内容,不包括参数): <span>{{path}}</span>
    <button ng-click="changePath()">改变</button>
  </p>

  <p>协议(比如http,https): <span>{{protocol}}</span></p>

  <p>主机名: <span>{{host}}</span></p>

  <p>端口号: <span>{{port}}</span></p>

  <p>哈希值: <span>{{hash}}</span>
    <button ng-click="changeHash()">改变</button>
  </p>

  <p>search值序列化json:
    <span>{{search}}</span>
    <button ng-click="changeSearch_1()">改变1</button>
    <button ng-click="changeSearch_2()">改变2</button>
    <button ng-click="changeSearch_3()">改变3</button>
    <button ng-click="changeSearch_4()">改变4</button>
    <button ng-click="changeSearch_5()">改变5</button>
    <button ng-click="changeSearch_6()">改变6</button>
  </p>

  <a href="some1?foo=bar">/some1?foo=bar</a> |
  <a href="some2?foo=bar#myhash">/some2?foo=bar#myhash</a> |
  <a href="http://www.baidu.com">外部链接</a>


</body>
</html>
js:
var locationApp = angular.module('locationApp',[]);
locationApp.config(function($locationProvider){
    $locationProvider.html5Mode(true).hashPrefix('!');
});
locationApp.controller('locationCtrl',function($scope,$location,$timeout,$rootScope){
    $scope.location=function(newLocation){
        return $location.url(newLocation);
    };
    $scope.absurl = $location.absUrl();
    $scope.url = $location.url();
    $scope.path = $location.path();
    $scope.protocol = $location.protocol();
    $scope.host = $location.host();
    $scope.port = $location.port();
    $scope.hash = $location.hash();
    $scope.search = $location.search();

    $scope.refresh = function(){
        $scope.absurl = $location.absUrl();
        $scope.url = $location.url();
        $scope.path = $location.path();
        $scope.hash = $location.hash();
        $scope.search = $location.search();
    };

    //重写url部分,相应的absurl,url,path,hash,search都会改变
    $scope.changeUrl = function(){
        $location.url('/foo2?name=bunny2&age=12#myhash2');
    };

    //重写path部分,相应的absurl,url,path都会改变
    $scope.changePath = function(){
        $location.path('/foo2/foo3');
    };

    //重写hash部分,相应的absurl,url,hash都会改变
    $scope.changeHash = function(){
        $location.hash('myhash3');
    };

    //修改search部分(方法1),相应的absurl,url,search,hash都会改变
    //指定两个参数,第一个参数是属性名,第二个参数是属性值.
    //如果属性名是已有属性,则修改,如果属性名不是已有的,则新增.
    //属性值也可以是一个数组,参考方法6
    $scope.changeSearch_1 = function(){
        $location.search('name','code_bunny');
    };

    //修改search部分(方法2),相应的absurl,url,search,hash都会改变
    //指定两个参数,第二个参数是null:删除第一个参数所指定的属性名.不再有这个属性
    //若第一个参数不是已有的,则不发生任何改变
    $scope.changeSearch_2 = function(){
        $location.search('age',null);
    };

    //修改search部分(方法3),相应的absurl,url,search,hash都会改变
    //指定一个参数,json对象,直接重写整个search部分.不管是不是已有属性,全部重写.
    //这里属性的值可以是一个数组,参考方法5
    $scope.changeSearch_3 = function(){
        $location.search({name:'papamibunny',age:16,love:'zxg'});
    };

    //修改search部分(方法4),相应的absurl,url,search,hash都会改变
    //指定一个参数,字符串,整个search部分就变为这个字符串.注意是没有属性值的.
    $scope.changeSearch_4 = function(){
        $location.search('bunnybaobao');
    };

    //修改search部分(方法5),相应的absurl,url,search,hash都会改变
    //其余和方法3一样.全部重写search:
    //指定一个参数,json格式,属性值是一个数组,那么最后的search会变成name=code_bunny&name=white_bunny&name=hua_bunny
    $scope.changeSearch_5 = function(){
        $location.search({name:['code_bunny','white_bunny','hua_bunny']});
    };

    //修改search部分(方法6),相应的absurl,url,search,hash都会改变
    //其余和方法1一样,修改指定的属性名(或新增)
    //第二个参数是一个数组,最后search中的love部分会变成love=zxg&love=mitu
    //它和方法5的区别,就像方法1和方法3的区别,一个是修改或新增某个属性值,一个是重置整个search
    $scope.changeSearch_6 = function(){
        $location.search('love',['zxg','mitu']).replace();
    };

    //使用$location.replace(),则这一次的修改路径不会被记录到历史记录中,点击后退,不会后退到改变前的路径,而是后退到改变前的路径的改变前的路径

    $rootScope.$on('$locationChangeStart',function(){
        console.log('开始改变$location')
    });
    $rootScope.$on('$locationChangeSuccess',function(){
        $scope.refresh();
        console.log('结束改变$location')
    });
    //这里就算绑定了$routeChangeStart和$routeChangeSuccess,也不会被触发,因为这里没有$route相关的服务.
});
*以上demo运行在我本地的http://localhost:801/这个wamp服务下.
1.添加base href标签
添加了base href标签后,页面的基础url就变为: http://localhost:801/$location/base/
2.hashbang和html5 history api处理浏览器兼容
设置启用html5的history api,设置bang标识符为'!'
完成了1,2以后,在浏览器里打开 http://localhost:801/$location/base
在高级浏览器里:

在ie9模式:
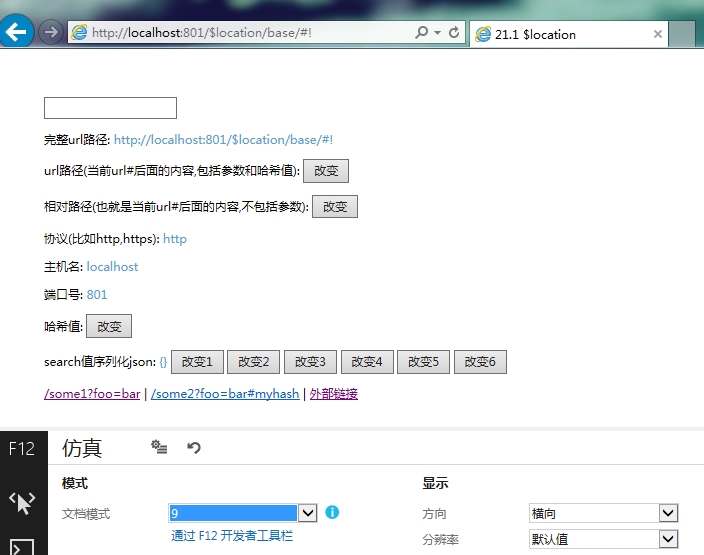
这里初始状态的$location.url,一个有'/',一个没有'/',不过这个不用介意.不影响实际的使用的.
需要重视的是,当链接发生过改变(比如我点击了链接1/some1?foo=bar),然后刷新页面,在ie9下,它依然可以加载到该页面,但是在chrome下是不行的,所以,在使用了history api的浏览器里,需要服务端配置.通常,你要把所有链接都转给应用的入口点(比如index.html)。
3.$location双向数据绑定
可以使用1.3提供的ng-model-options的getterSetter,给input绑定location方法.这样,input输入内容,就会调用$location.url(newLocation)设置url,当调用$location.url('...')的时候,input元素的value值也会被同步.需要注意,直接在地址栏输入url是没用的,不过这无所谓,因为应用中也不会有人要跳转的时候手动输地址...
4.a链接改变url
点击前面两个链接,url会改变,不刷新页面.
完整代码:https://github.com/OOP-Code-Bunny/angular/tree/master/%24location
参考文献:http://www.ngnice.com/docs/guide/$location (中文版的是1.2的,不是最新的) https://docs.angularjs.org/guide/$location