今日概要:
1. 结构体和方法
2. 接口
一、go中的struct
1. 用来自定义复杂数据结构
2. struct里面可以包含多个字段(属性)
3. struct类型可以定义方法,注意和函数的区分
4. struct类型是值类型
5. struct类型可以嵌套
6. Go语言没有class类型,只有struct类型
1.struct声明
type 标识符 struct {
field1 type
field2 type
}
例子:
  type Student struct {

         Name string

         Age int

  Score int

  }
2. struct 中字段访问:和其他语言一样,使用点
var stu Student

stu.Name = “tony”
stu.Age = 18
stu.Score=20

fmt.Printf(“name=%s age=%d score=%d”,
       stu.Name, stu.Age, stu.Score
3. struct定义的三种形式
//第一种
var stu Student
//第二种
var stu *Student = new (Student)
//第三种
var stu *Student = &Student{}
其中b和c返回的都是指向结构体的指针,访问形式如下:
stu.Name、stu.Age和stu.Score或者 (*stu).Name、(*stu).Age
4. struct的内存布局:struct中的所有字段在内存是连续的
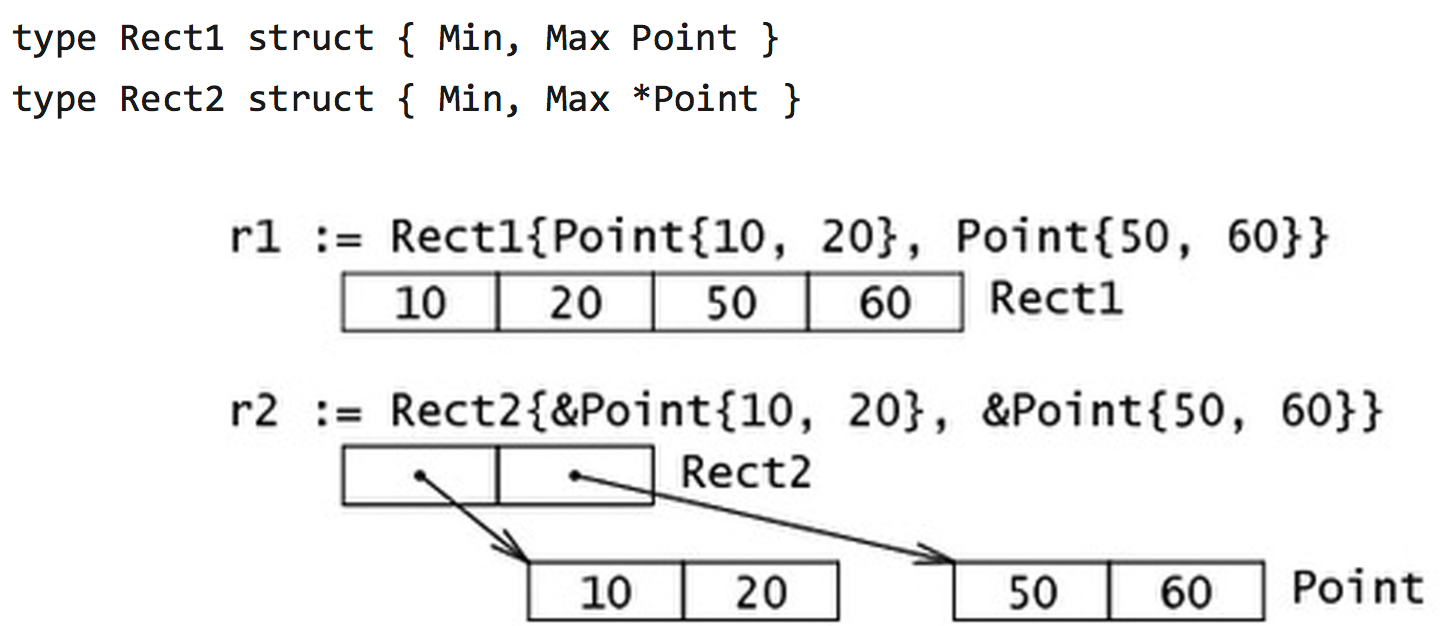
struct当传入的为值的时候,传入值对应的内存地址是连续的,当传入指针的时候,指针对应的内存地址是连续的,指针原数据对应的地址是不连续的.
例子:
package main

import (
	"fmt"
)
//结构体所有字段的内存布局都是连续的
type Student struct {
	name string
	age int //int占用8字节
	score float32
}

func main() {
	var stu Student
	stu.age = 18
	stu.name = "alex"
	stu.score = 100
	fmt.Printf("name:%s,age:%d,score:%d
",stu.name,stu.age,stu.score)
	//在内存中的布局
	fmt.Printf("Name:%p
",&stu.name)
	fmt.Printf("Age:%p
",&stu.age)
	fmt.Printf("Score:%p
",&stu.score)


	// 初始化,可以初始化部分字段
	var stu1 *Student = &Student{
		name:"xiaogang",
		age:29,
		score:1000,
	}
	fmt.Println(stu1)

	var stu2 = Student{
		name:"test",
		age:111,
	}

	fmt.Println(stu2)
	var stu3 *Student = new(Student)//创建了个内存地址
	fmt.Println(stu3)

}
5.链表定义
type Student struct {
       Name string
       Next* Student
}
每个节点包含下一个节点的地址,这样把所有的节点串起来了,通常把链表中的第一个节点叫做链表头
package main

import "fmt"

type Student struct {
	Name string
	Age int
	Score int
	next *Student
}

//函数化,循环链表
func trans (p *Student){
	for p != nil {
		fmt.Println(*p)
		p = p.next
	}
	fmt.Println()
}

func main() {

	var head Student
	head.Name = "alex"
	head.Age = 18
	head.Score = 100


	var stu2 Student
	stu2.Name = "xiaogang"

	head.next = &stu2
	trans(&head)

	var stu3 Student
	stu3.Name = "xiaoming"


	stu2.next = &stu3
	trans(&head)


	//p := &head // var p *Student = &head


}

链表头部插入:
package main

import (
	"fmt"
	"math/rand"
)

type Student struct {
	Name string
	Age int
	Score float32
	up *Student
}

//函数化
func trans (p *Student){
	for p != nil {
		fmt.Println(*p)
		p = p.up
	}
	fmt.Println()
}

func HeadChain(head **Student){
	for i :=0 ; i < 11; i ++ {
		var stu = Student{
			Name:fmt.Sprintf("student%d",i),
			Age:rand.Intn(100),
			Score:rand.Float32() * 100,
		}
		stu.up = *head
		*head = &stu //head相当于副本
	}

}

func DelNode(node *Student){
	//删除节点
	var prev_node *Student = node //临时变量保留上一个节点
	for node != nil{
		if (node.Name == "student6"){
			 prev_node.up = node.up //被删除节点上一个节点的的up 指向被删除节点的up
			 break
		}
		prev_node = node //prev是node的上一个节点
		node = node.up
	}
}

func AddNode(node *Student,new_node *Student){
	//插入节点
	for node != nil{
		if (node.Name == "student6"){
			 new_node.up = node.up
			 node.up = new_node
			 break
		}
		node = node.up
	}
}


func main() {
	//生成链表表头
	var head *Student = new(Student) //head是指针  //改变一个变量的地址,传变量的变量的内存地址,要是改变一个指针的地址,将指针的内存地址传入进去
	head.Name = "alex"
	head.Age = 18
	head.Score = 100
	//链表头部插入法
	HeadChain(&head) //传入指针的内存地址
	trans(head)

	//DelNode(head)
	//trans(head)

	var newNode *Student = new(Student)
	newNode.Name = "xiaogang"
	newNode.Age = 20
	newNode.Score = 300
	AddNode(head,newNode)
	trans(head)

	//p := &head // var p *Student = &head
}


/*
{student10 95 36.08714 0xc420072390}
{student9 37 21.855305 0xc420072360}
{student8 11 29.310184 0xc420072330}
{student7 28 46.888985 0xc420072300}
{student6 62 38.06572 0xc4200722d0}
{student5 94 81.36399 0xc4200722a0}
{student4 56 30.091187 0xc420072270}
{student3 25 15.651925 0xc420072240}
{student2 81 68.682304 0xc420072210}
{student1 47 43.77142 0xc4200721e0}
{student0 81 94.05091 0xc4200721b0}
{alex 18 100 <nil>}

{student10 95 36.08714 0xc420072390}
{student9 37 21.855305 0xc420072360}
{student8 11 29.310184 0xc420072330}
{student7 28 46.888985 0xc420072300}
{student6 62 38.06572 0xc420072630}
{xiaogang 20 300 0xc4200722d0}
{student5 94 81.36399 0xc4200722a0}
{student4 56 30.091187 0xc420072270}
{student3 25 15.651925 0xc420072240}
{student2 81 68.682304 0xc420072210}
{student1 47 43.77142 0xc4200721e0}
{student0 81 94.05091 0xc4200721b0}
{alex 18 100 <nil>}

*/
图解链表插入过程

链表从尾部插入:
package main

import (
	"fmt"
	"math/rand"
)

type Student struct {
	Name string
	Age int
	Score float32
	next *Student
}

//函数化
func trans (p *Student){
	for p != nil {
		fmt.Println(*p)
		p = p.next
	}
	fmt.Println()
}
func tailInsertChain(p *Student){

	for i := 0 ; i < 11 ; i++ {
	var stu = Student{
		Name:fmt.Sprintf("student%d",i),
		Age:rand.Intn(100),
		Score:rand.Float32() * 100,
	}
	p.next = &stu
	p = &stu
	}
}

func main() {
	//生成链表表头
	var head Student
	head.Name = "alex"
	head.Age = 18
	head.Score = 100

	//链表尾部插入法
	tailInsertChain(&head)
	trans(&head)

	//p := &head // var p *Student = &head
}


/*

{alex 18 100 0xc4200721b0}
{student0 81 94.05091 0xc4200721e0}
{student1 47 43.77142 0xc420072210}
{student2 81 68.682304 0xc420072240}
{student3 25 15.651925 0xc420072270}
{student4 56 30.091187 0xc4200722a0}
{student5 94 81.36399 0xc4200722d0}
{student6 62 38.06572 0xc420072300}
{student7 28 46.888985 0xc420072330}
{student8 11 29.310184 0xc420072360}
{student9 37 21.855305 0xc420072390}
{student10 95 36.08714 <nil>}

*/
6.双链表定义
如果有两个指针分别指向前一个节点和后一个节点,我们叫做双链表
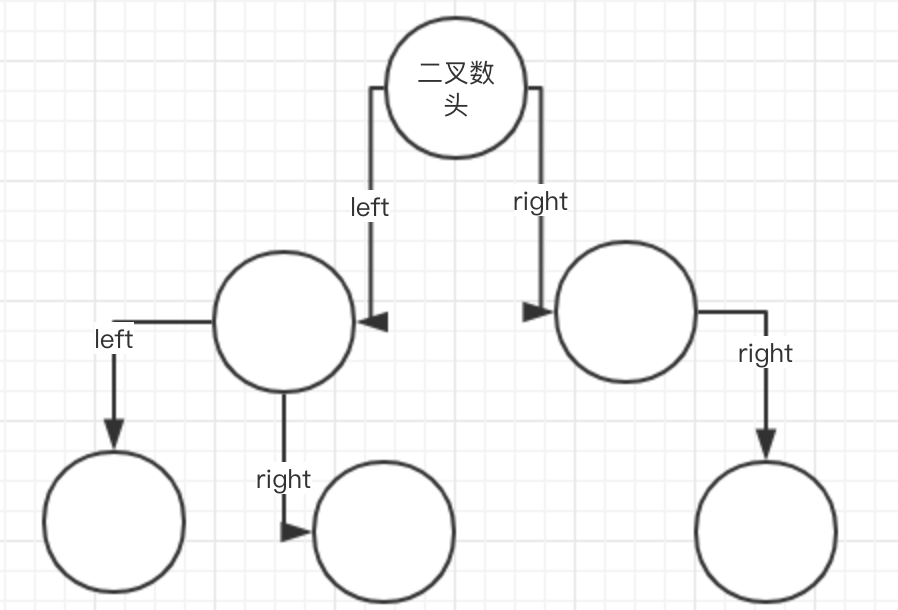
例子: 二叉树(通过递归实现)
如果每个节点有两个指针分别用来指向左子树和右子树,我们把这样的结构叫做二叉树
package main

import "fmt"
type Student struct {
	Name string
	Age int
	Score float32
	left *Student
	right *Student
}


func trans(p *Student){
	if (p == nil){ //如果为空就终止
		return
	}

	//前序遍历
	//fmt.Println(p)
	//trans(p.left)
	//trans(p.right)
	//中序遍历
	//trans(p.left)
	//fmt.Println(p)
	//trans(p.right)
	//后续遍历
	trans(p.left)
    trans(p.right)
	fmt.Println(p)


}

func main() {
	var root *Student = &Student{
		Name:"alex",
		Age:18,
		Score:100,
	}

	var left *Student = &Student{
		Name:"alex_left",
		Age:19,
		Score:200,
	}

	var left1 *Student = &Student{
		Name:"alex_left1",
		Age:19,
		Score:200,
	}

	var right *Student = &Student{
		Name:"alex_right",
		Age:19,
		Score:200,
	}

	var right1 *Student = &Student{
		Name:"alex_right1",
		Age:19,
		Score:200,
	}

	root.left = left
	root.right = right

	left.left = left1
	right.right = right1

	trans(root)
}
/*
&{alex_left1 19 200 <nil> <nil>}
&{alex_left 19 200 0xc4200721e0 <nil>}
&{alex_right1 19 200 <nil> <nil>}
&{alex_right 19 200 <nil> 0xc420072240}
&{alex 18 100 0xc4200721b0 0xc420072210}

*/
7.结构体是用户单独定义的类型,不能和其他类型进行强制转换
type Student struct {
        Number int
}

type Stu Student //alias

var a Student
a = Student(30)

var b Stu
a = b


//错误示范
8.golang中的struct没有构造函数,一般可以使用工厂模式来解决这个问题
类似于python的__init__构造方法
package main

import "fmt"
//go中没构造函数,可以通过工厂函数实现

type Student struct {
	Name string
	Age int
}

func NewStudent(name string,age int) *Student{
	res := new(Student)
	res.Name = name
	res.Age = age
	return res
	//return &Student{Name:name,Age:age}
}

func main() {
	S := NewStudent("alex",18)
	fmt.Println(S.Name,S.Age)
}
****前方高能:
- make 用来创建map、slice、channel(引用类型)
- new用来创建值类型
例子:
我们可以为struct中的每个字段,写上一个tag。这个tag可以通过反射的机制获取到,最常用的场景就是json序列化和反序列化
package main

import (
	"fmt"
	"encoding/json"
)

//结构体Student必须大写,不然json包无法使用结构体里的字段
type Student struct {
	Name string `json:"name"`
	Age int `json:"age"`
	Score int `json:"score"`

}


func main() {
	var stu1 Student
	stu1.Name = "alex"
	stu1.Age = 18
	stu1.Score = 200

	data, err := json.Marshal(stu1) //默认json序列化为byte数组
	if err != nil{
		fmt.Println("json error",err)
		return
	}
	fmt.Println(string(data))


}


/*
{"name":"alex","age":18,"score":200}
*/
9.结构体中字段可以没有名字,即匿名字段
package main

import "fmt"

type Human struct {
	name string
	age int
	weight int
}
//匿名字段类似python里的继承
type Student struct {
	Human  // 匿名字段,那么默认Student就包含了Human的所有字段
	speciality string
}

func main() {
	//初始化一个学生
	mark := Student{Human{"alex",18,180},"python"}
	fmt.Println(mark)
	//打印
	fmt.Println("His name is ", mark.name)
	fmt.Println("His age is ", mark.age)
	fmt.Println("His weight is ", mark.weight)
	fmt.Println("His speciality is ", mark.speciality)

	//修改这个学生的爱好
	mark.speciality = "golang"
	fmt.Println(mark)

	mark.age += 2
	fmt.Println(mark)
	mark.Human = Human{"dragon",33,190} //student可以.Human 直接修改
	fmt.Println(mark)
}

/*
我们看到Student访问属性age和name的时候,就像访问自己所有用的字段一样,对,匿名字段就是这样,能够实现字段的继承。是不是很酷啊?
还有比这个更酷的呢,那就是student还能访问Human这个字段作为字段名。请看下面的代码,是不是更酷了。
*/
匿名字段和自定义字段
package main

import "fmt"

//通过匿名访问和修改字段相当的有用,但是不仅仅是struct字段哦,所有的内置类型和自定义类型都是可以作为匿名字段的
type Skills []string

type Human struct {
	name string
	age int
	weight int
}

type Student struct {
	Human  // 匿名字段,struct
	Skills // 匿名字段,自定义的类型string slice
	int    // 内置类型作为匿名字段
	speciality string
}

func main() {
	// 初始化学生Jane
	jane := Student{Human:Human{"Jane", 35, 100}, speciality:"Biology"}
	// 现在我们来访问相应的字段
	fmt.Println("Her name is ", jane.name)
	fmt.Println("Her age is ", jane.age)
	fmt.Println("Her weight is ", jane.weight)
	fmt.Println("Her speciality is ", jane.speciality)
	// 我们来修改他的skill技能字段
	jane.Skills = []string{"anatomy"} //传一个切片进去
	fmt.Println("Her skills are ", jane.Skills)
	fmt.Println("She acquired two new ones ")
	jane.Skills = append(jane.Skills, "physics", "golang")
	fmt.Println("Her skills now are ", jane.Skills)
	// 修改匿名内置类型字段
	jane.int = 3
	fmt.Println("Her preferred number is", jane.int)
}
/*
Her name is  Jane
Her age is  35
Her weight is  100
Her speciality is  Biology
Her skills are  [anatomy]
She acquired two new ones
Her skills now are  [anatomy physics golang]
Her preferred number is 3
*/
匿名字段冲突问题:
package main

import "fmt"

type Cart1 struct {
	name string
	age int
}

type Cart2 struct {
	name string
}

type Train struct {
	Cart1
	Cart2
}


func main() {
	//cart1,cart2都包含name字段,需要精确选择
	var tra1 Train
	tra1.Cart1.name = "alex"
	fmt.Println(tra1)

}
10.Go中的方法是作用在特定类型的变量上,因此自定义类型,都可以有方法,而不仅仅是struct
定义:func (recevier type) methodName(参数列表)(返回值列表){}
package main

import "fmt"

type interger int

func (p interger) print(){
	fmt.Println("number is ",p)
}

func (p *interger) set(b interger){
	*p = b
}


type Student struct {
	name string
	age int
}

func (self *Student) init(name string,age int){
	self.name = name
	self.age = age
	fmt.Println(self)
}

func (self Student) get() Student{
	return self
}

func main() {

	var stu1 Student
	//go中自动变成指针,当赋值或者初始化的时候
	stu1.init("alex",18)
	res := stu1.get()
	fmt.Println(res)


	var myint interger
	myint = 100
	myint.print()
	myint.set(1000)
	myint.print()

}
/*
&{alex 18}
{alex 18}
number is  100
number is  1000

*/
方法和函数的区别:
- 函数调用: function(variable, 参数列表)
- 方法:variable.function(参数列表)
指针receiver vs 值receiver的区别
本质上和函数的值传递和地址传递是一样的
方法的访问控制,通过大小写控制
11.struct继承和组合
如果一个struct嵌套了另一个匿名结构体,那么这个结构可以直接访问匿名结构体的方法,从而实现了继承。
如果一个struct嵌套了另一个有名结构体,那么这个模式就叫组合。
例子:
如果一个变量实现了String()这个方法,那么fmt.Printf默认会调用这个变量的String()进行输出。
package main

import "fmt"

type Cart struct {
	weight int
	length int
}

func (p *Cart) run(speed int) {
	fmt.Println("running speed is ",speed)
}


//struct实现String,类调用方法都时候将变量转为指针,通过接口实现不会

func (p *Cart) String() string{
	str := fmt.Sprintf("[%d]-[%d]",p.length,p.weight)
	return str
}

type Bike struct {
	Cart
	speed int

}

//组合
type Train struct {
	c Cart
}

func main() {
	var a Bike
	a.speed = 100
	a.weight = 200
	a.length = 20000
	fmt.Println(a)

	a.run(100)

	var b Train
	//带着组合的别名
	b.c.run(1000)

     //触发了String的方法
	fmt.Printf("%s",&a)
}
/*
{{200 20000} 100}
running speed is  100
running speed is  1000
[20000]-[200]
*/
多重继承
如果一个struct嵌套了多个匿名结构体,那么这个结构可以直接访问多个匿名结构体的方法,从而实现了多重继承。
多个匿名结构体含有相同字段,需要 变量.结构体.字段 精确指向
12.interface接口
Interface类型可以定义一组方法,但是这些不需要实现。并且interface不能包含任何变量。
interface类型默认是一个指针
接口实现:
Golang中的接口,不需要显示的实现。只要一个变量,含有接口类型中的所有方法,那么这个变量就实现这个接口。因此,golang中没有implement类似的关键字
如果一个变量含有了多个interface类型的方法,那么这个变量就实现了多个接口。
如果一个变量只含有了1个interface的方部分方法,那么这个变量没有实现这个接口。
package main

import "fmt"

//接口是方法都集合,不能设置变量    用途类似于python的抽象类
type Test interface {
	print()
}

type Cart struct {
	name string
	speed int
}

//cart实现了print方法,可以通过接口直接调用
func (self *Cart) print() {
	fmt.Println(self.speed)
	fmt.Println(self.name)
}


func main() {
	var t Test //接口是一个地址
	var a Cart = Cart{
		name:"baoshijie",
		speed:100,
	}

	t = &a  //接口代表了具体都类型
	t.print()


}
/*
100
baoshijie

*/
接口嵌套
一个接口可以嵌套在另外的接口
type ReadWrite interface {
               Read(b Buffer) bool
               Write(b Buffer) bool
}
type Lock interface {
               Lock()
               Unlock()
}
type File interface {
               ReadWrite
               Lock
               Close()
}
类型断言,由于接口是一般类型,不知道具体类型,如果要转成具体类型
var t int
var x interface{}
x = t
y = x.(int)   //转成int


var t int
var x interface{}
x = t
y, ok = x.(int)   //转成int,带检查
练习:传入参数判断类型
func classifier(items ...interface{}) {
          for i, x := range items {
                  switch x.(type) {
                   case bool:       fmt.Printf(“param #%d is a bool
”, i)
                   case float64:    fmt.Printf(“param #%d is a float64
”, i)
                   case int, int64: fmt.Printf(“param #%d is an int
”, i)
                   case nil: fmt.Printf(“param #%d is nil
”, i)
                   case string: fmt.Printf(“param #%d is a string
”, i)
                    default: fmt.Printf(“param #%d’s type is unknown
”, i)
            }
}
空接口,interface{}
空接口没有任何方法,所以所有类型都实现了空接口。
var a int
var b interface{}
b  = a