引言
前面一篇文章已经讲了Locust压测数据在grafana上展示。这篇主要优化一下。
日志序列化优化
前面说了两大块,主要是读和写。我们用的是简单粗暴的方式去获取文件中的数据。现在以正则的方式来写:
import re
import io
import platform
import os,sys
from db_init.conn_influxdb import ConnectInfluxDB


BASE_DIR = os.path.dirname(os.path.dirname(os.path.abspath(__file__)))  # 项目目录
curPath = os.path.abspath(os.path.dirname(__file__))
rootPath = os.path.split(curPath)[0]
sys.path.append(rootPath)


pattern = '/' if platform.system() != 'Windows' else '\'
influxdb = ConnectInfluxDB()

def pressureData_test():
    """

    @param make:
    """
    performance_path = os.path.join(BASE_DIR ,'log'+ pattern + "run.log")
    with io.open(performance_path) as f:
        data_list = f.readlines()

        locust_list = []
        for data in data_list:
            res = re.match(
                r'^s+(?P<method>GET|POST)s+(?P<api>[/w?=-&.]+)s+(?P<reqs>d+)s+(?P<fails>[d(.)\%]+)s+(|)s+(?P<Avg>d+)s+(?P<Min>d+)s+(?P<Max>d+)s+(?P<Median>d+)s+(|)s+(?P<qps>[d(.)\%]+)s+(?P<failures>[d(.)\%]+)$',
                data)

            if res:
                # print("进入res")
                method = res.group('method')
                api = res.group('api')
                reqs = res.group('reqs')
                fails = res.group('fails')
                Avg = res.group('Avg')
                Min = res.group('Min')
                Max = res.group('Max')
                Median = res.group('Median')
                qps = res.group('qps')
                failures = res.group('failures')
                locust_dict = {'Method': method, 'Name': api, 'Requests': reqs, 'Fails': fails,'Failures_s': failures, 'Average_ms': Avg,
                               'Min_ms': Min, 'Max_ms': Max, 'Median_ms': Median, 'Current_RPS': qps}
                locust_list.append(locust_dict)

            aggregate = re.match(
                r'^s+(?P<aggregated>Aggregated)s+(?P<reqs>d+)s+(?P<fails>[d(.)\%]+)s+(?P<Avg>d+)s+(?P<Min>d+)s+(?P<Max>d+)s+(|)s+(?P<Median>d+)s+(?P<qps>[d(.)\%]+)s+(?P<failures>[d(.)\%]+)$',
                data)
            if aggregate:
                # print("进入aggregate")
                api = aggregate.group('aggregated')
                reqs = aggregate.group('reqs')
                fails = aggregate.group('fails')
                Avg = aggregate.group('Avg')
                Min = aggregate.group('Min')
                Max = aggregate.group('Max')
                Median = aggregate.group('Median')
                qps = aggregate.group('qps')
                failures = aggregate.group('failures')
                locust_dict = {'Method': "", 'Name': api, 'Requests': reqs, 'Fails': fails,'Failures_s': failures, 'Average_ms': Avg,
                               'Min_ms': Min, 'Max_ms': Max, 'Median_ms': Median, 'Current_RPS': qps}
                locust_list.append(locust_dict)
        influxdb.post_dump_data(locust_list, "locust")
pressureData_test()
钩子函数控制代码
代码如下:
import logging
from locust import events

@events.quitting.add_listener
def _(environment, **kw):
    # 超过1%的请求失败
    if environment.stats.total.fail_ratio > 0.01:
        logging.error("Test failed due to failure ratio > 1%")
        environment.process_exit_code = 1
        # 平均响应时间超过200毫秒
    elif environment.stats.total.avg_response_time > 200:
        logging.error("Test failed due to average response time ratio > 200 ms")
        environment.process_exit_code = 1
        # 响应时间的第95个百分位数大于800毫秒
    elif environment.stats.total.get_response_time_percentile(0.95) > 800:
        logging.error("Test failed due to 95th percentile response time > 800 ms")
        environment.process_exit_code = 1
    else:
        environment.process_exit_code = 0
监控成功心跳:
@events.request_success.add_listener
def request_success(request_type,name,response_time,response_length,**kwargs):
    """
    :param request_type:
    :param name:
    :param response_time:
    :param response_length:
    :param kwargs:
    """
    result = 'success'
    print("{ " + "'message':'{result}' ".format(result=result) + "'request_type':'{}','name':'{}','response_time':'{}','response_length':'{}'".format(request_type,name,response_time,response_length) + " }")
    pressureData_test()
配置文件启动
我们可以将一些变化的参数放到配置文件中,然后使用关键命令来启动程序,如图:
# master.conf in current directory
locustfile = locust_files/my_locust_file.py
headless = true
master = true
expect-workers = 5
host = http://target-system
users = 100
spawn-rate = 10
run-time = 10m
只需在控制台中输入简约命令:
locust --config=master.conf
如图:

我们再对压测日志重定向,命令如下:
locust --config=master.conf >C:UsersAdministratorDesktopLocust_grafana_demoV2log
un.log 2>&1
这样的话,在控制台是看不到这些输出的日志了。
分布式模式
上一篇主要是讲单机模式运行,这篇主要内容就是分布式。
先看一下Locust参数文档:
Usage: locust [OPTIONS] [UserClass ...]

Common options:
  -h, --help            show this help message and exit
  -f LOCUSTFILE, --locustfile LOCUSTFILE
                        Python module file to import, e.g. '../other.py'.
                        Default: locustfile
  --config CONFIG       Config file path
  -H HOST, --host HOST  Host to load test in the following format:
                        http://10.21.32.33
  -u NUM_USERS, --users NUM_USERS
                        Number of concurrent Locust users. Primarily used
                        together with --headless
  -r SPAWN_RATE, --spawn-rate SPAWN_RATE
                        The rate per second in which users are spawned.
                        Primarily used together with --headless
  -t RUN_TIME, --run-time RUN_TIME
                        Stop after the specified amount of time, e.g. (300s,
                        20m, 3h, 1h30m, etc.). Only used together with
                        --headless
  -l, --list            Show list of possible User classes and exit

Web UI options:
  --web-host WEB_HOST   Host to bind the web interface to. Defaults to '*'
                        (all interfaces)
  --web-port WEB_PORT, -P WEB_PORT
                        Port on which to run web host
  --headless            Disable the web interface, and instead start the load
                        test immediately. Requires -u and -t to be specified.
  --web-auth WEB_AUTH   Turn on Basic Auth for the web interface. Should be
                        supplied in the following format: username:password
  --tls-cert TLS_CERT   Optional path to TLS certificate to use to serve over
                        HTTPS
  --tls-key TLS_KEY     Optional path to TLS private key to use to serve over
                        HTTPS

Master options:
  Options for running a Locust Master node when running Locust distributed. A Master node need Worker nodes that connect to it before it can run load tests.

  --master              Set locust to run in distributed mode with this
                        process as master
  --master-bind-host MASTER_BIND_HOST
                        Interfaces (hostname, ip) that locust master should
                        bind to. Only used when running with --master.
                        Defaults to * (all available interfaces).
  --master-bind-port MASTER_BIND_PORT
                        Port that locust master should bind to. Only used when
                        running with --master. Defaults to 5557.
  --expect-workers EXPECT_WORKERS
                        How many workers master should expect to connect
                        before starting the test (only when --headless used).

Worker options:

  Options for running a Locust Worker node when running Locust distributed.
  Only the LOCUSTFILE (-f option) need to be specified when starting a Worker, since other options such as -u, -r, -t are specified on the Master node.

  --worker              Set locust to run in distributed mode with this
                        process as worker
  --master-host MASTER_NODE_HOST
                        Host or IP address of locust master for distributed
                        load testing. Only used when running with --worker.
                        Defaults to 127.0.0.1.
  --master-port MASTER_NODE_PORT
                        The port to connect to that is used by the locust
                        master for distributed load testing. Only used when
                        running with --worker. Defaults to 5557.

Tag options:
  Locust tasks can be tagged using the @tag decorator. These options let specify which tasks to include or exclude during a test.

  -T [TAG [TAG ...]], --tags [TAG [TAG ...]]
                        List of tags to include in the test, so only tasks
                        with any matching tags will be executed
  -E [TAG [TAG ...]], --exclude-tags [TAG [TAG ...]]
                        List of tags to exclude from the test, so only tasks
                        with no matching tags will be executed

Request statistics options:
  --csv CSV_PREFIX      Store current request stats to files in CSV format.
                        Setting this option will generate three files:
                        [CSV_PREFIX]_stats.csv, [CSV_PREFIX]_stats_history.csv
                        and [CSV_PREFIX]_failures.csv
  --csv-full-history    Store each stats entry in CSV format to
                        _stats_history.csv file. You must also specify the '--
                        csv' argument to enable this.
  --print-stats         Print stats in the console
  --only-summary        Only print the summary stats
  --reset-stats         Reset statistics once spawning has been completed.
                        Should be set on both master and workers when running
                        in distributed mode

Logging options:
  --skip-log-setup      Disable Locust's logging setup. Instead, the
                        configuration is provided by the Locust test or Python
                        defaults.
  --loglevel LOGLEVEL, -L LOGLEVEL
                        Choose between DEBUG/INFO/WARNING/ERROR/CRITICAL.
                        Default is INFO.
  --logfile LOGFILE     Path to log file. If not set, log will go to
                        stdout/stderr

Step load options:
  --step-load           Enable Step Load mode to monitor how performance
                        metrics varies when user load increases. Requires
                        --step-users and --step-time to be specified.
  --step-users STEP_USERS
                        User count to increase by step in Step Load mode. Only
                        used together with --step-load
  --step-time STEP_TIME
                        Step duration in Step Load mode, e.g. (300s, 20m, 3h,
                        1h30m, etc.). Only used together with --step-load

Other options:
  --show-task-ratio     Print table of the User classes' task execution ratio
  --show-task-ratio-json
                        Print json data of the User classes' task execution
                        ratio
  --version, -V         Show program's version number and exit
  --exit-code-on-error EXIT_CODE_ON_ERROR
                        Sets the process exit code to use when a test result
                        contain any failure or error
  -s STOP_TIMEOUT, --stop-timeout STOP_TIMEOUT
                        Number of seconds to wait for a simulated user to
                        complete any executing task before exiting. Default is
                        to terminate immediately. This parameter only needs to
                        be specified for the master process when running
                        Locust distributed.

User classes:
  UserClass             Optionally specify which User classes that should be
                        used (available User classes can be listed with -l or
                        --list)
Locust系统分布式架构图:
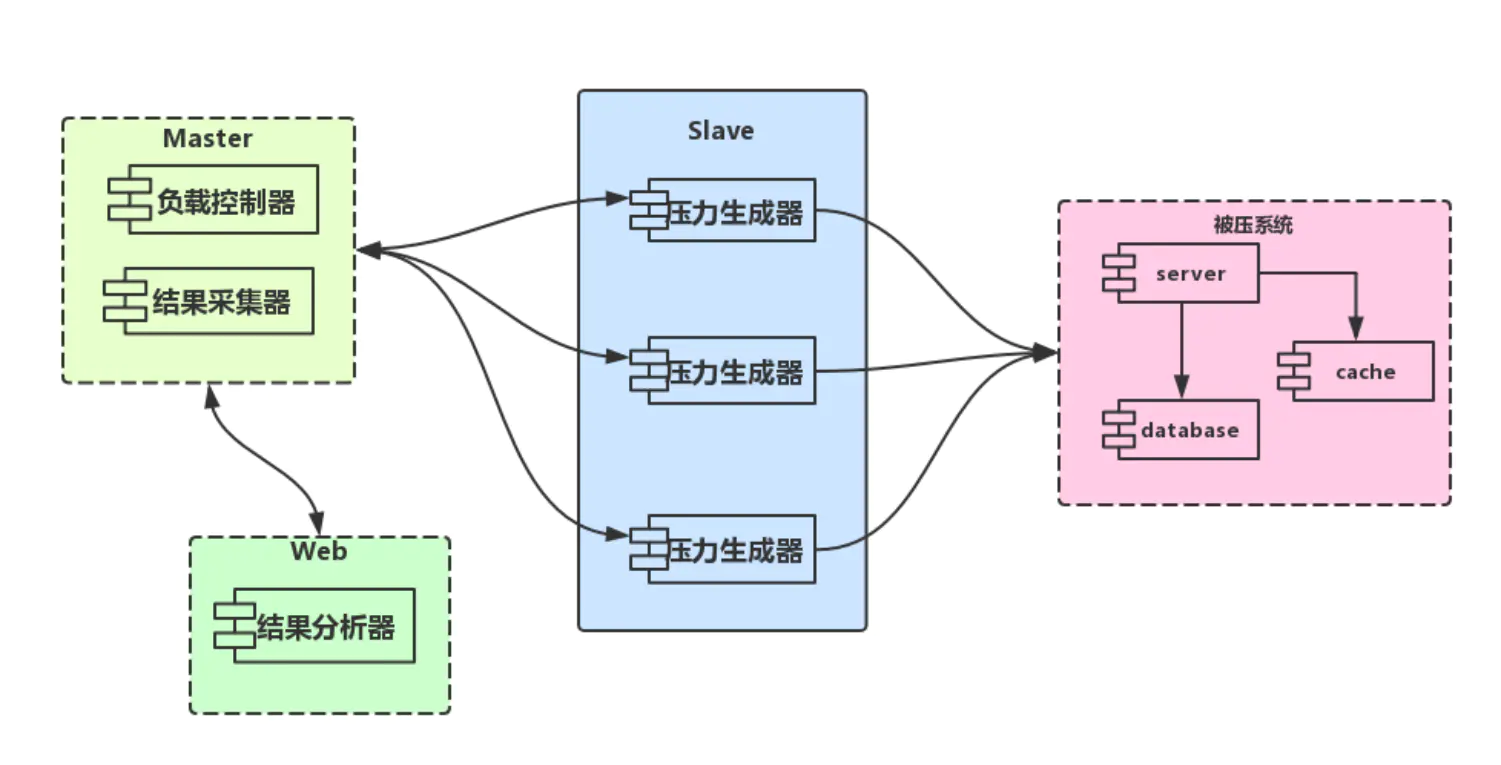
- locust架构上使用master-slave模型,支持单机和分布式
- master和slave(即worker)使用 ZeroMQ 协议通讯
- 提供web页面管理master,从而控制slave,同时展示压测过程和汇总结果
- 可选headless 模式(headless 一般用于调试)
- 基于Python本身已经支持跨平台
先来搞清楚几个关键的命令:
Master主机命令:
主选项:
   运行Locust分布式系统时用于运行Locust Master节点的选项。 主节点需要连接到它的辅助节点,然后它才能运行负载测试。

   --master将蝗虫设置为此以分布式模式运行
                         作为主人的过程
   --master-bind-host MASTER_BIND_HOST
                         蝗虫主控机应使用的接口(主机名,IP)
                         绑定到。 仅在与--master一起运行时使用。
                         默认为*(所有可用接口)。
   --master-bind-port MASTER_BIND_PORT
                         蝗虫主应该绑定的端口。 仅在以下情况下使用
                         与--master一起运行。 默认为5557
   --expect-workers EXPECT_WORKERS
                         主人应该期望连接多少工人
                         在开始测试之前(仅在使用--headless时)。
Slave从机命令:
工人选项:

   运行Locust分布式时运行Locust Worker节点的选项。
   启动Worker时,仅需要指定LOCUSTFILE(-f选项),因为在主节点上指定了-u,-r,-t等其他选项。

   --worker使用此命令将蝗虫设置为在分布式模式下运行
                         作为工人的过程
   --master-host MASTER_NODE_HOST
                         分布式主机的主机或IP地址
                         负载测试。 仅在与--worker一起运行时使用。
                         默认为127.0.0.1。
   --master-port MASTER_NODE_PORT
                         蝗虫使用的连接端口
                         进行分布式负载测试的主机。 仅在以下情况下使用
                         与--worker一起运行。 默认为5557
主机执行命令:
locust -f locustfile.py  --master  --master-bind-port 8089 --headless -u 10 -r 3 --expect-worker 2 -t 5m -H https://api.apiopen.top/   --csv D:locust_test_20190228locust_performance_testcsv --logfile D:locust_test_20190228loglocust.log --loglevel=INFO 1>D:locust_test_20190228log
un.log 2>&1
从机执行命令:
locust -f locustfile.py --master-host localhost --master-port 8089 --headless --worker
此处从机命令需要执行两次,本地的话,就打开两个控制台分别执行一次,相当于两台从机,因为主机已经指定了从机数2。
进步模式
其实在locust分布式中,还可以使用一种模式——进步模式,具体命令如下:
--step-load  启用步进模式
--step-users    每级的用户增量
--step-time     增量间隔
这两个参数放在主机命令中执行,可以满足一些复杂性能测试场景。
例如:
locust -f --headless -u 1000 -r 100 --run-time 30m --step-load --step-users 300 --step-time 1m
无web界面启动locust,设置总用户数1000,每秒增量100个用户,运行总时长30分钟,启动步进模式,步进用户300,维持每个步进模式时间为1分钟

当达到300用户时会维持一分钟,然后在持续增量用户,达到600在维持一分钟,以此类推
配置化生成脚本执行命令
如果是分布式,调度机执行一条命令,从机执行一条命令,如果是多台电脑,就会很多命令,不可能每次手动去填参数,然后再运行命令,那样很麻烦。
现在通过配置化,一键生成命令的方式来执行
项目结构:

新增了两个配置,一个是单击模式的配置,一个是分布式模式的配置,然后读取配置,生成命令的方法,代码如下:
def master_order():
    """
    生成主机命令

    :return:
    """
    master_kw = "locust -f %s  --%s  --master-bind-port %s --%s " % (locustfile,command_cmd['master'],command_cmd['slaveport'],command_cmd['headless'])
    master_args = "-u %s -r %s --expect-worker %s -t %s -H %s  --step-load --step-users %s --step-time %s --csv %s --logfile %s --loglevel=INFO 1>%s 2>&1"% (command_cmd['users'], command_cmd['rate'],command_cmd['expect_workers'], command_cmd['run_time'], command_cmd['host'], command_cmd['step_users'],command_cmd['step_time'],csvfile,logfile,runfile)
    cmd = master_kw + master_args
    print(cmd)
    return master_order

def slave_order():
    """
    生成从机命令

    :return:
    """
    slave_cmd = "locust -f %s --master-host  %s --master-port %s --headless --worker" % (locustfile,command_cmd['master_host'], command_cmd['master_port'])
    print(slave_cmd)
    return slave_cmd
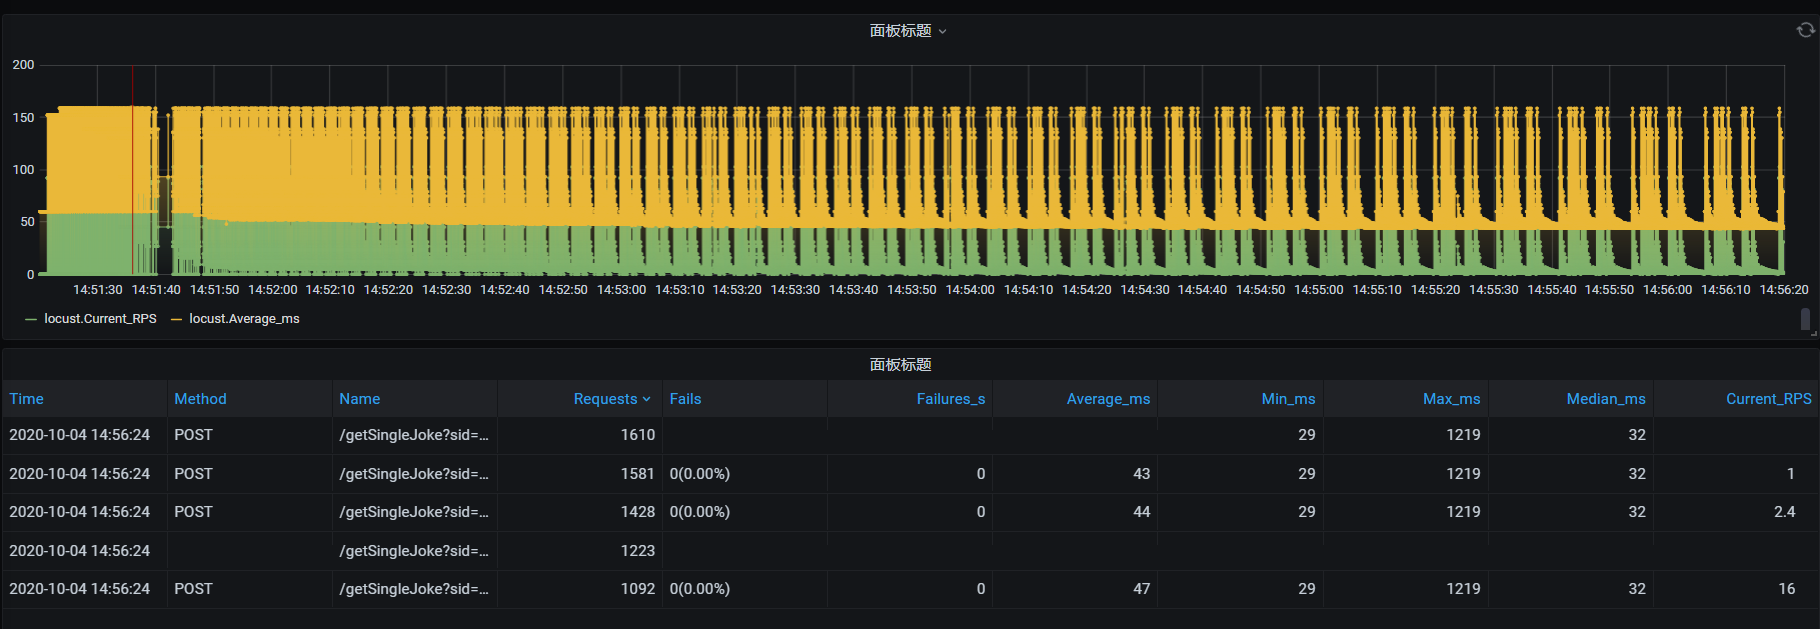
运行结果:

报告展示
上面优化部分到此,后续可能还要继续优化。
现在简单设置一下场景一台调度机设置成10个用户,每秒增加3个用户,压测5分钟,以进步模式进行,用户增加到10个用户,持续一分钟,累积增加到20个用户,持续一分钟,以此类推,压力机是2台,同时对服务器进行施压。
进入grafana图报表,查看报告:
总结
博客分享就到这里了,本套locust压测框架已上传至Gitee。
另外对测试开发感兴趣的,可以加入QQ测试开发交流群,这里只进来沟通与学习的,其他目的勿进!。